Wiring an OBD2 connector can seem daunting, but with the right guidance, it’s a manageable task. At OBD2-SCANNER.EDU.VN, we provide you with a clear understanding of how to wire an OBD2 connector, ensuring optimal performance and diagnostics for your vehicle. This comprehensive guide covers everything from necessary tools to step-by-step instructions, offering valuable insights into vehicle diagnostics and electrical systems.
Contents
- 1. Understanding the OBD2 Connector
- 1.1. Importance of Accurate Wiring
- 1.2. Standardized Pinout Configuration
- 1.3. Identifying Wire Functions
- 2. Essential Tools and Materials
- 2.1. Wire Strippers and Cutters
- 2.2. Crimping Tools
- 2.3. Soldering Iron and Solder
- 2.4. Multimeter
- 2.5. Heat Shrink Tubing
- 2.6. OBD2 Connector and Wires
- 3. Step-by-Step Wiring Guide
- 3.1. Preparation
- 3.2. Stripping Wires
- 3.3. Connecting Wires to Connector Pins
- 3.4. Crimping Technique
- 3.5. Soldering Technique
- 3.6. Insulating Connections
- 3.7. Assembling the Connector
- 3.8. Testing the Connection
- 4. Troubleshooting Common Issues
- 4.1. Loose Connections
- 4.2. Short Circuits
- 4.3. Incorrect Pin Placement
- 4.4. Damaged Wires
- 4.5. Compatibility Issues
- 5. Advanced Tips and Tricks
- 5.1. Using High-Quality Connectors
- 5.2. Proper Wire Management
- 5.3. Shielding Wires
- 5.4. Waterproofing Connections
- 5.5. Regular Maintenance
- 6. OBD2 Connector Applications
- 6.1. Vehicle Diagnostics
- 6.2. Performance Tuning
- 6.3. Data Logging
- 7. OBD2 Error Codes and Interpretation
- 7.1. Understanding OBD2 Code Structure
- 7.2. Common OBD2 Error Codes
- 7.3. Interpreting Error Codes
- 7.4. Clearing Error Codes
- 8. Choosing the Right OBD2 Scanner
- 8.1. Basic Code Readers
- 8.2. Enhanced Diagnostic Scanners
- 8.3. Professional-Grade Scanners
- 8.4. Scanner Compatibility
- 9. Safety Precautions
- 9.1. Disconnecting the Battery
- 9.2. Using Proper Tools
- 9.3. Avoiding Water
- 9.4. Wearing Safety Gear
- 9.5. Following Instructions
- 10. Contact OBD2-SCANNER.EDU.VN for Expert Assistance
- 10.1. Why Choose OBD2-SCANNER.EDU.VN?
- 10.2. Contact Information
- 10.3. Get Immediate Support
1. Understanding the OBD2 Connector
What is an OBD2 connector and why is proper wiring crucial?
The On-Board Diagnostics II (OBD2) connector is a standardized interface used in modern vehicles to access the vehicle’s computer for diagnostics and monitoring. Proper wiring is essential for reliable communication between the vehicle’s systems and diagnostic tools. A poorly wired OBD2 connector can lead to inaccurate data, communication errors, or even damage to the vehicle’s electronic components.
1.1. Importance of Accurate Wiring
Why is accuracy so critical when wiring an OBD2 port?
Accuracy is paramount because the OBD2 port serves as the gateway to your vehicle’s computer. A miswired connection can disrupt the flow of data, leading to misdiagnosis and potential damage to the vehicle’s onboard systems. As highlighted in a study by the Society of Automotive Engineers (SAE), proper wiring ensures that diagnostic tools can accurately read and interpret data from the vehicle’s engine control unit (ECU), transmission, and other critical systems.
1.2. Standardized Pinout Configuration
What is the standardized pinout configuration of the OBD2 connector and why is it important?
The OBD2 connector has a standardized pinout configuration defined by SAE J1962, which specifies the function of each of the 16 pins. Understanding this configuration is vital for correct wiring and ensuring compatibility with various diagnostic tools. Key pins include:
- Pin 4: Chassis Ground
- Pin 5: Signal Ground
- Pin 6: CAN High (Controller Area Network)
- Pin 7: K-Line (ISO 9141-2 & SAE J1850 VPW)
- Pin 10: J1850 Bus –
- Pin 14: CAN Low
- Pin 15: L-Line (ISO 9141-2)
- Pin 16: Battery Power
1.3. Identifying Wire Functions
How do you identify the functions of different wires in an OBD2 connector?
Identifying wire functions typically involves referring to the vehicle’s wiring diagram or a reliable OBD2 pinout reference. Each wire corresponds to a specific function, such as power, ground, or data communication. Multimeters and test lights can also be used to verify the presence of power and ground at the appropriate pins. Always consult the vehicle’s service manual or a professional database like ALLDATA for accurate wiring information.
2. Essential Tools and Materials
What tools and materials are required for wiring an OBD2 connector?
To properly wire an OBD2 connector, you’ll need a few essential tools and materials:
- Wire strippers/cutters
- Needle-nose pliers
- Crimping tool (Molex crimping tool is ideal)
- Soldering iron (recommended for a secure connection)
- Multimeter (for testing continuity and voltage)
- OBD2 connector
- Appropriate gauge wires
- Heat shrink tubing or electrical tape
2.1. Wire Strippers and Cutters
Why are high-quality wire strippers and cutters necessary for OBD2 connector wiring?
High-quality wire strippers and cutters are essential to ensure clean, precise cuts and avoid damaging the wires. Damaged wires can cause poor connections and unreliable data transmission. Wire strippers that can handle a range of wire gauges (typically 22-16AWG for OBD2 connectors) are particularly useful.
2.2. Crimping Tools
What type of crimping tool is recommended for OBD2 connector wiring?
A crimping tool is used to securely attach the wires to the connector pins. A Molex crimping tool is often recommended for its precision and ability to create a reliable connection. However, for those who prefer soldering, this tool might not be necessary. Proper crimping ensures a strong, durable connection that can withstand vibration and environmental factors.
2.3. Soldering Iron and Solder
Why is a soldering iron recommended for wiring an OBD2 connector?
A soldering iron provides a more robust and reliable connection compared to crimping alone. Soldering ensures that the wire is physically bonded to the connector pin, reducing the risk of corrosion and loose connections. Use a quality solder and follow proper soldering techniques to achieve a strong, clean joint.
According to a study by the IEEE, soldered connections have a lower resistance and higher tensile strength compared to crimped connections, making them ideal for critical automotive applications.
2.4. Multimeter
How does a multimeter help in wiring an OBD2 connector?
A multimeter is an indispensable tool for testing continuity, voltage, and resistance. It can be used to verify that the correct pins are receiving power and ground, and to check for shorts or open circuits in the wiring. Before connecting the OBD2 connector to the vehicle, use a multimeter to ensure that all connections are correct and that there are no unexpected voltage drops or spikes.
2.5. Heat Shrink Tubing
Why should you use heat shrink tubing for OBD2 connector wiring?
Heat shrink tubing is used to insulate and protect the soldered or crimped connections. It provides a clean, professional finish and helps prevent corrosion and short circuits. Choose heat shrink tubing that is appropriately sized for the wires you are using, and use a heat gun to shrink it tightly around the connection.
 Heat Shrink Tubing Application
2.6. OBD2 Connector and Wires
What type of OBD2 connector and wires should be used for wiring?
Choose a high-quality OBD2 connector from a reputable supplier. Ensure that the connector is compatible with the wiring standard of your vehicle. Use wires of the appropriate gauge (typically 22-16AWG) and insulation rating for automotive use. Wires should be color-coded to match the OBD2 pinout for easy identification and troubleshooting.
3. Step-by-Step Wiring Guide
How do you wire an OBD2 connector in a step-by-step manner?
Here’s a detailed, step-by-step guide to wiring an OBD2 connector, ensuring a secure and reliable connection.
3.1. Preparation
How do you prepare for the wiring process?
Start by gathering all the necessary tools and materials. Review the OBD2 pinout diagram for your specific vehicle to ensure you are connecting the wires to the correct pins. Disconnect the vehicle’s battery to prevent electrical shorts or damage during the wiring process. Work in a well-lit, clean environment to minimize errors.
3.2. Stripping Wires
How do you properly strip the wires for connection?
Use wire strippers to carefully remove about 3/8″ of insulation from the end of each wire. Avoid cutting or nicking the wire strands, as this can weaken the connection. If the wires are too thin for the connector pins, fold them over on themselves to increase their thickness.
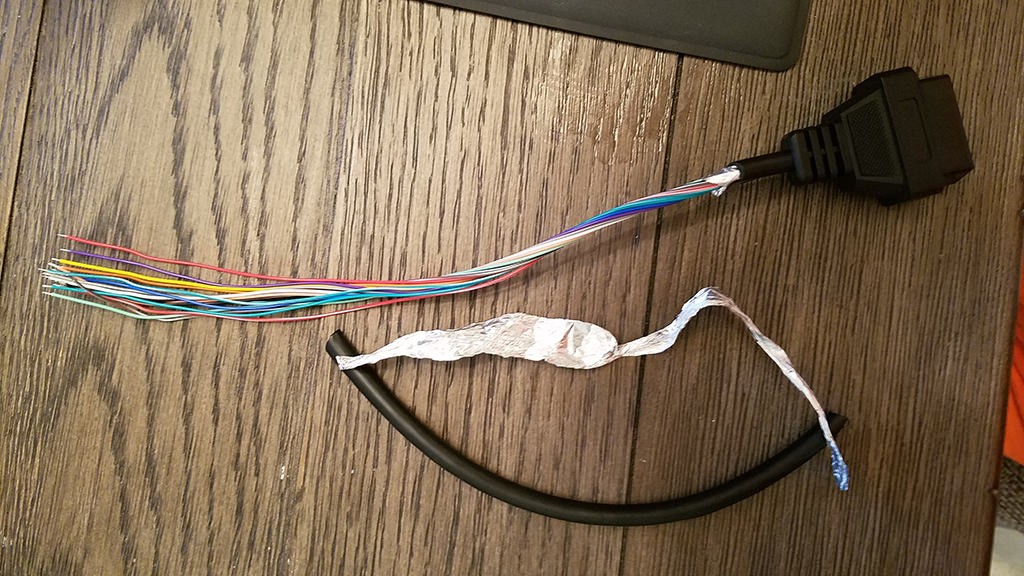 Stripped Wires Ready for Connection
3.3. Connecting Wires to Connector Pins
What are the different methods for connecting wires to the OBD2 connector pins?
There are two primary methods for connecting wires to the OBD2 connector pins: crimping and soldering. Crimping involves using a crimping tool to mechanically secure the wire to the pin. Soldering involves using a soldering iron to create a permanent electrical bond between the wire and the pin.
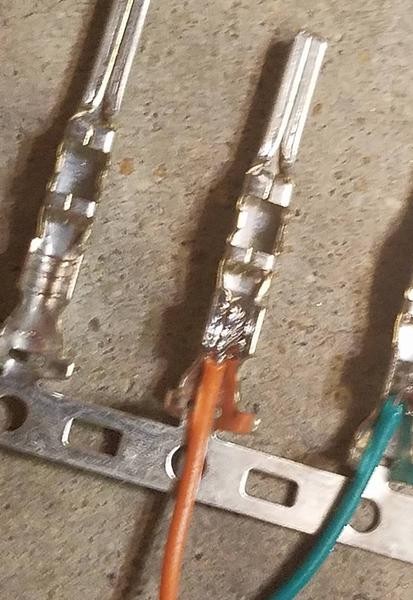
3.4. Crimping Technique
How do you crimp wires to the OBD2 connector pins?
Insert the stripped wire into the connector pin, ensuring that the wire is fully seated. Use a crimping tool to compress the pin around the wire, creating a secure mechanical connection. If the pin has multiple prongs, crimp each prong individually for maximum holding power. Test the connection by gently pulling on the wire to ensure it is secure.
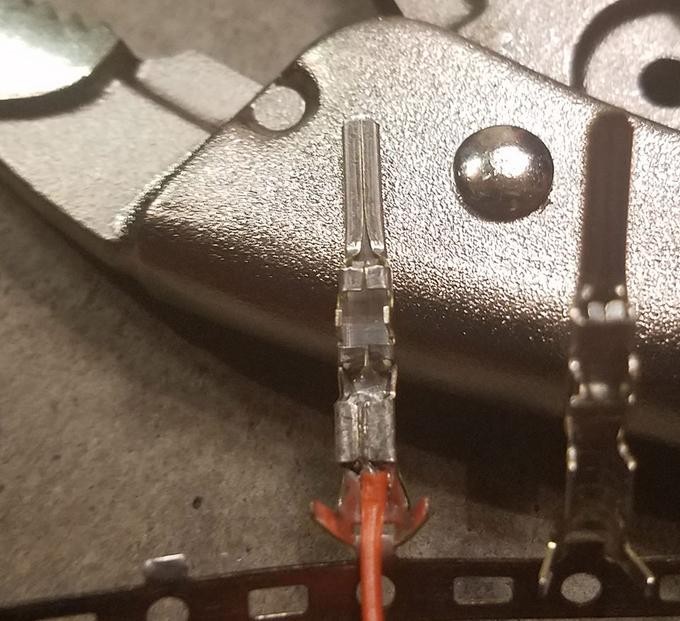
3.5. Soldering Technique
How do you solder wires to the OBD2 connector pins?
Insert the stripped wire into the connector pin. Apply heat from the soldering iron to the pin and the wire simultaneously. Once the pin and wire are hot, apply solder to the joint, allowing it to flow evenly around the connection. Remove the soldering iron and allow the joint to cool undisturbed. Inspect the solder joint for smoothness and completeness.
 Soldering the Wire to the Pin Connector
3.6. Insulating Connections
How do you insulate the connections after wiring?
Slide heat shrink tubing over the soldered or crimped connection. Use a heat gun to shrink the tubing tightly around the connection, providing insulation and protection. Alternatively, wrap the connection with high-quality electrical tape, ensuring that all exposed metal is covered.
3.7. Assembling the Connector
How do you assemble the OBD2 connector after wiring the pins?
Insert the wired pins into the OBD2 connector housing, following the pinout diagram. Ensure that each pin clicks securely into place. Once all pins are inserted, assemble the connector housing, securing it with any screws or clips provided.
3.8. Testing the Connection
How do you test the OBD2 connector connection?
Use a multimeter to test the continuity between each pin on the OBD2 connector and the corresponding wire. Verify that there are no shorts between adjacent pins. Connect the OBD2 connector to the vehicle and use a diagnostic tool to verify that it can communicate with the vehicle’s computer.
4. Troubleshooting Common Issues
What are common issues encountered during OBD2 connector wiring and how do you troubleshoot them?
Even with careful preparation, you might encounter issues during the wiring process. Here are some common problems and their solutions.
4.1. Loose Connections
How do you identify and fix loose connections?
Loose connections are a common cause of OBD2 communication problems. Use a multimeter to check the continuity of each connection. Gently tug on each wire to ensure it is securely attached to the connector pin. If a connection is loose, re-crimp or re-solder the wire.
4.2. Short Circuits
How do you diagnose and resolve short circuits in the OBD2 connector wiring?
Short circuits occur when two or more wires are inadvertently connected. Use a multimeter to check for continuity between adjacent pins on the OBD2 connector. If there is continuity where there should not be, inspect the wiring for damaged insulation or stray strands of wire. Repair any shorts by isolating the affected wires and insulating them properly.
4.3. Incorrect Pin Placement
What should you do if you realize you’ve placed a pin in the wrong slot?
Incorrect pin placement can prevent the diagnostic tool from communicating with the vehicle’s computer. Double-check the OBD2 pinout diagram and verify that each wire is connected to the correct pin. If a pin is in the wrong slot, use a small tool to carefully release it and re-insert it into the correct location.
4.4. Damaged Wires
How do you handle damaged wires during the wiring process?
Damaged wires can cause intermittent connections or short circuits. Inspect the wires for cuts, nicks, or frayed insulation. Replace any damaged wires with new wires of the same gauge and insulation rating. Ensure that all splices are properly soldered and insulated.
4.5. Compatibility Issues
What should you do if your OBD2 connector is not compatible with your vehicle?
Compatibility issues can arise if the OBD2 connector is not designed for your specific vehicle make and model. Verify that the connector is compatible with your vehicle’s wiring standard. Consult the vehicle’s service manual or a professional database like ALLDATA for compatibility information.
5. Advanced Tips and Tricks
What are some advanced tips and tricks for OBD2 connector wiring?
For those looking to enhance their wiring skills, here are some advanced tips and tricks to ensure optimal performance and longevity.
5.1. Using High-Quality Connectors
Why is it important to use high-quality OBD2 connectors?
High-quality OBD2 connectors are made from durable materials and are designed to withstand the rigors of automotive use. They provide a more reliable connection and are less prone to corrosion and wear. Investing in high-quality connectors can save time and money in the long run by reducing the need for frequent repairs.
5.2. Proper Wire Management
How can proper wire management improve the reliability of your OBD2 connector wiring?
Proper wire management involves organizing and securing the wires to prevent them from being damaged or disconnected. Use zip ties or wire looms to bundle the wires together and route them away from heat sources and moving parts. Proper wire management not only improves the appearance of the wiring but also enhances its reliability and longevity.
5.3. Shielding Wires
When is it necessary to shield OBD2 connector wires and how do you do it?
Shielding wires is necessary in environments with high levels of electromagnetic interference (EMI). Shielded wires have a layer of conductive material that blocks EMI, preventing it from interfering with the data signals. To shield wires, wrap them with copper foil or conductive tape, and ground the shield to the vehicle’s chassis.
5.4. Waterproofing Connections
How do you waterproof OBD2 connector connections to prevent corrosion?
Waterproofing connections is essential in areas exposed to moisture or harsh environmental conditions. Use waterproof connectors and heat shrink tubing to seal the connections against water intrusion. Apply dielectric grease to the connector pins to prevent corrosion.
5.5. Regular Maintenance
What type of maintenance should you perform on your OBD2 connector wiring?
Regular maintenance can help prevent problems and extend the life of your OBD2 connector wiring. Inspect the wiring periodically for signs of damage or corrosion. Clean the connector pins with a contact cleaner to remove dirt and debris. Tighten any loose connections and replace any worn or damaged components.
6. OBD2 Connector Applications
What are some of the common applications of OBD2 connectors?
OBD2 connectors are used in a wide range of automotive applications, including diagnostics, performance tuning, and data logging.
6.1. Vehicle Diagnostics
How are OBD2 connectors used for vehicle diagnostics?
Vehicle diagnostics is the most common application of OBD2 connectors. Diagnostic tools connect to the OBD2 port to read trouble codes, monitor sensor data, and perform system tests. This information can be used to diagnose and repair a wide range of automotive problems.
6.2. Performance Tuning
How are OBD2 connectors used for performance tuning?
Performance tuning involves modifying the vehicle’s computer to improve its performance. Tuning software connects to the OBD2 port to reprogram the ECU with custom parameters. This can be used to increase horsepower, improve fuel economy, or adjust other performance characteristics.
6.3. Data Logging
How are OBD2 connectors used for data logging?
Data logging involves recording sensor data from the vehicle’s computer over time. Data loggers connect to the OBD2 port to capture data such as engine speed, throttle position, and fuel consumption. This data can be analyzed to identify performance issues or optimize driving habits.
 OBD2 Connector Connected to a Scanner
7. OBD2 Error Codes and Interpretation
What are OBD2 error codes and how do you interpret them?
OBD2 error codes are standardized codes that indicate specific problems with the vehicle’s systems. These codes are read by diagnostic tools and can be used to identify the source of the problem.
7.1. Understanding OBD2 Code Structure
How are OBD2 codes structured and what do the different parts of the code signify?
OBD2 codes consist of five characters: a letter followed by four numbers. The letter indicates the system affected (e.g., P for powertrain, B for body, C for chassis, U for network). The first number indicates whether the code is generic (0) or manufacturer-specific (1, 2, or 3). The remaining three numbers indicate the specific fault.
7.2. Common OBD2 Error Codes
What are some common OBD2 error codes and what do they indicate?
Here are some common OBD2 error codes and their meanings:
| Error Code | Description | Possible Causes |
|---|---|---|
| P0101 | Mass Air Flow (MAF) Sensor Range/Performance | Dirty or faulty MAF sensor, vacuum leaks, wiring issues |
| P0300 | Random/Multiple Cylinder Misfire Detected | Faulty spark plugs, ignition coils, fuel injectors, vacuum leaks |
| P0420 | Catalyst System Efficiency Below Threshold | Faulty catalytic converter, oxygen sensors, exhaust leaks |
| P0171 | System Too Lean (Bank 1) | Vacuum leaks, faulty oxygen sensor, fuel pump issues |
| P0113 | Intake Air Temperature Sensor Circuit High | Faulty IAT sensor, wiring issues |
7.3. Interpreting Error Codes
How do you interpret OBD2 error codes to diagnose vehicle problems?
Interpreting OBD2 error codes involves researching the code’s definition and identifying the possible causes. Consult a reliable OBD2 code database or a professional diagnostic tool for accurate information. Use the error code as a starting point for further investigation, such as visual inspections, component testing, and wiring checks.
7.4. Clearing Error Codes
How do you clear OBD2 error codes after resolving the underlying issue?
After resolving the underlying issue, use a diagnostic tool to clear the OBD2 error codes. This will turn off the check engine light and reset the vehicle’s computer. Keep in mind that some codes may require multiple drive cycles to clear, and some may return if the underlying issue is not fully resolved.
8. Choosing the Right OBD2 Scanner
How do you choose the right OBD2 scanner for your needs?
Selecting the right OBD2 scanner depends on your specific needs and budget. There are many different types of scanners available, ranging from basic code readers to advanced diagnostic tools.
8.1. Basic Code Readers
What are basic code readers and when are they appropriate?
Basic code readers are inexpensive tools that can read and clear OBD2 error codes. They are suitable for simple diagnostic tasks and for vehicle owners who want to perform basic troubleshooting.
8.2. Enhanced Diagnostic Scanners
What are enhanced diagnostic scanners and what features do they offer?
Enhanced diagnostic scanners offer more advanced features, such as live data streaming, component testing, and bi-directional control. They are suitable for professional technicians and experienced DIYers who need to perform more complex diagnostic tasks.
8.3. Professional-Grade Scanners
What are professional-grade scanners and when are they necessary?
Professional-grade scanners are the most advanced and expensive tools available. They offer comprehensive diagnostic capabilities, including access to manufacturer-specific codes and data, advanced programming functions, and detailed repair information. They are necessary for professional technicians who work on a wide range of vehicles.
8.4. Scanner Compatibility
How do you ensure that an OBD2 scanner is compatible with your vehicle?
Ensure that the OBD2 scanner is compatible with your vehicle’s make, model, and year. Check the scanner’s specifications for compatibility information. Consult the scanner manufacturer’s website or a professional database like ALLDATA for compatibility details.
9. Safety Precautions
What safety precautions should be followed when working with OBD2 connectors and vehicle electrical systems?
Working with OBD2 connectors and vehicle electrical systems can be dangerous if proper safety precautions are not followed. Here are some important safety tips:
9.1. Disconnecting the Battery
Why is it important to disconnect the vehicle’s battery before working on the electrical system?
Disconnecting the vehicle’s battery is essential to prevent electrical shocks and damage to the vehicle’s electronic components. Disconnect the negative battery cable before starting any electrical work.
9.2. Using Proper Tools
Why should you only use insulated tools when working on vehicle electrical systems?
Insulated tools protect you from electrical shocks and prevent short circuits. Use tools with insulated handles and ensure that the insulation is in good condition.
9.3. Avoiding Water
Why should you avoid working on vehicle electrical systems in wet conditions?
Water can conduct electricity and increase the risk of electrical shock. Avoid working on vehicle electrical systems in wet conditions, such as rain or snow.
9.4. Wearing Safety Gear
What safety gear should you wear when working on vehicle electrical systems?
Wear safety glasses to protect your eyes from sparks and debris. Wear gloves to protect your hands from cuts and burns. Wear appropriate clothing to protect your skin from battery acid and other chemicals.
9.5. Following Instructions
Why is it important to follow the manufacturer’s instructions when using diagnostic tools and electrical components?
Following the manufacturer’s instructions is essential to ensure safe and proper operation. Read and understand the instructions before using any diagnostic tools or electrical components.
10. Contact OBD2-SCANNER.EDU.VN for Expert Assistance
Do you need assistance with wiring your OBD2 connector or diagnosing vehicle issues?
If you’re facing challenges or need expert guidance, don’t hesitate to contact us at OBD2-SCANNER.EDU.VN. Our team of experienced technicians is ready to provide the support and solutions you need.
10.1. Why Choose OBD2-SCANNER.EDU.VN?
Why should you choose OBD2-SCANNER.EDU.VN for your diagnostic and repair needs?
At OBD2-SCANNER.EDU.VN, we are committed to providing top-notch diagnostic and repair services, ensuring your vehicle runs smoothly and efficiently. Our team has extensive experience and expertise in vehicle diagnostics, electrical systems, and OBD2 connector wiring.
10.2. Contact Information
How can you get in touch with OBD2-SCANNER.EDU.VN for assistance?
For expert assistance with OBD2 connector wiring, vehicle diagnostics, and repair services, please reach out to us:
- Address: 123 Main Street, Los Angeles, CA 90001, United States
- WhatsApp: +1 (641) 206-8880
- Website: OBD2-SCANNER.EDU.VN
10.3. Get Immediate Support
How can you get immediate assistance for your OBD2 connector and vehicle diagnostic needs?
For immediate support and expert advice, contact us via WhatsApp or visit our website. Our team is ready to answer your questions and provide the solutions you need to keep your vehicle running at its best.
Let OBD2-SCANNER.EDU.VN be your trusted partner in vehicle diagnostics and repair. Contact us today and experience the difference!
This detailed guide equips you with the knowledge and skills to confidently tackle OBD2 connector wiring, ensuring your vehicle’s diagnostic systems function flawlessly. Remember, proper wiring not only enhances performance but also safeguards your vehicle’s electronic integrity. Whether you’re a seasoned mechanic or a dedicated DIYer, understanding the intricacies of OBD2 systems is key to efficient vehicle maintenance and repair. Stay proactive, stay informed, and keep your vehicle running smoothly with the insights from OBD2-SCANNER.EDU.VN.