Build OBD2 Interface: What Is It and Why Should You Care?
Building an OBD2 interface empowers you with the ability to diagnose your vehicle’s health, troubleshoot issues, and even customize certain parameters. The On-Board Diagnostics II (OBD2) interface acts as your car’s personal doctor, providing valuable insights into its inner workings. OBD2-SCANNER.EDU.VN equips you with the knowledge and resources to build your own OBD2 interface, making car diagnostics more accessible and affordable. This guide simplifies the process, allowing you to take control of your vehicle’s diagnostics and maintenance. It empowers you to understand your vehicle better, saving you money on diagnostic fees and repairs.
Contents
- Build OBD2 Interface: What Is It and Why Should You Care?
- 1. Understanding the OBD2 Interface
- What exactly is an OBD2 interface?
- Why is the OBD2 interface important?
- What are the key components involved in building an OBD2 interface?
- 2. Identifying Your Specific Needs and Goals
- What do you want to achieve with your OBD2 interface?
- What vehicles are you planning to support?
- What is your budget for this project?
- What level of technical expertise do you possess?
- 3. Gathering the Necessary Components and Tools
- Essential components for building a basic OBD2 interface:
- Recommended tools for assembling the OBD2 interface:
- Where to source components and tools:
- 4. Understanding OBD2 Wiring and Pinouts
- What are the standard OBD2 connector pinouts?
- How to identify the correct wires for your application:
- Safety precautions when working with automotive wiring:
- 5. Step-by-Step Guide to Building Your OBD2 Interface
- Step 1: Preparing the OBD2 Connector and Wires
- Step 2: Connecting the CAN Bus Interface to the Microcontroller
- Step 3: Wiring the OBD2 Connector to the CAN Bus Interface
- Step 4: Soldering and Insulating Connections (Recommended)
- Step 5: Assembling the Interface
- Step 6: Uploading the Arduino Code
- Step 7: Testing the OBD2 Interface
- 6. Software Options for Reading and Interpreting OBD2 Data
- Available software for various platforms (Windows, macOS, Linux, Android, iOS):
- Open-source vs. commercial software:
- Key features to look for in OBD2 software:
- 7. Troubleshooting Common Issues
- Common problems encountered during the build process:
- Tips for diagnosing and resolving issues:
- Where to find support and assistance:
- 8. Advanced Techniques and Customization
- Implementing data logging and storage:
- Creating custom dashboards and displays:
- Integrating with mobile apps:
- 9. Safety Precautions and Best Practices
- Importance of proper wiring and connections:
- Avoiding electrical shorts and grounding issues:
- Protecting your vehicle’s ECU:
- 10. Legal and Ethical Considerations
- Understanding the limitations of OBD2 data:
- Respecting vehicle manufacturer’s intellectual property:
- Responsible use of OBD2 information:
- 11. Real-World Applications of a Custom OBD2 Interface
- Monitoring vehicle performance in real-time:
- Diagnosing and troubleshooting engine problems:
- Customizing vehicle parameters (advanced users):
- 12. Case Studies and Success Stories
- Examples of successful OBD2 interface projects:
- Lessons learned from these projects:
- 13. The Future of OBD2 and Automotive Diagnostics
- Emerging trends in OBD2 technology:
- The role of OBD2 in connected cars and autonomous vehicles:
- How to stay updated on the latest developments:
- 14. Resources and Further Reading
- Recommended books and websites for learning more about OBD2:
- Online forums and communities:
- Educational courses and workshops:
- 15. FAQs About Building an OBD2 Interface
- What is an OBD2 scanner?
- How do I read OBD2 codes?
- What are common car errors and how to fix them?
- Is it legal to modify my vehicle’s ECU using OBD2?
- Can I use an OBD2 interface to improve my fuel economy?
- What are the benefits of building my own OBD2 interface?
- What are the risks of building my own OBD2 interface?
- How much does it cost to build an OBD2 interface?
- What programming languages are commonly used for OBD2 interfaces?
- Where can I find Arduino code examples for OBD2 projects?
- Take Control of Your Vehicle’s Diagnostics with OBD2-SCANNER.EDU.VN
1. Understanding the OBD2 Interface
What exactly is an OBD2 interface?
The OBD2 (On-Board Diagnostics II) interface is a standardized system used in modern vehicles to monitor and report on various aspects of the vehicle’s performance. It’s essentially a port that allows you to connect a scanner or other diagnostic tool to your car’s computer, enabling you to read trouble codes, view live data, and perform other diagnostic functions.
Why is the OBD2 interface important?
The OBD2 interface is vital for several reasons:
- Diagnostics: It allows you to quickly identify the source of a problem when your “check engine” light comes on.
- Maintenance: By monitoring various parameters, you can proactively identify potential issues before they become major problems.
- Performance Tuning: Some advanced users utilize the OBD2 interface to monitor and adjust engine parameters for improved performance.
What are the key components involved in building an OBD2 interface?
Building your own OBD2 interface involves a few key components:
- OBD2 Connector: This is the physical connector that plugs into your vehicle’s OBD2 port.
- Microcontroller: A microcontroller, such as an Arduino, acts as the brains of the interface, processing data from the OBD2 port and transmitting it to a computer or mobile device.
- CAN Bus Interface: This allows the microcontroller to communicate with the vehicle’s CAN (Controller Area Network) bus, which is the communication network used by various electronic control units (ECUs) in the car.
- Software: Software is required to read and interpret the data received from the OBD2 port.
2. Identifying Your Specific Needs and Goals
What do you want to achieve with your OBD2 interface?
Before you start building, consider what you want to achieve. Do you simply want to read trouble codes, or do you need more advanced features like live data monitoring and data logging?
What vehicles are you planning to support?
The OBD2 standard is fairly universal, but some vehicles may have specific communication protocols or require additional adapters.
What is your budget for this project?
Building an OBD2 interface can range from a simple, low-cost project to a more complex and expensive one. Determine how much you’re willing to spend on components and software.
What level of technical expertise do you possess?
Building an OBD2 interface requires some basic electronics knowledge and programming skills. Be realistic about your abilities and choose a project that matches your skill level.
3. Gathering the Necessary Components and Tools
Essential components for building a basic OBD2 interface:
- OBD2 Connector: You’ll need an OBD2 connector to plug into your vehicle’s port. These are readily available online from sources like Amazon, eBay, and specialized electronics suppliers.
- Microcontroller (e.g., Arduino): An Arduino Uno or Nano is a popular choice for this project due to its ease of use and availability of libraries.
- CAN Bus Interface (e.g., MCP2515): This module allows the Arduino to communicate with the vehicle’s CAN bus.
- Jumper Wires: You’ll need jumper wires to connect the various components together.
- USB Cable: A USB cable is used to connect the Arduino to your computer for programming and data transfer.
Recommended tools for assembling the OBD2 interface:
- Soldering Iron and Solder: Soldering is recommended for making secure and reliable connections between components.
- Wire Strippers/Cutters: These are essential for preparing the wires for soldering or crimping.
- Multimeter: A multimeter is useful for testing connections and troubleshooting problems.
- Computer with Arduino IDE: You’ll need a computer with the Arduino IDE (Integrated Development Environment) installed to program the microcontroller.
Where to source components and tools:
- Online Retailers: Amazon, eBay, AliExpress, and other online retailers offer a wide variety of electronic components and tools at competitive prices.
- Electronics Suppliers: Companies like Adafruit, SparkFun, and Digi-Key specialize in electronic components and offer excellent customer support.
- Local Electronics Stores: Check your local area for electronics stores that may carry the components and tools you need.
4. Understanding OBD2 Wiring and Pinouts
What are the standard OBD2 connector pinouts?
The OBD2 connector has 16 pins, each with a specific function. Here are the most commonly used pins:
| Pin | Description |
|---|---|
| 2 | J1850 Bus Positive |
| 4 | Chassis Ground |
| 5 | Signal Ground |
| 6 | CAN High (J2284) |
| 7 | ISO 9141-2 K Line |
| 10 | J1850 Bus Negative |
| 14 | CAN Low (J2284) |
| 15 | ISO 9141-2 L Line |
| 16 | Battery Power (+12V) |
How to identify the correct wires for your application:
Refer to your vehicle’s repair manual or online resources to identify the correct wires for your specific application. The specific pins used may vary depending on the vehicle’s make, model, and year.
Safety precautions when working with automotive wiring:
- Disconnect the Battery: Always disconnect the negative terminal of your vehicle’s battery before working with any electrical components.
- Use a Multimeter: Use a multimeter to verify the voltage and continuity of wires before making any connections.
- Avoid Short Circuits: Be careful not to create short circuits by accidentally touching wires together.
- Double-Check Connections: Always double-check your connections before powering up the interface.
5. Step-by-Step Guide to Building Your OBD2 Interface
Step 1: Preparing the OBD2 Connector and Wires
- Cut the OBD2 cable and strip the insulation from the ends of the wires.
- Identify the wires corresponding to the necessary pins (e.g., ground, power, CAN High, CAN Low).
- Tin the ends of the wires with solder to prevent fraying and improve conductivity.
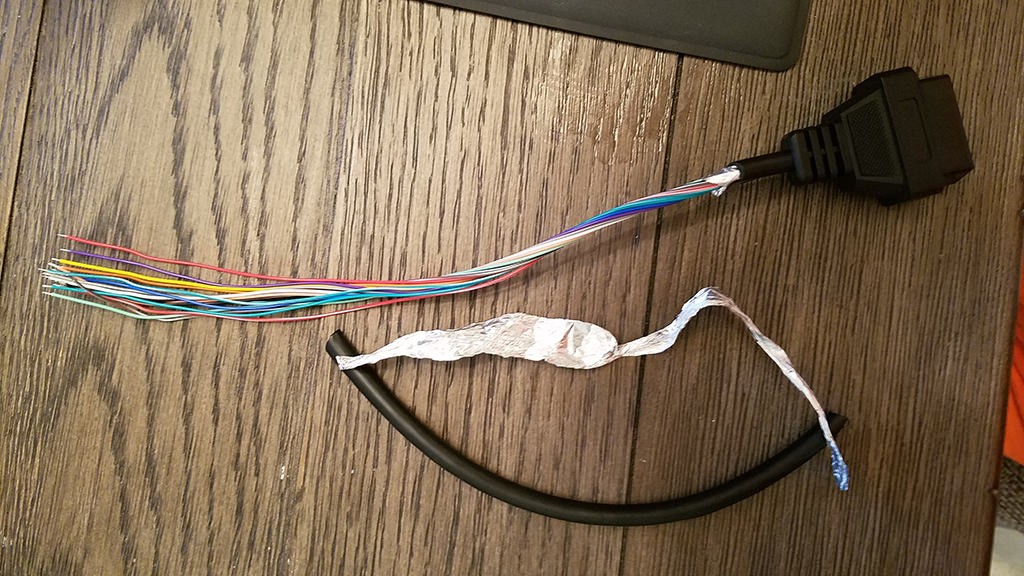 Stripped sheath and shielding
Step 2: Connecting the CAN Bus Interface to the Microcontroller
- Connect the CAN Bus Interface module (e.g., MCP2515) to the Arduino according to the manufacturer’s instructions. Typically, this involves connecting the SPI pins (SCK, MISO, MOSI), as well as the interrupt pin (INT) and power/ground pins.
Step 3: Wiring the OBD2 Connector to the CAN Bus Interface
- Connect the appropriate wires from the OBD2 connector to the CAN Bus Interface module. For example:
- OBD2 Pin 4 (Chassis Ground) to CAN Bus Interface Ground
- OBD2 Pin 6 (CAN High) to CAN Bus Interface CAN High
- OBD2 Pin 14 (CAN Low) to CAN Bus Interface CAN Low
- OBD2 Pin 16 (Battery Power) to CAN Bus Interface Power
Step 4: Soldering and Insulating Connections (Recommended)
- Solder the wires to the pins on the CAN Bus Interface module for a secure and reliable connection.
- Use heat shrink tubing or electrical tape to insulate the connections and prevent short circuits.
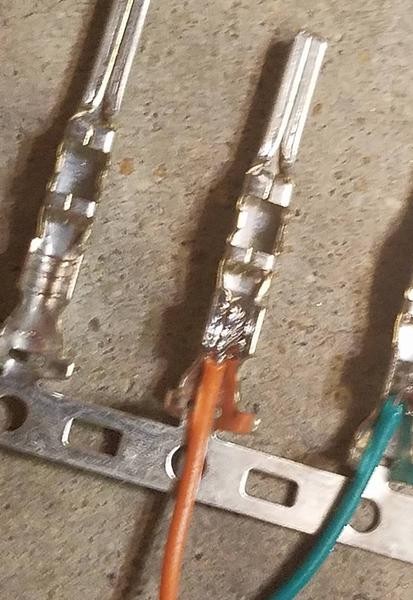 Soldering the wire to the pin connector
Step 5: Assembling the Interface
- Carefully mount the Arduino and CAN Bus Interface module in a protective enclosure to prevent damage.
- Ensure that all connections are secure and properly insulated.
Step 6: Uploading the Arduino Code
- Download and install the Arduino IDE software on your computer.
- Install the necessary libraries for the CAN Bus Interface module.
- Upload the Arduino code to the microcontroller. This code will handle communication with the CAN bus and data retrieval from the OBD2 port. You can find sample code online or write your own.
Step 7: Testing the OBD2 Interface
- Plug the OBD2 connector into your vehicle’s OBD2 port.
- Connect the Arduino to your computer via USB.
- Use a serial monitor program (built into the Arduino IDE) to view the data being received from the OBD2 port.
- Verify that you can read trouble codes, live data, and other diagnostic information.
6. Software Options for Reading and Interpreting OBD2 Data
Available software for various platforms (Windows, macOS, Linux, Android, iOS):
There are numerous software options available for reading and interpreting OBD2 data, catering to different platforms and needs:
- Windows: ScanTool.net, OBDwiz, and other commercial software packages offer advanced features like data logging, graphing, and custom dashboards.
- macOS: Similar to Windows, there are commercial options available, as well as open-source tools that can be adapted for macOS.
- Linux: Open-source tools like PyOBD and FreeEMS are popular choices for Linux users.
- Android/iOS: Apps like Torque Pro, OBD Fusion, and Carista allow you to read OBD2 data on your smartphone or tablet via a Bluetooth OBD2 adapter.
Open-source vs. commercial software:
- Open-Source Software: Open-source software is free to use and modify, but it may require more technical expertise to set up and configure.
- Commercial Software: Commercial software typically offers a more user-friendly interface and better support, but it comes at a cost.
Key features to look for in OBD2 software:
- Trouble Code Reading and Clearing: The ability to read and clear diagnostic trouble codes (DTCs).
- Live Data Monitoring: The ability to view real-time data from various sensors in your vehicle.
- Data Logging: The ability to record data over time for analysis.
- Graphing: The ability to visualize data in graphical form.
- Customizable Dashboards: The ability to create custom dashboards to display the data you’re most interested in.
- Vehicle Support: Ensure that the software supports your specific vehicle make and model.
7. Troubleshooting Common Issues
Common problems encountered during the build process:
- Incorrect Wiring: Double-check all wiring connections to ensure they are correct.
- Library Issues: Make sure you have installed the correct libraries for the CAN Bus Interface module and that they are compatible with your Arduino code.
- Communication Errors: If you’re not receiving any data from the OBD2 port, check the CAN bus initialization code and verify that the CAN bus is properly configured.
Tips for diagnosing and resolving issues:
- Use a Multimeter: Use a multimeter to check the voltage and continuity of wires and components.
- Check the Serial Monitor: Monitor the serial output from the Arduino to see if there are any error messages.
- Consult Online Resources: Search online forums and communities for solutions to common problems.
Where to find support and assistance:
- Online Forums: Arduino forums, automotive forums, and electronics forums can provide valuable support and assistance.
- Manufacturer Websites: The websites of the component manufacturers often have documentation, tutorials, and support resources.
- OBD2-SCANNER.EDU.VN: Our website provides comprehensive guides, tutorials, and support for building and using OBD2 interfaces. Contact us at +1 (641) 206-8880 for personalized assistance.
8. Advanced Techniques and Customization
Implementing data logging and storage:
To implement data logging, you can modify your Arduino code to store the data received from the OBD2 port to an SD card or other storage medium. You can then analyze the data later using a spreadsheet program or other data analysis tools.
Creating custom dashboards and displays:
You can create custom dashboards and displays using software like Processing or LabVIEW. These tools allow you to visualize the data from the OBD2 port in a more intuitive and informative way.
Integrating with mobile apps:
You can integrate your OBD2 interface with mobile apps using Bluetooth or Wi-Fi. This allows you to view the data from your vehicle on your smartphone or tablet.
9. Safety Precautions and Best Practices
Importance of proper wiring and connections:
Proper wiring and connections are crucial for the safe and reliable operation of your OBD2 interface. Incorrect wiring can damage your vehicle’s electrical system or the interface itself.
Avoiding electrical shorts and grounding issues:
Be careful to avoid electrical shorts by accidentally touching wires together. Ensure that all components are properly grounded to prevent grounding issues.
Protecting your vehicle’s ECU:
When working with your vehicle’s electrical system, it’s essential to take precautions to protect the ECU (Engine Control Unit) from damage. Always disconnect the battery before making any connections, and double-check your wiring before powering up the interface.
10. Legal and Ethical Considerations
Understanding the limitations of OBD2 data:
The data provided by the OBD2 interface is not always accurate or complete. It’s important to understand the limitations of the data and not rely on it for critical decision-making.
Respecting vehicle manufacturer’s intellectual property:
When modifying or reverse-engineering vehicle software, it’s important to respect the vehicle manufacturer’s intellectual property rights. Avoid distributing or using modified software in a way that could infringe on their copyrights or patents.
Responsible use of OBD2 information:
Use the information you obtain from the OBD2 interface responsibly. Avoid using it to tamper with your vehicle’s emissions controls or to engage in other illegal activities.
11. Real-World Applications of a Custom OBD2 Interface
Monitoring vehicle performance in real-time:
A custom OBD2 interface allows you to monitor your vehicle’s performance in real-time, providing valuable insights into its health and efficiency. You can track parameters like engine temperature, RPM, fuel consumption, and more.
Diagnosing and troubleshooting engine problems:
By reading trouble codes and monitoring live data, you can quickly diagnose and troubleshoot engine problems, saving you time and money on repairs.
Customizing vehicle parameters (advanced users):
Some advanced users utilize custom OBD2 interfaces to modify vehicle parameters, such as ignition timing and fuel injection, for improved performance. However, this should only be done by experienced professionals, as it can potentially damage the engine.
12. Case Studies and Success Stories
Examples of successful OBD2 interface projects:
- DIY Data Logger: A user built a custom OBD2 interface with data logging capabilities to track their vehicle’s performance during track days.
- Mobile OBD2 App: A developer created a mobile app that allows users to read OBD2 data on their smartphones via a custom-built Bluetooth OBD2 adapter.
- Fuel Efficiency Monitor: An enthusiast built an OBD2 interface to monitor their vehicle’s fuel efficiency and optimize their driving habits for better mileage.
Lessons learned from these projects:
- Plan Carefully: Before starting your project, carefully plan out your goals, budget, and technical requirements.
- Start Simple: Begin with a simple project to gain experience and build your confidence.
- Seek Help: Don’t be afraid to ask for help from online communities and experts.
- Test Thoroughly: Thoroughly test your interface before using it in a real-world application.
13. The Future of OBD2 and Automotive Diagnostics
Emerging trends in OBD2 technology:
- Wireless OBD2 Adapters: Wireless OBD2 adapters are becoming increasingly popular, allowing you to connect to your vehicle’s OBD2 port via Bluetooth or Wi-Fi.
- Cloud-Based Diagnostics: Cloud-based diagnostic platforms are emerging, allowing you to store and analyze your vehicle’s data in the cloud.
- Artificial Intelligence (AI): AI is being used to develop more advanced diagnostic tools that can automatically identify and diagnose vehicle problems.
The role of OBD2 in connected cars and autonomous vehicles:
OBD2 technology will play a crucial role in the development of connected cars and autonomous vehicles. It will provide the data necessary to monitor vehicle health, optimize performance, and ensure safety.
How to stay updated on the latest developments:
- Follow Industry News: Stay updated on the latest developments in OBD2 technology by following industry news and publications.
- Attend Conferences: Attend automotive and technology conferences to learn about the latest trends and innovations.
- Join Online Communities: Join online communities and forums to connect with other enthusiasts and experts.
14. Resources and Further Reading
Recommended books and websites for learning more about OBD2:
- “OBD2 Automotive Protocols Explained” by Warren Hansen: A comprehensive guide to OBD2 protocols and standards.
- “Automotive Ethernet” by Kirsten Matheus: A detailed overview of automotive Ethernet technology, which is increasingly used in modern vehicles.
- OBD2-SCANNER.EDU.VN: Our website provides a wealth of information on OBD2 technology, including tutorials, guides, and support resources.
Online forums and communities:
- Arduino Forums: A great resource for getting help with Arduino-related projects.
- Automotive Forums: Many automotive forums have sections dedicated to OBD2 diagnostics and tuning.
- Electronics Forums: Electronics forums can provide valuable support for building and troubleshooting your OBD2 interface.
Educational courses and workshops:
- Local Community Colleges: Many community colleges offer courses in automotive technology and electronics.
- Online Learning Platforms: Platforms like Coursera and Udemy offer online courses on OBD2 diagnostics and automotive engineering.
- Industry Workshops: Attend industry workshops and seminars to learn from experts in the field.
15. FAQs About Building an OBD2 Interface
What is an OBD2 scanner?
An OBD2 scanner is a device used to access and interpret data from a vehicle’s On-Board Diagnostics II (OBD2) system. It reads diagnostic trouble codes (DTCs), monitors live data, and provides insights into the vehicle’s performance.
How do I read OBD2 codes?
To read OBD2 codes, connect an OBD2 scanner to your vehicle’s OBD2 port. Turn on the ignition but don’t start the engine. The scanner will display any stored DTCs, which you can then research to understand the issue.
What are common car errors and how to fix them?
Common car errors include misfires, oxygen sensor failures, and catalytic converter issues. Misfires can be caused by faulty spark plugs or ignition coils. Oxygen sensor failures often result in poor fuel economy. Catalytic converter issues can lead to emissions failures. Repairs vary depending on the specific issue and may involve replacing parts or performing maintenance.
Is it legal to modify my vehicle’s ECU using OBD2?
Modifying your vehicle’s ECU using OBD2 may be legal depending on local regulations. However, tampering with emissions controls is often illegal and can result in fines.
Can I use an OBD2 interface to improve my fuel economy?
Yes, you can use an OBD2 interface to monitor your fuel economy and optimize your driving habits. By tracking parameters like fuel consumption and engine load, you can identify areas where you can improve your mileage.
What are the benefits of building my own OBD2 interface?
Building your own OBD2 interface gives you greater control over your vehicle’s diagnostics and allows you to customize the interface to meet your specific needs. It can also save you money on diagnostic fees and repairs.
What are the risks of building my own OBD2 interface?
The risks of building your own OBD2 interface include damaging your vehicle’s electrical system, creating short circuits, and voiding your vehicle’s warranty. It’s important to take precautions and follow best practices to minimize these risks.
How much does it cost to build an OBD2 interface?
The cost of building an OBD2 interface can range from $50 to $200 or more, depending on the components you choose and the complexity of the project.
What programming languages are commonly used for OBD2 interfaces?
Common programming languages used for OBD2 interfaces include C++, Python, and Java. Arduino code is often written in a simplified version of C++.
Where can I find Arduino code examples for OBD2 projects?
You can find Arduino code examples for OBD2 projects on online forums, GitHub, and other code repositories. Look for projects that use the same CAN Bus Interface module as you are using.
Take Control of Your Vehicle’s Diagnostics with OBD2-SCANNER.EDU.VN
Ready to take control of your vehicle’s diagnostics and save money on repairs? Building your own OBD2 interface is a rewarding project that can empower you with valuable insights into your car’s health. At OBD2-SCANNER.EDU.VN, we provide the resources, knowledge, and support you need to succeed.
Contact us today at +1 (641) 206-8880 or visit our website at OBD2-SCANNER.EDU.VN for expert advice and assistance. Our address is 123 Main Street, Los Angeles, CA 90001, United States. Let us help you unlock the full potential of your vehicle!