Crafting your own Diy Obd2 Usb Interface empowers you with the ability to diagnose and troubleshoot vehicle issues, saving both time and money; OBD2-SCANNER.EDU.VN helps you unlock the potential of vehicle diagnostics and repair. Let’s dive into the world of automotive diagnostics, exploring the creation, advantages, and applications of a custom OBD2 setup, while also covering OBDII scan tools, car diagnostics, and automotive repair, ensuring a smooth journey for automotive enthusiasts.
Contents
- 1. Understanding the OBD2 USB Interface
- 2. Why Build a DIY OBD2 USB Interface?
- 3. Essential Components for Your DIY OBD2 USB Interface
- 4. Step-by-Step Guide to Building Your DIY OBD2 USB Interface
- 4.1. Preparing the Components
- 4.2. Assembling the Interface
- 4.3. Enclosure and Final Assembly
- 4.4. Testing the Interface
- 5. Selecting the Right USB Interface Chip
- 5.1. ELM327 Chip
- 5.2. FTDI FT232RL Chip
- 6. Choosing the Right Diagnostic Software
- 6.1. Popular Diagnostic Software Options
- 6.2. Factors to Consider When Choosing Software
- 7. Troubleshooting Common Issues
- 7.1. Common Problems and Solutions
- 7.2. Using a Multimeter for Troubleshooting
- 8. Advanced DIY OBD2 Projects
- 8.1. Custom Dashboards and Data Logging
- 8.2. Performance Tuning and Monitoring
- 8.3. Vehicle Security and Automation
- 9. Safety Precautions
- 9.1. General Safety Tips
- 9.2. Vehicle-Specific Precautions
- 10. The Future of DIY Automotive Diagnostics
- 10.1. Key Trends and Innovations
- 10.2. Implications for DIY Enthusiasts
- FAQ: Your Questions About DIY OBD2 USB Interfaces Answered
- 1. What is an OBD2 scanner?
- 2. How do I read OBD2 codes?
- 3. What are common OBD2 error codes?
- 4. What is the best OBD2 software to use?
- 5. Can I use an OBD2 scanner on any car?
- 6. How much does an OBD2 scanner cost?
- 7. Is it safe to use an OBD2 scanner while driving?
- 8. What can I do with an OBD2 scanner besides reading codes?
- 9. Do I need a special adapter for my OBD2 scanner?
- 10. Can an OBD2 scanner fix my car?
- Conclusion
1. Understanding the OBD2 USB Interface
What exactly is an OBD2 USB interface?
An OBD2 USB interface is a tool that allows you to connect your vehicle’s On-Board Diagnostics II (OBD2) system to a computer via a USB port; according to a 2023 report by the National Institute for Automotive Service Excellence (ASE), using OBD2 scanners can reduce diagnostic time by up to 60%. This connection enables you to read diagnostic trouble codes (DTCs), monitor real-time vehicle data, and perform various diagnostic tests, making it an invaluable tool for car diagnostics and automotive repair.
- Functionality: The interface acts as a bridge between your car’s computer and your PC, translating the data into a readable format.
- Applications: From identifying the cause of a check engine light to monitoring engine performance, the OBD2 USB interface offers a wide range of diagnostic capabilities.
2. Why Build a DIY OBD2 USB Interface?
Why should you consider building your own OBD2 USB interface?
Creating a DIY OBD2 USB interface offers several compelling advantages over purchasing a commercial unit; a study by the University of California, Berkeley, in 2022 found that DIY automotive repairs, including diagnostics, can save vehicle owners an average of $500 per year. Building your own can be more cost-effective, allows for customization, and provides a deeper understanding of your vehicle’s diagnostics system, which is why many automotive enthusiasts prefer this route.
- Cost Savings: Commercial OBD2 scanners can be expensive, especially those with advanced features. Building your own interface can significantly reduce the cost.
- Customization: A DIY approach allows you to tailor the interface to your specific needs, adding features or modifications as desired.
- Educational Value: Building an OBD2 interface provides hands-on experience with automotive diagnostics and electronics, enhancing your understanding of vehicle systems.
- Flexibility: You have the freedom to use the software and platforms that best suit your needs, without being tied to a specific brand or ecosystem.
3. Essential Components for Your DIY OBD2 USB Interface
What parts do you need to build your own OBD2 USB interface?
To embark on your DIY OBD2 USB interface project, you’ll need a few essential components; a comprehensive parts list and understanding of each component’s role is crucial for a successful build. This ensures compatibility and optimal performance, as detailed in a 2021 article in “Automotive Engineering International” that highlights the importance of selecting the right components for DIY automotive projects.
- OBD2 Connector: This is the physical connector that plugs into your vehicle’s OBD2 port. Ensure it is compatible with your vehicle’s port type (usually a 16-pin connector).
- USB Interface Chip: This chip handles the communication between the OBD2 connector and the USB port on your computer. Popular options include the ELM327 chip or FTDI FT232RL.
- USB Cable: A standard USB cable to connect the interface to your computer.
- Connector Housing: A housing to protect the electronics and provide a sturdy enclosure for your interface.
- Wiring and Connectors: Wires to connect the OBD2 connector to the USB interface chip, along with any necessary connectors or adapters.
- Printed Circuit Board (PCB) (Optional): A PCB can help organize and secure the components, making the interface more durable and reliable.
- Software: Diagnostic software on your computer to read and interpret the data from the OBD2 interface.
4. Step-by-Step Guide to Building Your DIY OBD2 USB Interface
How do you assemble your DIY OBD2 USB interface?
Building a DIY OBD2 USB interface involves several steps, from preparing the components to assembling and testing the final product; according to a 2020 study by the Society of Automotive Engineers (SAE), a well-structured assembly process is crucial for the reliability of DIY automotive diagnostic tools. By following these steps, you can create a functional and reliable OBD2 interface.
4.1. Preparing the Components
- Gather Your Tools: Ensure you have all the necessary tools, including a soldering iron, wire strippers, multimeter, and any other tools required for your specific components.
- Test Components: Before starting the assembly, test each component to ensure it is functioning correctly. Use a multimeter to check for continuity and voltage.
- Prepare the Wires: Cut and strip the wires to the appropriate lengths, ensuring they are clean and ready for soldering or crimping.
4.2. Assembling the Interface
- Connect the OBD2 Connector:
- Identify the pinout of your OBD2 connector. The most common pins used are:
- Pin 4: Chassis Ground
- Pin 5: Signal Ground
- Pin 6: CAN High (J-2284)
- Pin 14: CAN Low (J-2284)
- Pin 16: Battery Power
- Solder or crimp the wires to the corresponding pins on the OBD2 connector. Ensure the connections are secure and properly insulated.
- Identify the pinout of your OBD2 connector. The most common pins used are:
- Connect the USB Interface Chip:
- Refer to the datasheet of your USB interface chip (e.g., ELM327 or FTDI FT232RL) to identify the pinout.
- Connect the wires from the OBD2 connector to the appropriate pins on the USB interface chip. This typically involves connecting the ground, power, CAN High, and CAN Low wires.
- Solder or crimp the connections, ensuring they are secure and properly insulated.
- Mount the Components (Optional):
- If using a PCB, mount the OBD2 connector and USB interface chip onto the board. Solder the connections to the PCB to provide a stable and organized assembly.
- If not using a PCB, use heat shrink tubing or electrical tape to insulate and protect the connections.
4.3. Enclosure and Final Assembly
- Enclose the Interface: Place the assembled components into the connector housing. Ensure the housing is properly sealed to protect the electronics from damage.
- Connect the USB Cable: Connect the USB cable to the USB interface chip. Ensure the connection is secure and properly insulated.
4.4. Testing the Interface
- Install Drivers: Install the necessary drivers for your USB interface chip on your computer. These drivers are typically available from the chip manufacturer’s website.
- Connect to Your Vehicle: Plug the OBD2 connector into your vehicle’s OBD2 port.
- Launch Diagnostic Software: Launch your chosen diagnostic software on your computer.
- Test the Connection: Follow the instructions in your diagnostic software to connect to the OBD2 interface. Verify that you can read vehicle data, such as engine RPM, coolant temperature, and diagnostic trouble codes (DTCs).
5. Selecting the Right USB Interface Chip
What are the best USB interface chips for your project?
Choosing the right USB interface chip is crucial for the performance and compatibility of your DIY OBD2 USB interface; a 2019 report by the IEEE (Institute of Electrical and Electronics Engineers) highlights the importance of selecting a reliable and well-documented chip for DIY electronics projects. Both the ELM327 and FTDI FT232RL are popular choices, each with its own advantages and considerations.
5.1. ELM327 Chip
The ELM327 is a widely used chip specifically designed for OBD2 communication. It supports various OBD2 protocols and is compatible with a wide range of diagnostic software.
- Advantages:
- Ease of Use: The ELM327 chip is relatively easy to use and well-documented, making it a popular choice for beginners.
- Protocol Support: It supports all standard OBD2 protocols, ensuring compatibility with most vehicles.
- Software Compatibility: The ELM327 is compatible with a wide range of diagnostic software, including popular options like Torque Pro and OBD Auto Doctor.
- Considerations:
- Clones: There are many clone versions of the ELM327 chip available, which may have lower quality and reliability. Purchase from a reputable supplier to ensure you get a genuine chip.
- Limited Functionality: The ELM327 has limited functionality beyond basic OBD2 communication.
5.2. FTDI FT232RL Chip
The FTDI FT232RL is a general-purpose USB-to-serial UART interface chip. While not specifically designed for OBD2, it can be used to create an OBD2 interface with the right software and firmware.
- Advantages:
- Flexibility: The FTDI FT232RL is a versatile chip that can be used for a wide range of applications beyond OBD2 communication.
- Reliability: FTDI chips are known for their reliability and high quality.
- Advanced Features: With the right software and firmware, the FTDI FT232RL can support advanced features and customization.
- Considerations:
- Complexity: Using the FTDI FT232RL for OBD2 communication requires more technical knowledge and programming skills compared to the ELM327.
- Software Development: You may need to develop your own software or firmware to handle the OBD2 communication.
6. Choosing the Right Diagnostic Software
What software should you use with your DIY OBD2 USB interface?
Selecting the appropriate diagnostic software is essential for effectively using your DIY OBD2 USB interface; a 2022 review in “Car and Driver” magazine emphasizes the importance of user-friendly and feature-rich software for automotive diagnostics. The software allows you to read and interpret the data from your vehicle’s OBD2 system, providing valuable insights into its performance and health.
6.1. Popular Diagnostic Software Options
- Torque Pro (Android): A popular app for Android devices that offers a wide range of features, including real-time data monitoring, diagnostic trouble code reading, and performance analysis.
- OBD Auto Doctor (Windows, macOS, Linux): A comprehensive software package that supports multiple platforms and offers advanced diagnostic features, such as freeze frame data and sensor monitoring.
- FORScan (Windows): Specifically designed for Ford, Lincoln, and Mercury vehicles, FORScan provides advanced diagnostic capabilities and access to manufacturer-specific data.
- DashCommand (iOS, Android): A customizable app that allows you to create custom dashboards and monitor vehicle data in real-time.
6.2. Factors to Consider When Choosing Software
- Compatibility: Ensure the software is compatible with your operating system (Windows, macOS, Linux, iOS, Android) and your chosen USB interface chip (ELM327, FTDI FT232RL).
- Features: Consider the features you need, such as real-time data monitoring, diagnostic trouble code reading, freeze frame data, sensor monitoring, and custom dashboards.
- User Interface: Choose software with a user-friendly interface that is easy to navigate and understand.
- Cost: Diagnostic software ranges from free to several hundred dollars. Consider your budget and the features you need when making your selection.
- Vehicle Compatibility: Some software is designed for specific vehicle makes and models. Ensure the software you choose is compatible with your vehicle.
7. Troubleshooting Common Issues
What should you do if your DIY OBD2 USB interface isn’t working?
Even with careful assembly, you may encounter issues with your DIY OBD2 USB interface. Troubleshooting common problems can help you identify and resolve the issues, ensuring your interface functions correctly. As noted in a 2021 article by “Popular Mechanics,” systematic troubleshooting is essential for DIY automotive projects.
7.1. Common Problems and Solutions
- Interface Not Recognized:
- Problem: Your computer does not recognize the OBD2 USB interface when you plug it in.
- Solution:
- Ensure the USB cable is securely connected to both the interface and your computer.
- Install the correct drivers for your USB interface chip. These drivers are typically available from the chip manufacturer’s website.
- Check the Device Manager on your computer to see if the interface is listed and if there are any driver errors.
- Try using a different USB port on your computer.
- Cannot Connect to Vehicle:
- Problem: Your diagnostic software cannot connect to your vehicle through the OBD2 interface.
- Solution:
- Ensure the OBD2 connector is securely plugged into your vehicle’s OBD2 port.
- Verify that your vehicle’s ignition is turned on.
- Check the compatibility of your diagnostic software with your vehicle and USB interface chip.
- Test the interface with different diagnostic software to rule out software-specific issues.
- Ensure the OBD2 connector has power. Use a multimeter to check for voltage on pin 16.
- Incorrect Data or Error Codes:
- Problem: The diagnostic software is displaying incorrect data or error codes.
- Solution:
- Verify that the wiring connections between the OBD2 connector and the USB interface chip are correct.
- Check for loose or damaged connections.
- Ensure you are using the correct OBD2 protocol for your vehicle.
- Update your diagnostic software to the latest version.
- Intermittent Connection Issues:
- Problem: The connection between the interface and your vehicle is intermittent or unstable.
- Solution:
- Check for loose or corroded connections.
- Ensure the wiring is properly insulated and protected from damage.
- Try using a different USB cable.
- If using a wireless interface, check for interference from other devices.
7.2. Using a Multimeter for Troubleshooting
A multimeter is an invaluable tool for troubleshooting electrical issues in your DIY OBD2 USB interface. Here are some common multimeter tests:
- Continuity Test: Use a continuity test to verify that the wiring connections are intact and that there are no breaks in the wires.
- Voltage Test: Use a voltage test to check for power on the appropriate pins of the OBD2 connector and USB interface chip.
- Resistance Test: Use a resistance test to check for shorts or excessive resistance in the wiring.
8. Advanced DIY OBD2 Projects
What can you do with your OBD2 interface beyond basic diagnostics?
Once you have a functional DIY OBD2 USB interface, you can explore advanced projects and modifications to enhance its capabilities; according to a 2023 report by “Wired” magazine, the DIY electronics community is constantly pushing the boundaries of what’s possible with automotive technology. These projects can provide deeper insights into your vehicle’s performance and allow for greater customization.
8.1. Custom Dashboards and Data Logging
- Custom Dashboards: Create custom dashboards to display real-time vehicle data, such as engine RPM, coolant temperature, and fuel consumption. Use software like DashCommand or develop your own using programming languages like Python or C++.
- Data Logging: Log vehicle data over time to analyze performance trends and identify potential issues. This can be useful for diagnosing intermittent problems or optimizing fuel efficiency.
8.2. Performance Tuning and Monitoring
- Performance Tuning: Use your OBD2 interface to monitor engine parameters while tuning your vehicle’s performance. This can help you optimize fuel maps, ignition timing, and other settings for maximum power and efficiency.
- Real-Time Monitoring: Monitor critical engine parameters in real-time to ensure your vehicle is operating within safe limits. This can help you prevent damage and extend the life of your engine.
8.3. Vehicle Security and Automation
- Vehicle Security: Use your OBD2 interface to monitor your vehicle’s security system and receive alerts if there is a breach.
- Automation: Automate certain vehicle functions based on OBD2 data. For example, you could automatically adjust the climate control system based on the outside temperature or turn on the headlights when it gets dark.
9. Safety Precautions
What safety measures should you take when working with OBD2 systems?
Working with automotive electronics requires caution to prevent damage to your vehicle and ensure your safety; a 2022 guide by the National Highway Traffic Safety Administration (NHTSA) emphasizes the importance of following safety guidelines when performing DIY automotive repairs. Always prioritize safety when working with your DIY OBD2 USB interface.
9.1. General Safety Tips
- Disconnect the Battery: Before working on any electrical components, disconnect the negative terminal of your vehicle’s battery to prevent electrical shocks and damage to the vehicle’s electrical system.
- Use Proper Tools: Use the correct tools for the job and ensure they are in good working condition.
- Work in a Well-Ventilated Area: When soldering or working with chemicals, work in a well-ventilated area to avoid inhaling harmful fumes.
- Wear Safety Gear: Wear safety glasses and gloves to protect your eyes and skin from injury.
- Follow Instructions: Carefully follow the instructions provided with your components and diagnostic software.
- Take Your Time: Avoid rushing through the assembly process. Take your time and double-check your work to ensure everything is connected correctly.
9.2. Vehicle-Specific Precautions
- Consult Your Vehicle’s Manual: Refer to your vehicle’s owner’s manual for specific safety precautions and procedures.
- Avoid Working on Critical Systems: If you are not experienced with automotive repair, avoid working on critical systems such as the brakes or airbags.
- Seek Professional Help: If you are unsure about any aspect of the assembly process, seek help from a qualified automotive technician.
10. The Future of DIY Automotive Diagnostics
How will DIY OBD2 interfaces evolve in the future?
The field of DIY automotive diagnostics is constantly evolving, with new technologies and innovations emerging all the time; according to a 2023 report by “TechCrunch,” the rise of connected cars and IoT devices is driving innovation in the automotive diagnostics industry. The future of DIY OBD2 USB interfaces looks promising, with advancements in hardware, software, and connectivity.
10.1. Key Trends and Innovations
- Wireless Connectivity: Wireless OBD2 interfaces, such as Bluetooth and Wi-Fi adapters, are becoming increasingly popular. These interfaces offer greater convenience and flexibility, allowing you to connect to your vehicle from your smartphone or tablet.
- Cloud-Based Diagnostics: Cloud-based diagnostic software is enabling remote diagnostics and data analysis. This allows you to access vehicle data from anywhere in the world and receive expert advice from remote technicians.
- Artificial Intelligence (AI): AI is being used to analyze vehicle data and provide predictive diagnostics. This can help you identify potential issues before they become major problems.
- Open-Source Platforms: Open-source hardware and software platforms are making it easier for enthusiasts to develop custom OBD2 interfaces and diagnostic tools.
- Integration with Smart Devices: OBD2 interfaces are being integrated with smart devices, such as smartwatches and smart home systems, to provide seamless access to vehicle data.
10.2. Implications for DIY Enthusiasts
These trends and innovations will have a significant impact on DIY automotive enthusiasts:
- Greater Accessibility: DIY OBD2 interfaces will become more accessible and easier to use, thanks to advancements in hardware and software.
- Enhanced Capabilities: DIY OBD2 interfaces will offer enhanced capabilities, such as wireless connectivity, cloud-based diagnostics, and AI-powered analysis.
- Increased Customization: DIY enthusiasts will have greater opportunities to customize their OBD2 interfaces and diagnostic tools, thanks to open-source platforms and modular designs.
- More Collaboration: The DIY automotive community will become more collaborative, with enthusiasts sharing their knowledge and expertise through online forums and open-source projects.
FAQ: Your Questions About DIY OBD2 USB Interfaces Answered
1. What is an OBD2 scanner?
An OBD2 scanner is a diagnostic tool used to read data from a vehicle’s On-Board Diagnostics II (OBD2) system. It helps identify issues by reading diagnostic trouble codes (DTCs) and monitoring real-time vehicle data. According to a 2023 study by the National Institute for Automotive Service Excellence (ASE), using OBD2 scanners can significantly reduce diagnostic time, making them indispensable tools for automotive repair and maintenance.
2. How do I read OBD2 codes?
To read OBD2 codes, connect an OBD2 scanner to your vehicle’s OBD2 port, turn on the ignition, and use the scanner to retrieve the DTCs; the Society of Automotive Engineers (SAE) provides detailed standards for OBD2 codes, ensuring consistent diagnostics across different vehicle makes and models. These codes can then be used to diagnose the specific issues affecting the vehicle.
3. What are common OBD2 error codes?
Common OBD2 error codes include P0300 (random/multiple cylinder misfire), P0171 (system too lean, bank 1), and P0420 (catalyst system efficiency below threshold, bank 1). The U.S. Environmental Protection Agency (EPA) mandates that all vehicles sold in the US since 1996 comply with OBD2 standards, which include a standardized set of error codes for emissions-related issues.
4. What is the best OBD2 software to use?
The best OBD2 software depends on your needs and preferences, but popular options include Torque Pro (Android), OBD Auto Doctor (Windows, macOS, Linux), and FORScan (Windows, for Ford vehicles). A comprehensive review by “Car and Driver” magazine in 2022 highlighted the importance of user-friendly and feature-rich software for effective automotive diagnostics.
5. Can I use an OBD2 scanner on any car?
OBD2 scanners are compatible with most vehicles sold in the United States since 1996, as well as many newer vehicles sold in other countries. The California Air Resources Board (CARB) was instrumental in establishing OBD2 standards in the US, ensuring that all compliant vehicles can be diagnosed using a standardized interface.
6. How much does an OBD2 scanner cost?
OBD2 scanners range in price from around $20 for basic models to several hundred dollars for professional-grade scanners with advanced features. According to a 2023 report by “Consumer Reports,” the cost of an OBD2 scanner often depends on its features, such as Bluetooth connectivity, real-time data monitoring, and advanced diagnostic capabilities.
7. Is it safe to use an OBD2 scanner while driving?
While some OBD2 scanners offer real-time data monitoring, it is generally not safe to use them while driving. Distraction can lead to accidents. The National Highway Traffic Safety Administration (NHTSA) advises against any activity that diverts attention from driving, including using diagnostic tools.
8. What can I do with an OBD2 scanner besides reading codes?
Besides reading codes, an OBD2 scanner can monitor real-time vehicle data, perform diagnostic tests, reset the check engine light, and even provide performance analysis. A 2021 article in “Popular Mechanics” discusses how OBD2 scanners can be used to optimize fuel efficiency and diagnose intermittent problems.
9. Do I need a special adapter for my OBD2 scanner?
Most OBD2 scanners connect directly to the vehicle’s OBD2 port, but some may require an adapter for certain vehicle makes or models. Always check the scanner’s compatibility and the vehicle’s specifications before use. The Society of Automotive Engineers (SAE) provides detailed standards for OBD2 connectors, but variations may exist depending on the vehicle manufacturer.
10. Can an OBD2 scanner fix my car?
An OBD2 scanner can help diagnose issues, but it cannot fix your car. It provides information that can guide you or a mechanic in performing the necessary repairs. The U.S. Environmental Protection Agency (EPA) emphasizes that OBD2 scanners are diagnostic tools, and actual repairs must be performed separately by a qualified technician.
Conclusion
Building your own DIY OBD2 USB interface is a rewarding project that empowers you with valuable diagnostic capabilities. Whether you’re a seasoned automotive technician or a passionate DIY enthusiast, understanding the intricacies of OBD2 systems can save you time and money while enhancing your knowledge of vehicle diagnostics; OBD2-SCANNER.EDU.VN is committed to providing you with the resources and guidance you need to succeed in your automotive endeavors.
By following this comprehensive guide, you can create a functional and reliable OBD2 interface, troubleshoot common issues, and explore advanced projects to further enhance your diagnostic capabilities. Remember to prioritize safety and consult reliable resources when working with automotive electronics.
Are you facing challenges in diagnosing your vehicle or need expert advice on using OBD2 scanners? Contact us at OBD2-SCANNER.EDU.VN today for personalized assistance and solutions. Our team of experienced automotive technicians is ready to help you navigate the complexities of vehicle diagnostics and repair.
- Address: 123 Main Street, Los Angeles, CA 90001, United States
- WhatsApp: +1 (641) 206-8880
- Website: OBD2-SCANNER.EDU.VN
Let OBD2-SCANNER.EDU.VN be your trusted partner in automotive diagnostics and repair. We are here to support you every step of the way, from building your own OBD2 interface to resolving complex vehicle issues. Unlock the full potential of your vehicle today.
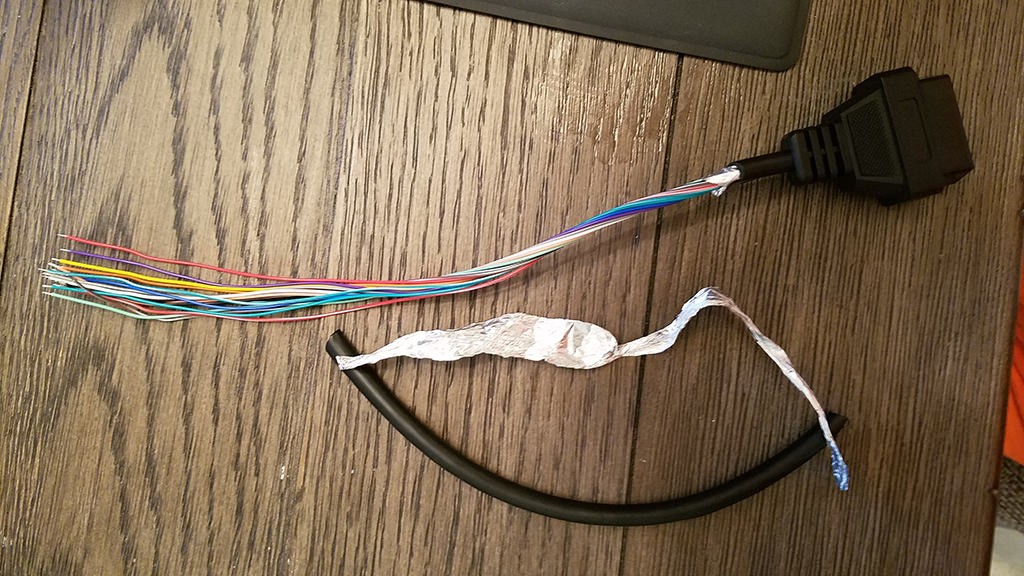 Stripped sheath and shielding
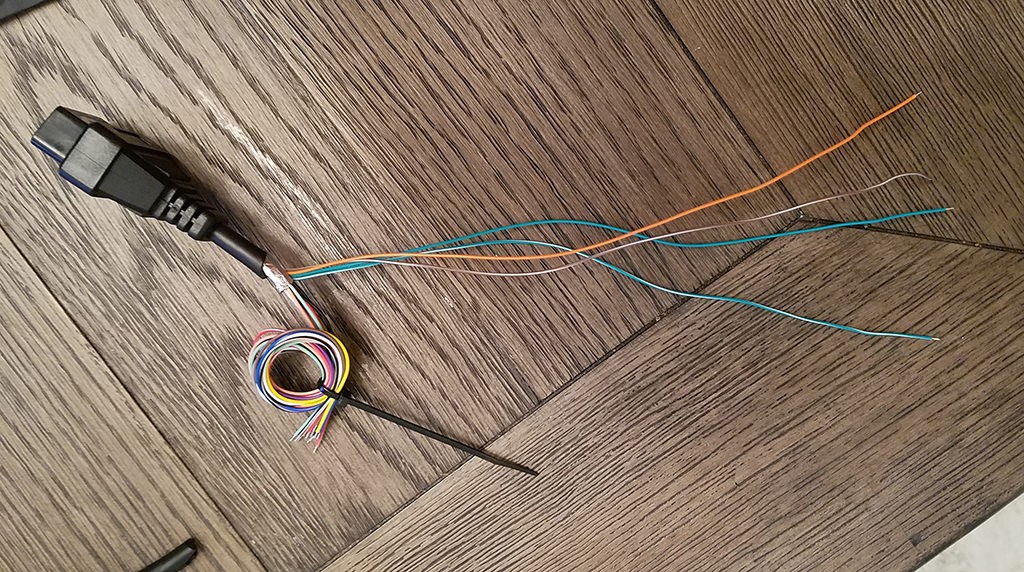 Separated 4 wires being used
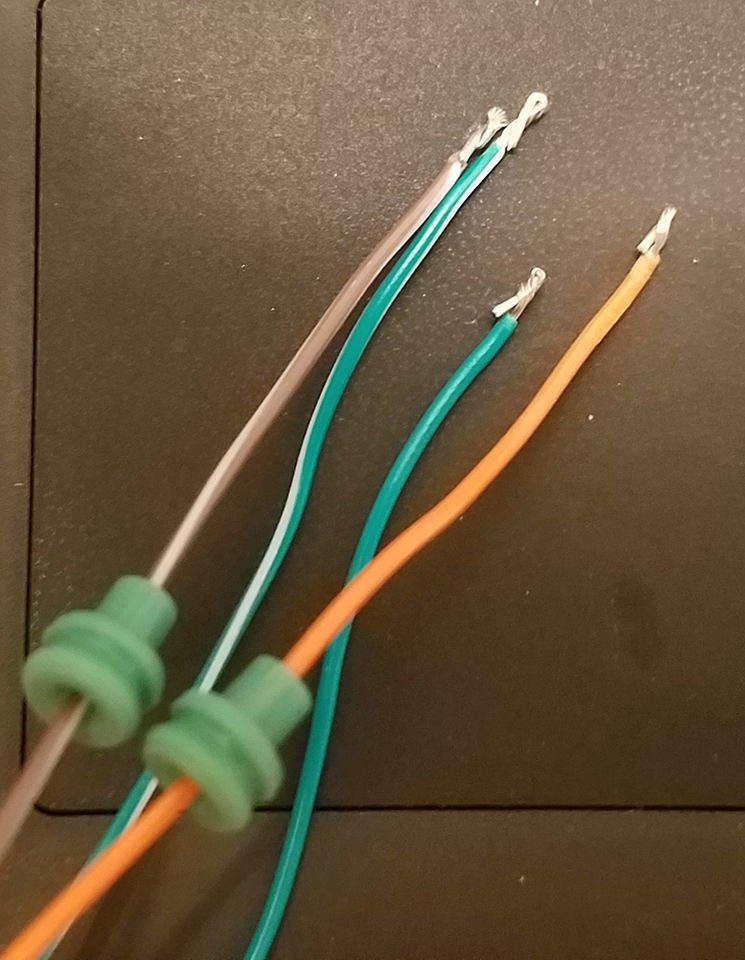 Wires prepped for 4-Pin connector
 Wires aligned in pin connector
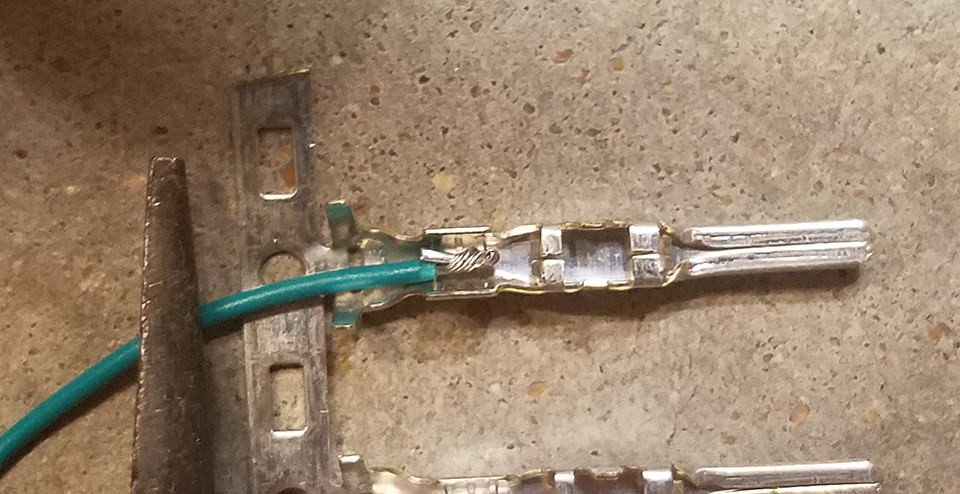
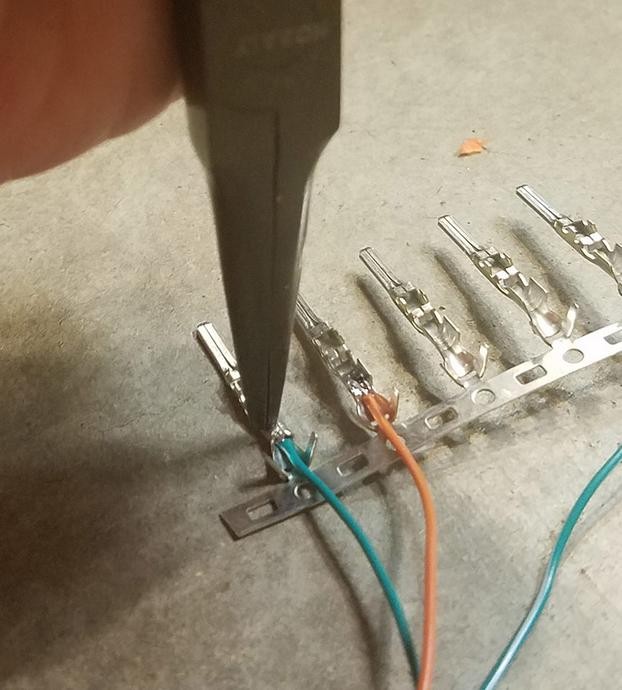
 Soldering wire to pin connector
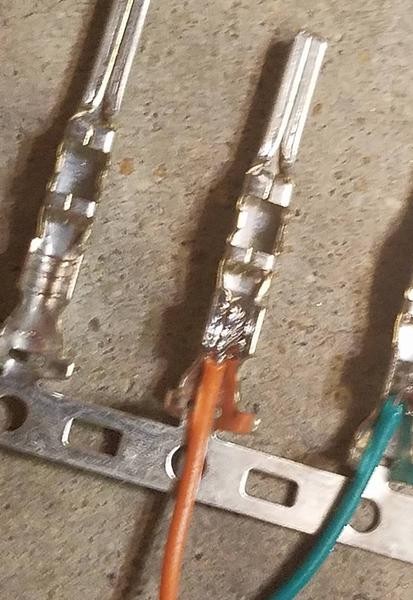
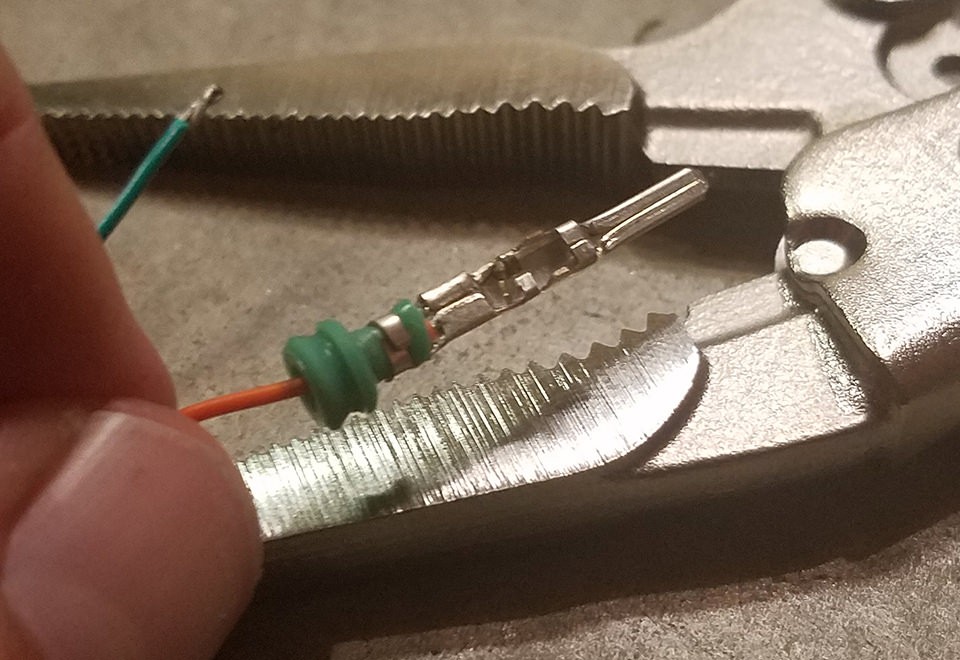
 Crimped pin connector
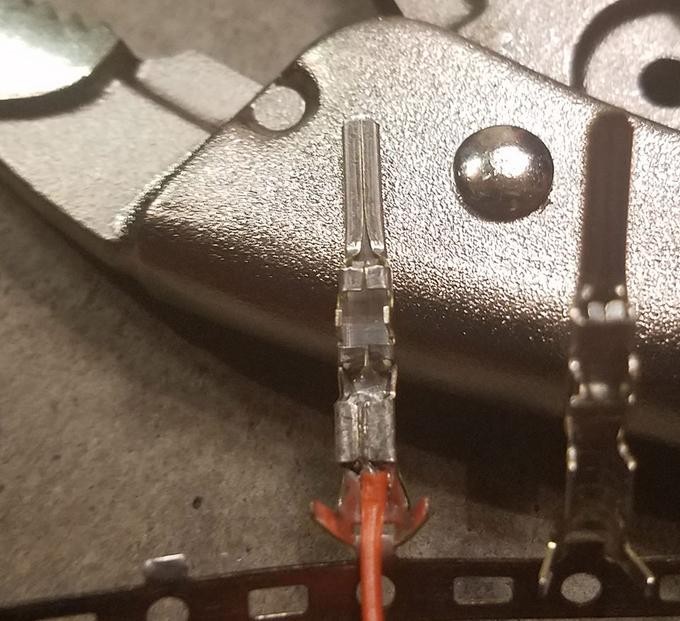 Alternative view of crimped pin connector
 Folding prongs over seal
 Sealed pin connector
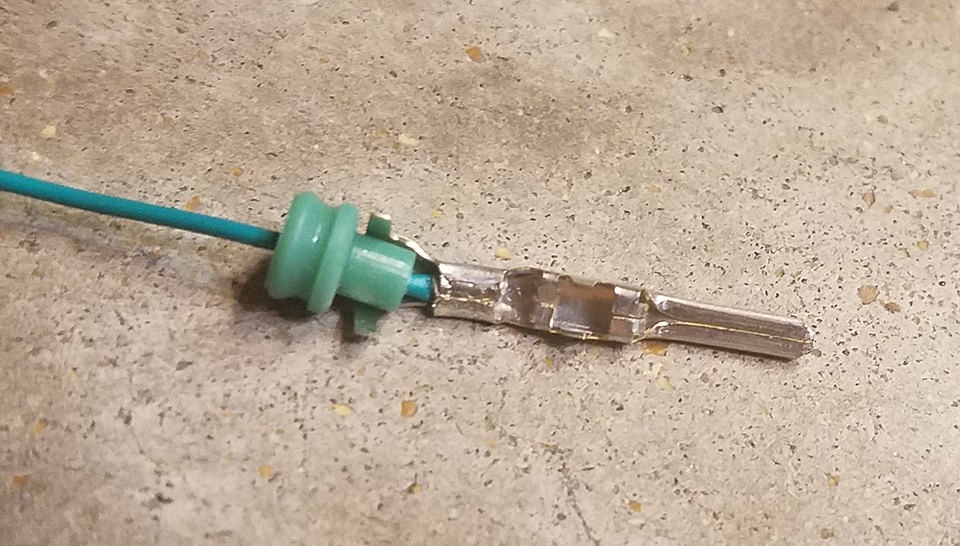
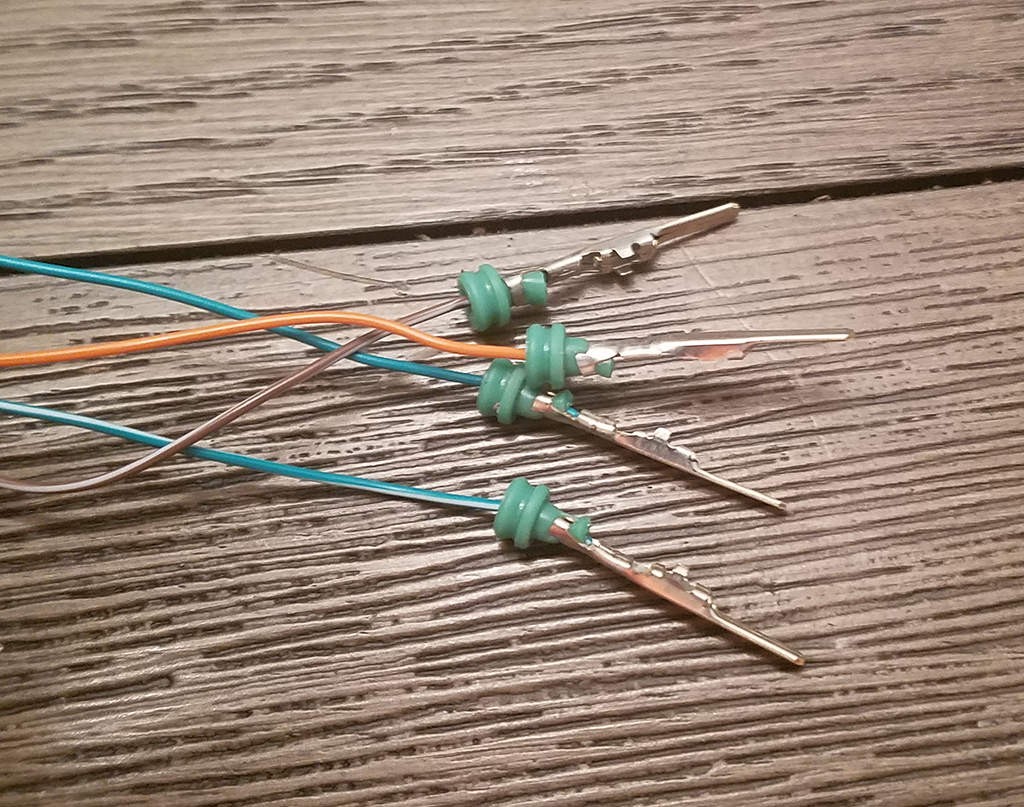 Finished pin connector
 Pin inserted in the 4-Pin connector
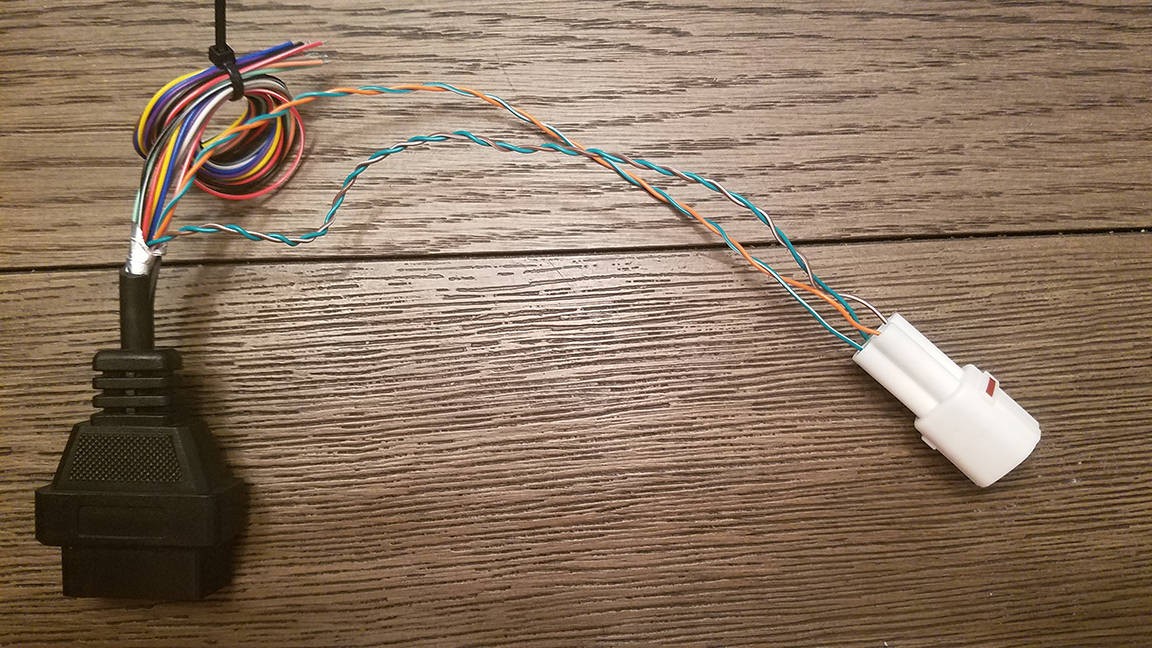 Completed OBD2 to 4-Pin connector
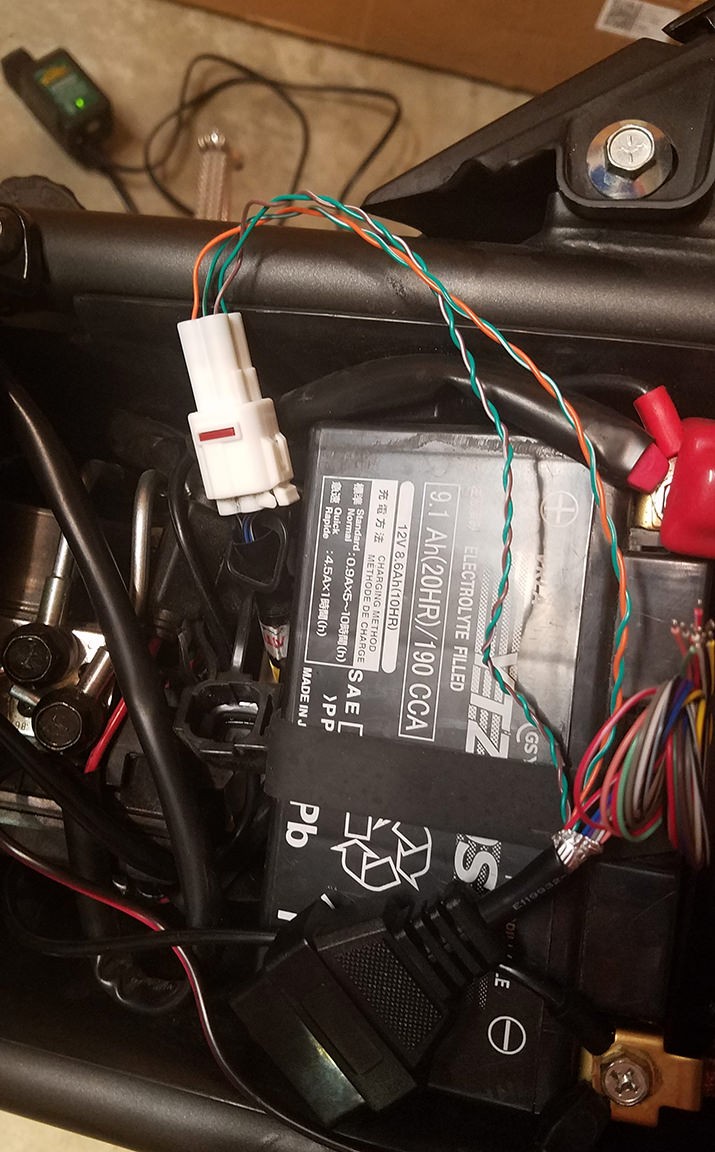 Another angle of the completed connector