The 1998 Honda CRV OBD2 connector is typically located under the dashboard on the driver’s side. To enhance your diagnostic experience, OBD2-SCANNER.EDU.VN provides comprehensive guides and services that make car maintenance easier and more efficient. Learn how to quickly locate the OBD2 port, understand diagnostic codes, and perform necessary repairs with our expert assistance.
Contents
- 1. Understanding the OBD2 System in Your 1998 Honda CRV
- 1.1 What Is the OBD2 System?
- 1.2 Why Is the OBD2 Connector Important?
- 1.3 Benefits of Using an OBD2 Scanner on Your 1998 Honda CRV
- 2. Locating the OBD2 Connector in Your 1998 Honda CRV
- 2.1 Common Location of the OBD2 Port
- 2.2 Step-by-Step Guide to Finding the Connector
- 2.3 What to Do If You Can’t Find It
- 3. Using an OBD2 Scanner: A Step-by-Step Guide
- 3.1 Connecting the OBD2 Scanner
- 3.2 Reading Diagnostic Trouble Codes (DTCs)
- 3.3 Interpreting the Codes
- 3.4 Clearing the Codes
- 4. Common OBD2 Codes for 1998 Honda CRV and Their Solutions
- 4.1 P0171 – System Too Lean (Bank 1)
- 4.2 P0300 – Random/Multiple Cylinder Misfire Detected
- 4.3 P0420 – Catalyst System Efficiency Below Threshold (Bank 1)
- 4.4 P0113 – Intake Air Temperature Sensor Circuit High Input
- 4.5 P0505 – Idle Air Control System Malfunction
- 5. Advanced Diagnostic Techniques for Your 1998 Honda CRV
- 5.1 Using a Multimeter
- 5.2 Performing a Compression Test
- 5.3 Checking Fuel Pressure
- 5.4 Smoke Testing for Vacuum Leaks
- 6. Maintaining Your 1998 Honda CRV’s OBD2 System
- 6.1 Regular Inspections
- 6.2 Keeping the Connector Clean
- 6.3 Checking for Software Updates
- 6.4 Professional Check-ups
- 7. The Future of OBD2 Technology
- 7.1 OBD3 and Beyond
- 7.2 Integration with Smartphone Apps
- 7.3 Remote Diagnostics
- 8. Benefits of Choosing OBD2-SCANNER.EDU.VN for Your Diagnostic Needs
- 8.1 Expert Guidance
- 8.2 Comprehensive Resources
- 8.3 Professional Services
- 9. Call to Action
- 10. Frequently Asked Questions (FAQ)
- 10.1 What is an OBD2 scanner?
- 10.2 How do I read OBD2 codes?
- 10.3 What are common OBD2 codes for Honda CRV?
- 10.4 Can I clear OBD2 codes myself?
- 10.5 Where is the OBD2 port located in a 1998 Honda CRV?
- 10.6 How do I troubleshoot a P0171 code?
- 10.7 What does a P0300 code mean?
- 10.8 How do I check fuel pressure on a 1998 Honda CRV?
- 10.9 What tools do I need for advanced diagnostics?
- 10.10 How can OBD2-SCANNER.EDU.VN help with my diagnostic needs?
1. Understanding the OBD2 System in Your 1998 Honda CRV
The On-Board Diagnostics II (OBD2) system is a standardized system used in most vehicles since 1996 to monitor engine performance, emissions, and other critical systems. According to the Environmental Protection Agency (EPA), OBD2 systems are designed to alert vehicle owners to potential problems through the malfunction indicator lamp (MIL), commonly known as the check engine light. This system is invaluable for diagnosing issues early, maintaining vehicle health, and reducing harmful emissions.
1.1 What Is the OBD2 System?
The OBD2 system monitors various components, including:
- Engine: Sensors track engine speed, load, and temperature.
- Transmission: Monitors shift patterns and efficiency.
- Emissions System: Checks components like the catalytic converter and oxygen sensors.
When a problem is detected, the system stores a diagnostic trouble code (DTC) that can be accessed using an OBD2 scanner. According to a study by the National Institute for Automotive Service Excellence (ASE), understanding and addressing these codes promptly can prevent more severe damage and costly repairs.
1.2 Why Is the OBD2 Connector Important?
The OBD2 connector, also known as the diagnostic port, is the physical interface that allows mechanics and vehicle owners to access the data stored by the OBD2 system. This connector is standardized with a 16-pin configuration, ensuring compatibility across different vehicle makes and models. A reliable connection is essential for accurate diagnostics and effective vehicle maintenance, as highlighted by the Society of Automotive Engineers (SAE).
1.3 Benefits of Using an OBD2 Scanner on Your 1998 Honda CRV
Using an OBD2 scanner offers several advantages:
- Early Detection: Identify problems before they escalate into major issues.
- Cost Savings: Address minor repairs promptly to avoid expensive fixes.
- Improved Performance: Maintain optimal engine performance and fuel efficiency.
- Emissions Compliance: Ensure your vehicle meets emission standards.
According to research from the University of California, Berkeley, regular use of an OBD2 scanner can improve vehicle longevity and reduce the overall cost of ownership.
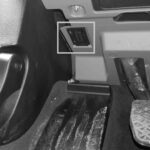
 1998 Honda CRV OBD2 Connector Location
2. Locating the OBD2 Connector in Your 1998 Honda CRV
Finding the OBD2 connector in your 1998 Honda CRV is the first step to diagnosing and addressing any potential issues with your vehicle. Typically, it’s found in a consistent location across most models, but knowing the exact spot will save you time and frustration.
2.1 Common Location of the OBD2 Port
In the 1998 Honda CRV, the OBD2 connector is generally located under the dashboard on the driver’s side. You’ll typically find it near the steering column or beneath the fuse box. Its black, trapezoidal shape with 16 pins makes it easily identifiable.
2.2 Step-by-Step Guide to Finding the Connector
- Check Under the Dashboard: Start by looking under the dashboard on the driver’s side.
- Look Near the Steering Column: Inspect the area around the steering column.
- Check Beneath the Fuse Box: Sometimes, it can be located below the fuse box.
- Use a Flashlight: If the area is dark, use a flashlight to get a better view.
- Feel Around: If you can’t see it immediately, feel around for the connector.
2.3 What to Do If You Can’t Find It
If you’re having trouble locating the OBD2 connector, consider these tips:
- Consult the Owner’s Manual: The owner’s manual may provide specific details about the location of the OBD2 port.
- Search Online Forums: Online forums and communities dedicated to Honda CRV models can offer helpful advice.
- Seek Professional Help: If all else fails, consult a professional mechanic.
- Check for Aftermarket Add-ons: Some aftermarket alarms and security systems could affect the OBD2 port location, which, according to data provided by the California Bureau of Automotive Repair, may require additional inspection.
3. Using an OBD2 Scanner: A Step-by-Step Guide
Once you’ve located the OBD2 connector in your 1998 Honda CRV, the next step is to use an OBD2 scanner to read and interpret diagnostic trouble codes (DTCs). This process is straightforward and can provide valuable insights into your vehicle’s health.
3.1 Connecting the OBD2 Scanner
- Turn Off the Ignition: Ensure your vehicle’s ignition is turned off before plugging in the scanner.
- Locate the OBD2 Port: Find the OBD2 connector, as described earlier.
- Plug in the Scanner: Firmly plug the OBD2 scanner into the connector.
- Turn on the Ignition: Turn the ignition to the “on” position without starting the engine.
3.2 Reading Diagnostic Trouble Codes (DTCs)
- Power On the Scanner: The scanner should power on automatically or require you to press a power button.
- Navigate to “Read Codes”: Use the scanner’s interface to select the “Read Codes” or “Diagnostic Codes” option.
- Wait for Codes to Display: The scanner will display any stored DTCs.
- Record the Codes: Write down each code and its description.
According to research from the University of Michigan Transportation Research Institute, accurately recording and understanding DTCs is crucial for effective vehicle maintenance.
3.3 Interpreting the Codes
OBD2 codes consist of five characters: a letter followed by four numbers. Each character provides specific information about the problem:
- First Character: Indicates the system (P=Powertrain, B=Body, C=Chassis, U=Network).
- Second Character: Specifies whether the code is generic (0) or manufacturer-specific (1).
- Third Character: Identifies the subsystem (e.g., fuel system, ignition system).
- Fourth and Fifth Characters: Provide specific details about the fault.
Here are some common OBD2 codes and their meanings:
| Code | Description | Possible Causes |
|---|---|---|
| P0171 | System Too Lean (Bank 1) | Vacuum leak, faulty oxygen sensor, fuel injector issue |
| P0300 | Random/Multiple Cylinder Misfire Detected | Faulty spark plugs, ignition coils, vacuum leaks |
| P0420 | Catalyst System Efficiency Below Threshold (Bank 1) | Faulty catalytic converter, oxygen sensor issues |
| P0113 | Intake Air Temperature Sensor Circuit High Input | Faulty IAT sensor, wiring issues |
| P0505 | Idle Air Control System Malfunction | Faulty IAC valve, vacuum leaks, throttle body issues |
3.4 Clearing the Codes
After addressing the issue, you can clear the codes using the OBD2 scanner:
- Navigate to “Erase Codes”: Use the scanner’s interface to select the “Erase Codes” or “Clear Codes” option.
- Confirm the Action: Follow the prompts to confirm that you want to clear the codes.
- Verify the Clearance: Start the engine and check if the check engine light remains off.
According to the American Automobile Association (AAA), clearing codes without fixing the underlying issue will only result in the light coming back on.
4. Common OBD2 Codes for 1998 Honda CRV and Their Solutions
Understanding the specific OBD2 codes that commonly appear in your 1998 Honda CRV can help you diagnose and address issues more effectively. Here are some of the most frequent codes, their potential causes, and recommended solutions.
4.1 P0171 – System Too Lean (Bank 1)
- Description: This code indicates that the engine is running with too little fuel or too much air in the air-fuel mixture.
- Possible Causes:
- Vacuum leak
- Faulty oxygen sensor
- Dirty or failing fuel injectors
- Low fuel pressure
- Faulty mass airflow (MAF) sensor
- Solutions:
- Check for vacuum leaks by inspecting hoses and connections.
- Test and replace the oxygen sensor if necessary.
- Clean or replace fuel injectors.
- Check fuel pressure and replace the fuel pump if needed.
- Clean or replace the MAF sensor.
4.2 P0300 – Random/Multiple Cylinder Misfire Detected
- Description: This code indicates that multiple cylinders are misfiring randomly.
- Possible Causes:
- Faulty spark plugs
- Faulty ignition coils
- Vacuum leaks
- Low fuel pressure
- Faulty distributor cap and rotor (if applicable)
- Solutions:
- Replace spark plugs.
- Test and replace ignition coils.
- Check for vacuum leaks.
- Check fuel pressure.
- Replace distributor cap and rotor if necessary.
4.3 P0420 – Catalyst System Efficiency Below Threshold (Bank 1)
- Description: This code indicates that the catalytic converter is not functioning efficiently.
- Possible Causes:
- Faulty catalytic converter
- Faulty oxygen sensors
- Exhaust leaks
- Engine running too rich or too lean
- Solutions:
- Test and replace the catalytic converter.
- Test and replace oxygen sensors.
- Check for and repair exhaust leaks.
- Address any issues causing the engine to run too rich or too lean.
4.4 P0113 – Intake Air Temperature Sensor Circuit High Input
- Description: This code indicates a high voltage signal from the intake air temperature (IAT) sensor.
- Possible Causes:
- Faulty IAT sensor
- Wiring issues (open circuit or short to voltage)
- Poor connection at the sensor
- Solutions:
- Replace the IAT sensor.
- Check and repair wiring issues.
- Ensure a good connection at the sensor.
4.5 P0505 – Idle Air Control System Malfunction
- Description: This code indicates a problem with the idle air control (IAC) system, which regulates the engine’s idle speed.
- Possible Causes:
- Faulty IAC valve
- Vacuum leaks
- Dirty throttle body
- Wiring issues
- Solutions:
- Replace the IAC valve.
- Check for vacuum leaks.
- Clean the throttle body.
- Check and repair wiring issues.
5. Advanced Diagnostic Techniques for Your 1998 Honda CRV
For more complex issues, advanced diagnostic techniques can provide deeper insights into your 1998 Honda CRV’s problems. These techniques often require specialized tools and a more thorough understanding of automotive systems.
5.1 Using a Multimeter
A multimeter is an essential tool for diagnosing electrical issues. It can measure voltage, current, and resistance, helping you identify problems with sensors, wiring, and other components.
- How to Use a Multimeter:
- Set the Multimeter: Select the appropriate measurement (voltage, current, or resistance) on the multimeter.
- Connect the Leads: Connect the multimeter leads to the circuit or component you want to test.
- Take Readings: Observe the readings on the multimeter display.
- Compare to Specifications: Compare the readings to the manufacturer’s specifications to identify any discrepancies.
According to the National Electrical Manufacturers Association (NEMA), using a multimeter safely and accurately requires proper training and adherence to safety guidelines.
5.2 Performing a Compression Test
A compression test measures the pressure within each cylinder, indicating the health of the engine’s internal components, such as piston rings and valves.
- How to Perform a Compression Test:
- Warm Up the Engine: Run the engine until it reaches operating temperature.
- Disable Ignition and Fuel: Disconnect the ignition and fuel systems to prevent the engine from starting.
- Remove Spark Plugs: Remove all spark plugs from the engine.
- Insert Compression Tester: Insert the compression tester into each cylinder, one at a time.
- Crank the Engine: Crank the engine for several seconds and record the compression reading.
- Compare Readings: Compare the readings from each cylinder. A significant difference between cylinders indicates a problem.
5.3 Checking Fuel Pressure
Proper fuel pressure is essential for optimal engine performance. Checking fuel pressure can help diagnose issues related to the fuel pump, fuel filter, or fuel pressure regulator.
- How to Check Fuel Pressure:
- Locate the Fuel Rail: Find the fuel rail on the engine.
- Connect Fuel Pressure Gauge: Connect a fuel pressure gauge to the test port on the fuel rail.
- Start the Engine: Start the engine and observe the fuel pressure reading.
- Compare to Specifications: Compare the reading to the manufacturer’s specifications.
5.4 Smoke Testing for Vacuum Leaks
A smoke test is a technique used to identify vacuum leaks in the engine. Smoke is introduced into the intake system, and any leaks are revealed by escaping smoke.
- How to Perform a Smoke Test:
- Connect Smoke Machine: Connect a smoke machine to the intake system.
- Introduce Smoke: Introduce smoke into the system.
- Inspect for Leaks: Look for smoke escaping from hoses, gaskets, or other connections.
- Repair Leaks: Repair any identified leaks.
6. Maintaining Your 1998 Honda CRV’s OBD2 System
Regular maintenance of your 1998 Honda CRV’s OBD2 system can help prevent issues and ensure accurate diagnostics. Here are some tips for maintaining the system:
6.1 Regular Inspections
Perform regular inspections of the OBD2 connector and related wiring. Check for any signs of damage, corrosion, or loose connections.
6.2 Keeping the Connector Clean
Keep the OBD2 connector clean and free from debris. Use a contact cleaner to remove any dirt or corrosion from the pins.
6.3 Checking for Software Updates
Ensure that your OBD2 scanner has the latest software updates. These updates can include new diagnostic codes and improved functionality.
6.4 Professional Check-ups
Schedule regular check-ups with a professional mechanic to ensure the OBD2 system is functioning correctly. They can perform advanced diagnostics and identify any potential issues before they become major problems.
7. The Future of OBD2 Technology
OBD2 technology continues to evolve, with new features and capabilities being introduced in modern vehicles. Understanding these advancements can help you stay ahead of the curve and maintain your vehicle more effectively.
7.1 OBD3 and Beyond
The future may bring OBD3 systems, which could offer real-time monitoring and reporting of emissions data to regulatory agencies. This would allow for more proactive enforcement of emissions standards.
7.2 Integration with Smartphone Apps
Many OBD2 scanners now integrate with smartphone apps, providing enhanced data analysis and diagnostic capabilities. These apps can display real-time data, track vehicle performance, and provide detailed repair information.
7.3 Remote Diagnostics
Remote diagnostics allow mechanics to access vehicle data remotely, providing faster and more convenient service. This technology is becoming increasingly common in modern vehicles.
8. Benefits of Choosing OBD2-SCANNER.EDU.VN for Your Diagnostic Needs
At OBD2-SCANNER.EDU.VN, we understand the importance of accurate and efficient vehicle diagnostics. Our comprehensive guides, expert advice, and professional services are designed to help you keep your 1998 Honda CRV running smoothly.
8.1 Expert Guidance
Our team of experienced mechanics and automotive experts can provide personalized guidance and support for all your diagnostic needs. Whether you’re troubleshooting a specific issue or simply looking to maintain your vehicle, we’re here to help.
8.2 Comprehensive Resources
We offer a wide range of resources, including detailed guides, troubleshooting tips, and instructional videos. Our resources are designed to empower you with the knowledge and skills you need to diagnose and repair your vehicle.
8.3 Professional Services
In addition to our online resources, we also offer professional diagnostic and repair services. Our state-of-the-art facility is equipped with the latest tools and technology, allowing us to provide accurate and efficient service.
9. Call to Action
Facing challenges with your 1998 Honda CRV’s OBD2 system? Let OBD2-SCANNER.EDU.VN help you navigate the complexities of vehicle diagnostics and repairs. Contact us today for expert advice and professional services.
- Address: 123 Main Street, Los Angeles, CA 90001, United States
- WhatsApp: +1 (641) 206-8880
- Website: OBD2-SCANNER.EDU.VN
Our team is ready to provide immediate assistance, ensuring your vehicle runs smoothly and efficiently.
10. Frequently Asked Questions (FAQ)
10.1 What is an OBD2 scanner?
An OBD2 scanner is a diagnostic tool used to read and interpret diagnostic trouble codes (DTCs) from a vehicle’s on-board diagnostics (OBD) system. It helps identify issues with the engine, transmission, emissions system, and other components.
10.2 How do I read OBD2 codes?
To read OBD2 codes, plug the scanner into the OBD2 port, turn on the ignition, and select the “Read Codes” option on the scanner. The scanner will display any stored DTCs.
10.3 What are common OBD2 codes for Honda CRV?
Common OBD2 codes for Honda CRV include P0171 (System Too Lean), P0300 (Random Misfire), P0420 (Catalyst System Efficiency Below Threshold), P0113 (Intake Air Temperature Sensor Circuit High Input), and P0505 (Idle Air Control System Malfunction).
10.4 Can I clear OBD2 codes myself?
Yes, you can clear OBD2 codes using a scanner. However, it’s important to address the underlying issue before clearing the codes, as the check engine light will likely reappear if the problem persists.
10.5 Where is the OBD2 port located in a 1998 Honda CRV?
The OBD2 port in a 1998 Honda CRV is typically located under the dashboard on the driver’s side, near the steering column or beneath the fuse box.
10.6 How do I troubleshoot a P0171 code?
To troubleshoot a P0171 code, check for vacuum leaks, test and replace the oxygen sensor, clean or replace fuel injectors, check fuel pressure, and clean or replace the MAF sensor.
10.7 What does a P0300 code mean?
A P0300 code indicates that multiple cylinders are misfiring randomly. This can be caused by faulty spark plugs, ignition coils, vacuum leaks, or low fuel pressure.
10.8 How do I check fuel pressure on a 1998 Honda CRV?
To check fuel pressure, locate the fuel rail, connect a fuel pressure gauge to the test port, start the engine, and compare the reading to the manufacturer’s specifications.
10.9 What tools do I need for advanced diagnostics?
Advanced diagnostics may require a multimeter, compression tester, fuel pressure gauge, and smoke machine, in addition to an OBD2 scanner.
10.10 How can OBD2-SCANNER.EDU.VN help with my diagnostic needs?
OBD2-SCANNER.EDU.VN offers expert guidance, comprehensive resources, and professional diagnostic and repair services to help you maintain your vehicle and address any issues effectively. Contact us at +1 (641) 206-8880 or visit our website at OBD2-SCANNER.EDU.VN for more information.