Having no power to your OBD2 port can be a frustrating problem, but it’s often fixable. The OBD2 port, officially known as the On-Board Diagnostics II port, is crucial for diagnosing vehicle issues using a scan tool. When there’s no power, you can’t connect your scanner to read diagnostic trouble codes (DTCs) and assess your vehicle’s health. OBD2-SCANNER.EDU.VN provides solutions for addressing OBD2 port issues and accessing vital vehicle data. Understanding the common causes and methods for troubleshooting a dead OBD2 port can help you resolve the issue and get your diagnostics back on track.
Contents
- 1. What Does it Mean When There’s No Power to the OBD2 Port?
- 2. Common Causes of No Power to the OBD2 Port
- 3. Step-by-Step Guide to Diagnosing No Power to OBD2
- 4. Tools Needed to Fix No Power to OBD2 Port
- 5. Step-by-Step Guide to Fixing No Power to OBD2 Port
- 6. The Role of Fuses in OBD2 Port Functionality
- 7. Troubleshooting Wiring Issues Affecting OBD2 Power Supply
- 8. How Aftermarket Accessories Can Affect OBD2 Port Power
- 9. What to Do If the ECU Is Causing the OBD2 Port Issue
1. What Does it Mean When There’s No Power to the OBD2 Port?
No power to the OBD2 port means that the diagnostic port in your vehicle is not receiving the necessary electrical supply to operate correctly. This prevents you from using an OBD2 scanner to read diagnostic trouble codes, monitor vehicle performance, or perform other diagnostic functions. According to a study by the National Institute for Automotive Service Excellence (ASE), a non-functional OBD2 port can significantly hinder the ability to diagnose and repair modern vehicles efficiently.
Understanding the Significance of a Functional OBD2 Port
A working OBD2 port is essential for modern vehicle maintenance and diagnostics. When the port is not functioning, several problems can arise:
- Inability to Diagnose Issues: Without power, you can’t use an OBD2 scanner to read diagnostic trouble codes (DTCs) that provide insights into potential vehicle problems.
- Hindered Maintenance: Regular maintenance checks that rely on OBD2 data, such as emissions testing, become impossible.
- Increased Repair Costs: Mechanics may resort to more time-consuming and expensive manual diagnostic methods.
- Safety Concerns: Undetected issues can lead to unexpected vehicle malfunctions, posing safety risks.
Key Components and Their Functions
To understand why an OBD2 port might lack power, it’s essential to know the critical components and their roles:
- OBD2 Port: The 16-pin diagnostic port is typically located under the dashboard on the driver’s side. It provides access to the vehicle’s computer system.
- Fuses: Fuses protect the OBD2 port and related systems from electrical overloads. A blown fuse is a common cause of no power to the port.
- Wiring: Wires connect the OBD2 port to the vehicle’s electrical system and the Engine Control Unit (ECU). Damaged or broken wires can disrupt power supply.
- Engine Control Unit (ECU): The ECU is the vehicle’s main computer, communicating with the OBD2 port to provide diagnostic data.
- Battery: The vehicle’s battery supplies the electrical power needed for the OBD2 port to function.
By understanding these components, you can better diagnose and address the root causes of a non-functional OBD2 port. For further diagnostics and potential repair services, you can contact OBD2-SCANNER.EDU.VN at +1 (641) 206-8880 or visit our location at 123 Main Street, Los Angeles, CA 90001, United States.
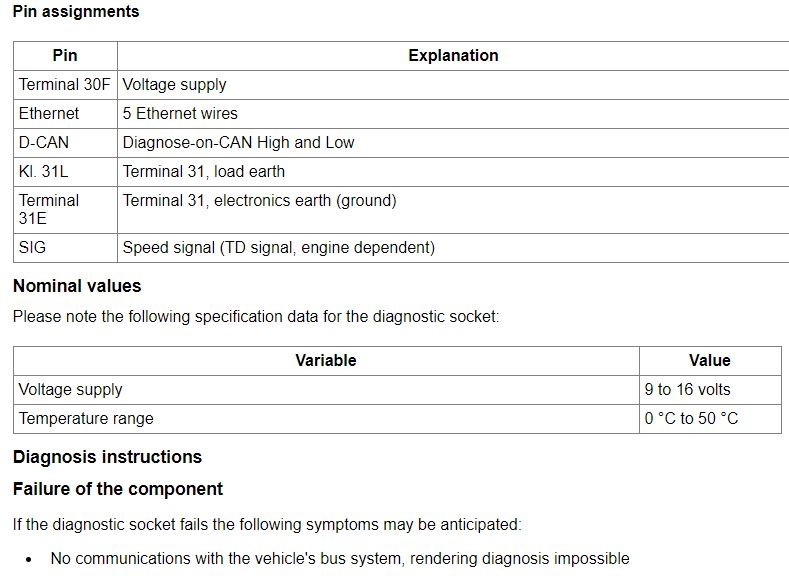 OBD2 Port Pinout
2. Common Causes of No Power to the OBD2 Port
Several factors can lead to a lack of power to the OBD2 port. Identifying these causes is the first step in troubleshooting the issue.
1. Blown Fuse
A blown fuse is one of the most common reasons for a dead OBD2 port. Fuses protect electrical circuits from overloads, and if there is a surge, the fuse will blow to prevent damage.
How to Check:
- Locate the Fuse Box: Consult your vehicle’s owner’s manual to find the fuse box location. It’s often under the dashboard, in the glove compartment, or in the engine bay.
- Identify the OBD2 Fuse: The manual will also specify which fuse is for the OBD2 port.
- Inspect the Fuse: Remove the fuse and visually inspect it. If the wire inside is broken or the fuse looks burnt, it has blown.
- Test with a Multimeter: Use a multimeter to test the fuse for continuity. If there’s no continuity, the fuse is blown.
2. Wiring Issues
Damaged or broken wires can disrupt the power supply to the OBD2 port. This can result from physical damage, corrosion, or wear and tear.
How to Check:
- Visual Inspection: Check the wires connected to the OBD2 port for any signs of damage, such as cuts, fraying, or corrosion.
- Continuity Test: Use a multimeter to perform a continuity test on the wires. Disconnect the battery before testing. Place one probe on one end of the wire and the other probe on the other end. If there’s no continuity, the wire is broken or damaged.
- Check Ground Connections: Ensure the ground wires are securely connected to the vehicle’s chassis. A poor ground connection can prevent the OBD2 port from receiving power.
3. Faulty OBD2 Port
The OBD2 port itself can sometimes be the problem. The pins inside the port may become damaged, bent, or corroded, preventing proper contact with the scanner.
How to Check:
- Visual Inspection: Inspect the pins inside the OBD2 port for any damage or corrosion.
- Pin Contact: Ensure that the pins are not bent and make good contact with the OBD2 scanner connector.
- Clean the Port: Use a contact cleaner to clean the pins and remove any corrosion.
4. Issues with the Vehicle’s Computer (ECU/PCM)
The Engine Control Unit (ECU) or Powertrain Control Module (PCM) controls the OBD2 port. If there is a problem with the ECU, it may not provide power to the OBD2 port.
How to Check:
- Check for Other Symptoms: Look for other symptoms of ECU problems, such as engine performance issues, warning lights, or other electrical malfunctions.
- Professional Diagnosis: Diagnosing ECU issues typically requires specialized equipment and knowledge. Consult a professional mechanic to diagnose and repair ECU problems.
5. Aftermarket Accessories
Aftermarket accessories, such as remote starters or GPS trackers, can sometimes interfere with the OBD2 port. These devices may draw power from the port or disrupt its communication with the ECU.
How to Check:
- Disconnect Accessories: Disconnect any aftermarket accessories connected to the OBD2 port or the vehicle’s electrical system.
- Test the OBD2 Port: After disconnecting the accessories, check if the OBD2 port now has power. If it does, the accessory was likely the cause of the problem.
6. CAN Bus Issues
The Controller Area Network (CAN) bus is a communication network that allows various components in the vehicle to communicate with each other. If there is a problem with the CAN bus, it can affect the OBD2 port. According to the Society of Automotive Engineers (SAE), CAN bus issues are increasingly common in modern vehicles due to the complexity of electronic systems.
How to Check:
- Check for Other Symptoms: Look for other symptoms of CAN bus problems, such as multiple warning lights, communication errors, or malfunctioning electronic systems.
- Professional Diagnosis: CAN bus issues often require specialized diagnostic tools and expertise. Consult a professional mechanic to diagnose and repair CAN bus problems.
By systematically checking these potential causes, you can narrow down the reason for the lack of power to your OBD2 port and take appropriate steps to resolve the issue. For professional assistance, contact OBD2-SCANNER.EDU.VN at +1 (641) 206-8880, or visit us at 123 Main Street, Los Angeles, CA 90001, United States.
 Checking OBD2 Port Fuse
3. Step-by-Step Guide to Diagnosing No Power to OBD2
Diagnosing a dead OBD2 port involves a systematic approach to identify the root cause. Follow these steps to troubleshoot the issue effectively.
Step 1: Gather Necessary Tools and Equipment
Before starting the diagnostic process, gather the necessary tools and equipment:
- Multimeter: To test voltage, continuity, and resistance.
- Fuse Puller: To safely remove fuses from the fuse box.
- OBD2 Scanner: To verify if the port is working after troubleshooting.
- Vehicle’s Owner’s Manual: To locate fuses and wiring diagrams.
- Contact Cleaner: To clean the OBD2 port pins.
- Basic Hand Tools: Screwdrivers, pliers, etc.
Step 2: Check the OBD2 Port Fuse
The fuse is the first and easiest thing to check.
- Locate the Fuse Box: Consult your vehicle’s owner’s manual to find the fuse box location. It’s often under the dashboard, in the glove compartment, or in the engine bay.
- Identify the OBD2 Fuse: The manual will specify which fuse is for the OBD2 port. Common fuse ratings are 5A, 10A, or 15A.
- Inspect the Fuse: Use a fuse puller to remove the fuse. Visually inspect it for a broken wire or burnt appearance.
- Test with a Multimeter: Set the multimeter to the continuity setting. Place one probe on each end of the fuse. If the multimeter doesn’t beep or show continuity, the fuse is blown.
- Replace the Fuse: If the fuse is blown, replace it with a new fuse of the same rating.
- Test the OBD2 Port: After replacing the fuse, plug in your OBD2 scanner to see if the port now has power.
Step 3: Inspect the OBD2 Port
The OBD2 port itself may have issues that prevent it from working correctly.
- Visual Inspection: Look for any signs of damage to the port, such as bent or broken pins, corrosion, or loose connections.
- Clean the Port: Use a contact cleaner to clean the pins and remove any corrosion.
- Check Pin Contact: Ensure that the pins are not bent and make good contact with the OBD2 scanner connector. Use a small tool to gently straighten any bent pins.
Step 4: Check for Voltage at the OBD2 Port
Use a multimeter to check for voltage at the OBD2 port.
- Locate the Power Pins: The OBD2 port has specific pins that provide power. Pin 16 is typically the battery voltage supply (12V), and pins 4 and 5 are ground connections.
- Set Up the Multimeter: Set the multimeter to the DC voltage setting (20V).
- Connect the Multimeter:
- Place the black probe on pin 4 or 5 (ground).
- Place the red probe on pin 16 (power).
- Read the Voltage: The multimeter should read approximately 12V, indicating that the port is receiving power. If the voltage is significantly lower or zero, there is a power supply issue.
Step 5: Check Wiring and Ground Connections
Wiring issues can prevent the OBD2 port from receiving power.
- Visual Inspection: Check the wires connected to the OBD2 port for any signs of damage, such as cuts, fraying, or corrosion.
- Continuity Test: Disconnect the battery before performing a continuity test. Use a multimeter to check the continuity of the wires. Place one probe on one end of the wire and the other probe on the other end. If there’s no continuity, the wire is broken or damaged.
- Check Ground Connections: Ensure the ground wires are securely connected to the vehicle’s chassis. A poor ground connection can prevent the OBD2 port from receiving power. Clean and tighten any loose ground connections.
Step 6: Check for Aftermarket Accessories
Aftermarket accessories can sometimes interfere with the OBD2 port.
- Disconnect Accessories: Disconnect any aftermarket accessories connected to the OBD2 port or the vehicle’s electrical system.
- Test the OBD2 Port: After disconnecting the accessories, check if the OBD2 port now has power. If it does, the accessory was likely the cause of the problem.
Step 7: Consult a Professional Mechanic
If you have followed these steps and the OBD2 port still has no power, there may be a more complex issue, such as a problem with the ECU or CAN bus. Consult a professional mechanic for further diagnosis and repair. According to a report by AAA, attempting to diagnose complex electrical issues without the proper tools and knowledge can lead to further damage and increased repair costs.
By following this step-by-step guide, you can effectively diagnose and address the causes of no power to the OBD2 port. For professional assistance, contact OBD2-SCANNER.EDU.VN at +1 (641) 206-8880, or visit us at 123 Main Street, Los Angeles, CA 90001, United States.
4. Tools Needed to Fix No Power to OBD2 Port
To effectively diagnose and fix a dead OBD2 port, having the right tools is essential. Here’s a detailed list of tools you’ll need, along with their specific uses.
1. Multimeter
A multimeter is a versatile tool used to measure voltage, current, and resistance in electrical circuits. It is crucial for diagnosing a dead OBD2 port by checking for power, continuity, and proper grounding.
How to Use:
- Voltage Testing: Set the multimeter to the DC voltage setting (20V). Place the black probe on a known good ground (e.g., the vehicle’s chassis) and the red probe on pin 16 of the OBD2 port to check for voltage.
- Continuity Testing: Set the multimeter to the continuity setting. Disconnect the battery and test the continuity of fuses and wires. A beep or a reading of 0 ohms indicates continuity.
- Resistance Testing: Use the resistance setting to check the resistance of circuits or components, such as the terminating resistor between pins 6 and 14.
2. Fuse Puller
A fuse puller is a small, plastic tool designed to safely remove fuses from the fuse box without damaging them or the fuse box itself.
How to Use:
- Insert the fuse puller around the fuse.
- Gently squeeze the puller to grip the fuse.
- Pull the fuse straight out of the fuse box.
3. OBD2 Scanner
An OBD2 scanner is used to read diagnostic trouble codes (DTCs) and monitor vehicle performance. While it can’t be used if there’s no power to the OBD2 port, it’s essential for verifying if the port is working after troubleshooting.
How to Use:
- Plug the OBD2 scanner into the OBD2 port.
- Turn the ignition on (without starting the engine).
- Follow the scanner’s instructions to read DTCs and monitor live data.
4. Vehicle’s Owner’s Manual
The vehicle’s owner’s manual is an invaluable resource for locating fuses, identifying wiring diagrams, and understanding the vehicle’s electrical system.
How to Use:
- Locate the fuse box diagram to identify the fuse for the OBD2 port.
- Refer to the wiring diagrams to trace the wiring connected to the OBD2 port.
5. Contact Cleaner
Contact cleaner is a solvent used to clean electrical contacts and remove corrosion, dirt, and grime. It can help improve the connection between the OBD2 port and the scanner.
How to Use:
- Spray contact cleaner onto the pins of the OBD2 port.
- Allow the cleaner to sit for a few minutes.
- Wipe away any excess cleaner with a clean cloth.
6. Basic Hand Tools
A set of basic hand tools, such as screwdrivers, pliers, and wire strippers, may be needed to access and repair wiring or other components related to the OBD2 port.
How to Use:
- Screwdrivers: To remove and install screws.
- Pliers: To grip and manipulate wires and connectors.
- Wire Strippers: To strip insulation from wires when making repairs.
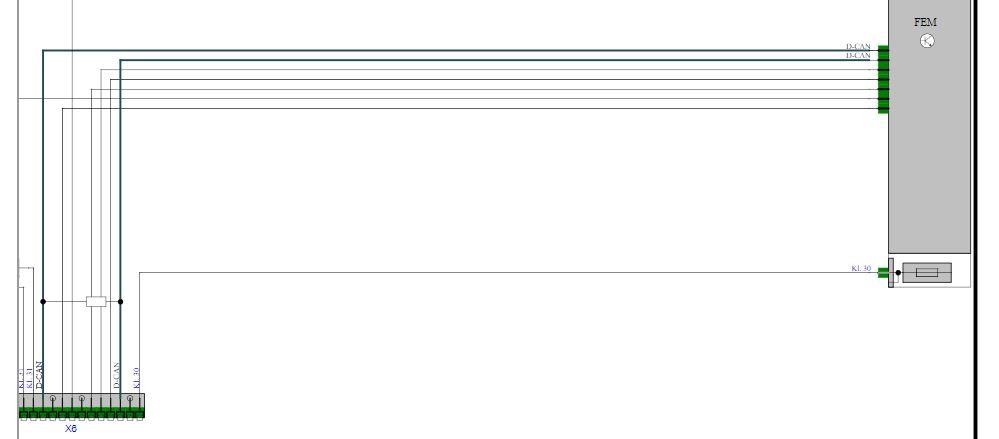
7. Wiring Diagrams
Wiring diagrams provide a detailed map of the vehicle’s electrical system, showing the connections between various components. They can be helpful for tracing the wiring connected to the OBD2 port and identifying potential faults.
How to Use:
- Refer to the wiring diagram to identify the wires connected to the OBD2 port.
- Use the diagram to trace the wiring and check for continuity or shorts.
8. Test Light
A test light is a simple tool used to check for the presence of voltage in an electrical circuit. It can be used to quickly verify if power is reaching the OBD2 port.
How to Use:
- Connect the clip of the test light to a known good ground.
- Probe the power pins of the OBD2 port with the test light.
- If the light illuminates, power is present.
Having these tools on hand will enable you to effectively diagnose and repair a dead OBD2 port. For professional assistance, contact OBD2-SCANNER.EDU.VN at +1 (641) 206-8880, or visit us at 123 Main Street, Los Angeles, CA 90001, United States.
5. Step-by-Step Guide to Fixing No Power to OBD2 Port
Once you have diagnosed the cause of no power to your OBD2 port, you can proceed with the necessary repairs. Here is a step-by-step guide to fixing common issues.
Step 1: Replacing a Blown Fuse
Replacing a blown fuse is a straightforward process.
- Locate the Fuse Box: Refer to your vehicle’s owner’s manual to find the fuse box location.
- Identify the OBD2 Fuse: Use the manual to identify the fuse for the OBD2 port.
- Remove the Blown Fuse: Use a fuse puller to remove the blown fuse.
- Inspect the Fuse: Visually inspect the fuse to confirm it is blown.
- Install a New Fuse: Replace the blown fuse with a new fuse of the same rating.
- Test the OBD2 Port: Plug in your OBD2 scanner to see if the port now has power.
Step 2: Repairing Damaged Wiring
Repairing damaged wiring requires careful attention to detail.
- Disconnect the Battery: Before working on any electrical wiring, disconnect the negative terminal of the battery to prevent electrical shocks.
- Identify Damaged Wires: Locate any damaged, frayed, or corroded wires connected to the OBD2 port.
- Repair or Replace Wires:
- If the wire is only slightly damaged, you can repair it by stripping the insulation, twisting the wires together, and covering them with electrical tape or heat shrink tubing.
- If the wire is severely damaged, it’s best to replace it entirely. Use a wire stripper to remove the insulation from the ends of the new wire, connect it to the existing wires using crimp connectors, and cover the connections with heat shrink tubing.
- Secure the Wires: Use zip ties or electrical tape to secure the repaired or replaced wires and prevent them from rubbing against other components.
- Reconnect the Battery: After repairing the wiring, reconnect the negative terminal of the battery.
- Test the OBD2 Port: Plug in your OBD2 scanner to see if the port now has power.
Step 3: Cleaning the OBD2 Port
Cleaning the OBD2 port can improve the connection between the port and the scanner.
- Disconnect the Battery: Disconnect the negative terminal of the battery to prevent electrical shorts.
- Apply Contact Cleaner: Spray contact cleaner onto the pins of the OBD2 port.
- Clean the Pins: Use a small brush or cotton swab to gently clean the pins and remove any corrosion or debris.
- Allow to Dry: Allow the contact cleaner to dry completely before reconnecting the battery.
- Reconnect the Battery: Reconnect the negative terminal of the battery.
- Test the OBD2 Port: Plug in your OBD2 scanner to see if the port now has power.
Step 4: Addressing Grounding Issues
Poor grounding can prevent the OBD2 port from receiving power.
- Locate Ground Connections: Identify the ground wires connected to the OBD2 port.
- Inspect Ground Connections: Check the ground connections for any signs of corrosion, looseness, or damage.
- Clean and Tighten Connections:
- Use a wire brush to clean any corrosion from the ground connections.
- Tighten the ground connections to ensure they are secure.
- Test the OBD2 Port: Plug in your OBD2 scanner to see if the port now has power.
Step 5: Disconnecting Aftermarket Accessories
Aftermarket accessories can sometimes interfere with the OBD2 port.
- Identify Accessories: Identify any aftermarket accessories connected to the OBD2 port or the vehicle’s electrical system.
- Disconnect Accessories: Disconnect the accessories from the OBD2 port or the vehicle’s electrical system.
- Test the OBD2 Port: Plug in your OBD2 scanner to see if the port now has power.
Step 6: Consulting a Professional Mechanic
If you have followed these steps and the OBD2 port still has no power, there may be a more complex issue, such as a problem with the ECU or CAN bus. Consult a professional mechanic for further diagnosis and repair. According to a study by the National Automobile Dealers Association (NADA), professional mechanics have the expertise and equipment to diagnose and repair complex electrical issues efficiently.
By following this step-by-step guide, you can effectively fix common issues that cause no power to the OBD2 port. For professional assistance, contact OBD2-SCANNER.EDU.VN at +1 (641) 206-8880, or visit us at 123 Main Street, Los Angeles, CA 90001, United States.
6. The Role of Fuses in OBD2 Port Functionality
Fuses play a critical role in the functionality of the OBD2 port by protecting the electrical circuit from overloads and short circuits. Understanding how fuses work and their specific function in the OBD2 system is essential for diagnosing and resolving power issues.
How Fuses Protect the OBD2 Port
A fuse is a safety device containing a metal strip that melts and breaks the circuit if the current exceeds a specified level. In the context of the OBD2 port, the fuse protects the port and related components from damage due to electrical surges or short circuits. According to the Electrical Safety Foundation International (ESFI), fuses prevent electrical fires and equipment damage by interrupting the flow of electricity when a fault occurs.
Specific Function of the OBD2 Fuse
The OBD2 fuse is dedicated to safeguarding the power supply to the OBD2 port. Typically, the OBD2 port receives power directly from the vehicle’s battery through a fuse-protected circuit. This power is essential for operating external scan tools and diagnostic equipment connected to the port.
- Overload Protection: If there is an electrical overload due to a fault in the OBD2 port or connected devices, the fuse will blow, cutting off the power supply and preventing damage to the vehicle’s electrical system.
- Short Circuit Protection: In the event of a short circuit in the wiring or components connected to the OBD2 port, the fuse will blow, preventing a potentially dangerous electrical fire.
Identifying the Correct OBD2 Fuse
Locating the correct OBD2 fuse is crucial for diagnosing and resolving power issues. The vehicle’s owner’s manual is the primary resource for identifying the fuse. The manual will provide a fuse box diagram indicating the location and function of each fuse.
Common Fuse Ratings for OBD2 Ports
The fuse rating for the OBD2 port typically ranges from 5A to 15A, depending on the vehicle’s make and model. It’s essential to replace a blown fuse with a new fuse of the same rating to ensure proper protection of the electrical circuit.
| Fuse Rating | Common Uses |
|---|---|
| 5A | Low-power OBD2 ports, diagnostic equipment |
| 10A | Standard OBD2 ports, general diagnostic tools |
| 15A | High-power OBD2 ports, advanced diagnostic equipment, aftermarket devices |
Symptoms of a Blown OBD2 Fuse
A blown OBD2 fuse will result in a complete loss of power to the OBD2 port, preventing the use of scan tools and diagnostic equipment.
- No Power To Obd2 Scanner: When you plug in your OBD2 scanner, it will not power on or communicate with the vehicle’s computer.
- Inability to Read Diagnostic Codes: You will not be able to read diagnostic trouble codes (DTCs) or monitor live data.
- No Communication with ECU: The scanner will display an error message indicating that it cannot communicate with the vehicle’s Engine Control Unit (ECU).
How to Check and Replace the OBD2 Fuse
Checking and replacing the OBD2 fuse is a simple process that can be performed with basic tools.
- Locate the Fuse Box: Refer to the vehicle’s owner’s manual to find the fuse box location.
- Identify the OBD2 Fuse: Use the manual to identify the fuse for the OBD2 port.
- Remove the Fuse: Use a fuse puller to remove the fuse from the fuse box.
- Inspect the Fuse: Visually inspect the fuse for a broken wire or burnt appearance.
- Test with a Multimeter: Use a multimeter to test the fuse for continuity. If there’s no continuity, the fuse is blown.
- Replace the Fuse: Replace the blown fuse with a new fuse of the same rating.
- Test the OBD2 Port: Plug in your OBD2 scanner to see if the port now has power.
By understanding the role of fuses in OBD2 port functionality, you can effectively diagnose and resolve power issues and ensure the proper operation of your vehicle’s diagnostic system. For professional assistance, contact OBD2-SCANNER.EDU.VN at +1 (641) 206-8880, or visit us at 123 Main Street, Los Angeles, CA 90001, United States.
7. Troubleshooting Wiring Issues Affecting OBD2 Power Supply
Wiring issues can significantly impact the power supply to the OBD2 port, leading to diagnostic failures. These issues can range from simple breaks in the wire to corrosion and short circuits. A systematic approach is necessary to diagnose and resolve these problems effectively.
Common Wiring Problems Affecting OBD2 Ports
Several wiring issues can cause a loss of power to the OBD2 port:
- Broken Wires: Physical damage, age, or stress can cause wires to break, interrupting the electrical connection.
- Corrosion: Exposure to moisture and environmental elements can lead to corrosion, increasing resistance and reducing power flow.
- Loose Connections: Over time, connections can loosen, causing intermittent or complete loss of power.
- Short Circuits: Damage to the insulation can cause wires to short circuit, leading to blown fuses and loss of power.
- Chafing: Rubbing against other components can wear away the insulation, leading to shorts or breaks.
Tools for Diagnosing Wiring Problems
To effectively diagnose wiring problems, you will need the following tools:
- Multimeter: To test continuity, voltage, and resistance.
- Wiring Diagrams: To understand the wiring layout and identify specific wires.
- Test Light: To quickly check for the presence of voltage.
- Wire Strippers: To remove insulation from wires for testing and repair.
- Pliers: To grip and manipulate wires and connectors.
- Electrical Tape: To insulate and protect repaired wires.
- Contact Cleaner: To clean corroded connections.
Step-by-Step Guide to Diagnosing Wiring Issues
Follow these steps to systematically diagnose wiring issues affecting the OBD2 port:
- Visual Inspection: Start by visually inspecting the wiring connected to the OBD2 port. Look for any signs of damage, such as cuts, fraying, corrosion, or loose connections.
- Check Ground Connections: Ensure that the ground wires are securely connected to the vehicle’s chassis. A poor ground connection can prevent the OBD2 port from receiving power.
- Continuity Test: Disconnect the battery before performing a continuity test. Use a multimeter to check the continuity of the wires. Place one probe on one end of the wire and the other probe on the other end. If there’s no continuity, the wire is broken or damaged.
- Voltage Test: Use a multimeter to check for voltage at the OBD2 port. With the ignition on, place the black probe on a known good ground and the red probe on pin 16 (power). The multimeter should read approximately 12V. If the voltage is significantly lower or zero, there is a power supply issue.
- Check for Short Circuits: Use a multimeter to check for short circuits between the power and ground wires. Disconnect the battery and set the multimeter to the continuity setting. Place one probe on the power wire and the other probe on the ground wire. If the multimeter shows continuity, there is a short circuit.
Repairing Common Wiring Problems
Once you have identified the wiring problem, you can proceed with the necessary repairs:
- Repairing Broken Wires: If the wire is broken, you can repair it by stripping the insulation, twisting the wires together, and covering them with electrical tape or heat shrink tubing.
- Cleaning Corroded Connections: Use a contact cleaner to clean corroded connections. You may also need to replace corroded connectors.
- Tightening Loose Connections: Tighten any loose connections to ensure a good electrical contact.
- Replacing Damaged Wires: If the wire is severely damaged, it’s best to replace it entirely. Use a wire stripper to remove the insulation from the ends of the new wire, connect it to the existing wires using crimp connectors, and cover the connections with heat shrink tubing.
Preventing Future Wiring Issues
To prevent future wiring issues, consider the following tips:
- Regular Inspection: Regularly inspect the wiring connected to the OBD2 port for any signs of damage or corrosion.
- Proper Routing: Ensure that the wiring is properly routed and secured to prevent chafing against other components.
- Use Quality Connectors: Use high-quality connectors to ensure a good electrical connection.
- Protect Wiring: Protect the wiring from moisture and environmental elements by using weatherproof connectors and heat shrink tubing.
By following this guide, you can effectively troubleshoot and repair wiring issues affecting the OBD2 power supply. For professional assistance, contact OBD2-SCANNER.EDU.VN at +1 (641) 206-8880, or visit us at 123 Main Street, Los Angeles, CA 90001, United States.
8. How Aftermarket Accessories Can Affect OBD2 Port Power
Aftermarket accessories, while enhancing vehicle functionality, can sometimes interfere with the OBD2 port’s power supply. Understanding how these accessories impact the OBD2 system is crucial for diagnosing and preventing related issues.
Common Aftermarket Accessories That Affect OBD2 Ports
Several aftermarket accessories can potentially affect the OBD2 port:
- Remote Starters: These systems often tap into the vehicle’s electrical system and can draw power from the OBD2 port circuit.
- GPS Trackers: GPS tracking devices connected to the OBD2 port can consume power and interfere with data transmission.
- Performance Chips: Performance chips or tuners that plug into the OBD2 port can alter the vehicle’s computer settings and potentially cause electrical issues.
- OBD2 Splitters: These devices allow multiple accessories to be connected to the OBD2 port simultaneously, which can overload the circuit.
How Accessories Interfere with OBD2 Port Power
Aftermarket accessories can interfere with the OBD2 port in several ways:
- Power Drain: Accessories can draw excessive power from the OBD2 port circuit, leading to a blown fuse or a drop in voltage.
- Signal Interference: Some accessories can interfere with the data signals transmitted through the OBD2 port, causing communication errors or diagnostic issues.
- Wiring Issues: Improper installation of accessories can damage the wiring connected to the OBD2 port, leading to shorts, breaks, or loose connections.
- ECU Conflicts: Certain accessories can conflict with the vehicle’s Engine Control Unit (ECU), causing electrical malfunctions or performance problems.
Diagnosing Accessory-Related OBD2 Port Issues
To diagnose whether an aftermarket accessory is causing OBD2 port power issues, follow these steps:
- Identify Accessories: Identify any aftermarket accessories connected to the OBD2 port or the vehicle’s electrical system.
- Disconnect Accessories: Disconnect the accessories from the OBD2 port or the vehicle’s electrical system.
- Test the OBD2 Port: After disconnecting the accessories, check if the OBD2 port now has power. Plug in your OBD2 scanner to see if it powers on and communicates with the vehicle’s computer.
- Isolate the Problem: If the OBD2 port works after disconnecting the accessories, reconnect them one at a time to identify which accessory is causing the issue.
Preventing Accessory-Related OBD2 Port Problems
To prevent aftermarket accessories from causing OBD2 port problems, consider the following tips:
- Professional Installation: Have accessories professionally installed by a qualified technician.
- Quality Accessories: Choose high-quality accessories from reputable manufacturers.
- Proper Wiring: Ensure that accessories are properly wired and connected to the vehicle’s electrical system.
- Avoid Overloading: Avoid connecting multiple accessories to the OBD2 port simultaneously.
- Monitor Performance: Monitor the vehicle’s performance and electrical system for any signs of issues after installing accessories.
By understanding how aftermarket accessories can affect OBD2 port power, you can take steps to prevent related problems and ensure the proper functioning of your vehicle’s diagnostic system. For professional assistance, contact OBD2-SCANNER.EDU.VN at +1 (641) 206-8880, or visit us at 123 Main Street, Los Angeles, CA 90001, United States.
9. What to Do If the ECU Is Causing the OBD2 Port Issue
The Engine Control Unit (ECU) plays a vital role in the operation of the OBD2 port. If the ECU is malfunctioning, it can lead to various issues, including a lack of power to the OBD2 port. Diagnosing and addressing ECU-related problems requires a systematic approach and, in many cases, professional expertise.
How the ECU Affects the OBD2 Port
The ECU is the central computer in the vehicle, responsible for controlling various functions, including engine management, emissions control, and diagnostics. The ECU communicates with the OBD2 port to provide diagnostic data and allow technicians to access vehicle information. If the ECU is not functioning correctly, it can affect the OBD2 port in several ways:
- No Power to OBD2 Port: The ECU may not provide power to the OBD2 port, preventing the use of scan tools and diagnostic equipment.
- Communication Errors: The ECU may not communicate properly with the OBD2 scanner, resulting in error messages or incomplete data.
- Incorrect Diagnostic Codes: The ECU may provide incorrect diagnostic trouble codes (DTCs), leading to misdiagnosis and unnecessary repairs.
Symptoms of ECU Problems Affecting the OBD2 Port
Several symptoms may indicate that the ECU is causing the OBD2 port issue:
- No Power to OBD2 Port: The OBD2 scanner does not power on or communicate with the vehicle’s computer.
- Communication Errors: The OBD2 scanner displays an error message indicating that it cannot communicate with the ECU.
- Multiple Warning Lights: Several warning lights on the dashboard may illuminate, indicating various system malfunctions.
- Engine Performance Issues: The engine may exhibit performance problems such as stalling, misfiring, or reduced power.
- Inconsistent Diagnostic Data: The OBD2 scanner provides inconsistent or unreliable diagnostic data.
Diagnosing ECU-Related OBD2 Port Issues
Diagnosing ECU-related OBD2 port issues requires specialized tools and expertise. Here are some steps you can take:
- Check for Other Symptoms: Look for other symptoms of ECU problems, such as engine performance issues, warning lights, or other electrical malfunctions.
- Scan for Diagnostic Codes: Use an OBD2 scanner to scan for diagnostic trouble codes (DTCs) stored in the ECU. Pay attention to any codes related to the ECU