Making your own OBD2 to USB cable is entirely possible and can be a rewarding DIY project for car enthusiasts and technicians alike, and OBD2-SCANNER.EDU.VN is here to guide you through the process. This allows for customized connections and potential cost savings. This comprehensive guide will walk you through the necessary steps, tools, and considerations to successfully create your own OBD2 to USB cable, enhancing your diagnostic capabilities and giving you greater control over your vehicle’s data.
Contents
- 1. Understanding the Basics of OBD2 and USB
- 1.1 What is OBD2?
- 1.2 What is USB?
- 1.3 Why Combine OBD2 and USB?
- 2. Essential Tools and Components
- 2.1 Required Tools
- 2.2 Necessary Components
- 2.3 Where to Buy Components
- 3. Step-by-Step Guide to Making Your OBD2 to USB Cable
- 3.1 Preparation
- 3.2 Identifying the Correct Pins
- 3.2.1 OBD2 Connector Pins
- 3.2.2 USB Connector Pins
- 3.2.3 Wiring Diagram
- 3.3 Cutting and Stripping the Wires
- 3.4 Connecting the Wires to the OBD2 Connector
- 3.5 Connecting the Wires to the USB Connector
- 3.6 Insulating the Connections
- 3.7 Testing the Cable
- 3.8 Final Assembly
- 4. Troubleshooting Common Issues
- 4.1 Cable Not Recognized by Computer
- 4.2 No Data Transfer
- 4.3 Intermittent Connection
- 5. Software and Applications for OBD2 to USB Cables
- 5.1 Free Software Options
- 5.2 Paid Software Options
- 5.3 Choosing the Right Software
- 6. Advanced Tips and Tricks
- 6.1 Using Shielded Cables
- 6.2 Soldering Techniques
- 6.3 Crimping Techniques
- 6.4 Protecting Your Vehicle’s ECU
- 7. Understanding OBD2 Codes
- 7.1 Types of OBD2 Codes
- 7.2 Common OBD2 Codes and Their Meanings
- 7.3 Using OBD2 Codes for Diagnosis
- 8. Benefits of Using OBD2-SCANNER.EDU.VN
- 8.1 Expert Guidance and Support
- 8.2 Access to Advanced Diagnostic Tools
- 8.3 Comprehensive Repair Information
- 8.4 Time and Cost Savings
- 9. Safety Precautions
- 9.1 Disconnect the Battery
- 9.2 Use Proper Tools
- 9.3 Wear Safety Gear
- 9.4 Work in a Well-Ventilated Area
- 9.5 Follow Instructions
- 10. Frequently Asked Questions (FAQs)
- 10.1 What is an OBD2 Scanner?
- 10.2 How Do I Read OBD2 Codes?
- 10.3 What Are Common Car Issues and How to Fix Them?
- 10.4 Can I Use Any USB Cable for OBD2?
- 10.5 What Software Can I Use with My OBD2 to USB Cable?
- 10.6 Is It Safe to Make My Own OBD2 Cable?
- 10.7 Where Can I Buy the Components for an OBD2 to USB Cable?
- 10.8 How Can OBD2-SCANNER.EDU.VN Help Me?
- 10.9 What Precautions Should I Take When Working with My Car’s Electrical System?
- 10.10 How Do I Clear OBD2 Codes After a Repair?
- Conclusion
1. Understanding the Basics of OBD2 and USB
To create your own OBD2 to USB cable, it’s crucial to first understand what OBD2 and USB are and how they interact. OBD2, or On-Board Diagnostics II, is a standardized system used in vehicles to monitor and report on various aspects of the vehicle’s performance. USB, or Universal Serial Bus, is a common interface used to connect devices to computers. By combining these two, you can access your vehicle’s diagnostic data on your computer.
1.1 What is OBD2?
OBD2 is a vital system in modern vehicles, mandated in the United States since 1996 and subsequently adopted worldwide. According to the Environmental Protection Agency (EPA), OBD2 was designed to monitor the performance of a vehicle’s major components, including those responsible for controlling emissions. The OBD2 system provides access to a wealth of information about the vehicle’s health, including diagnostic trouble codes (DTCs), live sensor data, and more.
1.2 What is USB?
USB is a versatile interface used to connect a wide range of devices to computers, from keyboards and mice to external hard drives and, in this case, OBD2 scanners. USB offers a standardized way to transfer data and power between devices. Its widespread adoption and ease of use make it an ideal choice for connecting OBD2 devices to computers for data analysis and diagnostics. The USB Implementers Forum (USB-IF) maintains the standards and specifications for USB technology.
1.3 Why Combine OBD2 and USB?
Combining OBD2 and USB allows you to interface your vehicle’s diagnostic system with your computer, opening up a world of possibilities for vehicle maintenance and diagnostics. Using a USB connection, you can use various software applications to read diagnostic trouble codes, monitor live sensor data, and perform advanced diagnostics. This is particularly useful for car enthusiasts, mechanics, and anyone interested in understanding their vehicle’s performance in detail.
2. Essential Tools and Components
Before diving into the process of creating your own OBD2 to USB cable, it’s important to gather all the necessary tools and components. Having the right equipment will not only make the process easier but also ensure a reliable and safe connection.
2.1 Required Tools
- Wire Strippers/Cutters: These are essential for removing the insulation from the wires without damaging the conductors. A good pair of wire strippers will have multiple gauge settings to accommodate different wire sizes.
- Needle-Nose Pliers: These are useful for gripping and manipulating small components, such as connector pins and wires, especially in tight spaces.
- Multimeter: A multimeter is a vital tool for testing the continuity and voltage of the connections. This ensures that the cable is functioning correctly and that the wiring is accurate.
- Soldering Iron and Solder (Recommended): Soldering provides a secure and reliable connection between the wires and connector pins. While not strictly required, it’s highly recommended for a durable connection.
- Crimping Tool: If you opt for crimping instead of soldering, a crimping tool is necessary to securely attach the connector pins to the wires. Make sure to use the correct type of crimping tool for the specific connector pins you are using.
- Heat Shrink Tubing and Heat Gun (Optional): Heat shrink tubing can be used to insulate and protect the soldered or crimped connections, providing additional durability and preventing short circuits.
- Helping Hand Tool (Optional): This tool can help hold wires and connectors in place while soldering, making the process easier and more precise.
2.2 Necessary Components
- OBD2 Connector: This is the male connector that plugs into the OBD2 port in your vehicle. Ensure you purchase a high-quality connector that meets the OBD2 standard specifications to ensure compatibility and reliability.
- USB Connector: This is the connector that plugs into your computer’s USB port. You can use either a USB-A or USB-C connector, depending on your computer’s ports and preferences.
- Wires: You will need several lengths of wire to connect the OBD2 and USB connectors. It’s recommended to use shielded wire to minimize interference and ensure a clean signal. 22-26 AWG (American Wire Gauge) is commonly used for OBD2 connections.
- 4-Pin Connector: To connect the OBD-II Cable, you’ll need a 4-pin connector with pin/wire size = 22-16AWG; insulation/seal size = 1.3-1.7mm.
2.3 Where to Buy Components
You can purchase the necessary components from various sources, including:
- Online Electronics Retailers: Websites like Amazon, eBay, and Digi-Key offer a wide selection of electronic components, including OBD2 and USB connectors, wires, and tools.
- Local Electronics Stores: Local electronics stores like RadioShack (if available in your area) and Fry’s Electronics (if available) are good places to find components and get advice from knowledgeable staff.
- Automotive Parts Stores: Some automotive parts stores may carry OBD2 connectors and related components. Check with stores like AutoZone, Advance Auto Parts, and O’Reilly Auto Parts.
When purchasing components, make sure to check customer reviews and ratings to ensure you are buying high-quality products.
3. Step-by-Step Guide to Making Your OBD2 to USB Cable
Here’s a detailed, step-by-step guide to help you create your own OBD2 to USB cable. Follow these instructions carefully to ensure a successful outcome.
3.1 Preparation
- Gather Your Tools and Components: Ensure you have all the necessary tools and components listed in Section 2.
- Prepare Your Workspace: Set up a clean, well-lit workspace. This will help you stay organized and avoid mistakes.
- Study the Wiring Diagrams: Familiarize yourself with the wiring diagrams for both the OBD2 and USB connectors. This is crucial for making the correct connections.
3.2 Identifying the Correct Pins
Identifying the correct pins on both the OBD2 and USB connectors is crucial for a successful connection. Here’s a breakdown of the pins you’ll need to connect:
3.2.1 OBD2 Connector Pins
Only a few pins on the OBD2 connector are needed for basic communication. These include:
- Pin 4: Chassis Ground
- Pin 5: Signal Ground
- Pin 6: CAN High (Controller Area Network High)
- Pin 14: CAN Low (Controller Area Network Low)
- Pin 16: Battery Power
3.2.2 USB Connector Pins
The USB connector has four pins, but only two are used for data transfer:
- Pin 1: VCC (Power)
- Pin 2: Data –
- Pin 3: Data +
- Pin 4: Ground
3.2.3 Wiring Diagram
Here is a basic wiring diagram to follow:
- OBD2 Pin 4 (Chassis Ground) to USB Pin 4 (Ground)
- OBD2 Pin 5 (Signal Ground) to USB Pin 4 (Ground)
- OBD2 Pin 6 (CAN High) to USB Pin 2 (Data -)
- OBD2 Pin 14 (CAN Low) to USB Pin 3 (Data +)
- OBD2 Pin 16 (Battery Power) to USB Pin 1 (VCC)
3.3 Cutting and Stripping the Wires
- Cut the Wires: Cut four lengths of wire to the desired length. Consider where you will be using the cable and how much length you will need.
- Strip the Wires: Use wire strippers to carefully remove about 1/4 inch of insulation from each end of the wires. Be careful not to nick or cut the wire strands.
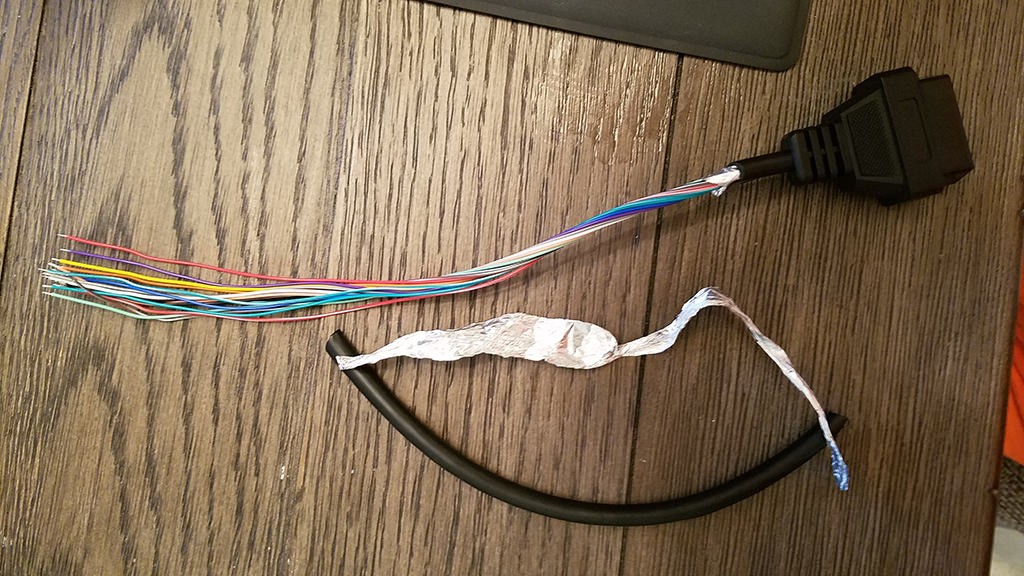 Stripped sheath and shielding
3.4 Connecting the Wires to the OBD2 Connector
- Prepare the OBD2 Connector: If the OBD2 connector requires soldering, pre-tin the connector pins with a small amount of solder.
- Attach the Wires: Solder or crimp the wires to the corresponding pins on the OBD2 connector, according to the wiring diagram. Ensure the connections are secure.
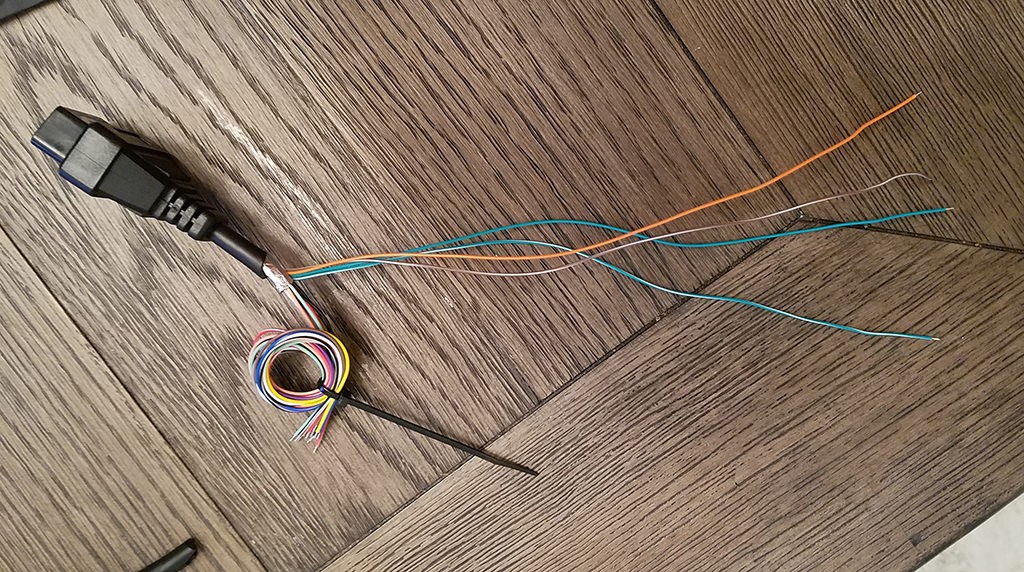 Separated 4 wires being used
3.5 Connecting the Wires to the USB Connector
- Prepare the USB Connector: Similarly, pre-tin the USB connector pins if soldering.
- Attach the Wires: Solder or crimp the wires to the corresponding pins on the USB connector, following the wiring diagram.
3.6 Insulating the Connections
- Apply Heat Shrink Tubing: Slide a piece of heat shrink tubing over each soldered or crimped connection.
- Shrink the Tubing: Use a heat gun to shrink the tubing, providing insulation and protection for the connections.
3.7 Testing the Cable
- Visual Inspection: Carefully inspect all connections to ensure they are secure and properly insulated.
- Continuity Test: Use a multimeter to perform a continuity test on each connection. This will verify that the wires are correctly connected and that there are no shorts.
- Voltage Test: Connect the OBD2 connector to your vehicle and the USB connector to your computer. Use a multimeter to check the voltage on the USB connector to ensure it is within the correct range.
3.8 Final Assembly
- Secure the Connectors: If the connectors have housings, assemble them according to the manufacturer’s instructions.
- Label the Cable: Label the cable with its purpose (OBD2 to USB) to avoid confusion.
4. Troubleshooting Common Issues
Even with careful assembly, issues can arise. Here are some common problems and how to troubleshoot them.
4.1 Cable Not Recognized by Computer
- Check Connections: Ensure all connections are secure and correctly wired.
- Test USB Port: Try a different USB port on your computer to rule out a faulty port.
- Driver Issues: Make sure you have the necessary drivers installed on your computer. You may need to download and install specific drivers for your OBD2 device.
4.2 No Data Transfer
- Verify Wiring: Double-check the wiring diagram and ensure all wires are connected to the correct pins.
- Continuity Test: Perform a continuity test to check for broken or loose connections.
- Software Compatibility: Ensure that the software you are using is compatible with your OBD2 device and vehicle.
4.3 Intermittent Connection
- Check for Loose Connections: Inspect all connections for looseness or damage.
- Shielded Cable: Using shielded cable can help reduce interference and improve connection reliability.
- Resolder Connections: If you suspect a faulty solder joint, resolder the connection to ensure a solid bond.
5. Software and Applications for OBD2 to USB Cables
Once you have created your OBD2 to USB cable, you will need software to interpret the data from your vehicle. Here are some popular options.
5.1 Free Software Options
- OBD Auto Doctor: OBD Auto Doctor is a free OBD2 diagnostic software that allows you to read diagnostic trouble codes, monitor live sensor data, and perform basic diagnostics. It is compatible with Windows, macOS, and Linux.
- ScanTool.net: ScanTool.net offers a free version of their OBD2 software that provides basic diagnostic functionality. It supports a wide range of OBD2 adapters and vehicles.
- pyOBD: pyOBD is an open-source OBD2 diagnostic tool written in Python. It allows you to read diagnostic trouble codes, monitor live sensor data, and perform advanced diagnostics. It is compatible with Windows, macOS, and Linux.
5.2 Paid Software Options
- Torque Pro (Android): Torque Pro is a popular OBD2 diagnostic app for Android devices. It offers advanced features such as real-time performance monitoring, data logging, and customizable dashboards.
- OBD Fusion (iOS and Android): OBD Fusion is a comprehensive OBD2 diagnostic app for iOS and Android devices. It supports a wide range of OBD2 adapters and vehicles and offers advanced features such as enhanced diagnostics and customizable dashboards.
- FORScan (Windows): FORScan is a powerful OBD2 diagnostic software for Ford, Lincoln, and Mercury vehicles. It allows you to perform advanced diagnostics, programming, and module configuration.
5.3 Choosing the Right Software
When choosing OBD2 software, consider the following factors:
- Compatibility: Ensure that the software is compatible with your OBD2 adapter, vehicle, and operating system.
- Features: Consider the features you need, such as reading diagnostic trouble codes, monitoring live sensor data, performing advanced diagnostics, and programming.
- User Interface: Choose software with a user-friendly interface that is easy to navigate and understand.
- Cost: Compare the cost of different software options and choose one that fits your budget.
6. Advanced Tips and Tricks
To get the most out of your OBD2 to USB cable, here are some advanced tips and tricks.
6.1 Using Shielded Cables
Using shielded cables can significantly improve the reliability and accuracy of your OBD2 to USB cable. Shielded cables reduce electromagnetic interference (EMI) and radio frequency interference (RFI), which can distort the data signal and cause errors.
6.2 Soldering Techniques
If you choose to solder the connections, proper soldering techniques are essential for a reliable connection. Here are some tips:
- Clean the Surfaces: Ensure that the surfaces to be soldered are clean and free of oxidation.
- Use Flux: Apply a small amount of flux to the surfaces to improve solder flow and adhesion.
- Heat the Joint, Not the Solder: Heat the joint with the soldering iron and then apply the solder to the heated joint. The solder should flow smoothly and evenly.
- Avoid Cold Joints: A cold joint occurs when the solder does not melt properly and forms a weak connection. Avoid cold joints by ensuring that the joint is heated sufficiently and that the solder flows smoothly.
6.3 Crimping Techniques
If you choose to crimp the connections, proper crimping techniques are essential for a secure and reliable connection. Here are some tips:
- Use the Correct Crimping Tool: Use the correct type of crimping tool for the specific connector pins you are using.
- Match Wire Gauge to Connector: Ensure that the wire gauge matches the connector pin size.
- Inspect the Crimp: After crimping, inspect the connection to ensure that the wire is securely held in place and that the crimp is properly formed.
6.4 Protecting Your Vehicle’s ECU
When working with your vehicle’s OBD2 system, it’s important to take precautions to protect your vehicle’s Engine Control Unit (ECU). The ECU is a sensitive electronic component that can be damaged by improper connections or voltage surges. Here are some tips:
- Double-Check Wiring: Always double-check the wiring diagram and ensure that all wires are connected to the correct pins before connecting the cable to your vehicle.
- Use a Surge Protector: Consider using a surge protector to protect your vehicle’s ECU from voltage surges.
- Disconnect Battery: Disconnecting the vehicle’s battery before working on the OBD2 system can help prevent damage to the ECU.
7. Understanding OBD2 Codes
OBD2 codes are standardized codes used to identify specific issues within a vehicle. Understanding these codes can help you diagnose and repair your vehicle more effectively.
7.1 Types of OBD2 Codes
OBD2 codes are divided into several categories:
- P Codes (Powertrain): These codes relate to the engine, transmission, and related components.
- B Codes (Body): These codes relate to the body control systems, such as the power windows, locks, and seats.
- C Codes (Chassis): These codes relate to the chassis systems, such as the anti-lock brakes, traction control, and suspension.
- U Codes (Network): These codes relate to the vehicle’s communication network, such as the CAN bus.
7.2 Common OBD2 Codes and Their Meanings
Here are some common OBD2 codes and their meanings:
| Code | Description | Possible Causes |
|---|---|---|
| P0300 | Random/Multiple Cylinder Misfire Detected | Faulty spark plugs, ignition coils, fuel injectors, vacuum leaks, low compression |
| P0171 | System Too Lean (Bank 1) | Vacuum leaks, faulty O2 sensor, faulty MAF sensor, fuel pump issues |
| P0420 | Catalyst System Efficiency Below Threshold (Bank 1) | Faulty catalytic converter, faulty O2 sensor, exhaust leaks |
| P0301 | Cylinder 1 Misfire Detected | Faulty spark plug, ignition coil, fuel injector, low compression in cylinder 1 |
| P0101 | Mass Air Flow (MAF) Sensor Range/Performance | Dirty or faulty MAF sensor, intake leaks |
| P0113 | Intake Air Temperature Sensor Circuit High Input | Faulty IAT sensor, wiring issues |
| P0442 | Evaporative Emission Control System Leak Detected | Loose or faulty gas cap, cracked or damaged EVAP hoses, faulty purge valve |
| P0401 | Exhaust Gas Recirculation (EGR) Insufficient Flow | Faulty EGR valve, clogged EGR passages, vacuum leaks |
| P0011 | A Camshaft Position Timing Over-Advanced or System Performance (Bank 1) | Faulty camshaft position sensor, oil control valve issues, timing chain/belt issues |
7.3 Using OBD2 Codes for Diagnosis
When diagnosing vehicle issues, follow these steps:
- Read the Codes: Use your OBD2 scanner to read the diagnostic trouble codes.
- Research the Codes: Look up the codes in a reliable database to understand their meanings and possible causes.
- Inspect the Vehicle: Visually inspect the vehicle for any obvious issues, such as loose connections, damaged wires, or leaks.
- Test the Components: Use a multimeter or other diagnostic tools to test the components related to the codes.
- Repair the Vehicle: Repair or replace the faulty components based on your findings.
- Clear the Codes: After repairing the vehicle, clear the diagnostic trouble codes and test the vehicle to ensure the issue is resolved.
8. Benefits of Using OBD2-SCANNER.EDU.VN
While creating your own OBD2 to USB cable can be a rewarding project, leveraging the expertise and resources of OBD2-SCANNER.EDU.VN can provide significant benefits.
8.1 Expert Guidance and Support
OBD2-SCANNER.EDU.VN offers expert guidance and support to help you diagnose and repair your vehicle. Our team of experienced technicians can provide personalized advice and troubleshooting assistance to help you resolve even the most complex issues.
8.2 Access to Advanced Diagnostic Tools
OBD2-SCANNER.EDU.VN provides access to advanced diagnostic tools and software that can help you perform in-depth diagnostics and programming. Our tools are designed to be user-friendly and provide accurate, reliable results.
8.3 Comprehensive Repair Information
OBD2-SCANNER.EDU.VN offers comprehensive repair information, including detailed repair procedures, wiring diagrams, and technical service bulletins. Our resources can help you perform repairs quickly and effectively, saving you time and money.
8.4 Time and Cost Savings
By using OBD2-SCANNER.EDU.VN, you can save time and money on vehicle diagnostics and repairs. Our expert guidance and comprehensive resources can help you quickly identify and resolve issues, reducing the need for expensive trips to the mechanic.
9. Safety Precautions
When working with electrical components and vehicles, it’s essential to follow safety precautions to protect yourself and your vehicle.
9.1 Disconnect the Battery
Before working on any electrical components, disconnect the vehicle’s battery to prevent electrical shocks and damage to the vehicle’s electrical system.
9.2 Use Proper Tools
Use the correct tools for the job and ensure that they are in good condition. Using the wrong tools or damaged tools can lead to injuries and damage to the vehicle.
9.3 Wear Safety Gear
Wear safety glasses, gloves, and other appropriate safety gear to protect yourself from hazards such as electrical shocks, burns, and chemical exposure.
9.4 Work in a Well-Ventilated Area
When soldering or working with chemicals, work in a well-ventilated area to avoid inhaling harmful fumes.
9.5 Follow Instructions
Always follow the manufacturer’s instructions and safety guidelines when working with electrical components and vehicles.
10. Frequently Asked Questions (FAQs)
Here are some frequently asked questions about making and using OBD2 to USB cables.
10.1 What is an OBD2 Scanner?
An OBD2 scanner is a diagnostic tool used to read and interpret data from a vehicle’s On-Board Diagnostics II (OBD2) system. It helps diagnose issues and monitor vehicle performance.
10.2 How Do I Read OBD2 Codes?
To read OBD2 codes, connect an OBD2 scanner to the vehicle’s OBD2 port, turn on the ignition, and follow the scanner’s instructions to retrieve the codes.
10.3 What Are Common Car Issues and How to Fix Them?
Common car issues include engine misfires, faulty O2 sensors, and catalytic converter problems. Fixes vary depending on the issue but often involve replacing faulty components.
10.4 Can I Use Any USB Cable for OBD2?
No, you cannot use any USB cable for OBD2. You need a specially wired cable that correctly connects the OBD2 port to the USB port for data transmission.
10.5 What Software Can I Use with My OBD2 to USB Cable?
You can use software like OBD Auto Doctor, Torque Pro (Android), OBD Fusion (iOS and Android), and FORScan (Windows) to read and interpret OBD2 data.
10.6 Is It Safe to Make My Own OBD2 Cable?
Yes, it is safe to make your own OBD2 cable if you follow the correct wiring diagrams and safety precautions. Ensure all connections are secure and insulated.
10.7 Where Can I Buy the Components for an OBD2 to USB Cable?
You can buy components from online retailers like Amazon and Digi-Key, or from local electronics and automotive parts stores.
10.8 How Can OBD2-SCANNER.EDU.VN Help Me?
OBD2-SCANNER.EDU.VN offers expert guidance, advanced diagnostic tools, and comprehensive repair information to help you diagnose and repair your vehicle effectively.
10.9 What Precautions Should I Take When Working with My Car’s Electrical System?
Always disconnect the battery before working on electrical components, use proper tools, wear safety gear, and work in a well-ventilated area.
10.10 How Do I Clear OBD2 Codes After a Repair?
After repairing the vehicle, use your OBD2 scanner to clear the diagnostic trouble codes. Follow the scanner’s instructions to clear the codes.
Conclusion
Creating your own OBD2 to USB cable can be a fulfilling project, providing you with a deeper understanding of your vehicle’s diagnostics. By following this comprehensive guide, you can confidently build your own cable and access valuable data from your vehicle. Remember to take safety precautions and double-check all connections to ensure a reliable and safe connection. For expert guidance and advanced diagnostic tools, consider leveraging the resources at OBD2-SCANNER.EDU.VN.
Are you facing challenges in diagnosing or repairing your vehicle? Do you need expert advice on using OBD2 scanners or creating custom OBD2 cables? Contact us today at OBD2-SCANNER.EDU.VN, located at 123 Main Street, Los Angeles, CA 90001, United States. Call us at +1 (641) 206-8880 or reach out via Whatsapp for immediate assistance. Let OBD2-SCANNER.EDU.VN help you unlock the full potential of your vehicle’s diagnostics and ensure it runs smoothly and efficiently. Don’t hesitate – your vehicle’s optimal performance is just a call or click away!