The 2003 Vw Golf Obd2 Port Bracket is typically located beneath the dashboard on the driver’s side. If you’re having trouble finding it or need to repair or replace it, OBD2-SCANNER.EDU.VN provides expert guidance to help you locate and maintain this essential component. Understanding its placement and function ensures proper diagnostics and maintenance of your vehicle.
Contents
- 1. Understanding the OBD2 Port and Its Importance
- What is an OBD2 Port?
- Why is the OBD2 Port Important?
- Common Issues Related to the OBD2 Port
- 2. Locating the OBD2 Port Bracket in a 2003 VW Golf
- Where is the OBD2 Port Located in a 2003 VW Golf?
- Step-by-Step Guide to Finding the OBD2 Port
- Tips for Identifying the OBD2 Port Bracket
- 3. Why the OBD2 Port Bracket Matters
- Importance of a Secure OBD2 Port Bracket
- Symptoms of a Damaged OBD2 Port Bracket
- Potential Issues from a Loose OBD2 Port Bracket
- 4. Step-by-Step Guide to Repairing or Replacing the OBD2 Port Bracket
- Tools and Materials Needed
- Step-by-Step Instructions for Repairing or Replacing the Bracket
- Tips for a Successful Repair or Replacement
- 5. Common Issues and Troubleshooting
- OBD2 Port Not Working After Bracket Replacement
- Diagnostic Tool Not Connecting to the OBD2 Port
- Intermittent Connection Issues
- 6. Maintaining Your VW Golf’s OBD2 Port
- Tips for Keeping the OBD2 Port in Good Condition
- Preventative Measures to Avoid Damage
- When to Seek Professional Help
- 7. Advanced Diagnostics with OBD2 Scanners
- Understanding Advanced OBD2 Functions
- Choosing the Right OBD2 Scanner for Advanced Diagnostics
- Using OBD2 Scanners to Diagnose Complex Issues
- 8. OBD2 Codes and Their Meanings
- Common OBD2 Codes for VW Golf
- How to Interpret OBD2 Codes
- Using OBD2 Codes to Guide Repairs
- 9. The Role of OBD2 in Emissions Testing
- How OBD2 Systems Monitor Emissions
- Preparing Your VW Golf for Emissions Testing
- What Happens During an OBD2 Emissions Test
- 10. OBD2 and Vehicle Security
- Potential Security Risks Associated with the OBD2 Port
- How to Protect Your Vehicle from OBD2-Related Security Threats
- Best Practices for OBD2 Port Security
- FAQ: Your Questions About the 2003 VW Golf OBD2 Port Answered
- 1. What is an OBD2 scanner?
- 2. How do I read OBD2 codes?
- 3. What are common car issues that can be diagnosed with an OBD2 scanner?
- 4. Where can I find the OBD2 port in my 2003 VW Golf?
- 5. Why is my OBD2 port not working?
- 6. How do I fix a loose OBD2 port bracket?
- 7. Can a damaged OBD2 port affect my car’s performance?
- 8. What should I do if my diagnostic tool won’t connect to the OBD2 port?
- 9. How can I protect my OBD2 port from security threats?
- 10. Is it necessary to seek professional help for OBD2 port issues?
1. Understanding the OBD2 Port and Its Importance
What is an OBD2 Port?
An OBD2 (On-Board Diagnostics II) port is a standardized interface in vehicles that allows access to the vehicle’s computer for diagnostics and monitoring. According to the Environmental Protection Agency (EPA), OBD2 systems have been mandatory in all cars sold in the US since 1996, ensuring consistent diagnostic capabilities. It enables mechanics and vehicle owners to retrieve diagnostic trouble codes (DTCs), monitor engine performance, and ensure the vehicle complies with emissions standards. The Society of Automotive Engineers (SAE) established the standards for OBD2, ensuring uniformity across different makes and models.
Why is the OBD2 Port Important?
The OBD2 port is essential for several reasons:
- Diagnostics: It allows technicians and vehicle owners to diagnose problems quickly and accurately.
- Emissions Testing: It’s crucial for emissions testing, ensuring vehicles meet environmental regulations.
- Performance Monitoring: It enables real-time monitoring of engine performance, helping to identify potential issues before they become major problems.
- Repairs: By providing access to diagnostic data, it streamlines the repair process, saving time and money.
Common Issues Related to the OBD2 Port
Several issues can arise with the OBD2 port:
- Physical Damage: The port can be physically damaged, making it difficult to connect diagnostic tools.
- Wiring Problems: Faulty wiring can prevent the port from functioning correctly.
- Software Glitches: Issues with the vehicle’s software can sometimes interfere with the OBD2 port’s operation.
- Loose Connections: Over time, connections can become loose, leading to intermittent connectivity.
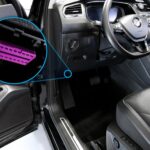
2. Locating the OBD2 Port Bracket in a 2003 VW Golf
Where is the OBD2 Port Located in a 2003 VW Golf?
In a 2003 VW Golf, the OBD2 port is typically located beneath the dashboard on the driver’s side. More specifically, it is usually found in the vicinity of the steering column or the fuse box. Its exact placement can vary slightly, but it is generally easily accessible once you know where to look.
Step-by-Step Guide to Finding the OBD2 Port
Follow these steps to locate the OBD2 port in your 2003 VW Golf:
- Get into the Driver’s Seat: Sit in the driver’s seat to get a good vantage point.
- Check Under the Dashboard: Look under the dashboard on the driver’s side.
- Search Near the Steering Column: Inspect the area around the steering column.
- Check Near the Fuse Box: The OBD2 port is often located close to the fuse box.
- Use a Flashlight: If the area is dark, use a flashlight to illuminate the space.
- Look for a 16-Pin Connector: The OBD2 port is a 16-pin connector, so look for a rectangular port with 16 pins.
Tips for Identifying the OBD2 Port Bracket
The OBD2 port bracket is the mounting structure that holds the OBD2 port in place. Here are some tips for identifying it:
- Follow the Wires: Trace the wires connected to the OBD2 port to the bracket.
- Look for a Plastic or Metal Frame: The bracket is usually made of plastic or metal.
- Check for Mounting Screws: The bracket is typically attached to the vehicle’s frame with screws.
3. Why the OBD2 Port Bracket Matters
Importance of a Secure OBD2 Port Bracket
A secure OBD2 port bracket is crucial for several reasons:
- Stable Connection: It ensures a stable connection between the diagnostic tool and the vehicle’s computer.
- Prevents Damage: It prevents physical damage to the OBD2 port and its wiring.
- Ensures Accurate Readings: A loose or damaged bracket can lead to inaccurate readings and diagnostic errors.
- Maintains Accessibility: It keeps the OBD2 port easily accessible for diagnostics and maintenance.
Symptoms of a Damaged OBD2 Port Bracket
Here are some symptoms of a damaged OBD2 port bracket:
- Loose OBD2 Port: The OBD2 port feels loose or wobbly.
- Difficulty Connecting: Difficulty connecting a diagnostic tool to the OBD2 port.
- Intermittent Connection: The connection is intermittent, causing diagnostic tools to disconnect.
- Visible Damage: Visible cracks or breaks in the bracket.
Potential Issues from a Loose OBD2 Port Bracket
A loose OBD2 port bracket can cause several issues:
- Diagnostic Errors: Inaccurate diagnostic readings can lead to misdiagnosis and unnecessary repairs.
- Data Corruption: Intermittent connections can corrupt data being transmitted between the diagnostic tool and the vehicle’s computer.
- Electrical Problems: Loose wiring can cause electrical shorts and other problems.
- Failed Emissions Testing: Inability to connect to the OBD2 port can result in failed emissions testing.
4. Step-by-Step Guide to Repairing or Replacing the OBD2 Port Bracket
Tools and Materials Needed
Before starting the repair or replacement, gather the necessary tools and materials:
- New OBD2 Port Bracket: Purchase a replacement bracket compatible with your 2003 VW Golf.
- Screwdriver Set: You’ll need a set of screwdrivers to remove and install the bracket.
- Socket Set: A socket set may be needed to remove and install the bracket, depending on the type of fasteners used.
- Pliers: Pliers can be helpful for gripping and manipulating wires.
- Flashlight: A flashlight is essential for illuminating the work area.
- Wiring Diagram: A wiring diagram can be helpful for identifying wires and connections.
- Safety Glasses: Protect your eyes from debris.
- Gloves: Protect your hands from dirt and grease.
Step-by-Step Instructions for Repairing or Replacing the Bracket
Follow these steps to repair or replace the OBD2 port bracket:
- Disconnect the Battery: Disconnect the negative terminal of the battery to prevent electrical shorts.
- Locate the OBD2 Port Bracket: Refer to the steps outlined earlier to locate the bracket.
- Remove the Old Bracket: Use a screwdriver or socket set to remove the screws or fasteners holding the bracket in place.
- Disconnect the OBD2 Port: Carefully disconnect the OBD2 port from the bracket. Be gentle to avoid damaging the connector.
- Inspect the Wiring: Check the wiring connected to the OBD2 port for any signs of damage, such as frayed wires or loose connections.
- Install the New Bracket: Place the new bracket in the same location as the old one and secure it with the screws or fasteners.
- Connect the OBD2 Port: Carefully connect the OBD2 port to the new bracket.
- Test the Connection: Connect a diagnostic tool to the OBD2 port to ensure it is working correctly.
- Reconnect the Battery: Reconnect the negative terminal of the battery.
- Verify Functionality: Start the vehicle and use a diagnostic tool to verify that the OBD2 port is functioning correctly.
Tips for a Successful Repair or Replacement
Here are some tips for a successful repair or replacement:
- Take Photos: Before disconnecting anything, take photos of the wiring and bracket to ensure you can put everything back correctly.
- Label Wires: Label any wires you disconnect to avoid confusion during reassembly.
- Use the Right Tools: Using the right tools will make the job easier and prevent damage to the vehicle.
- Be Gentle: Be gentle when disconnecting and connecting the OBD2 port to avoid damaging the connector or wiring.
- Test Thoroughly: After completing the repair or replacement, test the OBD2 port thoroughly to ensure it is working correctly.
5. Common Issues and Troubleshooting
OBD2 Port Not Working After Bracket Replacement
If the OBD2 port is not working after replacing the bracket, consider the following:
- Check the Connection: Ensure the OBD2 port is securely connected to the bracket and that all wiring connections are tight.
- Inspect the Wiring: Look for any signs of damage to the wiring, such as frayed wires or loose connections.
- Check the Fuse: Check the fuse for the OBD2 port to see if it has blown. Replace the fuse if necessary.
- Test with Another Tool: Try connecting a different diagnostic tool to the OBD2 port to rule out any issues with the tool itself.
- Consult a Professional: If you are unable to resolve the issue, consult a professional mechanic.
Diagnostic Tool Not Connecting to the OBD2 Port
If your diagnostic tool is not connecting to the OBD2 port, consider the following:
- Check the Tool: Ensure the diagnostic tool is functioning correctly and is compatible with your vehicle.
- Inspect the OBD2 Port: Look for any signs of physical damage to the OBD2 port.
- Check the Connection: Ensure the diagnostic tool is securely connected to the OBD2 port.
- Try Another Tool: Try connecting a different diagnostic tool to the OBD2 port to rule out any issues with the tool itself.
- Consult a Professional: If you are unable to resolve the issue, consult a professional mechanic.
Intermittent Connection Issues
If you are experiencing intermittent connection issues, consider the following:
- Check the Wiring: Look for any signs of loose or damaged wiring.
- Inspect the OBD2 Port: Check the OBD2 port for any signs of physical damage or corrosion.
- Secure the Bracket: Ensure the OBD2 port bracket is securely attached to the vehicle.
- Use Contact Cleaner: Use contact cleaner to clean the pins in the OBD2 port and the connector on the diagnostic tool.
- Consult a Professional: If you are unable to resolve the issue, consult a professional mechanic.
6. Maintaining Your VW Golf’s OBD2 Port
Tips for Keeping the OBD2 Port in Good Condition
Here are some tips for keeping your VW Golf’s OBD2 port in good condition:
- Protect the Port: Use a protective cover to prevent dust, dirt, and moisture from entering the port.
- Handle with Care: Handle the OBD2 port and diagnostic tools with care to avoid physical damage.
- Regular Inspections: Inspect the OBD2 port and bracket regularly for any signs of damage or wear.
- Clean the Port: Clean the OBD2 port periodically with contact cleaner to remove any dirt or corrosion.
- Secure the Bracket: Ensure the OBD2 port bracket is securely attached to the vehicle.
Preventative Measures to Avoid Damage
Here are some preventative measures to avoid damage to the OBD2 port:
- Avoid Rough Handling: Avoid rough handling of diagnostic tools when connecting or disconnecting them from the OBD2 port.
- Use Quality Tools: Use high-quality diagnostic tools that are compatible with your vehicle.
- Protect from Moisture: Protect the OBD2 port from moisture and extreme temperatures.
- Secure Wiring: Ensure the wiring connected to the OBD2 port is properly secured and protected.
- Regular Maintenance: Perform regular maintenance on your vehicle to prevent issues that could affect the OBD2 port.
When to Seek Professional Help
Seek professional help if you encounter any of the following issues:
- Unable to Locate the OBD2 Port: If you are unable to locate the OBD2 port in your vehicle.
- Physical Damage to the Port: If you notice any physical damage to the OBD2 port or bracket.
- Wiring Problems: If you suspect any wiring problems related to the OBD2 port.
- Diagnostic Tool Not Connecting: If your diagnostic tool is not connecting to the OBD2 port.
- Intermittent Connection Issues: If you are experiencing intermittent connection issues that you are unable to resolve.
7. Advanced Diagnostics with OBD2 Scanners
Understanding Advanced OBD2 Functions
Advanced OBD2 scanners offer a range of functions beyond basic code reading. These can include:
- Live Data Streaming: Viewing real-time data from various sensors.
- Actuation Tests: Testing individual components like fuel injectors or EGR valves.
- Freeze Frame Data: Capturing data when a fault code is triggered.
- Oxygen Sensor Testing: Monitoring oxygen sensor performance.
- Mode 6 Data: Accessing detailed diagnostic information for specific components.
Choosing the Right OBD2 Scanner for Advanced Diagnostics
Selecting the right OBD2 scanner depends on your needs:
- Professional Mechanics: Require advanced features, extensive vehicle coverage, and frequent software updates.
- DIY Enthusiasts: Can benefit from mid-range scanners with live data and actuation tests.
- Budget-Conscious Users: Should look for basic scanners that still offer essential functions like code reading and clearing.
Using OBD2 Scanners to Diagnose Complex Issues
OBD2 scanners can help diagnose complex issues by:
- Identifying Intermittent Faults: Monitoring live data to catch issues that don’t trigger permanent codes.
- Pinpointing Sensor Problems: Using actuation tests to verify sensor functionality.
- Analyzing Freeze Frame Data: Examining conditions when a fault code was set to understand the context.
- Comparing Sensor Readings: Identifying discrepancies between related sensors to narrow down the problem.
8. OBD2 Codes and Their Meanings
Common OBD2 Codes for VW Golf
Here are some common OBD2 codes you might encounter with a VW Golf:
| Code | Description | Possible Causes |
|---|---|---|
| P0171 | System Too Lean (Bank 1) | Vacuum leak, MAF sensor issue, fuel pump problem |
| P0300 | Random/Multiple Cylinder Misfire Detected | Spark plugs, ignition coils, fuel injectors |
| P0420 | Catalyst System Efficiency Below Threshold (Bank 1) | Faulty catalytic converter, oxygen sensor issues |
| P0401 | Exhaust Gas Recirculation Flow Insufficient Detected | EGR valve problem, blocked EGR passages |
| P0113 | Intake Air Temperature Sensor Circuit High Input | Faulty IAT sensor, wiring issues |
How to Interpret OBD2 Codes
Interpreting OBD2 codes involves:
- Reading the Code: Use an OBD2 scanner to retrieve the code.
- Consulting a Database: Look up the code in a reliable OBD2 code database.
- Identifying Possible Causes: Determine the possible causes based on the code description.
- Verifying the Issue: Perform further diagnostics to confirm the cause.
- Performing Repairs: Fix the underlying issue and clear the code.
Using OBD2 Codes to Guide Repairs
OBD2 codes provide a starting point for repairs. For example:
- P0171 (System Too Lean): Check for vacuum leaks, MAF sensor issues, and fuel pump problems.
- P0300 (Misfire): Inspect spark plugs, ignition coils, and fuel injectors.
- P0420 (Catalyst Efficiency): Evaluate the catalytic converter and oxygen sensors.
9. The Role of OBD2 in Emissions Testing
How OBD2 Systems Monitor Emissions
OBD2 systems monitor emissions by:
- Tracking Sensor Data: Monitoring oxygen sensors, MAF sensors, and other components.
- Running Diagnostic Tests: Performing tests on the catalytic converter, EGR system, and other emissions-related components.
- Storing Fault Codes: Recording fault codes when emissions exceed acceptable levels.
- Illuminating the Check Engine Light: Alerting the driver to potential emissions issues.
Preparing Your VW Golf for Emissions Testing
To prepare your VW Golf for emissions testing:
- Check for Codes: Use an OBD2 scanner to check for any stored fault codes.
- Address Any Issues: Repair any issues that could cause your vehicle to fail the test.
- Complete a Drive Cycle: Perform a drive cycle to ensure all OBD2 monitors are ready.
- Ensure Readiness: Verify that all monitors are in a ready state before the test.
What Happens During an OBD2 Emissions Test
During an OBD2 emissions test:
- Connection: The testing facility connects to your vehicle’s OBD2 port.
- Code Check: The system checks for any stored fault codes.
- Readiness Verification: The system verifies that all OBD2 monitors are ready.
- Results: The results are evaluated to determine if your vehicle passes or fails.
10. OBD2 and Vehicle Security
Potential Security Risks Associated with the OBD2 Port
The OBD2 port can be a potential entry point for vehicle hacking:
- Malware Injection: Hackers can inject malware through the OBD2 port.
- Data Theft: Sensitive vehicle data can be stolen.
- Remote Control: Hackers can potentially gain remote control of vehicle systems.
How to Protect Your Vehicle from OBD2-Related Security Threats
To protect your vehicle:
- Use Reputable Tools: Only use trusted OBD2 scanners and software.
- Monitor Access: Be aware of who has access to your OBD2 port.
- Secure the Port: Consider using a locking OBD2 port cover.
- Keep Software Updated: Keep your vehicle’s software updated to patch security vulnerabilities.
- Consult Professionals: Seek advice from cybersecurity experts specializing in automotive security.
Best Practices for OBD2 Port Security
Follow these best practices:
- Regular Audits: Perform regular security audits of your vehicle’s systems.
- Awareness: Stay informed about potential OBD2 security threats.
- Secure Devices: Use secure diagnostic tools with up-to-date security features.
- Professional Services: Consider using professional cybersecurity services for vehicle protection.
For any issues you encounter with your 2003 VW Golf OBD2 port bracket, remember that OBD2-SCANNER.EDU.VN is here to assist. Our experts can provide detailed guidance and support to ensure your vehicle’s diagnostic systems are functioning optimally. Contact us today for assistance at 123 Main Street, Los Angeles, CA 90001, United States, via WhatsApp at +1 (641) 206-8880, or visit our website at OBD2-SCANNER.EDU.VN. Let us help you keep your vehicle running smoothly.
FAQ: Your Questions About the 2003 VW Golf OBD2 Port Answered
1. What is an OBD2 scanner?
An OBD2 scanner is a diagnostic tool used to read and interpret data from a vehicle’s onboard computer system, helping identify issues and potential problems.
2. How do I read OBD2 codes?
To read OBD2 codes, connect an OBD2 scanner to the OBD2 port, turn on the ignition, and follow the scanner’s instructions to retrieve the diagnostic trouble codes (DTCs).
3. What are common car issues that can be diagnosed with an OBD2 scanner?
Common issues include engine misfires, emissions problems, sensor failures, and transmission issues, all of which generate specific OBD2 codes.
4. Where can I find the OBD2 port in my 2003 VW Golf?
The OBD2 port in a 2003 VW Golf is typically located under the dashboard on the driver’s side, often near the steering column or fuse box.
5. Why is my OBD2 port not working?
A non-functioning OBD2 port can be due to physical damage, wiring problems, a blown fuse, or software glitches. Check these components to diagnose the issue.
6. How do I fix a loose OBD2 port bracket?
To fix a loose OBD2 port bracket, you may need to tighten the screws, replace the bracket if it’s damaged, or secure it with additional fasteners.
7. Can a damaged OBD2 port affect my car’s performance?
Yes, a damaged OBD2 port can prevent proper diagnostics, leading to misdiagnosis and potentially affecting your car’s performance and emissions.
8. What should I do if my diagnostic tool won’t connect to the OBD2 port?
Ensure the diagnostic tool is compatible with your vehicle, check the OBD2 port for damage, and verify the connection. If problems persist, consult a professional.
9. How can I protect my OBD2 port from security threats?
Use reputable diagnostic tools, monitor access to the port, and consider using a locking cover to prevent unauthorized access and potential hacking.
10. Is it necessary to seek professional help for OBD2 port issues?
While some issues can be resolved with DIY methods, complex problems or persistent connection failures may require professional diagnostic and repair services.
Need expert assistance with your 2003 VW Golf OBD2 port? Contact OBD2-SCANNER.EDU.VN today at 123 Main Street, Los Angeles, CA 90001, United States, via WhatsApp at +1 (641) 206-8880, or visit our website at OBD2-SCANNER.EDU.VN for reliable support and solutions.