Clearing a check engine light is possible with an OBD2 scanner, and understanding the process empowers you to address minor issues yourself. OBD2-SCANNER.EDU.VN offers comprehensive guides and tools to help you diagnose and resolve car problems effectively. Take control of your vehicle’s health with our expert insights on automotive diagnostics, vehicle maintenance, and diagnostic tools.
Contents
- 1. What is an OBD2 Scanner and How Can It Help Clear the Check Engine Light?
- Understanding OBD2 Systems
- Benefits of Using an OBD2 Scanner
- Choosing the Right OBD2 Scanner
- 2. Identifying the Five Most Common Reasons for a Check Engine Light
- 1. Loose or Damaged Fuel Cap
- 2. Faulty Oxygen Sensor
- 3. Catalytic Converter Issues
- 4. Mass Airflow (MAF) Sensor Problems
- 5. Spark Plug or Ignition Coil Problems
- 3. Step-by-Step Guide: How to Clear a Check Engine Light Using an OBD2 Scanner
- Step 1: Connect the OBD2 Scanner
- Step 2: Turn On the Ignition
- Step 3: Read the Codes
- Step 4: Diagnose the Issue
- Step 5: Fix the Problem
- Step 6: Clear the Codes
- Step 7: Verify the Fix
- 4. When Should You Not Clear the Check Engine Light?
- Understanding the Risks of Clearing Codes Prematurely
- Situations Where Clearing the Light is Not Recommended
- Alternatives to Clearing the Check Engine Light
- 5. Common Mistakes to Avoid When Using an OBD2 Scanner to Clear Codes
- 1. Ignoring the Underlying Problem
- 2. Using a Low-Quality Scanner
- 3. Not Researching the Codes
- 4. Forgetting to Check for Related Issues
- 6. Understanding the Limitations of Clearing a Check Engine Light
- 1. Clearing the Light Doesn’t Fix the Problem
- 2. Temporary Solution
- 3. Loss of Diagnostic Data
- 7. Alternative Ways to Diagnose a Check Engine Light Without a Scanner
- 1. Visual Inspection
- 2. Listen for Unusual Noises
- 3. Check Fluid Levels
- 4. Consult Online Forums
- 8. The Future of OBD2 Scanners and Vehicle Diagnostics
- 1. Wireless Connectivity
- 2. Cloud-Based Diagnostics
- 3. Artificial Intelligence (AI)
- 4. Integration with Mobile Apps
1. What is an OBD2 Scanner and How Can It Help Clear the Check Engine Light?
An OBD2 scanner is a diagnostic tool that accesses your vehicle’s On-Board Diagnostics system, helping clear the check engine light. According to the Environmental Protection Agency (EPA), OBD systems monitor the performance of critical engine components. These scanners read diagnostic trouble codes (DTCs), which pinpoint potential problems, and allow you to reset the system after addressing the issue. Using an OBD2 scanner is a simple process that can save you time and money on car repairs.
Understanding OBD2 Systems
OBD2, or On-Board Diagnostics II, is a standardized system implemented in all cars sold in the United States after 1996. Its primary function is to monitor the performance of the engine, transmission, and other essential components, ensuring they operate within acceptable environmental standards. The OBD2 system consists of several sensors that continuously collect data and report any malfunctions to the car’s computer.
According to a study by the National Institute for Automotive Service Excellence (ASE), understanding the OBD2 system is crucial for modern car maintenance. When a sensor detects an issue, it triggers the check engine light on your dashboard, signaling that something needs attention. The OBD2 system then stores a specific Diagnostic Trouble Code (DTC) that corresponds to the detected problem.
 OBD2 Port Location
Alt text: Locating the OBD2 port under the dashboard for check engine light diagnosis.
Benefits of Using an OBD2 Scanner
Using an OBD2 scanner offers several benefits for car owners and automotive technicians:
- Early Problem Detection: OBD2 scanners allow you to identify problems early, preventing minor issues from escalating into major repairs.
- Cost Savings: By diagnosing and addressing issues yourself, you can avoid costly trips to the mechanic.
- Informed Decision-Making: Knowing the exact problem allows you to discuss repairs more knowledgeably with your mechanic, ensuring fair pricing and appropriate solutions.
- Performance Monitoring: Some advanced OBD2 scanners can monitor real-time performance data, helping you optimize your car’s efficiency and performance.
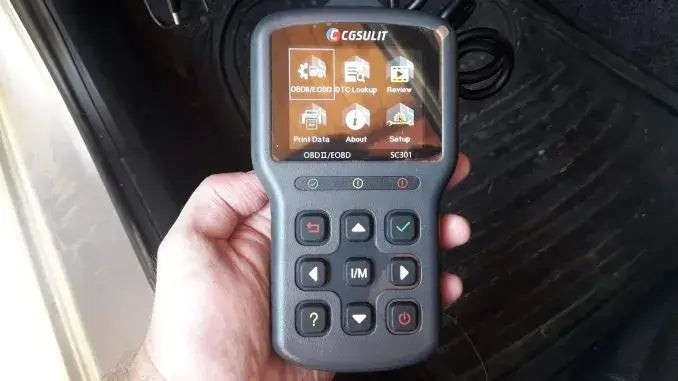
Choosing the Right OBD2 Scanner
When choosing an OBD2 scanner, consider the following factors:
- Functionality: Basic scanners can read and clear DTCs, while more advanced models offer features like live data streaming, freeze frame data, and bi-directional control.
- Compatibility: Ensure the scanner is compatible with your car’s make and model.
- User-Friendliness: Look for a scanner with an intuitive interface and clear display for easy navigation.
- Portability: Consider the size and weight of the scanner, especially if you plan to use it frequently on multiple vehicles.
OBD2-SCANNER.EDU.VN offers a range of OBD2 scanners to suit various needs and budgets. Our tools are designed for both beginners and experienced technicians, providing accurate and reliable diagnostic information.
2. Identifying the Five Most Common Reasons for a Check Engine Light
Several common issues can trigger the check engine light. Recognizing these can help you troubleshoot efficiently. According to the Society of Automotive Engineers (SAE), these are some typical causes:
- Loose Fuel Cap: The fuel cap prevents fuel vapors from escaping. A loose or damaged cap can cause the engine light to illuminate.
- Faulty Oxygen Sensor: Oxygen sensors measure the amount of oxygen in the exhaust to ensure proper air-fuel mixture.
- Catalytic Converter Issues: The catalytic converter reduces harmful emissions. Problems with this component can trigger the engine light.
- Mass Airflow (MAF) Sensor Problems: The MAF sensor measures the amount of air entering the engine, affecting fuel efficiency.
- Spark Plug or Ignition Coil Problems: These components are crucial for igniting the air-fuel mixture in the engine.
1. Loose or Damaged Fuel Cap
A loose or damaged fuel cap is one of the simplest and most common reasons for the check engine light to come on. The fuel cap’s primary function is to seal the fuel system, preventing gasoline vapors from escaping into the atmosphere. When the fuel cap is loose, cracked, or missing, it can cause a pressure drop in the fuel system. This pressure drop is detected by the car’s computer, which then illuminates the check engine light.
Impact:
- Environmental: Escaping fuel vapors contribute to air pollution.
- Fuel Efficiency: Loss of fuel vapors can slightly reduce fuel efficiency.
- Diagnostic Trouble Code (DTC): Typically triggers codes like P0455 (Evaporative Emission Control System Leak Detected – Gross Leak).
Solution:
- Check the Fuel Cap: Remove the fuel cap and inspect it for any visible damage, such as cracks or a worn-out rubber seal.
- Tighten the Cap: Ensure the fuel cap is properly tightened until you hear a click.
- Clear the Code: Use an OBD2 scanner to clear the check engine light. It may take a few drive cycles for the light to turn off automatically if the issue is resolved.
- Replace the Cap: If the cap is damaged, replace it with a new one from a reputable auto parts store.
2. Faulty Oxygen Sensor
Oxygen sensors play a vital role in monitoring the amount of oxygen in the exhaust gases. These sensors provide feedback to the car’s computer, which adjusts the air-fuel mixture to ensure optimal combustion. A faulty oxygen sensor can lead to poor fuel economy, increased emissions, and potential damage to the catalytic converter.
Impact:
- Fuel Efficiency: Inaccurate readings can cause the engine to run too rich (too much fuel) or too lean (not enough fuel), reducing fuel economy.
- Emissions: Increased emissions can lead to failing an emissions test.
- Engine Performance: Poor engine performance, including hesitation or rough idling.
- Diagnostic Trouble Code (DTC): Common codes include P0131 (O2 Sensor Circuit Low Voltage – Bank 1 Sensor 1) or P0171 (System Too Lean – Bank 1).
Solution:
- Diagnose with an OBD2 Scanner: Use an OBD2 scanner to confirm the oxygen sensor is the issue and identify which sensor is faulty (e.g., upstream or downstream).
- Inspect the Sensor: Check the sensor and its wiring for any visible damage.
- Replace the Sensor: Replace the faulty oxygen sensor. It’s often recommended to replace both upstream sensors at the same time to ensure balanced performance.
 Faulty Oxygen Sensor
Alt text: Reading and interpreting OBD2 error codes for vehicle diagnostics.
3. Catalytic Converter Issues
The catalytic converter is an essential component of the exhaust system that reduces harmful pollutants from the engine’s exhaust gases. Over time, the catalytic converter can become clogged or damaged, leading to reduced efficiency and increased emissions.
Impact:
- Emissions: Failing an emissions test due to high levels of pollutants.
- Engine Performance: Reduced engine power and acceleration.
- Fuel Efficiency: Decreased fuel economy.
- Diagnostic Trouble Code (DTC): Often triggers codes like P0420 (Catalyst System Efficiency Below Threshold – Bank 1).
Solution:
- Diagnose with an OBD2 Scanner: Confirm the catalytic converter is the issue using an OBD2 scanner.
- Inspect the Exhaust System: Check for any leaks or damage in the exhaust system.
- Test the Catalytic Converter: A professional mechanic can perform tests to assess the efficiency of the catalytic converter.
- Replace the Catalytic Converter: If the catalytic converter is faulty, it will need to be replaced.
4. Mass Airflow (MAF) Sensor Problems
The Mass Airflow (MAF) sensor measures the amount of air entering the engine. This information is crucial for the car’s computer to calculate the correct amount of fuel to inject for optimal combustion. A faulty MAF sensor can cause a variety of performance issues.
Impact:
- Engine Performance: Rough idling, stalling, or hesitation during acceleration.
- Fuel Efficiency: Reduced fuel economy.
- Emissions: Increased emissions.
- Diagnostic Trouble Code (DTC): Common codes include P0101 (Mass Air Flow Circuit Range/Performance Problem) or P0102 (Mass Air Flow Circuit Low Input).
Solution:
- Diagnose with an OBD2 Scanner: Use an OBD2 scanner to confirm the MAF sensor is the problem.
- Inspect the Sensor: Check the MAF sensor for any visible dirt or damage.
- Clean the MAF Sensor: Use a specialized MAF sensor cleaner to gently clean the sensor.
- Replace the MAF Sensor: If cleaning doesn’t resolve the issue, the MAF sensor may need to be replaced.
5. Spark Plug or Ignition Coil Problems
Spark plugs and ignition coils are essential for igniting the air-fuel mixture in the engine’s cylinders. Faulty spark plugs or ignition coils can cause misfires, leading to poor engine performance and potential damage to other components.
Impact:
- Engine Performance: Engine misfires, rough idling, and reduced power.
- Fuel Efficiency: Decreased fuel economy.
- Emissions: Increased emissions.
- Diagnostic Trouble Code (DTC): Common codes include P0300 (Random Misfire Detected), P0301 (Cylinder 1 Misfire Detected), or codes related to ignition coil failure.
Solution:
- Diagnose with an OBD2 Scanner: Use an OBD2 scanner to identify which cylinder is misfiring.
- Inspect Spark Plugs: Remove the spark plugs and inspect them for wear, damage, or fouling.
- Replace Spark Plugs: Replace worn or damaged spark plugs. It’s often recommended to replace all spark plugs at the same time.
- Test Ignition Coils: Use a multimeter to test the ignition coils.
- Replace Ignition Coils: Replace any faulty ignition coils.
Understanding these common issues can help you effectively use an OBD2 scanner to diagnose and clear the check engine light. For more detailed guides and expert advice, visit OBD2-SCANNER.EDU.VN.
3. Step-by-Step Guide: How to Clear a Check Engine Light Using an OBD2 Scanner
Clearing a check engine light involves a few simple steps. Here’s a comprehensive guide:
- Connect the OBD2 Scanner: Locate the OBD2 port (usually under the dashboard) and plug in the scanner.
- Turn On the Ignition: Turn the key to the “on” position without starting the engine.
- Read the Codes: Follow the scanner’s instructions to read the diagnostic trouble codes (DTCs).
- Diagnose the Issue: Research the codes to understand the problem. Resources like OBD2-SCANNER.EDU.VN offer detailed explanations.
- Fix the Problem: Address the issue based on the diagnostic code.
- Clear the Codes: Use the scanner to clear the DTCs.
- Verify the Fix: Start the engine and see if the check engine light stays off.
Step 1: Connect the OBD2 Scanner
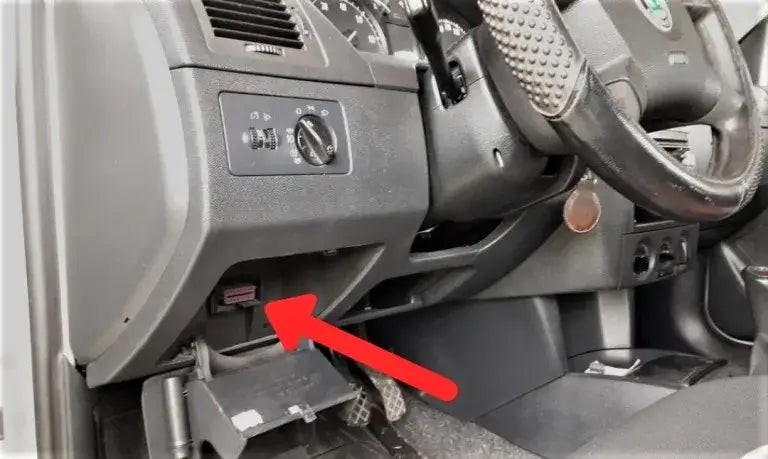
The first step in clearing a check engine light is to connect the OBD2 scanner to your vehicle. The OBD2 port is typically located under the dashboard on the driver’s side. In some vehicles, it may be concealed by a small panel.
Procedure:
- Locate the OBD2 Port: Look for a 16-pin connector, usually trapezoidal in shape.
- Connect the Scanner: Plug the OBD2 scanner into the port. Ensure it is securely connected.
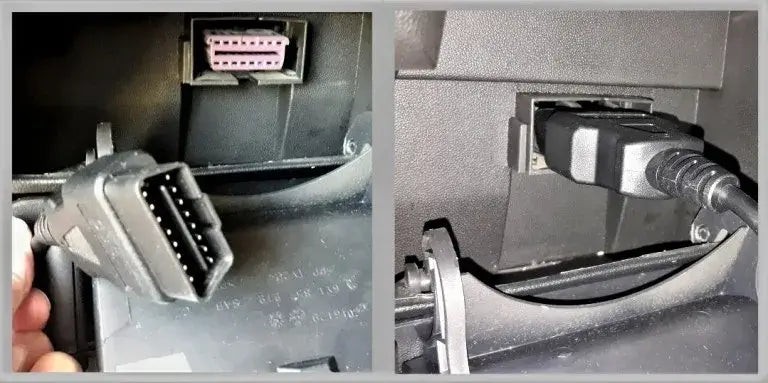 Connect OBD2 Scanner
Alt text: Connecting the OBD2 code reader to the vehicle’s diagnostic port.
Step 2: Turn On the Ignition
Once the OBD2 scanner is connected, turn the ignition to the “on” position. This provides power to the scanner and allows it to communicate with the vehicle’s computer.
Procedure:
- Insert the Key: Insert the car key into the ignition.
- Turn to “On” Position: Turn the key to the “on” position without starting the engine. All the dashboard lights should illuminate.
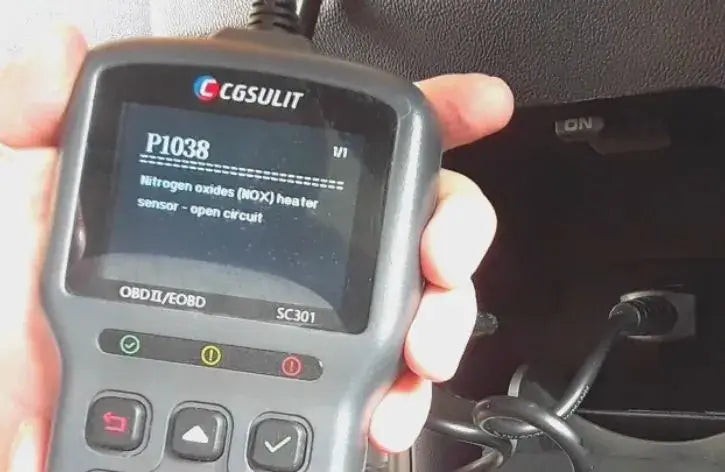
Step 3: Read the Codes
Using the OBD2 scanner, read the diagnostic trouble codes (DTCs) stored in the vehicle’s computer.
Procedure:
- Navigate the Menu: Use the scanner’s menu to select the “Read Codes” or “Diagnostic Codes” option.
- Record the Codes: Write down the codes that appear on the screen. There may be multiple codes, each indicating a different issue.
Step 4: Diagnose the Issue
Research the diagnostic trouble codes to understand the nature of the problem. Resources like OBD2-SCANNER.EDU.VN provide detailed explanations of each code and potential solutions.
Resources:
- Online Databases: Websites like OBD2-SCANNER.EDU.VN offer comprehensive databases of OBD2 codes and their meanings.
- Repair Manuals: Consult your vehicle’s repair manual for specific information on the codes and recommended repair procedures.
Step 5: Fix the Problem
Address the issue based on the diagnostic code. This may involve replacing a faulty sensor, tightening a loose gas cap, or performing more complex repairs.
Examples:
- P0420 (Catalyst System Efficiency Below Threshold): This code may indicate a faulty catalytic converter or oxygen sensor.
- P0171 (System Too Lean – Bank 1): This code may indicate a vacuum leak or a faulty MAF sensor.
Step 6: Clear the Codes
After addressing the issue, use the OBD2 scanner to clear the diagnostic trouble codes.
Procedure:
- Navigate the Menu: Use the scanner’s menu to select the “Clear Codes” or “Erase Codes” option.
- Confirm the Action: Follow the on-screen prompts to confirm that you want to clear the codes.
- Wait for Confirmation: The scanner will display a message indicating that the codes have been cleared.
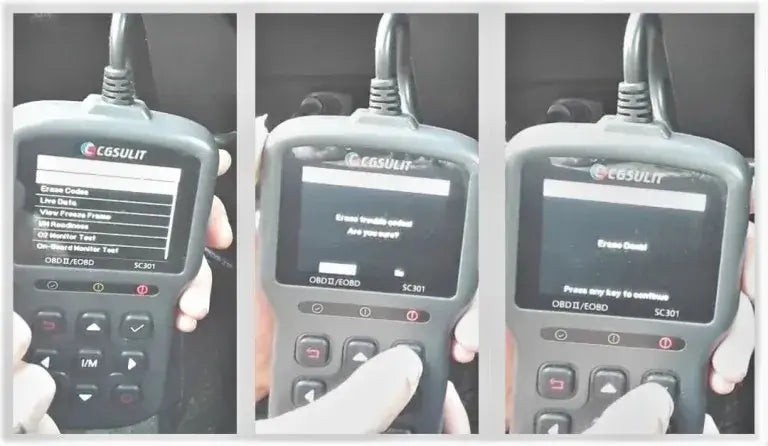 Clear Codes
Alt text: Navigating the OBD2 scanner menu to clear diagnostic trouble codes.
Step 7: Verify the Fix
Start the engine and check if the check engine light remains off. It may take a few drive cycles for the light to turn off automatically if the issue is intermittent.
Procedure:
- Start the Engine: Turn the ignition key to start the engine.
- Check the Dashboard: Observe the check engine light. If it remains off, the issue has been successfully resolved.
- Drive the Vehicle: Drive the vehicle for a few miles to ensure the check engine light does not reappear.
By following these steps, you can effectively clear a check engine light using an OBD2 scanner. For more detailed guides and expert advice, visit OBD2-SCANNER.EDU.VN.
4. When Should You Not Clear the Check Engine Light?
While clearing the check engine light can be tempting, there are situations where it’s best to avoid doing so. According to automotive experts at AAA, you shouldn’t clear the light if:
- You Don’t Know the Cause: Clearing the code without diagnosing the problem leaves the underlying issue unresolved.
- The Car is Running Poorly: If the car is experiencing performance issues, clearing the light won’t fix the problem and may mask important symptoms.
- Preparing for an Emissions Test: Clearing the codes right before an emissions test can result in a failed test because the car’s systems haven’t had time to reset.
Understanding the Risks of Clearing Codes Prematurely
Clearing the check engine light without addressing the underlying issue can lead to several potential problems:
- Masking Serious Issues: The check engine light is designed to alert you to potential problems that could cause significant damage if left unaddressed. Clearing the light without fixing the issue can mask these serious problems, leading to more costly repairs down the road.
- False Sense of Security: Seeing the check engine light disappear can create a false sense of security, leading you to believe that the problem has been resolved when it has not. This can result in you continuing to drive the vehicle with a potentially dangerous condition.
- Inaccurate Diagnostic Information: Clearing the codes erases valuable diagnostic information that can help mechanics accurately diagnose the problem. This can make it more difficult and time-consuming to identify the root cause of the issue, potentially increasing repair costs.
Situations Where Clearing the Light is Not Recommended
- Severe Engine Performance Issues: If your car is experiencing severe engine performance issues, such as rough idling, stalling, or significant loss of power, it is crucial to have the problem diagnosed and repaired before clearing the check engine light.
- Safety Concerns: If the check engine light is accompanied by other warning lights, such as the ABS (Anti-lock Braking System) or airbag light, it is important to address these safety concerns before clearing the codes.
- Persistent Check Engine Light: If the check engine light comes back on shortly after being cleared, it indicates that the underlying issue has not been resolved. In this case, it is important to have the problem diagnosed and repaired by a professional mechanic.
Alternatives to Clearing the Check Engine Light
If you are unsure about the cause of the check engine light or are experiencing significant performance issues, there are several alternatives to clearing the light:
- Consult a Professional Mechanic: A qualified mechanic can accurately diagnose the problem and recommend the appropriate repairs.
- Perform a Thorough Inspection: Inspect your car for any obvious signs of damage or wear, such as leaks, unusual noises, or worn-out parts.
- Gather Information: Research the potential causes of the check engine light based on the symptoms you are experiencing.
By understanding when not to clear the check engine light and exploring alternative solutions, you can ensure that your car is properly diagnosed and repaired, avoiding potential safety hazards and costly repairs. Visit OBD2-SCANNER.EDU.VN for more expert advice and resources on automotive diagnostics.
5. Common Mistakes to Avoid When Using an OBD2 Scanner to Clear Codes
Using an OBD2 scanner effectively requires avoiding common pitfalls. Here are some mistakes to steer clear of:
- Ignoring the Underlying Problem: Clearing the code without fixing the issue is a temporary solution.
- Using a Low-Quality Scanner: Inexpensive scanners may provide inaccurate readings or lack essential features.
- Not Researching the Codes: Failing to understand the codes can lead to misdiagnosis and ineffective repairs.
- Forgetting to Check for Related Issues: Sometimes, one problem can trigger multiple codes, so it’s important to investigate all related issues.
1. Ignoring the Underlying Problem
One of the most common and detrimental mistakes when using an OBD2 scanner is clearing the code without addressing the underlying problem. While it might be tempting to simply turn off the check engine light, this approach only provides a temporary fix and can lead to more severe issues in the long run.
Why This Is a Mistake:
- Temporary Fix: Clearing the code only turns off the light; it doesn’t resolve the actual issue causing the problem.
- Potential for Further Damage: The underlying problem can continue to worsen, potentially leading to more extensive and costly repairs.
- Safety Risks: Ignoring the issue can compromise the safety of the vehicle and its occupants.
Best Practice:
- Diagnose the Code: Use the OBD2 scanner to read the diagnostic trouble code (DTC) and understand what it means.
- Research the Issue: Research the code to identify the potential causes and solutions.
- Address the Problem: Perform the necessary repairs or maintenance to fix the underlying issue.
- Clear the Code: Only clear the code after you have addressed the problem.
2. Using a Low-Quality Scanner
Another common mistake is using a low-quality or unreliable OBD2 scanner. Inexpensive scanners may not provide accurate readings or may lack essential features, leading to misdiagnosis and ineffective repairs.
Why This Is a Mistake:
- Inaccurate Readings: Low-quality scanners may provide inaccurate or incomplete diagnostic information.
- Limited Functionality: Basic scanners may lack essential features such as live data streaming, freeze frame data, and bi-directional control.
- Compatibility Issues: Some scanners may not be compatible with all vehicle makes and models.
Best Practice:
- Invest in a Reputable Scanner: Choose an OBD2 scanner from a reputable brand known for accuracy and reliability.
- Check Compatibility: Ensure the scanner is compatible with your vehicle’s make and model.
- Consider Features: Look for a scanner with the features you need, such as live data streaming, freeze frame data, and bi-directional control.
3. Not Researching the Codes
Failing to research and understand the diagnostic trouble codes (DTCs) is another common mistake. Without a clear understanding of the codes, you may misdiagnose the problem and perform unnecessary repairs.
Why This Is a Mistake:
- Misdiagnosis: Misinterpreting the codes can lead to incorrect diagnoses and ineffective repairs.
- Unnecessary Repairs: Performing unnecessary repairs can waste time and money.
- Potential for Further Damage: Incorrect repairs can potentially cause further damage to the vehicle.
Best Practice:
- Consult Reliable Resources: Use reliable resources such as OBD2-SCANNER.EDU.VN to research the meaning of the codes.
- Check Multiple Sources: Verify the information with multiple sources to ensure accuracy.
- Consider the Context: Consider the context of the code and any other symptoms you are experiencing.
4. Forgetting to Check for Related Issues
Sometimes, one problem can trigger multiple diagnostic trouble codes (DTCs). Forgetting to check for related issues can lead to incomplete repairs and the check engine light coming back on.
Why This Is a Mistake:
- Incomplete Repairs: Addressing only one code may not resolve the underlying problem.
- Check Engine Light Reappearance: The check engine light may come back on if related issues are not addressed.
- Potential for Further Damage: Related issues can potentially cause further damage to the vehicle if left unaddressed.
Best Practice:
- Read All Codes: Read all the diagnostic trouble codes stored in the vehicle’s computer.
- Identify Related Issues: Look for codes that may be related to the primary issue.
- Address All Issues: Perform the necessary repairs or maintenance to address all related issues.
By avoiding these common mistakes, you can effectively use an OBD2 scanner to diagnose and clear codes, ensuring your vehicle is properly maintained and repaired. Visit OBD2-SCANNER.EDU.VN for more expert advice and resources on automotive diagnostics.
 OBD2 Scanner
Alt text: The OBD2 scan tool start menu for check engine light troubleshooting.
6. Understanding the Limitations of Clearing a Check Engine Light
Clearing a check engine light has its limitations. According to a report by Consumer Reports, it’s essential to understand these to avoid potential issues:
- Doesn’t Fix the Problem: Clearing the light only resets the system; it doesn’t repair the underlying issue.
- Temporary Solution: The light may reappear if the problem persists.
- Loss of Diagnostic Data: Clearing the codes erases valuable information that can help mechanics diagnose the issue.
1. Clearing the Light Doesn’t Fix the Problem
One of the most critical limitations to understand is that clearing the check engine light does not fix the underlying problem. The check engine light is an indicator that something is amiss within your vehicle’s systems. Clearing the light simply resets the indicator without addressing the root cause of the issue.
Why This Is a Limitation:
- Masking the Issue: Clearing the light can mask a potentially serious problem, allowing it to worsen over time.
- False Sense of Security: It can give you a false sense of security, leading you to believe that the problem has been resolved when it has not.
- Potential for Further Damage: The underlying issue can continue to cause damage to your vehicle, leading to more costly repairs down the road.
Best Practice:
- Diagnose the Issue: Always diagnose the cause of the check engine light before clearing it.
- Address the Problem: Perform the necessary repairs or maintenance to fix the underlying issue.
- Clear the Code: Only clear the code after you have addressed the problem.
2. Temporary Solution
Clearing a check engine light is often a temporary solution. If the underlying problem persists, the check engine light will likely reappear after a few drive cycles.
Why This Is a Limitation:
- Recurring Issue: The check engine light will continue to come back on until the underlying problem is resolved.
- Frustration: It can be frustrating to repeatedly clear the check engine light only to have it reappear.
- Ignoring the Real Problem: Relying on clearing the light as a solution can lead you to ignore the real problem and potentially cause further damage to your vehicle.
Best Practice:
- Monitor the Light: Pay attention to whether the check engine light comes back on after clearing it.
- Address the Issue: If the light reappears, take your vehicle to a qualified mechanic to diagnose and repair the problem.
3. Loss of Diagnostic Data
Clearing the codes erases valuable diagnostic information that can help mechanics accurately diagnose the issue. This information includes freeze frame data, which captures a snapshot of the engine’s operating conditions at the moment the code was triggered.
Why This Is a Limitation:
- Difficulty in Diagnosing: Without the diagnostic data, it can be more difficult and time-consuming for mechanics to diagnose the problem.
- Increased Repair Costs: The increased time required to diagnose the issue can lead to higher repair costs.
- Potential for Misdiagnosis: Without the diagnostic data, there is a greater risk of misdiagnosis and unnecessary repairs.
Best Practice:
- Record the Codes: Write down the diagnostic trouble codes (DTCs) before clearing them.
- Capture Freeze Frame Data: If possible, capture the freeze frame data using the OBD2 scanner before clearing the codes.
- Share the Information: Provide the codes and freeze frame data to your mechanic when you take your vehicle in for repairs.
Understanding these limitations can help you use an OBD2 scanner more effectively and avoid potential problems. Visit OBD2-SCANNER.EDU.VN for more expert advice and resources on automotive diagnostics.
7. Alternative Ways to Diagnose a Check Engine Light Without a Scanner
While an OBD2 scanner is the most efficient tool, alternative methods can help diagnose a check engine light:
- Visual Inspection: Check for loose gas caps, damaged wires, or other obvious issues.
- Listen for Unusual Noises: Pay attention to any unusual sounds coming from the engine or exhaust system.
- Check Fluid Levels: Ensure all fluid levels, such as oil, coolant, and brake fluid, are within the recommended range.
- Consult Online Forums: Many online forums provide valuable information on common car problems and potential solutions.
1. Visual Inspection
Performing a visual inspection is a simple yet effective way to diagnose a check engine light without an OBD2 scanner. This involves carefully examining your vehicle for any obvious signs of damage, wear, or other issues that could be triggering the light.
What to Look For:
- Loose Gas Cap: Ensure the gas cap is properly tightened.
- Damaged Wires: Check for any frayed, cracked, or disconnected wires.
- Vacuum Leaks: Look for any loose or disconnected vacuum hoses.
- Fluid Leaks: Check for any signs of fluid leaks, such as oil, coolant, or brake fluid.
- Exhaust System: Inspect the exhaust system for any signs of damage or leaks.
How to Perform a Visual Inspection:
- Gather Supplies: You will need a flashlight, gloves, and a basic set of tools.
- Start with the Basics: Begin by checking the gas cap and fluid levels.
- Inspect the Engine Bay: Carefully inspect the engine bay for any signs of damage or leaks.
- Check Under the Vehicle: Use a flashlight to check under the vehicle for any signs of fluid leaks or exhaust system damage.
2. Listen for Unusual Noises
Paying attention to any unusual noises coming from your engine or exhaust system can provide valuable clues about the cause of the check engine light. Different noises can indicate different types of problems.
Common Noises and What They May Indicate:
- Hissing: A hissing noise may indicate a vacuum leak.
- Knocking: A knocking noise may indicate engine problems.
- Rattling: A rattling noise may indicate loose exhaust system components.
- Screeching: A screeching noise may indicate a worn-out belt.
How to Listen for Unusual Noises:
- Start the Engine: Start the engine and let it idle for a few minutes.
- Listen Carefully: Listen carefully for any unusual noises coming from the engine bay or exhaust system.
- Identify the Source: Try to identify the source of the noise.
3. Check Fluid Levels
Ensuring that all fluid levels are within the recommended range is another important step in diagnosing a check engine light without a scanner. Low fluid levels can trigger the check engine light and indicate potential problems.
Fluids to Check:
- Engine Oil: Check the oil level using the dipstick.
- Coolant: Check the coolant level in the coolant reservoir.
- Brake Fluid: Check the brake fluid level in the master cylinder.
- Power Steering Fluid: Check the power steering fluid level in the power steering reservoir.
- Transmission Fluid: Check the transmission fluid level (if your vehicle has a dipstick for this purpose).
How to Check Fluid Levels:
- Locate the Reservoirs: Locate the reservoirs for each fluid.
- Check the Levels: Check the fluid levels against the markings on the reservoirs or dipsticks.
- Add Fluid as Needed: Add fluid as needed to bring the levels within the recommended range.
4. Consult Online Forums
Many online forums provide valuable information on common car problems and potential solutions. These forums can be a great resource for diagnosing a check engine light without a scanner.
How to Use Online Forums:
- Find a Relevant Forum: Search for online forums that are specific to your vehicle’s make and model.
- Describe the Problem: Describe the problem you are experiencing, including any symptoms and noises.
- Search for Solutions: Search the forum for similar problems and potential solutions.
- Ask for Advice: Ask for advice from other forum members.
By using these alternative methods, you can diagnose a check engine light without an OBD2 scanner. For more expert advice and resources on automotive diagnostics, visit OBD2-SCANNER.EDU.VN.
8. The Future of OBD2 Scanners and Vehicle Diagnostics
The future of OBD2 scanners and vehicle diagnostics is evolving rapidly. According to a report by Grand View Research, the global automotive diagnostics market is expected to grow significantly in the coming years, driven by advancements in technology and increasing demand for vehicle maintenance and repair services.
- Wireless Connectivity: Modern scanners offer Bluetooth and Wi-Fi connectivity for easier data transfer and software updates.
- Cloud-Based Diagnostics: Cloud-based platforms provide access to extensive databases and remote diagnostic capabilities.
- Artificial Intelligence (AI): AI-powered scanners can analyze data and provide more accurate diagnoses and repair recommendations.
- Integration with Mobile Apps: Mobile apps allow users to monitor vehicle health and perform basic diagnostics using their smartphones.
1. Wireless Connectivity
Wireless connectivity is becoming an increasingly common feature in OBD2 scanners. Modern scanners offer Bluetooth and Wi-Fi connectivity, allowing for easier data transfer and software updates.
Benefits of Wireless Connectivity:
- Easy Data Transfer: Wirelessly transfer diagnostic data to your smartphone, tablet, or computer.
- Software Updates: Easily update the scanner’s software to ensure compatibility with the latest vehicle models and diagnostic protocols.
- Remote Diagnostics: Perform remote diagnostics and access support from technicians.
How Wireless Connectivity Works:
- Pair the Scanner: Pair the OBD2 scanner with your smartphone, tablet, or computer via Bluetooth or Wi-Fi.
- Transfer Data: Use the scanner’s software or mobile app to transfer diagnostic data.
- Access Updates: Access and install software updates wirelessly.
2. Cloud-Based Diagnostics
Cloud-based diagnostics is another emerging trend in the automotive industry. Cloud-based platforms provide access to extensive databases and remote diagnostic capabilities, enabling more accurate and efficient diagnoses.
Benefits of Cloud-Based Diagnostics:
- Extensive Databases: Access to vast databases of diagnostic information, repair procedures, and technical service bulletins.
- Remote Diagnostics: Perform remote diagnostics and access support from technicians located anywhere in the world.
- Real-Time Updates: Receive real-time updates on new diagnostic information and repair procedures.
How Cloud-Based Diagnostics Works:
- Connect to the Cloud: Connect the OBD2 scanner to a cloud-based platform via Wi-Fi or a mobile app.
- Access Data: Access diagnostic information, repair procedures, and technical service bulletins from the cloud.
- Remote Support: Receive remote support from technicians.
3. Artificial Intelligence (AI)
Artificial Intelligence (AI) is revolutionizing the automotive diagnostics industry. AI-powered scanners can analyze data and provide more accurate diagnoses and repair recommendations, helping technicians and car owners make informed decisions.
Benefits of AI-Powered Scanners:
- Accurate Diagnoses: AI algorithms can analyze diagnostic data and provide more accurate diagnoses.
- Repair Recommendations: AI-powered scanners can recommend the most effective repair procedures.
- Predictive Maintenance: AI can predict potential problems and recommend preventive maintenance.
How AI-Powered Scanners Work:
- Collect Data: The scanner collects diagnostic data from the vehicle.
- Analyze Data: AI algorithms analyze the data to identify potential problems.
- Provide Recommendations: The scanner provides accurate diagnoses and repair recommendations.
4. Integration with Mobile Apps
Integration with mobile apps is making vehicle diagnostics more accessible and convenient. Mobile apps allow users to monitor vehicle health and perform basic diagnostics using their smartphones.
Benefits of Mobile Apps:
- Real-Time Monitoring: Monitor vehicle health in real-time.
- Basic Diagnostics: Perform basic diagnostics using your smartphone.
- Alerts and Notifications: Receive alerts and notifications about potential problems.
How Mobile Apps Work:
- Connect the Adapter: Connect a Bluetooth OBD2 adapter to the vehicle’s OBD2 port.
- Pair with the App: Pair the adapter with the mobile app on your smartphone.
- Monitor and Diagnose: Monitor vehicle health and perform basic diagnostics using the app.
The future of OBD2 scanners and vehicle diagnostics is bright, with advancements in technology making it easier and more efficient to diagnose