The Best Obd2 Scanner Tablet offers advanced diagnostic capabilities, streamlining vehicle maintenance and repair tasks, and at OBD2-SCANNER.EDU.VN, we help you find the perfect tool. These tablets combine ease of use with professional-grade features, ensuring accurate readings and efficient troubleshooting. Discover how these devices can improve your diagnostic workflows, offering detailed insights into vehicle health and performance with features such as real-time data streaming, comprehensive system analysis, and built-in repair guides.
Contents
- 1. What is an OBD2 Scanner Tablet and Why Do You Need One?
- 1.1. Key Features of OBD2 Scanner Tablets
- 1.2. Benefits of Using an OBD2 Scanner Tablet
- 1.3. Who Benefits from Using an OBD2 Scanner Tablet?
- 1.4. According to Research
- 2. Understanding OBD2 Protocols and Diagnostic Codes
- 2.1. What are OBD2 Protocols?
- 2.2. Reading and Interpreting Diagnostic Trouble Codes (DTCs)
- 2.3. Common OBD2 Codes and Their Meanings
- 2.4. Using an OBD2 Scanner Tablet to Diagnose Issues
- 2.5. Expert Insight
- 3. Top Features to Look for in an OBD2 Scanner Tablet
- 3.1. Comprehensive Vehicle Coverage
- 3.2. Advanced Diagnostic Functions
- 3.3. User-Friendly Interface and Display
- 3.4. Real-Time Data Streaming and Graphing
- 3.5. Wireless Connectivity and Updates
- 3.6. Durability and Build Quality
- 3.7. Integration with Repair Databases
- 3.8. Expert Recommendations
- 4. How to Choose the Right OBD2 Scanner Tablet for Your Needs
- 4.1. Assess Your Diagnostic Needs
- 4.2. Consider Vehicle Compatibility
- 4.3. Set a Budget
- 4.4. Evaluate User Interface and Ease of Use
- 4.5. Check for Wireless Connectivity and Updates
- 4.6. Read Reviews and Seek Recommendations
- 4.7. Factor in Durability and Build Quality
- 4.8. Expert Advice
- 5. Step-by-Step Guide to Using an OBD2 Scanner Tablet
- 5.1. Preparing to Use the OBD2 Scanner Tablet
- 5.2. Connecting the OBD2 Scanner Tablet
- 5.3. Reading Diagnostic Trouble Codes (DTCs)
- 5.4. Clearing Diagnostic Trouble Codes (DTCs)
- 5.5. Using Real-Time Data Streaming
- 5.6. Performing Actuation Tests
- 5.7. Updating the OBD2 Scanner Tablet
- 5.8. Expert Tip
- 6. Maintenance and Care Tips for Your OBD2 Scanner Tablet
- 6.1. Keeping the Scanner Clean
- 6.2. Protecting the Screen
- 6.3. Proper Storage
- 6.4. Battery Maintenance
- 6.5. Software Updates
- 6.6. Cable Care
- 6.7. Handling Precautions
- 6.8. Expert Insight
- 7. Common Problems and Troubleshooting Tips for OBD2 Scanner Tablets
1. What is an OBD2 Scanner Tablet and Why Do You Need One?
An OBD2 scanner tablet is a diagnostic tool that combines the functionality of a traditional OBD2 scanner with the user-friendly interface of a tablet, enhancing automotive diagnostics and repair processes. Are you looking to streamline your automotive repair process with a device that’s both powerful and user-friendly?
An OBD2 (On-Board Diagnostics II) scanner tablet is a specialized diagnostic tool designed for automotive technicians and serious DIYers. It merges the capabilities of a standard OBD2 scanner with the convenience and enhanced features of a tablet. According to a study by Grand View Research, the global automotive diagnostics market is expected to reach $47.9 billion by 2027, highlighting the increasing demand for advanced diagnostic tools like OBD2 scanner tablets.
1.1. Key Features of OBD2 Scanner Tablets
OBD2 scanner tablets come packed with features that make diagnosing and repairing vehicles more efficient. These features often go beyond what traditional handheld scanners offer.
- Larger Touchscreen Display: Offers a more intuitive and user-friendly interface for navigating menus and viewing diagnostic data.
- Enhanced Processing Power: Provides faster data processing and quicker access to diagnostic information.
- Expanded Vehicle Coverage: Supports a wider range of vehicle makes and models, ensuring compatibility with various cars.
- Advanced Diagnostic Functions: Includes capabilities such as bi-directional control, actuation tests, and module programming.
- Wireless Connectivity: Allows for easy software updates and data sharing via Wi-Fi or Bluetooth.
- Real-time Data Streaming: Displays live sensor data, enabling technicians to monitor vehicle performance in real-time.
- Built-in Repair Information: Integrates with repair databases to provide troubleshooting tips, wiring diagrams, and component locations.
- Data Logging and Playback: Records diagnostic sessions for later analysis and review.
1.2. Benefits of Using an OBD2 Scanner Tablet
Why should you consider upgrading to an OBD2 scanner tablet? The advantages are numerous.
- Increased Efficiency: Faster processing speeds and intuitive interfaces reduce diagnostic time.
- Comprehensive Diagnostics: Access to advanced functions allows for more thorough vehicle analysis.
- Improved Accuracy: Real-time data and detailed repair information help pinpoint issues more accurately.
- Enhanced User Experience: Larger screens and user-friendly software make the diagnostic process smoother and more intuitive.
- Portability and Convenience: The tablet form factor is easy to carry and use in various locations, from the shop to the roadside.
- Cost Savings: By accurately diagnosing and repairing vehicles, you can avoid unnecessary repairs and save money.
1.3. Who Benefits from Using an OBD2 Scanner Tablet?
OBD2 scanner tablets are valuable tools for a wide range of users.
- Professional Automotive Technicians: Benefit from the advanced diagnostic capabilities and time-saving features.
- Independent Repair Shops: Can offer comprehensive diagnostic services to their customers.
- Mobile Mechanics: Appreciate the portability and convenience of a tablet form factor.
- Serious DIY Enthusiasts: Gain access to professional-grade diagnostic tools for maintaining their vehicles.
- Fleet Managers: Can monitor the health and performance of their vehicles to minimize downtime.
1.4. According to Research
According to a report by Market Research Future, the automotive diagnostic scan tools market is projected to grow at a CAGR of 6.12% from 2020 to 2027. This growth is driven by the increasing complexity of vehicle systems and the need for advanced diagnostic tools.
The OBD2 scanner tablet combines user-friendliness with advanced functionality, making it an indispensable tool for anyone involved in automotive diagnostics and repair. At OBD2-SCANNER.EDU.VN, we can provide expert guidance to help you choose the right scanner for your needs, ensuring you get the most out of this technology. Contact us at +1 (641) 206-8880 or visit our website at OBD2-SCANNER.EDU.VN for more information.
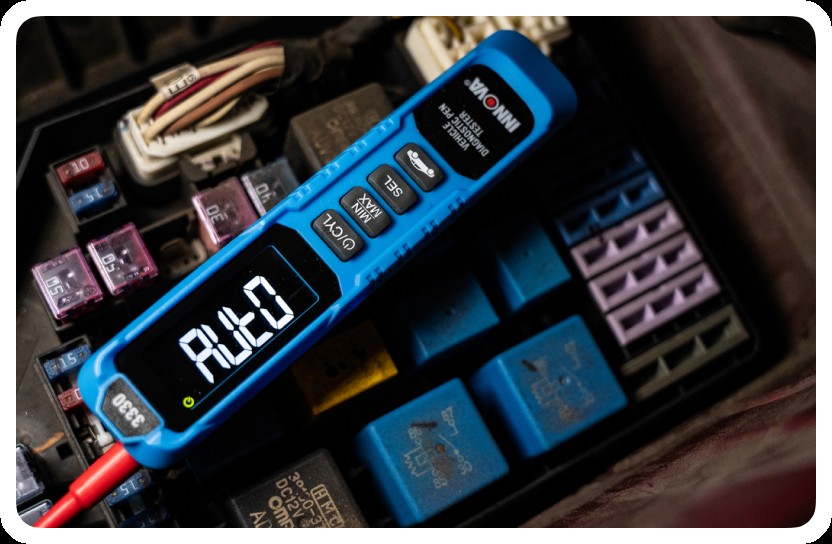
 OBD2 Scanner Tablet
2. Understanding OBD2 Protocols and Diagnostic Codes
Mastering OBD2 protocols and diagnostic codes is essential for accurate vehicle diagnostics and efficient repairs, allowing technicians and enthusiasts to quickly identify and address automotive issues. Are you struggling to decipher OBD2 codes and protocols?
OBD2 (On-Board Diagnostics II) is a standardized system used in modern vehicles to monitor and report on their performance. Understanding OBD2 protocols and diagnostic codes is crucial for anyone involved in automotive repair, from professional technicians to DIY enthusiasts. A study by the National Institute for Automotive Service Excellence (ASE) emphasizes the importance of understanding these codes for accurate diagnostics and efficient repairs.
2.1. What are OBD2 Protocols?
OBD2 protocols are the communication standards that vehicles use to transmit diagnostic information. These protocols define how data is formatted and transmitted between the vehicle’s computer and a diagnostic tool.
- SAE J1850 PWM (Pulse Width Modulation): Used primarily by Ford vehicles.
- SAE J1850 VPW (Variable Pulse Width): Used mainly by General Motors vehicles.
- ISO 9141-2: Used by European and Asian vehicles.
- ISO 14230-4 (KWP2000): Also used by European and Asian vehicles.
- CAN (Controller Area Network): The most modern protocol, used by virtually all vehicles since 2008.
2.2. Reading and Interpreting Diagnostic Trouble Codes (DTCs)
Diagnostic Trouble Codes (DTCs) are alphanumeric codes that indicate a specific problem within the vehicle. Each code corresponds to a particular fault detected by the vehicle’s computer.
-
The First Character: Indicates the system the code relates to:
- P: Powertrain (engine, transmission)
- B: Body (airbags, power windows)
- C: Chassis (ABS, suspension)
- U: Network (communication systems)
-
The Second Character: Indicates whether the code is generic or manufacturer-specific:
- 0: Generic (SAE) code
- 1: Manufacturer-specific code
-
The Third Character: Indicates the specific subsystem:
- 1: Fuel and air metering
- 2: Fuel and air metering (injector circuit)
- 3: Ignition system
- 4: Auxiliary emission controls
- 5: Vehicle speed control, idle control system
- 6: Computer output circuit
- 7: Transmission
- 8: Transmission
-
The Fourth and Fifth Characters: Specify the particular fault within the subsystem.
2.3. Common OBD2 Codes and Their Meanings
Understanding common OBD2 codes can help you quickly diagnose and address common vehicle issues.
| Code | Description | Possible Causes |
|---|---|---|
| P0171 | System Too Lean (Bank 1) | Vacuum leak, faulty oxygen sensor, MAF sensor issue, fuel pump problem |
| P0300 | Random/Multiple Cylinder Misfire Detected | Faulty spark plugs, ignition coils, fuel injectors, vacuum leaks, low compression |
| P0420 | Catalyst System Efficiency Below Threshold (Bank 1) | Faulty catalytic converter, oxygen sensor issues, exhaust leaks |
| P0442 | Evaporative Emission Control System Leak Detected (small leak) | Loose or faulty gas cap, damaged EVAP hoses, faulty purge valve |
| P0505 | Idle Air Control System Malfunction | Faulty IAC valve, vacuum leaks, throttle body issues |
| P0101 | Mass Air Flow (MAF) Circuit Range/Performance Problem | Dirty or faulty MAF sensor, vacuum leaks, air intake restrictions |
| P0113 | Intake Air Temperature Circuit High Input | Faulty IAT sensor, wiring issues |
| P0301 | Cylinder 1 Misfire Detected | Faulty spark plug, ignition coil, fuel injector, low compression |
| P0304 | Cylinder 4 Misfire Detected | Faulty spark plug, ignition coil, fuel injector, low compression |
| P0401 | Exhaust Gas Recirculation Flow Insufficient Detected | Clogged EGR valve, faulty EGR solenoid, vacuum leaks |
| P0455 | Evaporative Emission Control System Leak Detected (gross leak) | Loose or faulty gas cap, damaged EVAP hoses, faulty purge valve |
| P0011 | A Camshaft Position – Timing Over-Advanced or System Performance (Bank 1) | Faulty camshaft position sensor, oil control valve issues, timing chain problems |
| P0131 | O2 Sensor Circuit Low Voltage (Bank 1, Sensor 1) | Faulty oxygen sensor, wiring issues, exhaust leaks |
| P0135 | O2 Sensor Heater Circuit Malfunction (Bank 1, Sensor 1) | Faulty oxygen sensor, wiring issues |
| P0340 | Camshaft Position Sensor “A” Circuit (Bank 1 or Single Sensor) | Faulty camshaft position sensor, wiring issues, timing chain problems |
| P0430 | Catalyst System Efficiency Below Threshold (Bank 2) | Faulty catalytic converter, oxygen sensor issues, exhaust leaks |
| P0440 | Evaporative Emission Control System Malfunction | Loose or faulty gas cap, damaged EVAP hoses, faulty purge valve |
| P0102 | Mass Air Flow (MAF) Circuit Low Input | Dirty or faulty MAF sensor, wiring issues |
| P0118 | Engine Coolant Temperature Circuit High Input | Faulty ECT sensor, wiring issues |
| P0302 | Cylinder 2 Misfire Detected | Faulty spark plug, ignition coil, fuel injector, low compression |
| P0303 | Cylinder 3 Misfire Detected | Faulty spark plug, ignition coil, fuel injector, low compression |
| P0400 | Exhaust Gas Recirculation Flow Malfunction | Clogged EGR valve, faulty EGR solenoid, vacuum leaks |
| P0446 | Evaporative Emission Control System Vent Control Circuit Malfunction | Faulty vent valve, wiring issues, EVAP system issues |
| P0014 | B Camshaft Position – Timing Over-Advanced or System Performance (Bank 1) | Faulty camshaft position sensor, oil control valve issues, timing chain problems |
| P0132 | O2 Sensor Circuit High Voltage (Bank 1, Sensor 1) | Faulty oxygen sensor, wiring issues |
| P0141 | O2 Sensor Heater Circuit Malfunction (Bank 1, Sensor 2) | Faulty oxygen sensor, wiring issues |
| P0341 | Camshaft Position Sensor “A” Circuit Range/Performance (Bank 1 or Single Sensor) | Faulty camshaft position sensor, wiring issues, timing chain problems |
| P0456 | Evaporative Emission Control System Leak Detected (very small leak) | Loose or faulty gas cap, damaged EVAP hoses, faulty purge valve |
| P0103 | Mass Air Flow (MAF) Circuit High Input | Dirty or faulty MAF sensor, wiring issues |
| P0128 | Coolant Thermostat (Coolant Temperature Below Thermostat Regulating Temperature) | Faulty thermostat, low coolant level, faulty ECT sensor |
| P0305 | Cylinder 5 Misfire Detected | Faulty spark plug, ignition coil, fuel injector, low compression |
| P0306 | Cylinder 6 Misfire Detected | Faulty spark plug, ignition coil, fuel injector, low compression |
| P0402 | Exhaust Gas Recirculation Flow Excessive Detected | Clogged EGR valve, faulty EGR solenoid, vacuum leaks |
| P0457 | Evaporative Emission Control System Leak Detected (fuel cap loose/off) | Loose or missing gas cap, damaged gas cap seal |
| P0021 | A Camshaft Position – Timing Over-Advanced or System Performance (Bank 2) | Faulty camshaft position sensor, oil control valve issues, timing chain problems |
| P0133 | O2 Sensor Circuit Slow Response (Bank 1, Sensor 1) | Faulty oxygen sensor, exhaust leaks |
| P0170 | Fuel Trim Malfunction (Bank 1) | Vacuum leak, faulty oxygen sensor, MAF sensor issue, fuel pump problem |
| P0343 | Camshaft Position Sensor “A” Circuit High Input (Bank 1 or Single Sensor) | Faulty camshaft position sensor, wiring issues |
| P0463 | Fuel Level Sensor Circuit High Input | Faulty fuel level sensor, wiring issues |
| P0100 | Mass Air Flow (MAF) Circuit Malfunction | Dirty or faulty MAF sensor, wiring issues |
| P0112 | Intake Air Temperature Circuit Low Input | Faulty IAT sensor, wiring issues |
| P0307 | Cylinder 7 Misfire Detected | Faulty spark plug, ignition coil, fuel injector, low compression |
| P0308 | Cylinder 8 Misfire Detected | Faulty spark plug, ignition coil, fuel injector, low compression |
| P0403 | Exhaust Gas Recirculation Circuit Malfunction | Faulty EGR valve, EGR solenoid, wiring issues |
| P0460 | Fuel Level Sensor Circuit Malfunction | Faulty fuel level sensor, wiring issues |
| P0024 | B Camshaft Position – Timing Over-Advanced or System Performance (Bank 2) | Faulty camshaft position sensor, oil control valve issues, timing chain problems |
| P0134 | O2 Sensor Circuit No Activity Detected (Bank 1, Sensor 1) | Faulty oxygen sensor, wiring issues, exhaust leaks |
| P0172 | System Too Rich (Bank 1) | Faulty oxygen sensor, fuel injector issue, high fuel pressure, vacuum leak |
| P0344 | Camshaft Position Sensor “A” Circuit Intermittent (Bank 1 or Single Sensor) | Faulty camshaft position sensor, wiring issues |
| P0462 | Fuel Level Sensor Circuit Low Input | Faulty fuel level sensor, wiring issues |
2.4. Using an OBD2 Scanner Tablet to Diagnose Issues
An OBD2 scanner tablet simplifies the process of reading and interpreting DTCs.
- Connect the Scanner: Plug the OBD2 scanner tablet into the vehicle’s OBD2 port, typically located under the dashboard.
- Turn on the Vehicle: Start the vehicle’s engine or turn the ignition to the “ON” position.
- Read the Codes: Use the scanner’s interface to read and display any stored DTCs.
- Interpret the Codes: Refer to a DTC lookup table or database to understand the meaning of each code.
- Troubleshoot the Issue: Use the information from the DTCs to diagnose and repair the underlying problem.
2.5. Expert Insight
According to a technical bulletin from Bosch, proper interpretation of OBD2 codes requires understanding the specific vehicle’s systems and the conditions under which the codes were triggered.
By understanding OBD2 protocols and diagnostic codes, you can accurately diagnose and repair vehicle issues, saving time and money. At OBD2-SCANNER.EDU.VN, we offer comprehensive resources and support to help you master these essential skills. Contact us at +1 (641) 206-8880 or visit our website at OBD2-SCANNER.EDU.VN for expert assistance.
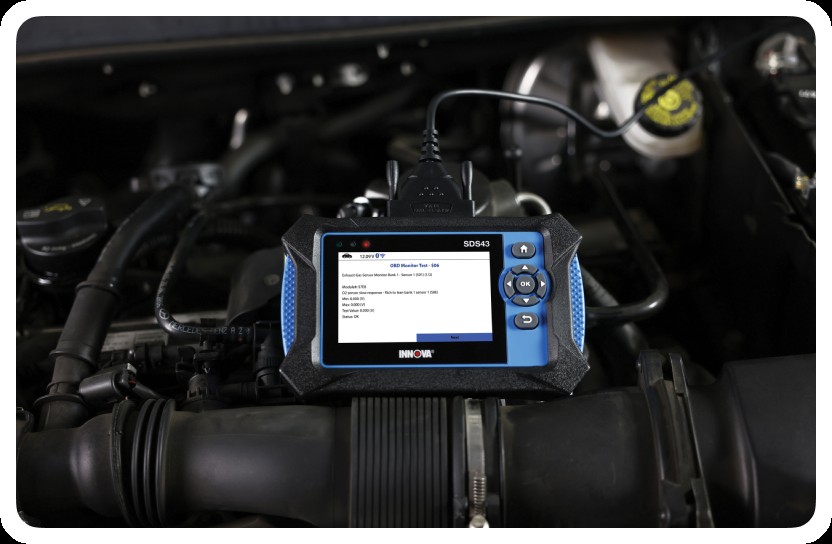
 Vehicle Diagnostic
3. Top Features to Look for in an OBD2 Scanner Tablet
Identifying the essential features in an OBD2 scanner tablet ensures you select a tool that meets your diagnostic needs and enhances your repair efficiency. What features should you prioritize when choosing an OBD2 scanner tablet?
When selecting an OBD2 scanner tablet, it’s crucial to consider the features that will best meet your diagnostic needs and improve your efficiency. According to a survey by Auto Technician Magazine, technicians value features like comprehensive vehicle coverage, advanced diagnostic functions, and ease of use.
3.1. Comprehensive Vehicle Coverage
The best OBD2 scanner tablet should support a wide range of vehicle makes and models, ensuring compatibility with the vehicles you service.
- Domestic, Asian, and European Vehicles: Look for a scanner that supports vehicles from various regions.
- OBD1 and OBD2 Compatibility: Some scanners can also diagnose older vehicles with OBD1 systems.
- Regular Updates: Ensure the scanner receives regular software updates to support the latest vehicle models.
3.2. Advanced Diagnostic Functions
Advanced diagnostic functions enable you to perform more in-depth analysis and troubleshooting.
- Bi-Directional Control: Allows you to send commands to vehicle components to test their functionality.
- Actuation Tests: Enables you to activate specific components, such as fuel injectors or solenoids, to verify their operation.
- Module Programming: Provides the ability to reprogram or update vehicle modules.
- Key Fob Programming: Allows you to program new key fobs for vehicles.
3.3. User-Friendly Interface and Display
A user-friendly interface and clear display are essential for efficient and accurate diagnostics.
- Touchscreen Display: Offers intuitive navigation and easy access to diagnostic data.
- High Resolution: Provides clear and detailed display of diagnostic information.
- Customizable Interface: Allows you to personalize the scanner’s settings and layout.
- Multilingual Support: Supports multiple languages to accommodate diverse users.
3.4. Real-Time Data Streaming and Graphing
Real-time data streaming and graphing allow you to monitor vehicle performance in real-time.
- Live Sensor Data: Displays live data from various sensors, such as engine temperature, RPM, and oxygen sensor readings.
- Graphing Capabilities: Allows you to visualize data in graphs to identify trends and anomalies.
- Data Logging: Records diagnostic sessions for later analysis and review.
3.5. Wireless Connectivity and Updates
Wireless connectivity and updates ensure your scanner is always up-to-date with the latest vehicle information and software enhancements.
- Wi-Fi Connectivity: Enables easy software updates and access to online resources.
- Bluetooth Connectivity: Allows you to connect to other devices, such as printers or mobile devices.
- Automatic Updates: Automatically downloads and installs the latest software updates.
3.6. Durability and Build Quality
Durability and build quality are important considerations for a tool that will be used in demanding environments.
- Rugged Design: Built to withstand drops, impacts, and exposure to harsh conditions.
- Water and Dust Resistance: Protects the scanner from damage in wet or dusty environments.
- Long Battery Life: Provides extended use without needing to be recharged.
3.7. Integration with Repair Databases
Integration with repair databases provides access to valuable troubleshooting information and repair procedures.
- Troubleshooting Tips: Offers advice and guidance for diagnosing and repairing common issues.
- Wiring Diagrams: Provides detailed wiring diagrams for vehicle systems.
- Component Locations: Shows the location of various components within the vehicle.
- Repair Procedures: Offers step-by-step instructions for performing repairs.
3.8. Expert Recommendations
According to a review by Diagnostic News, the best OBD2 scanner tablets combine comprehensive features with ease of use, providing technicians with the tools they need to diagnose and repair vehicles efficiently.
By considering these top features, you can choose an OBD2 scanner tablet that meets your needs and enhances your diagnostic capabilities. At OBD2-SCANNER.EDU.VN, we can help you find the perfect scanner for your requirements. Contact us at +1 (641) 206-8880 or visit our website at OBD2-SCANNER.EDU.VN for expert advice and support.
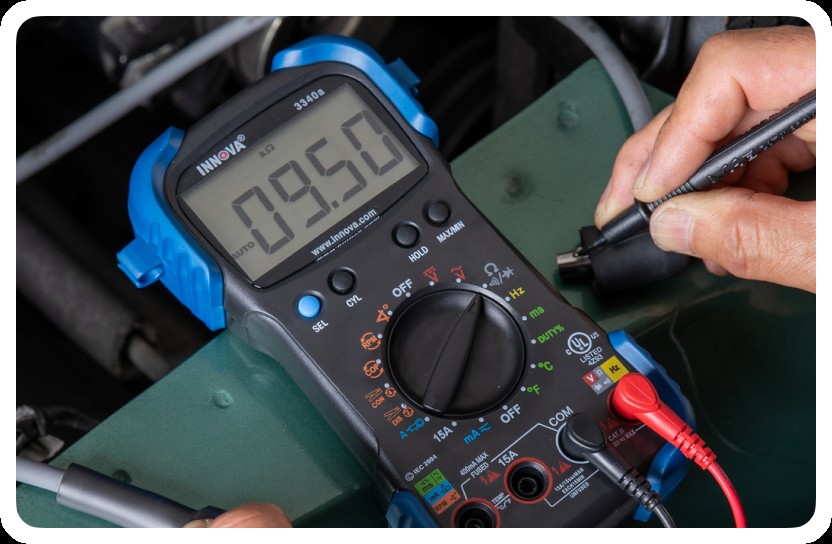
 Diagnostic tools
4. How to Choose the Right OBD2 Scanner Tablet for Your Needs
Selecting the right OBD2 scanner tablet requires careful consideration of your specific diagnostic requirements and budget to ensure optimal performance and value. What factors should influence your choice of an OBD2 scanner tablet?
Choosing the right OBD2 scanner tablet involves assessing your specific diagnostic needs, budget, and the types of vehicles you’ll be working on. A report by the Automotive Research Association of India (ARAI) highlights the importance of selecting diagnostic tools that align with the specific requirements of the automotive service environment.
4.1. Assess Your Diagnostic Needs
Start by identifying the types of diagnostic tasks you’ll be performing.
- Basic Code Reading: If you only need to read and clear codes, a basic OBD2 scanner tablet may suffice.
- Advanced Diagnostics: For more complex tasks like bi-directional control, actuation tests, and module programming, you’ll need a more advanced scanner.
- Specific Vehicle Systems: If you specialize in certain vehicle systems (e.g., engine, transmission, ABS), ensure the scanner supports those systems.
4.2. Consider Vehicle Compatibility
Ensure the scanner is compatible with the vehicles you’ll be working on.
- Vehicle Makes and Models: Check the scanner’s vehicle coverage list to ensure it supports the makes and models you service.
- OBD1 and OBD2 Support: If you work on older vehicles, look for a scanner that supports both OBD1 and OBD2 systems.
- Software Updates: Ensure the scanner receives regular software updates to support the latest vehicle models.
4.3. Set a Budget
OBD2 scanner tablets range in price from a few hundred dollars to several thousand dollars.
- Entry-Level Scanners: Offer basic code reading and clearing capabilities at an affordable price.
- Mid-Range Scanners: Provide advanced diagnostic functions and broader vehicle coverage.
- High-End Scanners: Offer the most comprehensive features and capabilities, including module programming and bi-directional control.
4.4. Evaluate User Interface and Ease of Use
Choose a scanner with a user-friendly interface that is easy to navigate.
- Touchscreen Display: A touchscreen display makes it easier to navigate menus and view diagnostic data.
- Intuitive Software: Look for a scanner with software that is well-organized and easy to understand.
- Customizable Settings: The ability to customize the scanner’s settings can improve your workflow.
4.5. Check for Wireless Connectivity and Updates
Wireless connectivity and regular updates are essential for keeping your scanner up-to-date.
- Wi-Fi Connectivity: Allows you to download software updates and access online resources.
- Bluetooth Connectivity: Enables you to connect to other devices, such as printers or mobile devices.
- Automatic Updates: Automatic updates ensure your scanner is always up-to-date with the latest vehicle information.
4.6. Read Reviews and Seek Recommendations
Before making a purchase, read reviews from other technicians and seek recommendations from trusted sources.
- Online Reviews: Check online reviews to see what other users have to say about the scanner.
- Professional Forums: Participate in professional forums to get recommendations from experienced technicians.
- Industry Publications: Read reviews in industry publications to get expert opinions on different scanners.
4.7. Factor in Durability and Build Quality
Choose a scanner that is built to withstand the demands of a shop environment.
- Rugged Design: Look for a scanner with a rugged design that can withstand drops and impacts.
- Water and Dust Resistance: Water and dust resistance can protect the scanner from damage in harsh environments.
- Warranty: A good warranty provides peace of mind and protection against defects.
4.8. Expert Advice
According to a survey by the Society of Automotive Engineers (SAE), technicians who use advanced diagnostic tools report increased efficiency and accuracy in their work.
By carefully considering these factors, you can choose an OBD2 scanner tablet that meets your needs and enhances your diagnostic capabilities. At OBD2-SCANNER.EDU.VN, we offer expert guidance to help you make the right choice. Contact us at +1 (641) 206-8880 or visit our website at OBD2-SCANNER.EDU.VN for personalized assistance.
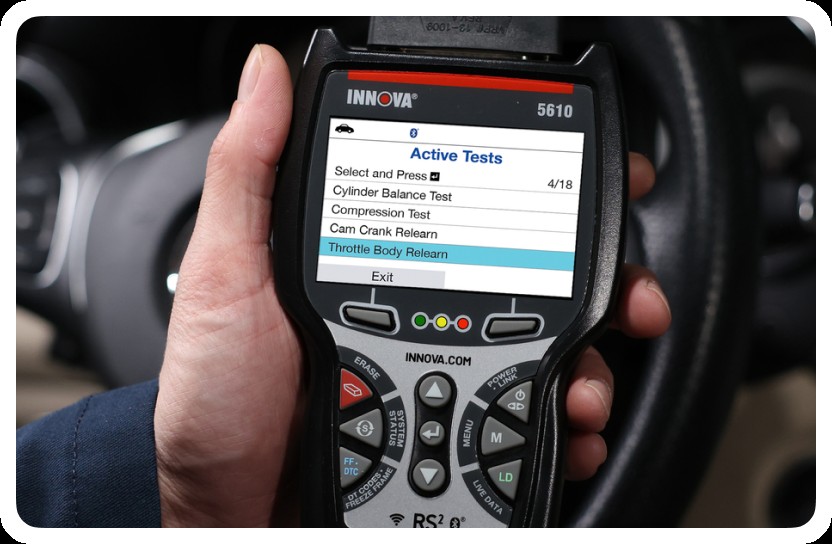
 automotive scanner
5. Step-by-Step Guide to Using an OBD2 Scanner Tablet
A clear, step-by-step guide on using an OBD2 scanner tablet ensures accurate diagnostics and efficient troubleshooting for both novice and experienced users. How do you effectively use an OBD2 scanner tablet to diagnose vehicle issues?
Using an OBD2 scanner tablet effectively involves a systematic approach to ensure accurate diagnostics and efficient troubleshooting. According to a guide published by the Equipment and Tool Institute (ETI), following a structured process is essential for getting the most out of your diagnostic tools.
5.1. Preparing to Use the OBD2 Scanner Tablet
Before you begin, ensure you have everything you need.
- Gather Necessary Information: Collect the vehicle’s make, model, year, and VIN (Vehicle Identification Number).
- Locate the OBD2 Port: Find the OBD2 port in the vehicle, typically located under the dashboard on the driver’s side.
- Ensure the Scanner is Charged: Make sure the OBD2 scanner tablet is fully charged or connected to a power source.
- Read the Manual: Familiarize yourself with the scanner’s features and functions by reading the user manual.
5.2. Connecting the OBD2 Scanner Tablet
Connect the scanner to the vehicle’s OBD2 port.
- Turn Off the Ignition: Ensure the vehicle’s ignition is turned off before connecting the scanner.
- Plug in the Scanner: Plug the OBD2 scanner tablet into the vehicle’s OBD2 port.
- Turn on the Ignition: Turn the vehicle’s ignition to the “ON” position, but do not start the engine unless instructed by the scanner.
- Power on the Scanner: Turn on the OBD2 scanner tablet and wait for it to establish a connection with the vehicle.
5.3. Reading Diagnostic Trouble Codes (DTCs)
Read and interpret the DTCs to identify potential issues.
- Select the Vehicle: Use the scanner’s interface to select the vehicle’s make, model, and year.
- Read Codes: Choose the “Read Codes” or “Diagnostic Codes” option to retrieve any stored DTCs.
- Record the Codes: Write down the DTCs and their descriptions for later reference.
- Interpret the Codes: Use the scanner’s built-in DTC lookup or refer to an online database to understand the meaning of each code.
5.4. Clearing Diagnostic Trouble Codes (DTCs)
Clear the DTCs after addressing the underlying issues.
- Address the Issues: Repair any issues identified by the DTCs before clearing the codes.
- Select the Clear Codes Option: Choose the “Clear Codes” or “Erase Codes” option in the scanner’s menu.
- Confirm the Erase: Follow the scanner’s prompts to confirm the erasure of the DTCs.
- Verify the Clear: After clearing the codes, restart the vehicle and recheck for any new DTCs.
5.5. Using Real-Time Data Streaming
Monitor live sensor data to diagnose intermittent issues.
- Select Live Data: Choose the “Live Data” or “Data Stream” option in the scanner’s menu.
- Select Parameters: Select the specific parameters you want to monitor, such as engine temperature, RPM, and oxygen sensor readings.
- Monitor the Data: Observe the data stream for any anomalies or deviations from normal values.
- Record the Data: Use the scanner’s data logging feature to record the data stream for later analysis.
5.6. Performing Actuation Tests
Use actuation tests to verify the functionality of specific components.
- Select Actuation Tests: Choose the “Actuation Tests” or “Component Tests” option in the scanner’s menu.
- Select the Component: Select the component you want to test, such as a fuel injector or solenoid.
- Follow the Instructions: Follow the scanner’s prompts to activate the component and observe its operation.
- Verify Functionality: Ensure the component is functioning correctly based on the scanner’s feedback.
5.7. Updating the OBD2 Scanner Tablet
Keep your scanner up-to-date with the latest software and vehicle information.
- Connect to Wi-Fi: Connect the OBD2 scanner tablet to a Wi-Fi network.
- Check for Updates: Choose the “Update” or “Software Update” option in the scanner’s menu.
- Download Updates: Download and install any available software updates.
- Restart the Scanner: Restart the scanner after the updates are installed.
5.8. Expert Tip
According to a training manual from Delphi Technologies, regular updates and proper usage are essential for maintaining the accuracy and reliability of OBD2 scanner tablets.
By following these steps, you can effectively use an OBD2 scanner tablet to diagnose and repair vehicle issues. At OBD2-SCANNER.EDU.VN, we offer training and support to help you get the most out of your diagnostic tools. Contact us at +1 (641) 206-8880 or visit our website at OBD2-SCANNER.EDU.VN for expert assistance.
 OBD2 Scanner in Use
6. Maintenance and Care Tips for Your OBD2 Scanner Tablet
Proper maintenance and care of your OBD2 scanner tablet are essential to ensure its longevity, accuracy, and reliability, protecting your investment. How do you maintain your OBD2 scanner tablet for optimal performance?
Maintaining your OBD2 scanner tablet properly is crucial for ensuring its longevity, accuracy, and reliability. According to a guide by the Automotive Maintenance and Repair Association (AMRA), regular maintenance and care can significantly extend the life of your diagnostic tools.
6.1. Keeping the Scanner Clean
Regular cleaning helps prevent damage and ensures proper function.
- Wipe Down the Screen: Use a soft, lint-free cloth to clean the touchscreen display regularly.
- Clean the Ports: Use a small brush or compressed air to remove dust and debris from the OBD2 port and other connectors.
- Avoid Harsh Chemicals: Do not use harsh chemicals or solvents to clean the scanner, as they can damage the screen and housing.
6.2. Protecting the Screen
Protecting the screen prevents scratches and damage.
- Use a Screen Protector: Apply a screen protector to prevent scratches and smudges.
- Store in a Case: Store the scanner in a protective case when not in use to prevent physical damage.
- Avoid Direct Sunlight: Do not leave the scanner in direct sunlight for extended periods, as this can damage the screen.
6.3. Proper Storage
Proper storage protects the scanner from damage and extreme temperatures.
- Store in a Cool, Dry Place: Store the scanner in a cool, dry place when not in use.
- Avoid Extreme Temperatures: Do not store the scanner in extreme temperatures, as this can damage the battery and internal components.
- Keep Away from Moisture: Keep the scanner away from moisture and humidity to prevent corrosion.
6.4. Battery Maintenance
Proper battery maintenance extends the battery’s life.
- Charge Regularly: Charge the scanner regularly to keep the battery in good condition.
- Avoid Overcharging: Do not leave the scanner plugged in for extended periods after it is fully charged.
- Use the Correct Charger: Use only the charger that came with the scanner or a compatible charger recommended by the manufacturer.
6.5. Software Updates
Keeping the software up-to-date ensures optimal performance and compatibility.
- Check for Updates Regularly: Check for software updates regularly and install them as soon as they are available.
- Follow Update Instructions: Follow the manufacturer’s instructions carefully when installing software updates.
- Back Up Data: Back up your data before installing software updates to prevent data loss.
6.6. Cable Care
Proper cable care prevents damage and ensures reliable connections.
- Avoid Kinking: Avoid kinking or bending the cables sharply, as this can damage the wires inside.
- Unplug Carefully: Unplug the cables carefully by gripping the connector, not the cable itself.
- Store Cables Properly: Store the cables neatly when not in use to prevent tangling and damage.
6.7. Handling Precautions
Taking precautions during handling prevents accidental damage.
- Avoid Dropping: Be careful not to drop the scanner, as this can damage the internal components.
- Use in a Clean Environment: Use the scanner in a clean environment to prevent dust and debris from entering the ports.
- Protect from Liquids: Protect the scanner from liquids, as spills can cause damage.
6.8. Expert Insight
According to a technical service bulletin from Snap-on, proper maintenance and care are essential for ensuring the accuracy and reliability of diagnostic tools, which directly impacts the quality of automotive repairs.
By following these maintenance and care tips, you can extend the life of your OBD2 scanner tablet and ensure it continues to provide accurate and reliable diagnostic information. At OBD2-SCANNER.EDU.VN, we offer expert advice and support to help you maintain your diagnostic tools. Contact us at +1 (641) 206-8880 or visit our website at OBD2-SCANNER.EDU.VN for personalized assistance.
7. Common Problems and Troubleshooting Tips for OBD2 Scanner Tablets
Addressing common problems and knowing troubleshooting tips for OBD2 scanner tablets ensures quick resolutions and minimizes downtime during diagnostics. What should you do if your OBD2 scanner tablet isn’t working correctly?
Even with proper care, you may encounter issues with your OBD2 scanner tablet. Knowing common problems and troubleshooting tips can help you resolve these issues quickly and minimize downtime. A guide by the National Automotive Service Task Force (NASTF) emphasizes the importance of understanding troubleshooting techniques for diagnostic tools.