The 06 Malibu Obd2 Fuse Location is typically found in the interior fuse panel, often located under the dashboard on the driver’s side or in the center console. Identifying and accessing this fuse is crucial for diagnosing and addressing OBD2 scanner issues. OBD2-SCANNER.EDU.VN provides comprehensive guidance and support for effectively utilizing your OBD2 scanner and performing necessary repairs.
Contents
- 1. Understanding the Importance of the OBD2 Fuse Location in Your 2006 Chevrolet Malibu
- 2. Locating the OBD2 Fuse in a 2006 Chevy Malibu: A Step-by-Step Guide
- 2.1. Detailed Locations of Fuse Boxes in the 2006 Chevy Malibu
- 2.2. Interpreting Fuse Box Diagrams for the 2006 Malibu
- 2.3. Tools Needed to Access and Check Fuses
- 3. Identifying the Correct OBD2 Fuse in Your 2006 Malibu
- 3.1. Common Fuse Labels for the OBD2 Port
- 3.2. Understanding Amperage Ratings
- 3.3. Visual Inspection Techniques for Fuses
- 4. Replacing a Blown OBD2 Fuse in Your 2006 Chevrolet Malibu
- 4.1. Choosing the Correct Replacement Fuse
- 4.2. Step-by-Step Fuse Replacement Procedure
- 4.3. Safety Precautions During Fuse Replacement
- 5. Common Issues Related to the OBD2 Fuse in a 2006 Malibu
- 5.1. Identifying the Root Cause of Repeatedly Blown Fuses
- 5.2. Addressing Corrosion in the Fuse Box
- 5.3. Diagnosing Wiring Issues Related to the OBD2 Port
- 6. OBD2 Scanner Compatibility with the 2006 Chevy Malibu
- 6.1. Understanding OBD2 Protocols
- 6.2. Selecting the Right OBD2 Scanner for Your Needs
- 6.3. Troubleshooting Common OBD2 Scanner Connection Problems
- 7. Decoding OBD2 Trouble Codes for Your 2006 Malibu
- 7.1. Common OBD2 Codes for Chevy Malibu
- 7.2. Using Online Databases and Repair Manuals for Code Definitions
- 7.3. Understanding Generic vs. Manufacturer-Specific Codes
- 8. Maintaining Your 2006 Malibu’s Electrical System
- 8.1. Preventing Electrical Problems Through Regular Maintenance
- 8.2. Best Practices for Handling Automotive Fuses
- 8.3. When to Seek Professional Help
- 9. Advanced Diagnostic Techniques for Electrical Issues
- 9.1. Utilizing a Multimeter for Electrical Testing
- 9.2. Reading and Interpreting Wiring Diagrams
- 9.3. Component Testing Techniques
1. Understanding the Importance of the OBD2 Fuse Location in Your 2006 Chevrolet Malibu
Knowing the 06 Malibu OBD2 fuse location is crucial for maintaining your vehicle’s diagnostic capabilities. A blown fuse can disable your OBD2 port, preventing you from reading diagnostic trouble codes (DTCs) and assessing your car’s health. Understanding the fuse’s location, function, and replacement is essential for both DIY enthusiasts and professional mechanics.
- Why is the OBD2 Fuse Important? The OBD2 fuse protects the diagnostic port from electrical overload. Without a functioning port, you cannot use a scanner to identify issues, leading to potential long-term damage and increased repair costs.
- Common Symptoms of a Blown OBD2 Fuse: If your OBD2 scanner fails to power on or connect to your 2006 Chevrolet Malibu, a blown fuse is a likely cause. Other symptoms include a non-functional cigarette lighter or other electrical issues linked to the same circuit.
2. Locating the OBD2 Fuse in a 2006 Chevy Malibu: A Step-by-Step Guide
Finding the 06 Malibu OBD2 fuse location involves a systematic approach to ensure you can quickly identify and access it. Follow these steps to locate the fuse:
- Consult the Owner’s Manual: Your 2006 Chevrolet Malibu’s owner’s manual is the best resource for identifying the exact location of the fuse panels and the OBD2 fuse. Look for the section on fuses and electrical components.
- Identify Fuse Box Locations: Typically, the Malibu has two main fuse boxes:
- Interior Fuse Box: Usually located under the dashboard on the driver’s side or in the center console. This is the most likely location for the OBD2 fuse.
- Engine Compartment Fuse Box: Located under the hood, this fuse box contains fuses for critical engine components but is less likely to house the OBD2 fuse.
- Accessing the Interior Fuse Box:
- Under the Dashboard: Look for a panel that can be easily opened. You might need a screwdriver or a plastic pry tool to gently remove the cover.
- Center Console: Some models have the fuse box located behind a panel in the center console.
- Reading the Fuse Box Diagram: Once you’ve accessed the fuse box, you’ll see a diagram on the inside of the cover or nearby. This diagram labels each fuse and its function.
- Identifying the OBD2 Fuse: Look for a fuse labeled “OBD,” “Diagnostic Port,” or something similar. If the diagram is unclear, refer to the owner’s manual for clarification.
- Using a Test Light or Multimeter: If you’re unsure whether a fuse is blown, use a test light or multimeter to check for continuity. A blown fuse will not show continuity.
- Documenting the Location: Make a note of the fuse location and its amperage rating for future reference.
2.1. Detailed Locations of Fuse Boxes in the 2006 Chevy Malibu
To effectively locate the OBD2 fuse, it’s important to understand the specific locations of the fuse boxes in your 2006 Chevy Malibu.
- Instrument Panel Fuse Block: This fuse box is generally located beneath the steering wheel on the driver’s side. You may need to kneel down and look upwards to find it. The cover can usually be removed by hand or with a flathead screwdriver.
- Engine Compartment Fuse Block: This fuse box is situated in the engine compartment, typically near the battery or on the fender wall. It is enclosed in a protective box with a snap-on or screw-on cover.
- Rear Compartment Fuse Block: Found in the trunk or rear cargo area, this fuse box might be behind a side panel or under the floor covering.
[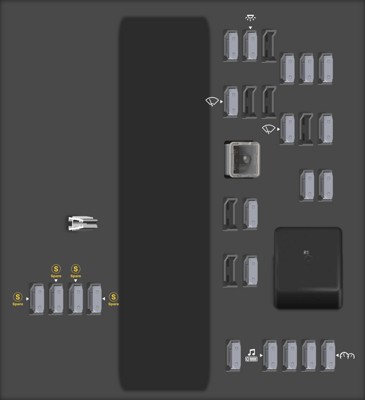 2006 Chevrolet Malibu fuse box diagram Instrument Panel Fuse Block
Instrument Panel Fuse Block diagram](https://images.startmycar.com/legos/fusebox-thumbnails/fusebox-chevrolet-malibu-2006-0.png)
2.2. Interpreting Fuse Box Diagrams for the 2006 Malibu
Each fuse box has a diagram that identifies the purpose of each fuse and relay. These diagrams are usually located on the inside of the fuse box cover. Here’s how to interpret them:
- Fuse Numbers: Each fuse is assigned a number that corresponds to the diagram.
- Fuse Function: The diagram will list the function of each fuse (e.g., “OBD II Port,” “Radio,” “Headlights”).
- Amperage Rating: The amperage rating (e.g., 10A, 15A, 20A) indicates the maximum current the fuse can handle.
- Color Coding: Fuses are color-coded based on their amperage rating, which can help you quickly identify the correct fuse.
2.3. Tools Needed to Access and Check Fuses
Having the right tools will make the process of accessing and checking fuses much easier. Here’s a list of essential tools:
- Flathead Screwdriver: Useful for prying open fuse box covers.
- Needle-Nose Pliers: Helpful for removing fuses, especially in tight spaces.
- Fuse Puller: Many fuse boxes include a small plastic fuse puller, which makes removing fuses easier and safer.
- Test Light: A simple tool to check if a fuse is blown. Clip the test light to a ground and touch the probe to each test point on the fuse. If the light illuminates on both sides, the fuse is good. If it lights up on only one side or not at all, the fuse is blown.
- Multimeter: A more precise tool for checking continuity. Set the multimeter to the continuity setting (usually indicated by a sound wave symbol). Touch the probes to each end of the fuse. If the multimeter beeps or shows a reading close to zero ohms, the fuse is good. If it shows an open circuit (OL) or a very high resistance, the fuse is blown.
- Owner’s Manual: Essential for identifying the exact location and function of the OBD2 fuse.
- Work Light or Flashlight: Provides adequate lighting to see inside the fuse box.
3. Identifying the Correct OBD2 Fuse in Your 2006 Malibu
Once you’ve located the fuse box, identifying the correct OBD2 fuse is the next crucial step. Here’s how to do it effectively:
- Refer to the Fuse Box Diagram: The diagram inside the fuse box cover is your primary guide. Look for a fuse labeled “OBD,” “Diagnostic Port,” or a similar term. The exact labeling may vary, so check the owner’s manual if needed.
- Check the Amperage Rating: Note the amperage rating of the OBD2 fuse. This is important when replacing the fuse to ensure you use the correct type.
- Visually Inspect the Fuse: Remove the fuse and visually inspect it. A blown fuse typically has a broken filament or a dark, burnt appearance inside the glass or plastic housing.
- Use a Multimeter or Test Light: If a visual inspection isn’t conclusive, use a multimeter or test light to check for continuity. A good fuse will show continuity, while a blown fuse will not.
- Consult the Owner’s Manual: If you’re still unsure, the owner’s manual provides detailed information on fuse identification and replacement.
3.1. Common Fuse Labels for the OBD2 Port
The OBD2 port fuse may not always be labeled with the exact same terminology. Here are some common labels to look for:
- OBD
- OBD II
- Diagnostic Port
- DLC (Data Link Connector)
- Cigar Lighter/Aux Power (if the OBD2 port shares a circuit with these)
If you find a fuse with one of these labels, it is likely the correct fuse for the OBD2 port. Always double-check with your owner’s manual to confirm.
3.2. Understanding Amperage Ratings
The amperage rating of a fuse is crucial for its proper function and safety. Here’s what you need to know:
- Definition: Amperage (amps) is the unit of measure for electrical current. The amperage rating on a fuse indicates the maximum current the fuse can handle before it blows.
- Importance: Using a fuse with a lower amperage rating than specified can cause it to blow prematurely. Using a fuse with a higher amperage rating can allow too much current to flow, potentially damaging electrical components and creating a fire hazard.
- Color Coding: Fuses are color-coded to indicate their amperage rating. Here are some common colors:
- 2 Amp: Gray
- 3 Amp: Violet
- 4 Amp: Pink
- 5 Amp: Tan
- 7.5 Amp: Brown
- 10 Amp: Red
- 15 Amp: Blue
- 20 Amp: Yellow
- 25 Amp: Clear
- 30 Amp: Green
- 40 Amp: Orange
3.3. Visual Inspection Techniques for Fuses
A visual inspection can often reveal whether a fuse is blown. Here’s what to look for:
- Intact Filament: A good fuse will have a continuous, unbroken filament running between the two contacts inside the fuse.
- Broken Filament: A blown fuse will have a visible break in the filament.
- Dark or Burnt Appearance: The glass or plastic housing of a blown fuse may appear dark or burnt due to the excessive heat generated when the fuse blew.
- Loose Filament: In some cases, the filament may be loose or distorted, indicating that the fuse has been stressed and may fail soon.
4. Replacing a Blown OBD2 Fuse in Your 2006 Chevrolet Malibu
Once you’ve identified a blown OBD2 fuse, replacing it is a straightforward process. Follow these steps to ensure a successful replacement:
- Turn Off the Ignition: Before replacing any fuse, turn off the ignition to prevent electrical shorts.
- Remove the Blown Fuse: Use a fuse puller or needle-nose pliers to gently remove the blown fuse. Avoid using excessive force, which could damage the fuse box.
- Inspect the Fuse Box Terminals: Check the fuse box terminals for any signs of corrosion or damage. Clean the terminals if necessary.
- Insert the New Fuse: Insert a new fuse with the same amperage rating as the blown fuse. Ensure the fuse is fully seated in the fuse box.
- Test the OBD2 Port: Turn on the ignition and test the OBD2 port with a scanner to ensure it’s functioning correctly.
- Replace the Fuse Box Cover: Replace the fuse box cover and ensure it’s securely fastened.
4.1. Choosing the Correct Replacement Fuse
Selecting the right replacement fuse is critical for the safety and proper functioning of your vehicle’s electrical system. Here’s what to consider:
- Amperage Rating: Always use a replacement fuse with the same amperage rating as the original fuse. Using a fuse with a different amperage rating can cause electrical problems or create a fire hazard.
- Type of Fuse: Ensure you are using the correct type of fuse (e.g., MINI, ATO, MAXI). The fuse type is usually indicated on the fuse box diagram.
- Quality of Fuse: Choose high-quality fuses from reputable brands. Cheap fuses may not provide reliable protection and could fail prematurely.
- Availability: Keep a spare set of fuses in your vehicle so you can quickly replace a blown fuse when needed.
4.2. Step-by-Step Fuse Replacement Procedure
Follow these detailed steps to safely and effectively replace a blown fuse:
- Turn Off the Vehicle: Ensure the ignition is turned off to prevent electrical shorts. Remove the key from the ignition switch.
- Locate the Fuse Box: Identify the fuse box that contains the blown fuse. Refer to your owner’s manual for the exact location.
- Open the Fuse Box: Use a flathead screwdriver or your fingers to open the fuse box cover.
- Identify the Blown Fuse: Refer to the fuse box diagram to locate the blown fuse.
- Remove the Blown Fuse: Use a fuse puller or needle-nose pliers to gently remove the blown fuse. Be careful not to damage the surrounding fuses or the fuse box terminals.
- Inspect the Fuse: Visually inspect the fuse to confirm that it is blown. Look for a broken filament or a dark, burnt appearance.
- Choose the Correct Replacement Fuse: Select a replacement fuse with the same amperage rating and type as the blown fuse.
- Install the New Fuse: Align the new fuse with the terminals in the fuse box and gently push it into place. Ensure that the fuse is fully seated.
- Test the Circuit: Turn on the ignition and test the circuit that the fuse protects. For example, if you replaced the fuse for the OBD2 port, plug in your OBD2 scanner and see if it powers on.
- Replace the Fuse Box Cover: Put the fuse box cover back on and make sure it is securely fastened.
4.3. Safety Precautions During Fuse Replacement
Taking the necessary safety precautions is essential when replacing fuses. Here are some key safety tips:
- Turn Off the Ignition: Always turn off the ignition before working on the electrical system.
- Use the Right Tools: Use a fuse puller or needle-nose pliers to remove fuses. Avoid using metal objects that could cause a short circuit.
- Never Use a Higher Amperage Fuse: Never replace a fuse with one that has a higher amperage rating. This can overload the circuit and cause damage or a fire.
- Wear Safety Glasses: Wear safety glasses to protect your eyes from sparks or debris.
- Work in a Well-Lit Area: Ensure you have adequate lighting to see what you are doing.
- Consult a Professional: If you are not comfortable working on the electrical system, consult a qualified mechanic.
[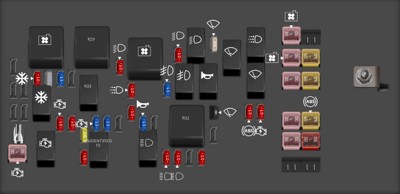 2006 Chevrolet Malibu fuse box diagram Engine Compartment Fuse Block
Engine Compartment Fuse Block diagram](https://images.startmycar.com/legos/fusebox-thumbnails/fusebox-chevrolet-malibu-2006-1.png)
5. Common Issues Related to the OBD2 Fuse in a 2006 Malibu
Several issues can arise with the OBD2 fuse in your 2006 Malibu, affecting your ability to diagnose and maintain your vehicle.
- Blown Fuse: The most common issue is a blown fuse, which can be caused by a short circuit, electrical overload, or a faulty component.
- Corrosion: Corrosion on the fuse or fuse box terminals can cause poor electrical contact and lead to intermittent issues or a blown fuse.
- Incorrect Fuse: Using the wrong amperage fuse can cause it to blow prematurely or, worse, lead to electrical damage.
- Faulty Wiring: Damaged or frayed wiring connected to the OBD2 port can cause a short circuit and blow the fuse.
- OBD2 Port Damage: Physical damage to the OBD2 port can also cause electrical issues and blow the fuse.
5.1. Identifying the Root Cause of Repeatedly Blown Fuses
If you find that the OBD2 fuse blows repeatedly, it indicates a more significant underlying issue. Here’s how to identify the root cause:
- Check for Short Circuits: Inspect the wiring connected to the OBD2 port for any signs of damage, such as frayed wires or exposed conductors. Use a multimeter to check for continuity between the wires and ground.
- Inspect the OBD2 Port: Examine the OBD2 port for any physical damage or corrosion. Clean the port with aContact cleaner if necessary.
- Test the OBD2 Scanner: Try using a different OBD2 scanner to see if the issue is with the scanner itself. A faulty scanner can sometimes cause a short circuit.
- Check for Overloads: Disconnect any aftermarket accessories that are powered through the OBD2 port, such as GPS trackers or performance monitors. These devices can sometimes draw too much current and overload the circuit.
- Consult a Wiring Diagram: Refer to a wiring diagram for your 2006 Chevy Malibu to trace the circuit connected to the OBD2 port. This can help you identify any potential issues in the wiring.
- Professional Inspection: If you are unable to identify the cause of the blown fuses, it is best to consult a professional mechanic or electrician. They have the tools and expertise to diagnose complex electrical issues.
5.2. Addressing Corrosion in the Fuse Box
Corrosion in the fuse box can lead to a variety of electrical problems. Here’s how to address it:
- Disconnect the Battery: Before cleaning the fuse box, disconnect the negative terminal of the battery to prevent electrical shorts.
- Inspect for Corrosion: Carefully inspect the fuse box and the fuse terminals for any signs of corrosion, such as white or green deposits.
- Clean the Terminals: Use a wire brush or sandpaper to gently clean the corroded terminals. Be careful not to damage the terminals.
- Apply Contact Cleaner: Spray the terminals with a contact cleaner to remove any remaining corrosion and protect against future corrosion.
- Reassemble the Fuse Box: Once the terminals are clean and dry, reassemble the fuse box and reconnect the battery.
- Preventive Measures: To prevent future corrosion, apply a dielectric grease to the terminals before reassembling the fuse box. This will help to seal out moisture and prevent corrosion.
5.3. Diagnosing Wiring Issues Related to the OBD2 Port
Wiring issues are a common cause of problems with the OBD2 port. Here’s how to diagnose them:
- Visual Inspection: Start by visually inspecting the wiring connected to the OBD2 port. Look for any signs of damage, such as frayed wires, exposed conductors, or melted insulation.
- Continuity Testing: Use a multimeter to check the continuity of the wires connected to the OBD2 port. This will help you identify any broken or disconnected wires.
- Voltage Testing: Use a multimeter to check the voltage at the OBD2 port. This will help you identify any issues with the power supply to the port.
- Wiring Diagram: Refer to a wiring diagram for your 2006 Chevy Malibu to trace the circuit connected to the OBD2 port. This will help you identify the correct wires and their functions.
- Professional Diagnosis: If you are unable to diagnose the wiring issues, it is best to consult a professional mechanic or electrician. They have the tools and expertise to diagnose complex electrical problems.
6. OBD2 Scanner Compatibility with the 2006 Chevy Malibu
Ensuring your OBD2 scanner is compatible with your 2006 Chevy Malibu is crucial for accurate diagnostics. Here’s what you need to know:
- OBD2 Compliance: The 2006 Chevy Malibu is OBD2 compliant, meaning it uses a standardized diagnostic system. Any OBD2 scanner should be able to connect and read basic diagnostic information.
- Scanner Features: Consider the features you need in a scanner. Basic scanners read trouble codes, while advanced scanners offer features like live data streaming, bidirectional control, and enhanced diagnostics.
- Software Updates: Ensure your scanner has the latest software updates to support the 2006 Malibu’s specific diagnostic protocols.
- Compatibility Issues: Some scanners may have compatibility issues with specific vehicle makes or models. Check the scanner’s compatibility list before purchasing.
6.1. Understanding OBD2 Protocols
OBD2 protocols are the standardized communication languages that vehicles use to transmit diagnostic data. Here’s what you need to know:
- Standardization: The OBD2 standard was introduced in the mid-1990s to provide a standardized way for accessing vehicle diagnostic information.
- Common Protocols: The 2006 Chevy Malibu uses one or more of the following OBD2 protocols:
- ISO 9141-2: A common protocol used by many European and Asian vehicles.
- SAE J1850 VPW: Used by General Motors vehicles, including the Chevy Malibu.
- SAE J1850 PWM: Used by Ford vehicles.
- ISO 14230 (KWP2000): An international standard for diagnostic communication.
- CAN (Controller Area Network): The most modern and widely used OBD2 protocol.
- Scanner Compatibility: Ensure that your OBD2 scanner supports the protocols used by your 2006 Chevy Malibu. Most modern scanners support all of the common OBD2 protocols.
- Protocol Identification: You can usually find information about the OBD2 protocols used by your vehicle in the owner’s manual or by searching online.
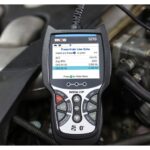
6.2. Selecting the Right OBD2 Scanner for Your Needs
Choosing the right OBD2 scanner can greatly enhance your ability to diagnose and maintain your vehicle. Here are some factors to consider:
- Basic vs. Advanced Scanners:
- Basic Scanners: These scanners can read and clear diagnostic trouble codes (DTCs). They are relatively inexpensive and easy to use.
- Advanced Scanners: These scanners offer more features, such as live data streaming, bidirectional control, and enhanced diagnostics. They are more expensive but provide more detailed information.
- Features to Consider:
- Code Reading and Clearing: Essential for any OBD2 scanner.
- Live Data Streaming: Allows you to monitor real-time data from various sensors and systems in your vehicle.
- Bidirectional Control: Allows you to send commands to the vehicle’s control modules to test components and systems.
- Enhanced Diagnostics: Provides access to manufacturer-specific diagnostic codes and information.
- Software Updates: Ensures that the scanner is compatible with the latest vehicle models and diagnostic protocols.
- Ease of Use: Choose a scanner with a user-friendly interface and clear instructions.
- Compatibility: Ensure that the scanner is compatible with your 2006 Chevy Malibu. Check the scanner’s compatibility list or consult the manufacturer.
- Price: OBD2 scanners range in price from around $20 to several hundred dollars. Choose a scanner that fits your budget and meets your needs.
6.3. Troubleshooting Common OBD2 Scanner Connection Problems
Even with a compatible scanner, you may encounter connection problems. Here are some common issues and how to troubleshoot them:
- Check the Connection: Ensure that the scanner is securely plugged into the OBD2 port.
- Verify Power: Make sure that the scanner is powered on and has a good battery or power supply.
- Check the Fuse: Verify that the OBD2 port fuse is not blown. Replace the fuse if necessary.
- Turn On the Ignition: The vehicle’s ignition must be turned on for the scanner to communicate with the vehicle’s computer.
- Check the Scanner Settings: Ensure that the scanner is configured correctly for your vehicle.
- Update the Software: Make sure that the scanner has the latest software updates.
- Try a Different Scanner: If possible, try using a different OBD2 scanner to see if the issue is with the scanner itself.
- Professional Assistance: If you are unable to resolve the connection problems, consult a professional mechanic or technician.
7. Decoding OBD2 Trouble Codes for Your 2006 Malibu
Reading and understanding OBD2 trouble codes is essential for diagnosing issues with your 2006 Malibu. Here’s how to decode these codes effectively:
- Read the Codes: Use an OBD2 scanner to read the trouble codes stored in your vehicle’s computer.
- Understand the Code Structure: OBD2 codes consist of five characters:
- First Character: Indicates the system (P=Powertrain, B=Body, C=Chassis, U=Network).
- Second Character: Indicates whether the code is generic (0) or manufacturer-specific (1).
- Third Character: Indicates the subsystem (e.g., Fuel System, Ignition System, Emission Control).
- Fourth and Fifth Characters: Specify the particular fault within the subsystem.
- Look Up the Code: Use a reliable source, such as the owner’s manual, a repair manual, or an online database, to look up the meaning of the code.
- Diagnose the Issue: Based on the code definition, diagnose the underlying issue. This may involve further testing and inspection.
- Repair the Issue: Repair the issue based on your diagnosis. This may involve replacing a faulty component, repairing a wiring problem, or performing other maintenance.
- Clear the Code: After repairing the issue, clear the trouble code using the OBD2 scanner.
- Verify the Repair: Verify that the issue is resolved and that the code does not return.
7.1. Common OBD2 Codes for Chevy Malibu
Certain OBD2 codes are more common in Chevy Malibus. Knowing these can help you quickly identify potential issues:
- P0171: System Too Lean (Bank 1)
- P0300: Random/Multiple Cylinder Misfire Detected
- P0420: Catalyst System Efficiency Below Threshold (Bank 1)
- P0442: Evaporative Emission Control System Leak Detected (Small Leak)
- P0455: Evaporative Emission Control System Leak Detected (Large Leak)
- P0102: Mass Air Flow (MAF) Circuit Low Input
- P0135: O2 Sensor Heater Circuit Malfunction (Bank 1, Sensor 1)
- P0301-P0306: Cylinder Misfire Detected (Cylinders 1-6)
- P0401: Exhaust Gas Recirculation (EGR) Flow Insufficient Detected
- P0410: Secondary Air Injection System Malfunction
7.2. Using Online Databases and Repair Manuals for Code Definitions
Online databases and repair manuals are invaluable resources for looking up OBD2 code definitions and troubleshooting information. Here are some popular resources:
- OBD-Codes.com: A comprehensive online database of OBD2 codes with detailed definitions, possible causes, and troubleshooting tips.
- RepairPal.com: Provides code definitions, repair estimates, and information about common problems for various vehicles.
- AutoCodes.com: Offers a searchable database of OBD2 codes with detailed information and troubleshooting guides.
- Chilton Repair Manuals: These manuals provide detailed repair procedures, wiring diagrams, and code definitions for various vehicles.
- Haynes Repair Manuals: Similar to Chilton manuals, Haynes manuals offer step-by-step repair instructions and code definitions.
7.3. Understanding Generic vs. Manufacturer-Specific Codes
OBD2 codes can be either generic or manufacturer-specific. Here’s what you need to know:
- Generic Codes: These codes are standardized across all vehicle makes and models. They cover common issues that affect most vehicles.
- Manufacturer-Specific Codes: These codes are specific to a particular vehicle make or model. They provide more detailed information about issues that are unique to that vehicle.
- Code Structure: The second character of an OBD2 code indicates whether it is generic (0) or manufacturer-specific (1). For example, a code that starts with P0 is a generic code, while a code that starts with P1 is a manufacturer-specific code.
- Troubleshooting: When troubleshooting OBD2 codes, it is important to consider whether the code is generic or manufacturer-specific. Manufacturer-specific codes may require more specialized knowledge and tools to diagnose and repair.
8. Maintaining Your 2006 Malibu’s Electrical System
Regular maintenance of your 2006 Malibu’s electrical system is crucial for preventing issues and ensuring reliable performance. Here are some key maintenance tips:
- Regular Inspections: Periodically inspect the wiring, fuses, and connectors for any signs of damage or corrosion.
- Battery Maintenance: Keep the battery terminals clean and corrosion-free. Check the battery voltage regularly and replace the battery when it’s weak.
- Fuse Replacement: Replace blown fuses immediately with the correct amperage fuse.
- Wiring Repairs: Repair any damaged wiring promptly to prevent short circuits and other electrical problems.
- Professional Service: Have the electrical system inspected by a qualified mechanic at regular intervals.
8.1. Preventing Electrical Problems Through Regular Maintenance
Preventive maintenance is key to avoiding electrical issues and ensuring the longevity of your vehicle. Here are some tips:
- Keep Connections Clean: Regularly clean battery terminals, ground connections, and other electrical connections to prevent corrosion.
- Inspect Wiring: Periodically inspect wiring harnesses for signs of damage, such as fraying, cracking, or exposure to heat.
- Check Fuses and Relays: Inspect fuses and relays for signs of corrosion or damage. Replace any that appear to be in poor condition.
- Maintain Battery Health: Keep the battery properly charged and test it regularly to ensure it is functioning properly.
- Avoid Overloading Circuits: Be careful not to overload electrical circuits by adding too many accessories or using devices that draw too much current.
- Professional Inspections: Have the electrical system inspected by a qualified mechanic at regular intervals.
8.2. Best Practices for Handling Automotive Fuses
Proper handling of automotive fuses is essential for safety and preventing damage to your vehicle’s electrical system. Here are some best practices:
- Use the Right Fuse: Always use a replacement fuse with the same amperage rating and type as the original fuse.
- Avoid Over-Sizing: Never replace a fuse with one that has a higher amperage rating. This can overload the circuit and cause damage or a fire.
- Use a Fuse Puller: Use a fuse puller to remove and install fuses. This will help prevent damage to the fuse box and the fuses themselves.
- Inspect Fuses: Before installing a fuse, inspect it for any signs of damage or corrosion.
- Store Fuses Properly: Store spare fuses in a dry, clean place where they will not be damaged or corroded.
- Dispose of Fuses Properly: Dispose of old or blown fuses properly. Do not throw them in the trash, as they may contain hazardous materials.
- Keep a Fuse Kit: Keep a fuse kit in your vehicle so you can quickly replace a blown fuse when needed.
8.3. When to Seek Professional Help
While many electrical issues can be resolved with basic maintenance and repairs, there are times when it is best to seek professional help. Here are some situations when you should consult a qualified mechanic or electrician:
- Complex Electrical Problems: If you are unable to diagnose or repair an electrical problem, it is best to consult a professional.
- Repeated Fuse Blows: If a fuse blows repeatedly, it indicates a more serious underlying issue that requires professional diagnosis and repair.
- Wiring Damage: If you find extensive damage to the wiring harness, it is best to have it repaired by a professional.
- Airbag or ABS Issues: If you are experiencing issues with the airbag or anti-lock braking system (ABS), it is important to have the system inspected and repaired by a qualified technician.
- Unfamiliar Systems: If you are working on an electrical system that you are not familiar with, it is best to seek professional help.
- Safety Concerns: If you have any safety concerns about working on the electrical system, it is always best to consult a professional.
[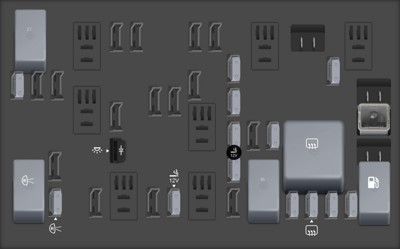 2006 Chevrolet Malibu fuse box diagram Rear Compartment Fuse Block
Rear Compartment Fuse Block diagram](https://images.startmycar.com/legos/fusebox-thumbnails/fusebox-chevrolet-malibu-2006-2.png)
9. Advanced Diagnostic Techniques for Electrical Issues
For more complex electrical problems, advanced diagnostic techniques may be necessary. These techniques require specialized tools and knowledge.
- Using a Multimeter: A multimeter can be used to measure voltage, current, and resistance in electrical circuits. This can help you identify short circuits, open circuits, and other electrical problems.
- Using a Scan Tool: A scan tool can be used to read diagnostic trouble codes (DTCs) from the vehicle’s computer. This can help you identify the source of electrical problems.
- Using a Wiring Diagram: A wiring diagram can be used to trace the electrical circuits in the vehicle. This can help you identify damaged wires, connectors, and components.
- Performing Component Testing: Component testing involves testing individual electrical components to determine if they are functioning properly. This can help you identify faulty components.
- Using an Oscilloscope: An oscilloscope can be used to visualize electrical signals in the vehicle. This can help you identify intermittent problems and other complex electrical issues.
9.1. Utilizing a Multimeter for Electrical Testing
A multimeter is an essential tool for diagnosing electrical problems. Here’s how to use it effectively:
- Voltage Testing: Use a multimeter to measure the voltage at various points in the circuit. This can help you identify voltage drops, shorts to ground, and other voltage-related issues.
- Continuity Testing: Use a multimeter to check the continuity of wires and connections. This can help you identify open circuits and broken wires.
- Resistance Testing: Use a multimeter to measure the resistance of components such as resistors and sensors. This can help you identify faulty components.
- Current Testing: Use a multimeter to measure the current flowing through a circuit. This can help you identify overloaded circuits and excessive current draw.
- Proper Settings: Ensure that the multimeter is set to the correct setting for the type of measurement you are taking (e.g., voltage, continuity, resistance, current).
- Safety Precautions: Take the necessary safety precautions when using a multimeter. Avoid touching live wires and always disconnect the battery before working on the electrical system.
9.2. Reading and Interpreting Wiring Diagrams
Wiring diagrams are essential for tracing electrical circuits and diagnosing electrical problems. Here’s how to read and interpret them:
- Symbols: Wiring diagrams use a variety of symbols to represent electrical components, wires, and connections. Familiarize yourself with these symbols.
- Circuit Tracing: Use the wiring diagram to trace the path of an electrical circuit from the power source to the component. This will help you understand how the circuit works and identify potential problems.
- Component Identification: Use the wiring diagram to identify the location and function of various electrical components.
- Wire Colors: Pay attention to the wire colors in the wiring diagram. This can help you identify the correct wires in the vehicle.
- Ground Connections: Identify the ground connections in the wiring diagram. These connections are essential for the proper functioning of the electrical system.
- Voltage and Current Ratings: Pay attention to the voltage and current ratings of the wires and components in the wiring diagram. This will help you avoid overloading circuits.
9.3. Component Testing Techniques
Component testing involves testing individual electrical components to determine if they are functioning properly. Here are some common component testing techniques:
- Voltage Drop Testing: This technique involves measuring the voltage drop across a component to determine if it is functioning properly.
- Resistance Testing: This technique involves measuring the resistance of a component to determine if it is within the specified range.
- Continuity Testing: This technique involves checking the continuity of a component to determine if it is open or shorted.
- Activation Testing: This technique involves activating a component to see if it functions properly. For example, you can activate a relay to see if it clicks and closes the circuit.
- Signal Testing: This technique involves testing the signal from a sensor to see if it is within the specified range.
- **Manufacturer