Does a 1994 Mazda B3000 have an OBD2 port? No, a 1994 Mazda B3000 does not have an OBD2 port. It utilizes the older OBD1 system. Understanding this crucial difference is essential for accurate vehicle diagnostics and maintenance. At OBD2-SCANNER.EDU.VN, we provide the resources and expertise you need to navigate both OBD1 and OBD2 systems effectively, ensuring you can diagnose and resolve your vehicle’s issues with confidence using diagnostic scanning tools and automotive diagnostic services.
Contents
- 1. Understanding OBD1 and OBD2 Systems
- 1.1. OBD1 Systems: A Closer Look
- 1.2. OBD2 Systems: A Standardized Approach
- 2. Identifying the Diagnostic Port on a 1994 Mazda B3000
- 2.1. Visual Inspection of the Connector
- 2.2. Using the Vehicle’s Service Manual
- 3. Retrieving Diagnostic Codes from a 1994 Mazda B3000
- 3.1. Manual Code Retrieval Process
- 3.2. Interpreting the Check Engine Light (CEL) Flashes
- 4. Common OBD1 Diagnostic Trouble Codes for Mazda
- 4.1. Code 111: System Pass/No Codes Present
- 4.2. Code 116: Coolant Temperature Sensor Out of Range
- 4.3. Code 121: Throttle Position Sensor (TPS) Out of Range
- 4.4. Code 126: Manifold Absolute Pressure (MAP) Sensor Out of Range
- 4.5. Code 172: Oxygen Sensor Indicates Lean
- 4.6. Code 173: Oxygen Sensor Indicates Rich
- 4.7. Code 212: Ignition System Fault
- 4.8. Code 327: Exhaust Gas Recirculation (EGR) System Fault
- 4.9. Code 512: Keep Alive Memory (KAM) Error
- 4.10. Code 536: Brake On/Off (BOO) Switch Circuit Failure
- 5. Clearing Diagnostic Codes on a 1994 Mazda B3000
- 5.1. Using the Jumper Wire Method to Clear Codes
- 5.2. Disconnecting the Battery to Reset the System
- 6. Tools and Resources for OBD1 Diagnostics
- 6.1. Essential Tools for OBD1 Diagnostics
- 6.2. Online Resources and Communities
- 7. Maintaining Your 1994 Mazda B3000
- 7.1. Regular Maintenance Tasks
- 7.2. Preventing Common Issues
1. Understanding OBD1 and OBD2 Systems
What are the key differences between OBD1 and OBD2? OBD1 (On-Board Diagnostics 1) and OBD2 (On-Board Diagnostics 2) are automotive diagnostic systems, but they differ significantly in terms of standardization, functionality, and the type of information they provide. Understanding these differences is crucial for anyone involved in vehicle maintenance or repair, whether you’re a professional mechanic or a car enthusiast.
- OBD1: This was the early generation of on-board diagnostic systems used in vehicles before the mid-1990s.
- OBD2: It became standard in the United States in 1996, offering enhanced diagnostic capabilities.
Here’s a detailed breakdown of the key differences:
| Feature | OBD1 | OBD2 |
|---|---|---|
| Standardization | Not standardized; varies by manufacturer | Standardized across all makes and models sold in the US (and later adopted in other countries) |
| Connector Type | Various; often manufacturer-specific | Standardized 16-pin DLC (Data Link Connector) |
| Diagnostic Codes | Limited; manufacturer-specific | Standardized codes (SAE J1979) |
| Data Parameters | Fewer parameters monitored | Extensive parameters monitored, including emissions, engine performance, and more |
| Communication | Various protocols | Standardized protocols (e.g., CAN, ISO) |
| Access to Data | Often requires specialized tools | Accessible with a generic OBD2 scanner |
| Emission Focus | Primarily emissions-related issues | Broader range of issues, including emissions, engine, transmission, and more |
| Fault Detection | Less precise fault detection | More precise and comprehensive fault detection |
| Global Adoption | Primarily used in North America | Adopted globally, with variations in implementation |
| Year of Adoption | Pre-1996 | 1996 and later (in the US) |
| Ease of Use | More complex and manufacturer-dependent | Simpler to use with standardized connectors and codes |
| Data Interpretation | Requires specific knowledge for each make | Easier to interpret with standardized codes and parameters |
For instance, OBD2 systems, as noted in a study by the Environmental Protection Agency (EPA), provide more comprehensive monitoring of vehicle systems, leading to better diagnostics and reduced emissions [EPA, 2000].
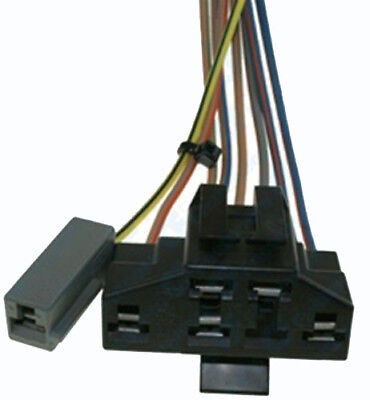 OBD1 Connector
1.1. OBD1 Systems: A Closer Look
What are the characteristics of OBD1 systems? OBD1 systems were the first generation of on-board diagnostic systems in vehicles. Unlike the later OBD2 systems, OBD1 was not standardized, meaning each manufacturer could implement it differently. This lack of standardization made diagnosing issues more complex and required specialized tools and knowledge.
Key characteristics of OBD1 systems include:
- Manufacturer-Specific: Each car manufacturer had its own diagnostic connector, location, and communication protocol.
- Limited Diagnostic Codes: The number and type of diagnostic codes were limited and specific to each manufacturer.
- Basic Data Parameters: Monitored fewer parameters compared to OBD2, mainly focusing on emissions-related issues.
- Complex Data Interpretation: Interpreting the data often required specific knowledge and tools for each make and model.
- Location of Connector: The diagnostic connector could be found in various locations, such as under the dashboard, in the engine bay, or even in the passenger compartment.
The OBD1 system, as detailed in “Automotive Technology: A Systems Approach” by Jack Erjavec, lacked uniformity, making it challenging for technicians to service a wide range of vehicles efficiently [Erjavec, 2016].
1.2. OBD2 Systems: A Standardized Approach
What makes OBD2 systems a significant advancement? OBD2 systems represent a significant advancement over OBD1 due to their standardization and enhanced diagnostic capabilities. In 1996, the OBD2 system became mandatory in all new cars sold in the United States, leading to a uniform approach in vehicle diagnostics.
Key features of OBD2 systems include:
- Standardized Connector: A 16-pin Data Link Connector (DLC) is used across all vehicles, making it easier to connect diagnostic tools.
- Standardized Diagnostic Codes: OBD2 uses standardized diagnostic trouble codes (DTCs) as specified by SAE J1979, allowing technicians to quickly identify the nature of the problem.
- Extensive Data Parameters: Monitors a wide range of parameters, including emissions, engine performance, transmission, and more.
- Global Adoption: Adopted globally, with variations in implementation based on local regulations.
- Enhanced Fault Detection: More precise and comprehensive fault detection compared to OBD1.
- Ease of Use: Simpler to use with standardized connectors and codes, enabling quicker and more accurate diagnostics.
According to a report by the National Automotive Service Task Force (NASTF), the OBD2 system has significantly improved the efficiency and accuracy of vehicle diagnostics, resulting in better repairs and reduced emissions [NASTF, 2010].
2. Identifying the Diagnostic Port on a 1994 Mazda B3000
How do you locate the diagnostic port on a 1994 Mazda B3000? Since the 1994 Mazda B3000 uses an OBD1 system, the diagnostic port is not the standardized 16-pin connector found in OBD2 vehicles. Instead, it has a unique connector that requires a different diagnostic approach.
To locate the diagnostic port on a 1994 Mazda B3000:
- Check the Engine Bay: Look for a connector, often near the engine fuse box.
- Identify the Connector Type: The connector is typically a multi-pin connector, usually rectangular or square.
- Look for Labels: The connector may have a cap labeled “EEC” (Electronic Engine Control) or similar.
- Refer to the Vehicle’s Service Manual: Consult the service manual for the exact location and type of connector.
If you need help locating the OBD1 connector, contact us at OBD2-SCANNER.EDU.VN for expert guidance.
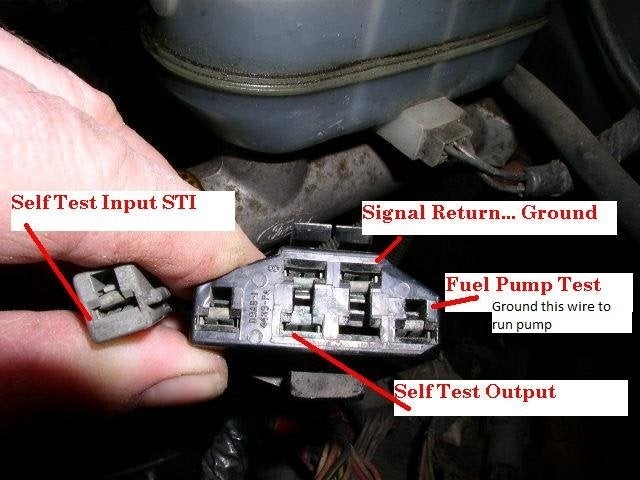 OBD1 Connector Slots
2.1. Visual Inspection of the Connector
What should you look for when inspecting the OBD1 connector? A visual inspection is the first step in identifying the OBD1 connector on your 1994 Mazda B3000.
Here’s what to look for:
- Shape and Size: The connector is not the standard 16-pin OBD2 connector. It is usually a rectangular or square multi-pin connector.
- Color: Typically black or gray.
- Location: Often found in the engine bay, near the fuse box, or on the firewall.
- Labels: Look for a cap labeled “EEC” or similar markings indicating it is the diagnostic port.
- Wiring: Check for a single gray connector with a wire harness attached to the main connector.
2.2. Using the Vehicle’s Service Manual
Why is the service manual important for finding the diagnostic port? The vehicle’s service manual is an invaluable resource for locating the diagnostic port, especially for older vehicles with OBD1 systems. The manual provides specific details about the location, type, and pin configuration of the diagnostic connector.
Benefits of using the service manual:
- Accurate Location: Provides the exact location of the diagnostic connector for your specific make and model.
- Connector Type: Identifies the specific type of connector used, which helps in using the correct diagnostic procedure.
- Pin Configuration: Offers detailed information about the pin layout, essential for manual code retrieval.
- Diagnostic Procedures: Includes step-by-step instructions on how to retrieve diagnostic codes.
Consulting the service manual ensures you are using the correct procedure and connecting to the correct port.
3. Retrieving Diagnostic Codes from a 1994 Mazda B3000
How can you retrieve diagnostic codes from a 1994 Mazda B3000 without an OBD2 scanner? Since the 1994 Mazda B3000 uses an OBD1 system, you cannot use a standard OBD2 scanner. Instead, you need to use a manual method to retrieve the diagnostic codes. This involves using a jumper wire and interpreting the Check Engine Light (CEL) flashes.
Here are the steps to retrieve diagnostic codes:
- Locate the OBD1 Connector: Find the OBD1 connector in the engine bay, usually near the fuse box.
- Prepare a Jumper Wire: Use a short jumper wire or an unfolded paper clip.
- Jumper the Connector:
- Turn off the ignition key.
- Locate the single gray connector (“Self Test Input”) on the same harness.
- Jumper the “Self Test Input” to the “Signal Return” slot on the larger connector.
- Turn On the Key: Turn the ignition key to the “ON” position, but do not start the engine.
- Watch the Check Engine Light (CEL): The CEL will flash a series of codes.
- Interpret the Codes: The CEL will flash once to indicate the start of the diagnostic sequence, then it will flash the diagnostic codes. For example, if the CEL flashes once, short pause, then flashes once again, short pause, and finally flashes six times, long pause, that would be code 116.
- Record the Codes: Write down the codes as they are displayed. The codes will repeat, so you have a chance to confirm them.
- Refer to a Code List: Consult a list of OBD1 diagnostic codes for Mazda to interpret the codes.
3.1. Manual Code Retrieval Process
What is the step-by-step process for manually retrieving codes? The manual code retrieval process for a 1994 Mazda B3000 involves using a jumper wire to put the EEC (Electronic Engine Control) into test mode and then reading the diagnostic codes from the Check Engine Light (CEL).
Here is the step-by-step process:
- Preparation:
- Ensure the ignition key is in the “OFF” position.
- Locate the OBD1 connector in the engine bay.
- Prepare a jumper wire or an unfolded paper clip.
- Jumpering the Connector:
- Identify the single gray connector (“Self Test Input”) and the “Signal Return” slot on the larger connector.
- Insert the jumper wire to connect the “Self Test Input” to the “Signal Return” slot.
- Initiating Test Mode:
- Turn the ignition key to the “ON” position, but do not start the engine.
- Observe the Check Engine Light (CEL).
- Reading the Codes:
- The CEL will flash once to indicate the start of the diagnostic sequence.
- The CEL will then flash the diagnostic codes.
- For example, if the CEL flashes once, short pause, once again, short pause, and finally six times, long pause, that would be code 116.
- Recording the Codes:
- Write down the codes as they are displayed.
- The codes will repeat, allowing you to confirm them.
- Interpreting the Codes:
- Consult a list of OBD1 diagnostic codes for Mazda.
- Use the code list to identify the issue indicated by each code.
3.2. Interpreting the Check Engine Light (CEL) Flashes
How do you interpret the flashes from the Check Engine Light? Interpreting the Check Engine Light (CEL) flashes is crucial in the manual code retrieval process for OBD1 systems. The CEL will flash a series of codes, and understanding the pattern is essential for accurate diagnosis.
Here’s how to interpret the CEL flashes:
- Initial Flash: The CEL will first flash once to indicate the beginning of the diagnostic sequence.
- Code Sequence: The diagnostic codes are displayed as a series of flashes.
- Each code consists of three digits.
- Flashes are separated by short pauses.
- Digits are separated by short pauses.
- Codes are separated by long pauses.
- Example:
- If the CEL flashes once, short pause, once again, short pause, and finally six times, long pause, that would be code 116.
- One flash = 1
- One flash = 1
- Six flashes = 6
- Repeating Codes: The system will repeat the codes to ensure you have recorded them correctly.
- Code 111: If the CEL flashes code 111 (one flash, short pause, one flash, short pause, one flash), it means there are no stored codes in the system.
Understanding these patterns allows you to accurately record and interpret the diagnostic codes from your 1994 Mazda B3000.
4. Common OBD1 Diagnostic Trouble Codes for Mazda
What are some common OBD1 codes for Mazda vehicles? Understanding common OBD1 diagnostic trouble codes (DTCs) can significantly aid in diagnosing issues with your 1994 Mazda B3000. These codes provide valuable information about potential problems within the vehicle’s systems.
Here are some common OBD1 codes for Mazda:
| Code | Description | Possible Causes |
|---|---|---|
| 111 | System Pass/No Codes Present | No faults detected; system is functioning correctly |
| 116 | Coolant Temperature Sensor Out of Range | Faulty coolant temperature sensor, wiring issues, or coolant level issues |
| 121 | Throttle Position Sensor (TPS) Out of Range | Faulty TPS, incorrect TPS adjustment, wiring issues |
| 126 | Manifold Absolute Pressure (MAP) Sensor Out of Range | Faulty MAP sensor, vacuum leaks, wiring issues |
| 172 | Oxygen Sensor Indicates Lean | Vacuum leaks, low fuel pressure, faulty oxygen sensor |
| 173 | Oxygen Sensor Indicates Rich | High fuel pressure, faulty oxygen sensor, leaking fuel injectors |
| 212 | Ignition System Fault | Faulty ignition module, wiring issues, faulty crankshaft position sensor |
| 327 | Exhaust Gas Recirculation (EGR) System Fault | Faulty EGR valve, vacuum leaks, blocked EGR passages |
| 512 | Keep Alive Memory (KAM) Error | Loss of power to the PCM (Powertrain Control Module), faulty PCM |
| 536 | Brake On/Off (BOO) Switch Circuit Failure | Faulty BOO switch, wiring issues |
These codes are a starting point for diagnosing issues, but always consult the vehicle’s service manual for specific troubleshooting steps.
4.1. Code 111: System Pass/No Codes Present
What does code 111 indicate in an OBD1 system? Code 111 in an OBD1 system indicates that the system has passed its self-test and no diagnostic trouble codes (DTCs) are present. This means the vehicle’s computer has not detected any faults in the monitored systems during the test.
Key points about code 111:
- No Faults Detected: Indicates that no issues were found during the self-test.
- System Functioning Correctly: Suggests that the engine and related systems are operating within normal parameters.
- Not a Guarantee: While it indicates no current faults, it does not guarantee that there are no intermittent issues or potential problems that have not yet triggered a code.
If you receive code 111, it’s still a good idea to perform regular maintenance checks to ensure optimal vehicle performance.
4.2. Code 116: Coolant Temperature Sensor Out of Range
What does code 116 mean, and what are the potential causes? Code 116 indicates that the Coolant Temperature Sensor is out of its normal operating range. This sensor provides crucial data to the engine control unit (ECU) about the engine’s temperature, which affects fuel delivery and timing.
Potential causes for code 116:
- Faulty Coolant Temperature Sensor: The sensor itself may be defective and providing incorrect readings.
- Wiring Issues: Damaged, corroded, or disconnected wiring to the sensor can cause inaccurate readings.
- Coolant Level Issues: Low coolant levels can affect the sensor’s ability to accurately measure temperature.
- Thermostat Problems: A malfunctioning thermostat can cause the engine to overheat or not reach optimal temperature.
Addressing code 116 promptly is important to prevent engine damage and ensure proper fuel efficiency.
4.3. Code 121: Throttle Position Sensor (TPS) Out of Range
What does code 121 signify, and what steps should you take? Code 121 indicates that the Throttle Position Sensor (TPS) signal is out of its normal operating range. The TPS monitors the position of the throttle plate and sends this information to the engine control unit (ECU), which adjusts fuel delivery and ignition timing accordingly.
Potential causes for code 121:
- Faulty TPS: The sensor itself may be defective and providing incorrect readings.
- Incorrect TPS Adjustment: The TPS may be improperly adjusted, causing it to send inaccurate signals.
- Wiring Issues: Damaged, corroded, or disconnected wiring to the sensor can cause inaccurate readings.
- Throttle Body Problems: Issues with the throttle body, such as carbon buildup, can affect TPS operation.
To address code 121:
- Inspect the TPS: Check for any visible damage or corrosion.
- Check Wiring: Ensure the wiring and connectors are in good condition.
- Adjust TPS: Use a multimeter to check the TPS voltage and adjust it according to the vehicle’s service manual.
- Replace TPS: If the sensor is faulty, replace it with a new one.
4.4. Code 126: Manifold Absolute Pressure (MAP) Sensor Out of Range
What does code 126 indicate, and how do you resolve it? Code 126 indicates that the Manifold Absolute Pressure (MAP) sensor signal is out of its normal operating range. The MAP sensor measures the pressure in the intake manifold, providing crucial data to the engine control unit (ECU) for fuel and ignition control.
Potential causes for code 126:
- Faulty MAP Sensor: The sensor itself may be defective and providing incorrect readings.
- Vacuum Leaks: Vacuum leaks in the intake manifold or vacuum lines can cause inaccurate MAP sensor readings.
- Wiring Issues: Damaged, corroded, or disconnected wiring to the sensor can cause inaccurate readings.
To resolve code 126:
- Inspect the MAP Sensor: Check for any visible damage or corrosion.
- Check Vacuum Lines: Inspect all vacuum lines for leaks or damage.
- Check Wiring: Ensure the wiring and connectors are in good condition.
- Replace MAP Sensor: If the sensor is faulty, replace it with a new one.
4.5. Code 172: Oxygen Sensor Indicates Lean
What does code 172 mean, and how can it be fixed? Code 172 indicates that the oxygen sensor is detecting a lean condition, meaning there is too much oxygen in the exhaust stream. This can lead to reduced fuel efficiency and potential engine damage.
Potential causes for code 172:
- Vacuum Leaks: Vacuum leaks can introduce extra air into the system, causing a lean condition.
- Low Fuel Pressure: Insufficient fuel pressure can result in a lean mixture.
- Faulty Oxygen Sensor: A malfunctioning oxygen sensor may provide incorrect readings.
- Exhaust Leaks: Leaks in the exhaust system can introduce extra air, leading to a lean reading.
To fix code 172:
- Check for Vacuum Leaks: Inspect all vacuum lines and intake manifold gaskets for leaks.
- Check Fuel Pressure: Verify that the fuel pressure is within the specified range.
- Inspect Oxygen Sensor: Check the oxygen sensor for damage or contamination.
- Replace Oxygen Sensor: If the sensor is faulty, replace it with a new one.
4.6. Code 173: Oxygen Sensor Indicates Rich
What does code 173 signify, and what steps should you take? Code 173 indicates that the oxygen sensor is detecting a rich condition, meaning there is too much fuel in the exhaust stream. This can lead to reduced fuel efficiency, increased emissions, and potential engine damage.
Potential causes for code 173:
- High Fuel Pressure: Excessive fuel pressure can result in a rich mixture.
- Faulty Oxygen Sensor: A malfunctioning oxygen sensor may provide incorrect readings.
- Leaking Fuel Injectors: Leaking fuel injectors can introduce extra fuel into the cylinders.
To address code 173:
- Check Fuel Pressure: Verify that the fuel pressure is within the specified range.
- Inspect Oxygen Sensor: Check the oxygen sensor for damage or contamination.
- Check Fuel Injectors: Inspect the fuel injectors for leaks or damage.
- Replace Oxygen Sensor: If the sensor is faulty, replace it with a new one.
4.7. Code 212: Ignition System Fault
What does code 212 mean, and how do you resolve it? Code 212 indicates a fault within the ignition system. The ignition system is crucial for starting the engine and maintaining its performance by providing the spark needed for combustion.
Potential causes for code 212:
- Faulty Ignition Module: A malfunctioning ignition module can disrupt the spark timing.
- Wiring Issues: Damaged, corroded, or disconnected wiring in the ignition system can cause faults.
- Faulty Crankshaft Position Sensor: A faulty crankshaft position sensor can lead to incorrect ignition timing.
To resolve code 212:
- Inspect Ignition Module: Check the ignition module for any visible damage or corrosion.
- Check Wiring: Ensure the wiring and connectors are in good condition.
- Test Crankshaft Position Sensor: Use a multimeter to test the crankshaft position sensor.
- Replace Faulty Components: Replace any faulty components, such as the ignition module or crankshaft position sensor.
4.8. Code 327: Exhaust Gas Recirculation (EGR) System Fault
What does code 327 indicate, and what steps should you take? Code 327 indicates a fault within the Exhaust Gas Recirculation (EGR) system. The EGR system reduces emissions by recirculating a portion of the exhaust gas back into the intake manifold.
Potential causes for code 327:
- Faulty EGR Valve: A malfunctioning EGR valve can disrupt the recirculation process.
- Vacuum Leaks: Vacuum leaks in the EGR system can prevent proper valve operation.
- Blocked EGR Passages: Carbon buildup can block the EGR passages, preventing exhaust gas recirculation.
To address code 327:
- Inspect EGR Valve: Check the EGR valve for any visible damage or carbon buildup.
- Check Vacuum Lines: Inspect all vacuum lines for leaks or damage.
- Clean EGR Passages: Clean the EGR passages to remove any carbon buildup.
- Replace EGR Valve: If the valve is faulty, replace it with a new one.
4.9. Code 512: Keep Alive Memory (KAM) Error
What does code 512 mean, and how can it be fixed? Code 512 indicates a Keep Alive Memory (KAM) error. The KAM stores important data, such as fuel trims and adaptive learning values, even when the ignition is turned off.
Potential causes for code 512:
- Loss of Power to the PCM (Powertrain Control Module): A loss of power to the PCM can cause the KAM to lose its stored data.
- Faulty PCM: A malfunctioning PCM can cause KAM errors.
To fix code 512:
- Check Battery Voltage: Ensure the battery voltage is within the specified range.
- Check PCM Power Supply: Verify that the PCM is receiving power.
- Inspect Wiring: Check the wiring to the PCM for any damage or corrosion.
- Replace PCM: If the PCM is faulty, replace it with a new one.
4.10. Code 536: Brake On/Off (BOO) Switch Circuit Failure
What does code 536 signify, and what steps should you take? Code 536 indicates a failure in the Brake On/Off (BOO) switch circuit. The BOO switch signals to the engine control unit (ECU) when the brake pedal is pressed.
Potential causes for code 536:
- Faulty BOO Switch: The BOO switch itself may be defective.
- Wiring Issues: Damaged, corroded, or disconnected wiring to the switch can cause a failure.
To address code 536:
- Inspect BOO Switch: Check the BOO switch for any visible damage.
- Check Wiring: Ensure the wiring and connectors are in good condition.
- Replace BOO Switch: If the switch is faulty, replace it with a new one.
5. Clearing Diagnostic Codes on a 1994 Mazda B3000
How do you clear diagnostic codes on a 1994 Mazda B3000? Clearing diagnostic codes on a 1994 Mazda B3000, which uses an OBD1 system, requires a manual process since you cannot use a standard OBD2 scanner. The procedure involves disconnecting the jumper wire while the key is in the “ON” position or disconnecting the battery.
Here are the steps to clear diagnostic codes:
- Retrieve Diagnostic Codes: First, retrieve the diagnostic codes using the manual method described earlier.
- Clear Codes:
- Method 1: Removing the Jumper Wire: With the key still in the “ON” position, remove the jumper wire from the diagnostic connector. This will clear all stored codes in the memory.
- Method 2: Disconnecting the Battery: Disconnect the negative terminal of the battery for about 5 minutes. This will reset the computer and clear the codes.
- Verify Codes are Cleared: After clearing the codes, turn off the key, reconnect the jumper wire (if you used Method 1), and turn the key back to the “ON” position to recheck the codes. If the codes have been successfully cleared, code 111 (System Pass/No Codes Present) should be displayed.
5.1. Using the Jumper Wire Method to Clear Codes
How does the jumper wire method clear the diagnostic codes? The jumper wire method is a quick way to clear diagnostic codes on a 1994 Mazda B3000.
Here’s how it works:
- Retrieve Codes: First, retrieve the diagnostic codes using the manual method, noting any issues.
- Clear Codes:
- Ensure the key is in the “ON” position (engine not running).
- Remove the jumper wire from the diagnostic connector.
- This action clears all stored codes from the computer’s memory.
- Verify Clearing:
- Turn off the key.
- Reconnect the jumper wire.
- Turn the key back to the “ON” position and check for codes again.
- If the codes have been successfully cleared, code 111 should be displayed.
5.2. Disconnecting the Battery to Reset the System
Why does disconnecting the battery clear the diagnostic codes? Disconnecting the battery is another method to clear diagnostic codes on a 1994 Mazda B3000.
Here’s how it works:
- Disconnect the Negative Terminal:
- Ensure the ignition is turned off.
- Locate the negative terminal on the battery.
- Use a wrench to loosen the nut on the negative terminal clamp.
- Carefully remove the negative terminal clamp from the battery post.
- Wait:
- Wait for about 5 minutes. This allows the computer’s memory to fully reset.
- Reconnect the Negative Terminal:
- Place the negative terminal clamp back onto the battery post.
- Tighten the nut to secure the clamp.
- Verify Clearing:
- Start the engine and check for any error codes.
- If the codes have been successfully cleared, no new codes should appear.
Disconnecting the battery clears the codes by cutting off the power supply to the vehicle’s computer, causing it to reset and erase the stored diagnostic information. According to “Modern Automotive Technology” by James E. Duffy, this method is effective but may also reset other settings, such as radio presets [Duffy, 2018].
6. Tools and Resources for OBD1 Diagnostics
What tools and resources are helpful for OBD1 diagnostics? Diagnosing OBD1 systems requires different tools and resources compared to OBD2 systems.
Here are some essential tools and resources:
- Jumper Wire: A simple jumper wire or an unfolded paper clip is needed to initiate the diagnostic test mode.
- OBD1 Code Reader: Although manual code retrieval is possible, an OBD1 code reader can simplify the process.
- Vehicle Service Manual: The service manual provides detailed information about the vehicle’s diagnostic procedures, connector locations, and code definitions.
- Multimeter: A multimeter is useful for testing sensors and circuits.
- OBD1 Code List: A comprehensive list of OBD1 diagnostic codes for Mazda is essential for interpreting the codes.
- Online Forums and Communities: Online forums and communities can provide valuable information and assistance from other Mazda owners and mechanics.
6.1. Essential Tools for OBD1 Diagnostics
What tools are necessary for effective OBD1 diagnostics? Effective OBD1 diagnostics require specific tools to accurately retrieve and interpret diagnostic codes.
Here are some essential tools:
- Jumper Wire: A basic jumper wire or an unfolded paper clip is necessary to initiate the diagnostic test mode by connecting the appropriate terminals.
- OBD1 Code Reader: While not always necessary, an OBD1 code reader can simplify the code retrieval process. These readers are designed specifically for OBD1 systems and can provide a more straightforward way to access diagnostic information.
- Multimeter: A multimeter is an essential tool for testing sensors, circuits, and wiring. It can help identify voltage drops, shorts, and open circuits, which are common causes of OBD1 diagnostic codes.
- Socket Set and Wrenches: A comprehensive set of sockets and wrenches is needed to access and remove sensors and components for testing and replacement.
- Screwdrivers: Various screwdrivers (Phillips head and flathead) are necessary for removing panels and accessing components.
6.2. Online Resources and Communities
What online resources can assist with OBD1 diagnostics? Online resources and communities can provide invaluable support and information for diagnosing and repairing OBD1 systems.
Here are some useful resources:
- Vehicle-Specific Forums: Online forums dedicated to Mazda vehicles can offer specific advice and troubleshooting tips for your 1994 B3000.
- Automotive Repair Websites: Websites like OBD2-SCANNER.EDU.VN provide diagnostic information, code definitions, and repair guides.
- YouTube Tutorials: Many mechanics and car enthusiasts post videos demonstrating OBD1 diagnostic procedures and repairs.
- Online Service Manuals: Some websites offer access to online service manuals, providing detailed information about your vehicle’s systems and diagnostic procedures.
- Social Media Groups: Facebook groups and other social media platforms can connect you with other Mazda owners and mechanics.
By leveraging these resources, you can gain the knowledge and support needed to effectively diagnose and repair your 1994 Mazda B3000.
7. Maintaining Your 1994 Mazda B3000
How can you maintain your 1994 Mazda B3000 to prevent diagnostic issues? Maintaining your 1994 Mazda B3000 is essential for preventing diagnostic issues and ensuring its longevity. Regular maintenance can help identify potential problems before they trigger diagnostic codes.
Here are some key maintenance tasks:
- Regular Oil Changes: Changing the oil and filter at the recommended intervals keeps the engine lubricated and prevents wear.
- Check Coolant Levels: Maintaining proper coolant levels prevents overheating and protects the engine.
- Inspect Hoses and Belts: Regularly inspect hoses and belts for cracks, leaks, or wear.
- Check and Replace Filters: Replace air, fuel, and cabin filters as needed to ensure proper engine performance and air quality.
- Inspect Brakes: Regularly inspect the brakes for wear and replace pads, rotors, or drums as needed.
- Check Tires: Maintain proper tire pressure and inspect tires for wear and damage.
- Tune-Ups: Perform tune-ups as recommended, including replacing spark plugs and checking ignition timing.
7.1. Regular Maintenance Tasks
What maintenance tasks should be performed regularly on a 1994 Mazda B3000? Regular maintenance is crucial for keeping your 1994 Mazda B3000 running smoothly and preventing diagnostic issues.
Here are some key maintenance tasks to perform regularly:
- Oil Changes: Change the engine oil and filter every 3,000 to 5,000 miles, depending on driving conditions and the type of oil used.
- Coolant Flush: Flush and replace the coolant every two years to prevent corrosion and maintain proper cooling system performance.
- Air Filter Replacement: Replace the air filter every 12,000 to 15,000 miles to ensure proper airflow to the engine.
- Fuel Filter Replacement: Replace the fuel filter every 24,000 to 30,000 miles to prevent fuel contamination.
- Spark Plug Replacement: Replace the spark plugs every 30,000 miles to maintain optimal ignition performance.
- Brake Inspection: Inspect the brake pads, rotors, and lines every 6 months and replace as needed.
- Tire Rotation: Rotate the tires every 6,000 to 8,000 miles to ensure even wear.
- Fluid Checks: Regularly check and top off all fluids, including brake fluid, power steering fluid, transmission fluid, and windshield washer fluid.
7.2. Preventing Common Issues
How can you prevent common diagnostic issues in your Mazda B3000? Preventing common diagnostic issues in your 1994 Mazda B3000 involves proactive maintenance and addressing potential problems early.
Here are some tips to prevent common issues:
- Address Leaks Promptly: Repair any leaks (oil, coolant, fuel) as soon as they are detected to prevent further damage.
- Use Quality Parts: Use high-quality replacement parts to ensure reliability and longevity.
- Monitor Performance: Pay attention to any changes in engine performance, such as rough idling, reduced power, or unusual noises.
- Keep the Vehicle Clean: Regularly wash and wax the vehicle to protect it from rust and corrosion.
- Follow Service Intervals: Adhere to the recommended service intervals for all maintenance tasks.