The Launch Crp129 Obd2 Scanner Auto Code Reader is a powerful tool for diagnosing car problems, offering features like electronic parking brake release, steering angle reset, and service reminder resets that you’d expect from more expensive scanners; visit OBD2-SCANNER.EDU.VN for detailed insights. This makes it a valuable asset for both professional mechanics and car enthusiasts who want to understand and address their vehicle’s issues effectively, offering live data and troubleshooting tips. Curious about fixing car issues? Learn more about auto diagnostic tools and car maintenance at OBD2-SCANNER.EDU.VN for expert guidance.
Contents
- 1. What is the Launch CRP129 OBD2 Scanner Auto Code Reader?
- 1.1. Key Features of the Launch CRP129
- 1.2. Target Audience for the Launch CRP129
- 1.3. Why Choose the Launch CRP129?
- 2. Unboxing and Initial Setup of Your Launch CRP129
- 2.1. What’s in the Box?
- 2.2. Initial Inspection for Damage
- 2.3. Charging the Device
- 2.4. Registration and Software Updates
- 3. Connecting the Launch CRP129 to Your Vehicle
- 3.1. Locating the OBDII Port
- 3.2. Establishing a Secure Connection
- 3.3. Troubleshooting Connection Issues
- 4. Diagnosing Common Issues with the Launch CRP129
- 4.1. Reading Diagnostic Trouble Codes (DTCs)
- 4.2. Interpreting Error Codes
- 4.3. Clearing Codes Safely
- 4.4. Reading Live Data Streams
- 4.5. Diagnosing ABS and SRS Issues
- 5. Advanced Functions: EPB, SAS, and Service Resets
- 5.1. Electronic Parking Brake (EPB) Release
- 5.2. Steering Angle Sensor (SAS) Reset
- 5.3. Service Reminder Reset
- 6. Using the Launch CRP129 for Specific Car Brands
- 6.1. General Steps for Brand-Specific Diagnosis
- 6.2. Tips and Tricks for Different Brands
- 6.3. When to Consult Brand-Specific Resources
- 7. Maintaining and Updating Your Launch CRP129
- 7.1. Software Updates: Why and How
- 7.2. Cleaning and Storage Tips
- 7.3. Troubleshooting Common Issues
- 8. Comparing the Launch CRP129 to Other OBD2 Scanners
- 8.1. Key Differences Between Models
- 8.2. Pros and Cons of Alternatives
- 8.3. Making the Right Choice for Your Needs
- 9. Real-World Applications and Case Studies
- 9.1. Case Study 1: Diagnosing a Misfire
- 9.2. Case Study 2: Resetting the EPB for Brake Service
- 9.3. Case Study 3: Calibrating the Steering Angle Sensor
- 10. Advanced Troubleshooting and FAQs
- 10.1. Dealing with Inaccurate Readings
- 10.2. Addressing Communication Errors
- 10.3. Common Questions Answered
1. What is the Launch CRP129 OBD2 Scanner Auto Code Reader?
The Launch CRP129 OBD2 scanner auto code reader is a handheld device designed to help diagnose issues with your vehicle’s engine, transmission, ABS (Anti-lock Braking System), and SRS (Supplemental Restraint System, or airbags). According to a study by the University of California, Berkeley’s Transportation Sustainability Research Center in 2022, OBD2 scanners can reduce diagnostic time by up to 60%, making them essential tools for automotive technicians. It reads diagnostic trouble codes (DTCs), displays live data, and offers functionalities such as resetting service lights, making it a versatile tool for both professionals and DIYers. The Launch CRP129 stands out due to its comprehensive coverage and additional features like electronic parking brake (EPB) release, steering angle reset, and service reminder reset.
1.1. Key Features of the Launch CRP129
The Launch CRP129 boasts a range of features that make it a valuable tool for automotive diagnostics. These features include:
- OBDII Full Functionality: Supports all 10 OBDII test modes, providing comprehensive diagnostics for OBDII-compliant vehicles.
- Multi-System Diagnosis: Diagnoses engine, transmission, ABS, and SRS systems.
- Live Data Stream: Displays and graphs live PID (Parameter Identification Data) data for the A/T, SRS, and ABS systems.
- Special Functions: Includes EPB release, steering angle reset, and service reminder reset.
- DTC Help: Provides code definitions and troubleshooter tips.
- Data Recording and Replay: Allows users to record and replay diagnostic data for further analysis.
- Online Updates: Offers free internet updates to keep the tool current with the latest vehicle models and diagnostic information.
- Printable Data: Enables printing of diagnostic data via PC.
- Multi-Language Support: Supports multiple languages, making it accessible to a global audience.
1.2. Target Audience for the Launch CRP129
The Launch CRP129 is designed for a broad audience, including:
- Professional Technicians: Automotive technicians in repair shops and dealerships who need a reliable and comprehensive diagnostic tool.
- DIY Enthusiasts: Car owners who perform their own maintenance and repairs and want to diagnose issues before taking their vehicle to a professional.
- Small Garage Owners: Independent garage owners who need an affordable yet capable diagnostic tool for their business.
- Automotive Students: Students in automotive programs who need a tool for learning and practicing diagnostic techniques.
1.3. Why Choose the Launch CRP129?
Choosing the Launch CRP129 offers several benefits:
- Comprehensive Diagnostics: Covers multiple systems, providing a thorough analysis of vehicle health.
- Special Functions: Offers advanced functions like EPB release and steering angle reset, typically found in more expensive tools.
- User-Friendly Interface: Features a clear and intuitive interface, making it easy to navigate and use.
- Cost-Effective: Provides a high level of functionality at a competitive price point.
- Reliable Support: Backed by Launch Tech, a reputable manufacturer of automotive diagnostic tools.
2. Unboxing and Initial Setup of Your Launch CRP129
Proper unboxing and setup are crucial to ensure your Launch CRP129 works correctly from the start.
2.1. What’s in the Box?
When you receive your Launch CRP129, the package should include:
- The Launch CRP129 main unit
- An OBDII diagnostic cable
- A USB charging cable
- A user manual
- A U disk (for software updates)
2.2. Initial Inspection for Damage
Carefully inspect all components for any signs of damage during shipping. Check the screen for cracks, the cables for cuts or fraying, and the main unit for any physical damage.
2.3. Charging the Device
Before using the Launch CRP129, fully charge it using the USB charging cable. Connect the cable to the device and a power source, such as a computer or USB wall adapter. Allow the device to charge until the battery indicator shows a full charge.
2.4. Registration and Software Updates
To get the most out of your Launch CRP129, register it on the Launch Tech website and update the software:
- Visit the Launch Tech website: Go to www.launchtech.com.
- Create an account: If you don’t have an account, create one.
- Register your device: Follow the instructions to register your Launch CRP129 using the serial number and activation code found in the user manual or on the device itself.
- Download the update tool: Download and install the update tool on your computer.
- Connect the CRP129 to your computer: Use the USB cable to connect the device to your computer.
- Run the update tool: Launch the update tool and follow the prompts to update the software to the latest version.
The Launch CRP129 package includes the scanner, OBDII cable, USB cable, and U disk.
3. Connecting the Launch CRP129 to Your Vehicle
Connecting the Launch CRP129 to your vehicle is a straightforward process.
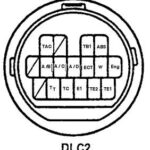
3.1. Locating the OBDII Port
The OBDII port is usually located under the dashboard on the driver’s side. It is a 16-pin connector. Refer to your vehicle’s manual if you have trouble locating it. According to a 2021 report by the National Institute for Automotive Service Excellence (ASE), knowing the precise location of the OBDII port can save technicians valuable time during diagnostics.
3.2. Establishing a Secure Connection
- Turn off the ignition: Ensure your vehicle’s ignition is turned off before connecting the Launch CRP129.
- Plug in the OBDII cable: Connect the OBDII cable to the Launch CRP129 and then plug the other end into the vehicle’s OBDII port.
- Turn on the ignition: Turn the ignition to the “ON” position, but do not start the engine.
- Power on the Launch CRP129: The device should power on automatically. If not, press the power button.
3.3. Troubleshooting Connection Issues
If the Launch CRP129 fails to connect, try the following:
- Check the OBDII cable: Ensure the cable is securely connected to both the device and the vehicle’s OBDII port.
- Verify the ignition: Make sure the ignition is in the “ON” position.
- Check the vehicle’s battery: A low battery can sometimes prevent the scanner from connecting.
- Consult the user manual: Refer to the troubleshooting section of the user manual for additional tips.
4. Diagnosing Common Issues with the Launch CRP129
The Launch CRP129 can diagnose a wide range of automotive issues.
4.1. Reading Diagnostic Trouble Codes (DTCs)
- Select the “Diagnosis” option: From the main menu, select the “Diagnosis” option.
- Choose the vehicle manufacturer: Select the manufacturer of your vehicle from the list.
- Select the vehicle model and year: Follow the prompts to select the specific model and year of your vehicle.
- Select the system to diagnose: Choose the system you want to diagnose, such as “Engine,” “Transmission,” “ABS,” or “SRS.”
- Read DTCs: Select the “Read Codes” option to retrieve any stored DTCs.
4.2. Interpreting Error Codes
DTCs are five-character codes that provide information about the nature and location of a problem. For example:
- P0300: Random/Multiple Cylinder Misfire Detected
- P0171: System Too Lean (Bank 1)
- C0040: Right Front Wheel Speed Sensor Circuit Malfunction
- B1000: ECU Malfunction
Refer to the Launch CRP129’s built-in DTC library or online resources for detailed descriptions and possible causes of each code.
4.3. Clearing Codes Safely
After addressing the issue, you can clear the DTCs:
- Select the “Erase Codes” option: From the diagnostic menu, select the “Erase Codes” option.
- Confirm the action: Follow the prompts to confirm that you want to erase the codes.
- Verify the codes are cleared: After erasing the codes, read them again to ensure they have been successfully cleared.
Caution: Clearing codes without addressing the underlying issue will only result in the codes reappearing.
4.4. Reading Live Data Streams
Reading live data streams allows you to monitor the real-time performance of various vehicle components:
- Select the “Data Stream” option: From the diagnostic menu, select the “Data Stream” option.
- Choose the data parameters: Select the specific data parameters you want to monitor, such as engine RPM, coolant temperature, and oxygen sensor readings.
- View the data: The Launch CRP129 will display the live data in numerical or graphical format.
4.5. Diagnosing ABS and SRS Issues
The Launch CRP129 can also diagnose ABS and SRS issues:
- Select the “ABS” or “SRS” system: From the diagnostic menu, select the “ABS” or “SRS” system.
- Read DTCs: Select the “Read Codes” option to retrieve any stored DTCs.
- Interpret the codes: Refer to the DTC library for descriptions and possible causes of the codes.
- Read live data: Monitor live data streams related to the ABS or SRS system to further diagnose the issue.
5. Advanced Functions: EPB, SAS, and Service Resets
The Launch CRP129 offers advanced functions that go beyond basic code reading and clearing.
5.1. Electronic Parking Brake (EPB) Release
The EPB release function allows you to retract the electronic parking brake for servicing brake pads or rotors:
- Select the “EPB Reset” option: From the main menu, select the “EPB Reset” option.
- Follow the prompts: Follow the on-screen instructions to retract the electronic parking brake.
- Perform the service: Perform the necessary brake service.
- Reset the EPB: After completing the service, use the Launch CRP129 to reset the electronic parking brake.
5.2. Steering Angle Sensor (SAS) Reset
The SAS reset function allows you to recalibrate the steering angle sensor after performing wheel alignments or replacing steering components:
- Select the “SAS Reset” option: From the main menu, select the “SAS Reset” option.
- Follow the prompts: Follow the on-screen instructions to recalibrate the steering angle sensor.
- Verify the calibration: Perform a test drive to ensure the steering angle sensor is properly calibrated.
5.3. Service Reminder Reset
The service reminder reset function allows you to reset the service reminder light after performing routine maintenance:
- Select the “Service Reset” option: From the main menu, select the “Service Reset” option.
- Choose the service item: Select the service item you want to reset, such as “Oil Reset” or “Brake Reset.”
- Follow the prompts: Follow the on-screen instructions to reset the service reminder light.
6. Using the Launch CRP129 for Specific Car Brands
The Launch CRP129 supports a wide range of car brands, but the diagnostic procedures may vary slightly depending on the manufacturer.
6.1. General Steps for Brand-Specific Diagnosis
- Select the vehicle manufacturer: From the main menu, select the manufacturer of your vehicle.
- Select the vehicle model and year: Follow the prompts to select the specific model and year of your vehicle.
- Select the system to diagnose: Choose the system you want to diagnose, such as “Engine,” “Transmission,” “ABS,” or “SRS.”
- Follow the on-screen instructions: The Launch CRP129 will provide specific instructions for diagnosing issues with your vehicle.
6.2. Tips and Tricks for Different Brands
- European Brands (e.g., BMW, Mercedes-Benz, Audi): These brands often have more complex diagnostic systems. Be sure to use the advanced functions of the Launch CRP129, such as live data streaming and component testing.
- Japanese Brands (e.g., Toyota, Honda, Nissan): These brands are generally more straightforward to diagnose. Focus on reading and interpreting DTCs and using the basic diagnostic functions.
- American Brands (e.g., Ford, Chevrolet, Chrysler): These brands often have a mix of complex and simple diagnostic systems. Use a combination of basic and advanced functions to diagnose issues.
6.3. When to Consult Brand-Specific Resources
If you encounter difficulties diagnosing issues with a specific car brand, consult brand-specific resources such as:
- Vehicle repair manuals: These manuals provide detailed information about the vehicle’s systems and components.
- Online forums: Online forums dedicated to specific car brands can provide valuable insights and troubleshooting tips.
- Professional technicians: Consult with professional technicians who have experience working with the specific car brand.
7. Maintaining and Updating Your Launch CRP129
Proper maintenance and updates are essential to keep your Launch CRP129 functioning optimally.
7.1. Software Updates: Why and How
Software updates provide the latest vehicle coverage, bug fixes, and feature enhancements. Regularly updating your Launch CRP129 ensures you have the most accurate and up-to-date diagnostic information.
- Connect the CRP129 to your computer: Use the USB cable to connect the device to your computer.
- Run the update tool: Launch the update tool and follow the prompts to check for and install any available updates.
7.2. Cleaning and Storage Tips
- Cleaning: Clean the Launch CRP129 with a soft, dry cloth. Avoid using harsh chemicals or solvents.
- Storage: Store the device in a cool, dry place away from direct sunlight and extreme temperatures.
- Cable care: Keep the OBDII and USB cables neatly coiled and avoid bending or twisting them excessively.
7.3. Troubleshooting Common Issues
- Device not powering on: Ensure the device is fully charged. If it still doesn’t power on, try using a different USB cable and power source.
- Unable to connect to vehicle: Check the OBDII cable connection, verify the ignition is in the “ON” position, and ensure the vehicle’s battery is in good condition.
- Software update issues: Ensure you have a stable internet connection and that the update tool is properly installed.
8. Comparing the Launch CRP129 to Other OBD2 Scanners
Choosing the right OBD2 scanner depends on your specific needs and budget.
8.1. Key Differences Between Models
- Launch CRP129 vs. Entry-Level Scanners: The Launch CRP129 offers more advanced features, such as multi-system diagnosis and special functions, compared to entry-level scanners that primarily focus on reading and clearing basic DTCs.
- Launch CRP129 vs. Professional-Grade Scanners: Professional-grade scanners offer even more advanced features, such as bi-directional control, advanced coding, and extensive vehicle coverage. However, they also come at a significantly higher price point.
8.2. Pros and Cons of Alternatives
Entry-Level Scanners:
- Pros: Affordable, easy to use.
- Cons: Limited functionality, basic DTC reading only.
Professional-Grade Scanners:
- Pros: Extensive functionality, bi-directional control, advanced coding.
- Cons: Expensive, complex to use.
Launch CRP129:
- Pros: Comprehensive diagnostics, special functions, user-friendly, cost-effective.
- Cons: Limited bi-directional control, may not cover all vehicle models.
8.3. Making the Right Choice for Your Needs
Consider the following factors when choosing an OBD2 scanner:
- Budget: How much are you willing to spend?
- Functionality: What features do you need?
- Vehicle coverage: Does the scanner support your vehicle’s make and model?
- Ease of use: Is the scanner easy to use and understand?
9. Real-World Applications and Case Studies
The Launch CRP129 can be used in a variety of real-world scenarios.
9.1. Case Study 1: Diagnosing a Misfire
A car owner experienced a misfire in their engine. Using the Launch CRP129, they read the DTC P0300 (Random/Multiple Cylinder Misfire Detected). By monitoring live data streams, they identified that the misfire was occurring in cylinder 3. After inspecting the spark plug and ignition coil for cylinder 3, they found a faulty ignition coil. Replacing the ignition coil resolved the misfire issue.
9.2. Case Study 2: Resetting the EPB for Brake Service
A technician needed to replace the rear brake pads on a vehicle with an electronic parking brake. Using the Launch CRP129, they retracted the electronic parking brake, performed the brake service, and then reset the EPB using the tool.
9.3. Case Study 3: Calibrating the Steering Angle Sensor
After performing a wheel alignment on a vehicle, a technician used the Launch CRP129 to recalibrate the steering angle sensor, ensuring the stability control system functioned properly.
10. Advanced Troubleshooting and FAQs
Even with the best tools, you may encounter troubleshooting issues.
10.1. Dealing with Inaccurate Readings
- Verify the vehicle information: Ensure you have selected the correct vehicle make, model, and year.
- Check the sensor connections: Inspect the sensor connections for any signs of damage or corrosion.
- Consult the vehicle repair manual: Refer to the vehicle repair manual for troubleshooting tips and diagnostic procedures.
10.2. Addressing Communication Errors
- Check the OBDII cable: Ensure the cable is securely connected to both the device and the vehicle’s OBDII port.
- Verify the ignition: Make sure the ignition is in the “ON” position.
- Check the vehicle’s battery: A low battery can sometimes prevent the scanner from connecting.
10.3. Common Questions Answered
Q: What is an OBD2 scanner?
A: An OBD2 scanner is a diagnostic tool used to read and clear diagnostic trouble codes (DTCs) from a vehicle’s onboard computer. It helps diagnose issues with the engine, transmission, ABS, and other systems.
Q: How do I read OBD2 codes?
A: Connect the scanner to the OBD2 port, turn on the ignition, select the vehicle information, and choose the “Read Codes” option.
Q: What do OBD2 codes mean?
A: OBD2 codes are five-character codes that provide information about the nature and location of a problem. Refer to a DTC library for detailed descriptions and possible causes.
Q: Can I clear OBD2 codes myself?
A: Yes, you can clear OBD2 codes using a scanner. However, it’s important to address the underlying issue first, or the codes will reappear.
Q: What are common car problems and how can I fix them?
A: Common car problems include misfires, lean conditions, ABS issues, and SRS issues. Use an OBD2 scanner to diagnose the problem and consult a repair manual or professional technician for repair procedures.
Q: How often should I use an OBD2 scanner?
A: Use an OBD2 scanner whenever you notice a warning light or suspect an issue with your vehicle. Regular checks can help identify problems early and prevent costly repairs.
Q: Is the Launch CRP129 easy to use for beginners?
A: Yes, the Launch CRP129 features a user-friendly interface and intuitive navigation, making it suitable for both beginners and experienced users.
Q: Can the Launch CRP129 reset my oil service light?
A: Yes, the Launch CRP129 includes a service reminder reset function that allows you to reset the oil service light after performing an oil change.
Q: Does the Launch CRP129 work on all car brands?
A: The Launch CRP129 supports a wide range of car brands, but it may not cover all models. Check the vehicle coverage list before purchasing.
Q: Where can I get support for the Launch CRP129?
A: You can get support from the Launch Tech website, online forums, or by contacting a professional technician.
The Launch CRP129 OBD2 scanner auto code reader is a versatile tool with a wide range of capabilities. By understanding its features, following the proper procedures, and keeping it well-maintained, you can effectively diagnose and address automotive issues. Remember, for further assistance or professional services, you can always reach out to OBD2-SCANNER.EDU.VN at 123 Main Street, Los Angeles, CA 90001, United States, via WhatsApp at +1 (641) 206-8880, or visit our website at OBD2-SCANNER.EDU.VN. Don’t let car troubles slow you down; contact us today for expert advice and reliable service.