Making an OBD2 USB cable allows you to interface with your vehicle’s computer for diagnostics and data logging. This guide from OBD2-SCANNER.EDU.VN provides a detailed, step-by-step process to create your own OBD2 USB cable, empowering you to troubleshoot car issues effectively and save money. Building your own diagnostic tool unlocks advanced vehicle data analysis, enhancing your automotive repairs and maintenance capabilities with effective automotive diagnostics and vehicle communication interface.
Contents
- 1. Understanding the OBD2 USB Cable and Its Significance
- 1.1. The Role of OBD2 in Modern Vehicle Diagnostics
- 1.2. Key Benefits of Using an OBD2 USB Cable
- 1.3. Why Consider Building Your Own OBD2 USB Cable?
- 2. Essential Tools and Components
- 2.1. Comprehensive List of Necessary Tools
- 2.2. Detailed Breakdown of Required Parts
- 2.3. Where to Source Your Tools and Components
- 3. Understanding OBD2 Connector Pinouts
- 3.1. Standard OBD2 Connector Pin Assignments
- 3.2. Identifying the Pins You Need for a Basic OBD2 USB Cable
- 3.3. Visual Guide to Pin Identification
- 4. Step-by-Step Guide to Building Your OBD2 USB Cable
- 4.1. Preparing the OBD2 Connector
- 4.2. Connecting Wires to the OBD2 Connector
- 4.3. Preparing the USB Connector
- 4.4. Connecting Wires to the USB Connector
- 4.5. Testing the Cable for Continuity and Shorts
- 5. Advanced Considerations: Active vs. Passive Cables
- 5.1. Understanding Passive OBD2 USB Cables
- 5.2. Exploring Active OBD2 USB Cables
- 5.3. Choosing the Right Type for Your Needs
- 6. Software and Drivers for Your OBD2 USB Cable
- 6.1. Popular OBD2 Diagnostic Software Options
- 6.2. Installing Necessary Drivers for USB Connectivity
- 6.3. Configuring Software to Recognize Your OBD2 Adapter
- 7. Troubleshooting Common Issues
- 7.1. Cable Not Recognized by Computer
- 7.2. Software Fails to Connect to the Vehicle
- 7.3. Intermittent or Unreliable Data Transmission
- 8. Safety Precautions and Best Practices
- 8.1. Electrical Safety Guidelines
- 8.2. Vehicle Handling and Precautions
- 8.3. Best Practices for Accurate Diagnostics
- 9. The Future of OBD and Vehicle Diagnostics
- 9.1. Advancements in OBD Standards
- 9.2. Integration with Telematics and IoT
- 9.3. The Role of AI and Machine Learning in Vehicle Diagnostics
- 10. OBD2-SCANNER.EDU.VN: Your Partner in Automotive Diagnostics
- 10.1. Comprehensive Resources and Guides
- 10.2. Expert Support and Consultation
- 10.3. Contact Us Today
1. Understanding the OBD2 USB Cable and Its Significance
What is an OBD2 USB cable and why is it important for car diagnostics? An OBD2 (On-Board Diagnostics II) USB cable is a specialized cable that allows you to connect your car’s OBD2 port to a computer via a USB interface. This connection enables you to read diagnostic trouble codes (DTCs), monitor real-time sensor data, and perform various diagnostic tests using appropriate software. According to a study by the National Institute for Automotive Service Excellence (ASE), accurate diagnostics can reduce repair times by up to 40%. The OBD2 USB cable is a crucial tool for both professional mechanics and DIY enthusiasts looking to understand and maintain their vehicles effectively.
1.1. The Role of OBD2 in Modern Vehicle Diagnostics
How does OBD2 enhance vehicle diagnostics? OBD2 is a standardized system implemented in virtually all cars and light trucks sold in the United States since 1996. It provides a standardized interface for accessing data from the vehicle’s engine control unit (ECU) and other onboard computers. This standardized access allows for consistent diagnostics across different makes and models. A report by the Environmental Protection Agency (EPA) highlights that OBD2 systems have significantly improved vehicle emissions monitoring and diagnostics, leading to more effective repairs and reduced pollution.
1.2. Key Benefits of Using an OBD2 USB Cable
What are the main advantages of using an OBD2 USB cable for vehicle maintenance? Using an OBD2 USB cable offers several benefits:
- Cost Savings: Diagnosing and clearing minor issues yourself can save money on mechanic fees.
- Real-Time Data Monitoring: Monitor engine performance, fuel efficiency, and other critical parameters in real time.
- Early Problem Detection: Identify potential problems before they become major repairs.
- Customization: Access and modify certain vehicle settings and parameters (depending on the software and vehicle).
- Enhanced Learning: Gain a deeper understanding of your vehicle’s operation and performance.
These advantages make the OBD2 USB cable a valuable tool for anyone interested in vehicle maintenance and diagnostics.
1.3. Why Consider Building Your Own OBD2 USB Cable?
Why might someone choose to build their own OBD2 USB cable instead of buying one? Building your own OBD2 USB cable can be a rewarding project for several reasons:
- Cost-Effectiveness: Building a cable can be cheaper than buying a commercial one, especially if you already have some of the necessary components.
- Customization: You can tailor the cable to your specific needs, such as cable length or connector type.
- Educational Value: The project provides a hands-on learning experience about OBD2 systems and electronics.
- Satisfaction: There’s a sense of accomplishment in creating your own tool and using it to diagnose your vehicle.
While building your own cable requires some technical skills and effort, the benefits can outweigh the costs for many enthusiasts.
2. Essential Tools and Components
What tools and parts are needed to successfully create an OBD2 USB cable? To build your own OBD2 USB cable, you’ll need a few essential tools and components. Gathering these beforehand will ensure a smooth and efficient build process.
2.1. Comprehensive List of Necessary Tools
What tools are crucial for assembling an OBD2 USB cable? Here’s a detailed list of the tools you’ll need:
| Tool | Description |
|---|---|
| Wire Strippers/Cutters | Used to strip the insulation from wires and cut them to the desired length. |
| Needle-Nose Pliers | Helpful for manipulating small components and connectors. |
| Multimeter | To test continuity and voltage. |
| Soldering Iron and Solder | To create secure and reliable electrical connections (recommended but not required). |
| USB to OBD2 Interface IC | Required to convert USB to OBD2 protocol |
| Heat Shrink Tubing | Insulates and protects solder joints, providing a clean and professional finish. |
| Helping Hands | PCB holder, simplify soldering work |
These tools will help you assemble the cable accurately and safely.
2.2. Detailed Breakdown of Required Parts
What components are necessary to construct the OBD2 USB cable? Here’s a list of the parts you’ll need:
| Part | Description |
|---|---|
| OBD2 Connector (Male) | Connects to the vehicle’s OBD2 port. |
| USB Connector (Type A) | Connects to the computer’s USB port. |
| Wires | Stranded copper wires for connecting the OBD2 and USB connectors (22-26 AWG recommended). |
| Electronic Components | Resistors, capacitors, and integrated circuits (ICs) as specified in the schematic diagram (if building an active cable). |
| Enclosure (Optional) | A case to house the electronic components and protect the cable. |
| Printed Circuit BoardPCB | Securely hold electronic components |
Ensure that you source high-quality components to ensure the reliability and longevity of your cable.
2.3. Where to Source Your Tools and Components
Where can you find the necessary tools and components for this project? You can source the tools and components from various online and local retailers:
- Online Retailers: Websites like Amazon, Digi-Key, Mouser Electronics, and eBay offer a wide selection of electronic components and tools.
- Local Electronics Stores: Stores like RadioShack (if available in your area) and other local electronics suppliers can provide many of the necessary components.
- Automotive Parts Stores: Stores like AutoZone, Advance Auto Parts, and O’Reilly Auto Parts may carry OBD2 connectors and some basic tools.
- Surplus Stores: Electronic surplus stores can be a great source for discounted components and tools.
When purchasing components, be sure to check the specifications and compatibility to ensure they meet the requirements of your project.
3. Understanding OBD2 Connector Pinouts
Why is understanding the OBD2 connector pinout essential? The OBD2 connector pinout is crucial for correctly wiring your OBD2 USB cable. Incorrect wiring can lead to malfunction or even damage to your vehicle’s ECU. According to the Society of Automotive Engineers (SAE), the OBD2 connector provides access to various diagnostic and communication protocols, each assigned to specific pins. Knowing the function of each pin ensures that you connect the correct wires to the corresponding signals.
3.1. Standard OBD2 Connector Pin Assignments
What are the standard pin assignments for an OBD2 connector? The OBD2 connector has 16 pins, each with a specific function. Here are some of the most commonly used pins:
| Pin | Function |
|---|---|
| 2 | SAE J1850 Bus Positive |
| 4 | Chassis Ground |
| 5 | Signal Ground |
| 6 | CAN High (J-2284) |
| 7 | ISO 9141-2 K Line |
| 10 | SAE J1850 Bus Negative |
| 14 | CAN Low (J-2284) |
| 15 | ISO 9141-2 L Line |
| 16 | Battery Power (12V) |
Refer to this table when connecting your wires to ensure proper functionality.
3.2. Identifying the Pins You Need for a Basic OBD2 USB Cable
Which pins are essential for a basic OBD2 USB cable? For a basic OBD2 USB cable that reads diagnostic data, you typically need to connect the following pins:
- Pin 4 (Chassis Ground): Provides a ground connection for the circuit.
- Pin 5 (Signal Ground): Provides a ground reference for the signals.
- Pin 6 (CAN High): Carries the CAN (Controller Area Network) high signal.
- Pin 14 (CAN Low): Carries the CAN low signal.
- Pin 16 (Battery Power): Supplies power to the OBD2 interface.
These pins are essential for communicating with the vehicle’s ECU and retrieving diagnostic information.
3.3. Visual Guide to Pin Identification
How can you visually identify the OBD2 connector pins? The OBD2 connector is trapezoidal in shape, with two rows of pins. The pins are numbered from 1 to 8 on the top row (left to right) and 9 to 16 on the bottom row (left to right). Many connectors have the pin numbers molded into the plastic, making it easier to identify each pin.
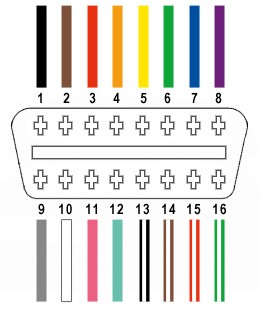 OBD2 Connector Pinout DiagramUse a visual aid, such as a diagram or photograph, to help you locate the correct pins on the connector.
4. Step-by-Step Guide to Building Your OBD2 USB Cable
How do you assemble the OBD2 USB cable? Follow these steps to create your own OBD2 USB cable:
4.1. Preparing the OBD2 Connector
How do you prepare the OBD2 connector for wiring?
- Gather Your Supplies: Ensure you have your OBD2 connector, wires, wire strippers, and crimping tool.
- Cut Wires to Length: Cut five wires to the desired length, typically around 3-6 feet, depending on your needs.
- Strip Wire Ends: Use wire strippers to carefully remove about 1/4 inch of insulation from both ends of each wire.
- Tin the Wire Ends: Apply a small amount of solder to the exposed wire ends to prevent fraying and ensure a good connection.
4.2. Connecting Wires to the OBD2 Connector
How do you connect the wires to the OBD2 connector pins?
- Identify the Correct Pins: Refer to the OBD2 pinout diagram to identify pins 4, 5, 6, 14, and 16.
- Insert Wires into Connector: Insert the tinned end of each wire into the corresponding pin socket on the OBD2 connector.
- Crimp or Solder Connections: Use a crimping tool to secure the wires to the pins, or solder the wires to the pins for a more reliable connection.
- Secure the Wires: Ensure that the wires are firmly attached to the pins and cannot be easily pulled out.
4.3. Preparing the USB Connector
How do you prepare the USB connector for wiring?
- Gather Your Supplies: Ensure you have your USB connector, wires, wire strippers, and soldering iron.
- Cut Wires to Length: Cut four wires to the desired length, typically around 3-6 feet, depending on your needs.
- Strip Wire Ends: Use wire strippers to carefully remove about 1/4 inch of insulation from both ends of each wire.
- Tin the Wire Ends: Apply a small amount of solder to the exposed wire ends to prevent fraying and ensure a good connection.
4.4. Connecting Wires to the USB Connector
How do you connect the wires to the USB connector pins?
- Identify the Correct Pins: Refer to the USB pinout diagram to identify pins 1 (VCC), 2 (Data-), 3 (Data+), and 4 (Ground).
- Solder Connections: Solder the wires to the corresponding pin on the USB connector.
- Insulate Connections: Use heat shrink tubing to insulate the solder joints and prevent short circuits.
- Secure the Wires: Ensure that the wires are firmly attached to the pins and cannot be easily pulled out.
4.5. Testing the Cable for Continuity and Shorts
How do you test the completed cable to ensure it works correctly?
- Visual Inspection: Check all connections to ensure they are secure and properly insulated.
- Continuity Test: Use a multimeter to test the continuity between corresponding pins on the OBD2 and USB connectors.
- Short Circuit Test: Use a multimeter to check for short circuits between adjacent pins on both connectors.
- Functionality Test: Connect the cable to your vehicle and computer, and use diagnostic software to verify that data is being transmitted correctly.
By following these steps carefully, you can build your own OBD2 USB cable and start diagnosing your vehicle.
5. Advanced Considerations: Active vs. Passive Cables
What is the difference between active and passive OBD2 USB cables, and which one should you build? OBD2 USB cables can be either passive or active, depending on whether they contain additional electronic components to handle the communication protocols.
5.1. Understanding Passive OBD2 USB Cables
What are the characteristics of a passive OBD2 USB cable? A passive OBD2 USB cable simply connects the pins on the OBD2 connector to the corresponding wires on the USB connector without any additional electronic components. These cables are simpler to build but may not support all OBD2 protocols or vehicles.
5.2. Exploring Active OBD2 USB Cables
What are the characteristics of an active OBD2 USB cable? An active OBD2 USB cable includes electronic components, such as integrated circuits (ICs), to handle the communication protocols between the vehicle and the computer. These cables are more complex to build but offer wider compatibility and more reliable performance.
5.3. Choosing the Right Type for Your Needs
Which type of cable is most suitable for your specific requirements? The choice between a passive and active OBD2 USB cable depends on your specific needs and technical skills:
- Passive Cable: Suitable for basic diagnostics and simple applications, easier to build, and less expensive.
- Active Cable: Required for advanced diagnostics, supports more protocols, and provides more reliable performance.
Consider your technical expertise and the types of vehicles you plan to diagnose when making your decision.
6. Software and Drivers for Your OBD2 USB Cable
What software and drivers are needed to use your OBD2 USB cable with a computer? To use your OBD2 USB cable, you’ll need appropriate software and drivers to interface with your vehicle’s ECU.
6.1. Popular OBD2 Diagnostic Software Options
What are some popular software options for diagnosing vehicles using an OBD2 USB cable? Several software options are available for diagnosing vehicles using an OBD2 USB cable:
- FORScan: FORScan is a powerful software for Ford, Lincoln, and Mercury vehicles, offering advanced diagnostics and customization options.
- OBD Auto Doctor: OBD Auto Doctor is a user-friendly software that supports all OBD2-compliant vehicles and provides basic diagnostic functions.
- Torque Pro (Android): Torque Pro is a popular Android app that allows you to monitor real-time data, read fault codes, and perform other diagnostic functions.
- ScanXL Pro: ScanXL Pro is a professional-grade software that supports a wide range of vehicles and offers advanced diagnostic capabilities.
- Carista: Customization of car through coding.
These software options vary in features, compatibility, and cost, so choose one that meets your specific needs.
6.2. Installing Necessary Drivers for USB Connectivity
How do you install the drivers needed for your OBD2 USB cable to communicate with your computer?
- Identify the Correct Drivers: Determine the correct drivers for your OBD2 USB cable, typically provided by the cable manufacturer or software vendor.
- Download Drivers: Download the drivers from the manufacturer’s website or software installation package.
- Install Drivers: Follow the installation instructions provided with the drivers to install them on your computer.
- Verify Installation: After installation, verify that the drivers are correctly installed by checking the device manager on your computer.
Properly installed drivers are essential for your computer to recognize and communicate with the OBD2 USB cable.
6.3. Configuring Software to Recognize Your OBD2 Adapter
How do you configure the diagnostic software to recognize your OBD2 adapter?
- Connect the Cable: Connect the OBD2 USB cable to your vehicle’s OBD2 port and your computer’s USB port.
- Launch Diagnostic Software: Open your chosen diagnostic software.
- Select Adapter: In the software settings, select the appropriate OBD2 adapter or COM port.
- Test Connection: Test the connection to ensure that the software can communicate with the adapter and retrieve data from your vehicle.
Configuring the software correctly ensures that you can effectively diagnose and monitor your vehicle’s performance.
7. Troubleshooting Common Issues
What are some common issues encountered when building and using an OBD2 USB cable, and how can you resolve them? Building and using an OBD2 USB cable can sometimes present challenges. Here are some common issues and their solutions.
7.1. Cable Not Recognized by Computer
What should you do if your computer doesn’t recognize the OBD2 USB cable?
- Check USB Connection: Ensure that the USB cable is securely connected to both the computer and the OBD2 adapter.
- Verify Driver Installation: Confirm that the correct drivers are installed and properly configured in the device manager.
- Try a Different USB Port: Try connecting the cable to a different USB port on your computer.
- Restart Computer: Restart your computer to refresh the USB connections and driver configurations.
7.2. Software Fails to Connect to the Vehicle
What should you do if the diagnostic software fails to connect to your vehicle?
- Check OBD2 Port Connection: Ensure that the OBD2 connector is securely plugged into your vehicle’s OBD2 port.
- Verify Vehicle Compatibility: Confirm that your vehicle is compatible with the OBD2 protocol and the diagnostic software.
- Check Adapter Settings: Ensure that the correct OBD2 adapter and COM port are selected in the software settings.
- Test on Another Vehicle: If possible, test the cable and software on another vehicle to rule out vehicle-specific issues.
7.3. Intermittent or Unreliable Data Transmission
What causes intermittent or unreliable data transmission, and how can you fix it?
- Check Wire Connections: Inspect all wire connections for looseness, corrosion, or damage.
- Improve Soldering: If using a soldered cable, ensure that the solder joints are clean and secure.
- Shielded Cable: The cable is shielded from external noise
- Reduce Cable Length: Shorter cable lengths
- Test Cable on Another Vehicle: Test the cable on another vehicle to rule out vehicle-specific issues.
Addressing these common issues will help ensure reliable performance from your OBD2 USB cable.
8. Safety Precautions and Best Practices
What safety measures should you take when building and using an OBD2 USB cable? Safety should always be a priority when working with electronics and vehicles. Here are some essential safety precautions and best practices to follow.
8.1. Electrical Safety Guidelines
What are the key electrical safety guidelines to keep in mind?
- Work in a Dry Area: Avoid working in damp or wet environments to prevent electric shock.
- Use Insulated Tools: Use tools with insulated handles to protect yourself from electrical hazards.
- Disconnect Battery: Disconnect the vehicle’s battery before working on the electrical system to prevent accidental shorts or damage.
- Avoid Overvoltage: Ensure that the voltage levels are within the specified limits to prevent damage to the ECU or other electronic components.
8.2. Vehicle Handling and Precautions
What precautions should you take when handling your vehicle during diagnostics?
- Park on a Level Surface: Park the vehicle on a level surface and engage the parking brake to prevent it from rolling.
- Use Wheel Chocks: Use wheel chocks to secure the wheels and prevent movement.
- Ventilation: Ensure adequate ventilation when running the engine indoors to prevent carbon monoxide poisoning.
- Avoid Touching Hot Components: Avoid touching hot engine components, such as the exhaust manifold, to prevent burns.
8.3. Best Practices for Accurate Diagnostics
What are the best practices for ensuring accurate diagnostic results?
- Use Reliable Software: Choose a reputable and reliable diagnostic software to ensure accurate data and interpretations.
- Verify Fault Codes: Verify fault codes with multiple sources, such as repair manuals and online forums, to confirm their accuracy.
- Follow Diagnostic Procedures: Follow the recommended diagnostic procedures and troubleshooting steps to avoid misdiagnosis.
- Document Findings: Document all findings, including fault codes, sensor data, and repair steps, for future reference.
Adhering to these safety precautions and best practices will help ensure a safe and successful diagnostic experience.
9. The Future of OBD and Vehicle Diagnostics
How is OBD technology evolving, and what does the future hold for vehicle diagnostics? OBD technology is continuously evolving to meet the demands of modern vehicles and advanced diagnostic capabilities.
9.1. Advancements in OBD Standards
What are some of the latest advancements in OBD standards?
- OBD-III: While not yet fully implemented, OBD-III aims to provide real-time monitoring and reporting of emissions-related issues to regulatory agencies.
- Enhanced Data Parameters: Modern OBD systems include a wider range of data parameters, allowing for more detailed and accurate diagnostics.
- Wireless Connectivity: Wireless OBD adapters and smartphone apps are becoming increasingly popular, offering convenient and portable diagnostic solutions.
- Cybersecurity Measures: With the increasing connectivity of vehicles, cybersecurity measures are being integrated into OBD systems to protect against unauthorized access and tampering.
9.2. Integration with Telematics and IoT
How is OBD technology integrating with telematics and the Internet of Things (IoT)?
- Remote Diagnostics: OBD data is being integrated with telematics systems to enable remote diagnostics and predictive maintenance.
- Usage-Based Insurance: Telematics systems use OBD data to monitor driving behavior and offer usage-based insurance policies.
- Fleet Management: Fleet management systems use OBD data to track vehicle performance, optimize routes, and improve fuel efficiency.
- Smart City Applications: OBD data is being used in smart city applications to monitor traffic flow, optimize transportation systems, and improve air quality.
9.3. The Role of AI and Machine Learning in Vehicle Diagnostics
How are artificial intelligence (AI) and machine learning (ML) transforming vehicle diagnostics?
- Predictive Maintenance: AI and ML algorithms can analyze OBD data to predict potential failures and schedule maintenance proactively.
- Automated Diagnostics: AI-powered diagnostic tools can automatically identify and diagnose complex vehicle issues, reducing diagnostic time and improving accuracy.
- Personalized Recommendations: AI systems can provide personalized recommendations for vehicle maintenance and repairs based on individual driving habits and vehicle conditions.
- Remote Assistance: AI-powered virtual assistants can provide remote diagnostic assistance to drivers and technicians, guiding them through troubleshooting steps.
These advancements are paving the way for more efficient, accurate, and connected vehicle diagnostics.
10. OBD2-SCANNER.EDU.VN: Your Partner in Automotive Diagnostics
How can OBD2-SCANNER.EDU.VN assist you in your automotive diagnostic needs? At OBD2-SCANNER.EDU.VN, we are committed to providing you with the best resources, tools, and services for all your automotive diagnostic needs.
10.1. Comprehensive Resources and Guides
What resources and guides does OBD2-SCANNER.EDU.VN offer? We offer a wide range of comprehensive resources and guides to help you understand and utilize OBD2 technology effectively:
- Detailed Articles: In-depth articles covering various aspects of OBD2 diagnostics, including fault code definitions, troubleshooting tips, and repair procedures.
- Step-by-Step Tutorials: Easy-to-follow tutorials on how to use OBD2 scanners, interpret data, and perform common diagnostic tasks.
- Video Demonstrations: Video demonstrations showcasing the use of OBD2 scanners and diagnostic software.
- Community Forum: A community forum where you can ask questions, share experiences, and connect with other automotive enthusiasts and professionals.
10.2. Expert Support and Consultation
How can you get expert support and consultation from OBD2-SCANNER.EDU.VN? Our team of experienced automotive technicians and diagnostic specialists is available to provide expert support and consultation:
- Live Chat Support: Get real-time assistance from our support team via live chat.
- Email Support: Send us your questions via email, and we’ll respond promptly with detailed answers and guidance.
- Phone Consultation: Schedule a phone consultation with one of our experts to discuss your specific diagnostic needs.
- Remote Diagnostic Assistance: We offer remote diagnostic assistance to help you troubleshoot complex issues and perform advanced diagnostic procedures.
10.3. Contact Us Today
Ready to enhance your automotive diagnostic skills? Contact OBD2-SCANNER.EDU.VN today!
- Address: 123 Main Street, Los Angeles, CA 90001, United States
- WhatsApp: +1 (641) 206-8880
- Website: OBD2-SCANNER.EDU.VN
Don’t let vehicle issues slow you down. With the right tools and knowledge, you can diagnose and resolve problems efficiently. Contact OBD2-SCANNER.EDU.VN now and take control of your vehicle’s health!
By following this guide, you can confidently build your own OBD2 USB cable and unlock the power of vehicle diagnostics. Whether you’re a professional mechanic or a DIY enthusiast, this tool will help you understand and maintain your vehicle with ease.
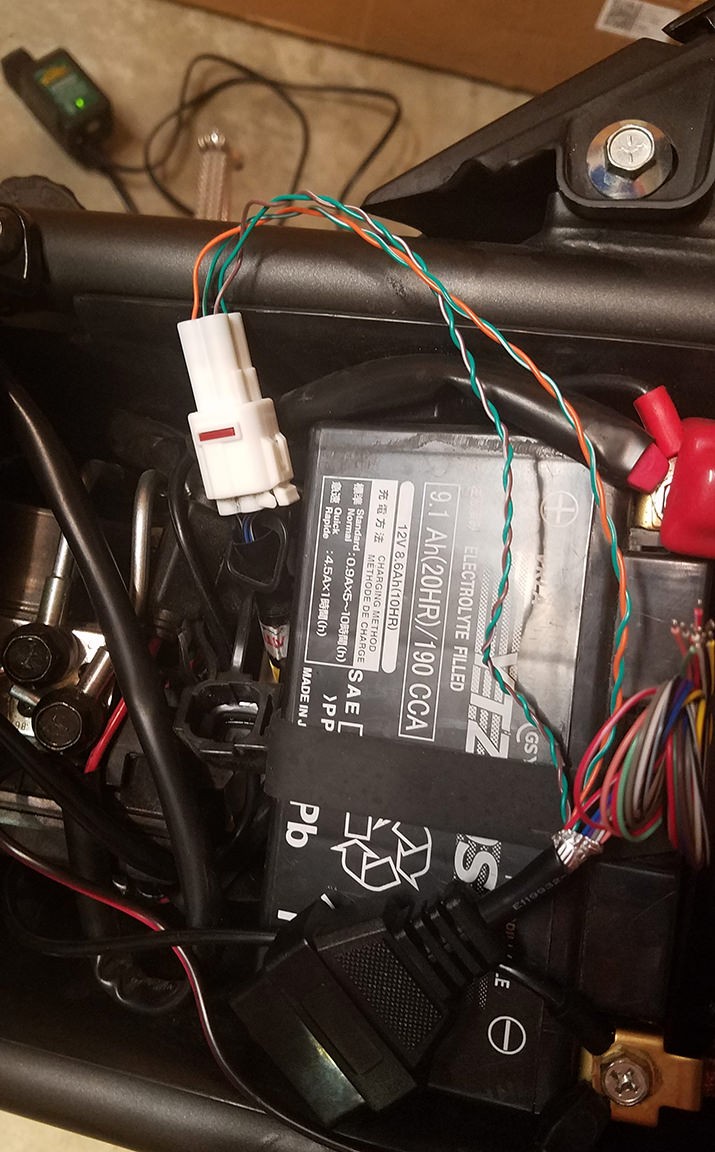 Completed OBD2 USB CableAnd remember, for any questions or assistance, OBD2-SCANNER.EDU.VN is here to support you every step of the way.