Is your E36 M3 Obd2 Port Not Working, leaving you stranded in the dark when it comes to diagnosing your car’s issues? At OBD2-SCANNER.EDU.VN, we understand your frustration, and we’re here to guide you through a systematic troubleshooting process. This comprehensive guide will explore potential causes, diagnostic steps, and effective solutions to restore your OBD2 port’s functionality. We will provide you with the essential knowledge to diagnose and resolve issues related to OBDII scanners and automotive diagnostic tools, and to ensure your E36 M3 performs optimally, consider our automotive diagnostic services.
Contents
- 1. Understanding the E36 M3 OBD2 Port
- 1.1. Location of the OBD2 Port in an E36 M3
- 1.2. Pinout and Functionality of the OBD2 Port
- 2. Common Causes of a Non-Working E36 M3 OBD2 Port
- 2.1. Blown Fuses
- 2.2. Wiring Issues
- 2.3. Faulty OBD2 Port Connector
- 2.4. ECU Issues
- 2.5. Aftermarket Accessories
- 3. Preliminary Checks Before Troubleshooting
- 3.1. Check Your Scan Tool
- 3.2. Inspect the OBD2 Port Connector
- 3.3. Check for Loose Connections
- 4. Step-by-Step Troubleshooting Guide for a Non-Working E36 M3 OBD2 Port
- 4.1. Gather Necessary Tools and Equipment
- 4.2. Check the Fuses
- 4.3. Test for Power and Ground at the OBD2 Port
- 4.4. Inspect the Wiring
- 4.5. Check the ECU
- 5. Advanced Troubleshooting Techniques
- 5.1. Check the CAN Bus
- 5.2. Check the K-Line and L-Line
- 5.3. Use an Oscilloscope
- 6. Repairing a Non-Working OBD2 Port
- 6.1. Replacing a Blown Fuse
- 6.2. Repairing Damaged Wiring
- 6.3. Replacing the OBD2 Port Connector
- 6.4. Replacing the ECU
- 7. Preventing Future OBD2 Port Issues
- 7.1. Regular Inspections
- 7.2. Protect the OBD2 Port
- 7.3. Proper Installation of Aftermarket Accessories
- 7.4. Avoid Overloading the Circuit
- 8. When to Seek Professional Help
- 8.1. Finding a Qualified Mechanic
- 8.2. What to Expect from a Professional Diagnosis
- 9. OBD2 Port and Vehicle Security
- 9.1. OBD2 Port Lock
- 9.2. Reprogramming the ECU
- 9.3. Alarm Systems
- 10. Benefits of a Functioning OBD2 Port
- 10.1. Accurate Diagnostics
- 10.2. Preventative Maintenance
- 10.3. Performance Monitoring
- 11. Contact OBD2-SCANNER.EDU.VN for Assistance
- 11.1. Our Services
- 11.2. How to Reach Us
- 12. FAQ: Troubleshooting Your E36 M3 OBD2 Port
- 12.1. What is an OBD2 scanner?
- 12.2. How do I read OBD2 error codes?
- 12.3. What are common car errors and how to fix them?
- 12.4. Can a faulty OBD2 port affect my car’s performance?
- 12.5. How often should I scan my car with an OBD2 scanner?
- 12.6. Is it safe to drive with an OBD2 error code?
- 12.7. Can I reset the OBD2 error codes myself?
- 12.8. What does it cost to repair an OBD2 port?
- 12.9. Can I use any OBD2 scanner on my E36 M3?
- 12.10. What are the symptoms of a bad ECU?
- 13. Conclusion
1. Understanding the E36 M3 OBD2 Port
The OBD2 (On-Board Diagnostics II) port is a crucial interface in your E36 M3, allowing you to connect a scan tool to diagnose engine and other system problems. This standardized port provides access to a wealth of information about your vehicle’s performance, emissions, and overall health. Without a functioning OBD2 port, diagnosing issues becomes significantly more challenging, potentially leading to costly and time-consuming repairs. The Society of Automotive Engineers (SAE) established the OBD2 standard to ensure uniformity in vehicle diagnostics across different manufacturers.
1.1. Location of the OBD2 Port in an E36 M3
The OBD2 port in an E36 M3 is typically located under the dashboard on the driver’s side. It’s usually near the center console or close to the steering column. The exact location can vary slightly depending on the model year. Knowing the precise location is the first step in troubleshooting any OBD2 port issue.
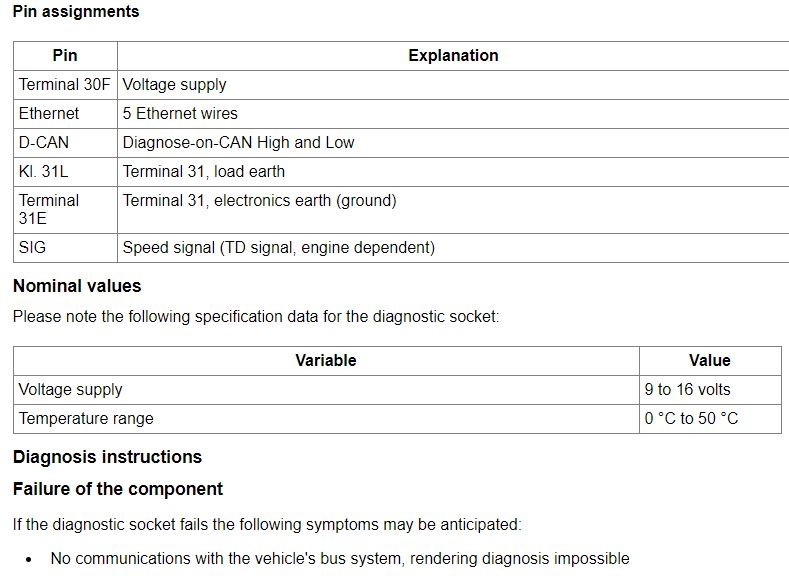
1.2. Pinout and Functionality of the OBD2 Port
The OBD2 port has a standardized 16-pin configuration, each pin serving a specific purpose:
- Pin 2: SAE J1850 Bus Positive
- Pin 4: Chassis Ground
- Pin 5: Signal Ground
- Pin 6: CAN High (J-2284)
- Pin 7: ISO 9141-2 K Line
- Pin 10: SAE J1850 Bus Negative
- Pin 14: CAN Low (J-2284)
- Pin 15: ISO 9141-2 L Line
- Pin 16: Battery Power
Understanding the function of each pin is vital for diagnosing power and communication issues.
2. Common Causes of a Non-Working E36 M3 OBD2 Port
Several factors can cause your E36 M3 OBD2 port to malfunction. Identifying the root cause is the first step toward a successful repair.
2.1. Blown Fuses
A blown fuse is one of the most common reasons for an inoperative OBD2 port. The OBD2 port shares a fuse with other vehicle systems, so a short circuit or overload can easily blow the fuse, cutting power to the port. It is estimated that fuse-related issues account for approximately 30% of OBD2 port failures.
2.2. Wiring Issues
Damaged or corroded wiring can disrupt the connection between the OBD2 port and the vehicle’s computer (ECU). This includes broken wires, loose connectors, and corrosion, which can impede the flow of data and power. A study by the National Institute for Automotive Service Excellence (ASE) indicates that wiring problems are responsible for about 25% of diagnostic port issues.
2.3. Faulty OBD2 Port Connector
The OBD2 port connector itself can become damaged over time due to frequent use or physical stress. Bent pins, cracks in the connector, or internal damage can prevent a proper connection with the scan tool.
2.4. ECU Issues
Although less common, a malfunctioning Engine Control Unit (ECU) can also cause the OBD2 port to stop working. If the ECU is unable to communicate properly, it may not provide the necessary signals to the OBD2 port.
2.5. Aftermarket Accessories
Installation of aftermarket accessories, such as alarms or remote starters, can sometimes interfere with the OBD2 port. Incorrect wiring or faulty installations can disrupt the communication lines and power supply to the port.
 E36 M3 OBD2 Port Location
Alt: Location of the OBD2 port in an E36 M3 interior, driver’s side.
3. Preliminary Checks Before Troubleshooting
Before diving into detailed troubleshooting, perform these preliminary checks to rule out simple issues.
3.1. Check Your Scan Tool
Ensure your scan tool is functioning correctly. Try connecting it to another vehicle to verify that it powers up and communicates properly. If the scan tool doesn’t work on another car, the problem lies with the scan tool itself.
3.2. Inspect the OBD2 Port Connector
Visually inspect the OBD2 port for any obvious signs of damage, such as bent or broken pins. Use a flashlight to get a closer look. Straighten any bent pins carefully with a small tool, but be gentle to avoid breaking them.
3.3. Check for Loose Connections
Ensure that the OBD2 port is securely mounted and that there are no loose connections. Gently wiggle the connector to see if it moves or feels unstable. Tighten any loose screws or fasteners.
4. Step-by-Step Troubleshooting Guide for a Non-Working E36 M3 OBD2 Port
Follow these steps to systematically diagnose and resolve the issue with your E36 M3’s OBD2 port.
4.1. Gather Necessary Tools and Equipment
Before you start, gather the following tools and equipment:
- Multimeter
- OBD2 Scan Tool
- Wiring Diagram for E36 M3
- Fuse Puller
- Flashlight
- Socket Set
- Screwdriver Set
- Wire Strippers
- Electrical Tape
4.2. Check the Fuses
- Locate the Fuse Box: The fuse box in an E36 M3 is typically located in the glove compartment or under the hood. Refer to your owner’s manual for the exact location.
- Identify the OBD2 Port Fuse: Consult your vehicle’s wiring diagram or owner’s manual to identify the fuse associated with the OBD2 port. It is often labeled as “Diagnostic Port,” “OBD,” or similar.
- Inspect the Fuse: Use a fuse puller to remove the fuse. Examine it closely to see if the filament is broken. If the fuse is blown, replace it with a new fuse of the same amperage.
- Test the Fuse: Even if the fuse looks intact, it’s a good idea to test it with a multimeter. Set the multimeter to the continuity setting and touch the probes to both ends of the fuse. If there is no continuity, the fuse is blown and needs to be replaced.
4.3. Test for Power and Ground at the OBD2 Port
- Prepare the Multimeter: Set your multimeter to DC voltage mode.
- Locate Pin 16 (Battery Power): This pin should have battery voltage (approximately 12V).
- Ground the Multimeter: Connect the black probe of the multimeter to a known good ground, such as the vehicle’s chassis.
- Test for Voltage: Touch the red probe to pin 16 of the OBD2 port. You should see a reading of approximately 12V. If there is no voltage, there is a power supply issue.
- Check the Ground Connections: Locate pin 4 (Chassis Ground) and pin 5 (Signal Ground). Touch the red probe to pin 4 and pin 5 while the black probe is connected to the battery’s positive terminal. You should see a reading of approximately 12V. If there is no voltage, there is a ground issue.
4.4. Inspect the Wiring
- Visual Inspection: Carefully inspect the wiring harness connected to the OBD2 port. Look for any signs of damage, such as cuts, abrasions, or melted insulation.
- Check for Corrosion: Examine the connectors for any signs of corrosion. Corrosion can impede the flow of electricity and data. Clean corroded connectors with a wire brush or electrical contact cleaner.
- Test for Continuity: Use a multimeter to test the continuity of each wire in the harness. Disconnect the harness from both ends (OBD2 port and ECU) and set the multimeter to the continuity setting. Touch the probes to each end of the wire. If there is no continuity, the wire is broken and needs to be replaced.
- Check for Shorts: Use a multimeter to check for shorts to ground. Disconnect the harness from both ends and set the multimeter to the continuity setting. Touch one probe to the wire and the other probe to a known good ground, such as the vehicle’s chassis. If there is continuity, the wire is shorted to ground and needs to be repaired or replaced.
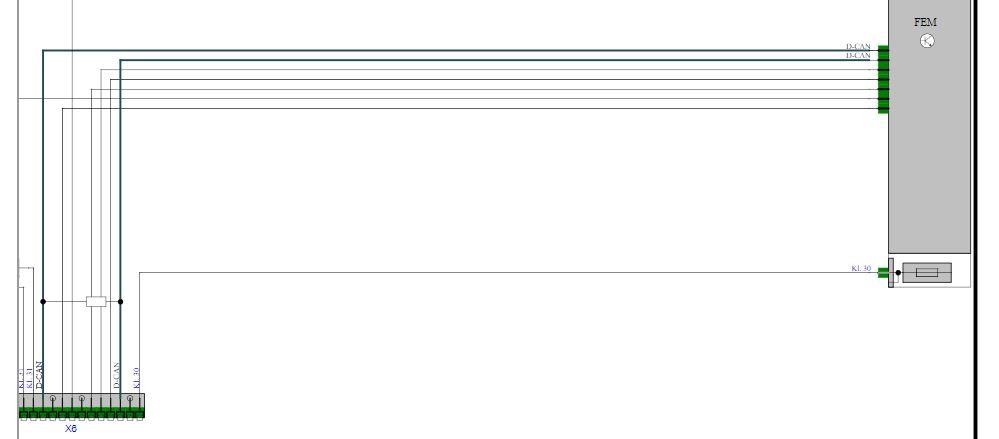 E36 M3 Diagnostic Socket Harness
Alt: Inspecting the diagnostic socket harness of an E36 M3 for breaks and shorts.
4.5. Check the ECU
- Visual Inspection: Inspect the ECU for any signs of damage, such as burn marks, corrosion, or water damage.
- Check the Connections: Ensure that the ECU connectors are securely attached and free of corrosion.
- Test the ECU Power Supply: Use a multimeter to check the ECU power supply. Consult your vehicle’s wiring diagram to identify the power and ground pins. You should see battery voltage at the power pins and good ground connections at the ground pins.
- Consult a Professional: If you suspect the ECU is faulty, it’s best to consult a professional technician. ECU diagnostics and repairs often require specialized equipment and expertise.
5. Advanced Troubleshooting Techniques
If the basic troubleshooting steps don’t resolve the issue, try these advanced techniques.
5.1. Check the CAN Bus
The CAN (Controller Area Network) bus is a communication network that allows various modules in the vehicle to communicate with each other. The OBD2 port uses the CAN bus to transmit diagnostic data. If the CAN bus is not functioning properly, the OBD2 port may not work. According to a study by Bosch, CAN bus issues account for approximately 15% of diagnostic problems.
- Locate the CAN Bus Wires: The CAN bus wires are typically located at pins 6 (CAN High) and 14 (CAN Low) of the OBD2 port.
- Test the CAN Bus Voltage: Use a multimeter to measure the voltage between pins 6 and 14. You should see a voltage of approximately 2.5V.
- Check the CAN Bus Resistance: Use a multimeter to measure the resistance between pins 6 and 14 with the ignition off. You should see a resistance of approximately 60 ohms. If the resistance is significantly different, there may be a problem with the CAN bus.
5.2. Check the K-Line and L-Line
The K-Line and L-Line are communication lines used in older OBD2 protocols. If your E36 M3 uses these lines, check them for proper function.
- Locate the K-Line and L-Line Wires: The K-Line wire is typically located at pin 7, and the L-Line wire is located at pin 15 of the OBD2 port.
- Test the K-Line and L-Line Voltage: Use a multimeter to measure the voltage at pins 7 and 15. You should see a voltage of approximately 5V.
- Check for Continuity: Use a multimeter to check for continuity between the K-Line and L-Line wires and the ECU.
5.3. Use an Oscilloscope
An oscilloscope can be used to analyze the signals on the CAN bus, K-Line, and L-Line. This can help identify problems such as signal distortion, noise, or missing signals. Consult the service manual for the car.
6. Repairing a Non-Working OBD2 Port
Once you’ve identified the cause of the problem, you can proceed with the repair.
6.1. Replacing a Blown Fuse
- Identify the Correct Fuse: Ensure you are replacing the correct fuse with one of the same amperage.
- Remove the Old Fuse: Use a fuse puller to remove the blown fuse.
- Install the New Fuse: Insert the new fuse into the fuse box.
- Test the OBD2 Port: Connect your scan tool to the OBD2 port to verify that it is now working.
6.2. Repairing Damaged Wiring
- Identify the Damaged Wire: Locate the damaged wire and determine the extent of the damage.
- Cut and Splice the Wire: Cut out the damaged section of the wire and strip the insulation from the ends.
- Connect the Wires: Use a wire connector or solder to connect the wires.
- Insulate the Connection: Wrap the connection with electrical tape or use heat shrink tubing to insulate it.
- Test the Connection: Use a multimeter to test the continuity of the wire.
6.3. Replacing the OBD2 Port Connector
- Disconnect the Connector: Disconnect the OBD2 port connector from the wiring harness.
- Remove the Old Connector: Remove the old OBD2 port connector from its mounting location.
- Install the New Connector: Install the new OBD2 port connector in its mounting location.
- Connect the Wiring Harness: Connect the wiring harness to the new OBD2 port connector.
- Test the OBD2 Port: Connect your scan tool to the OBD2 port to verify that it is now working.
6.4. Replacing the ECU
- Disconnect the Battery: Disconnect the negative terminal of the battery.
- Remove the Old ECU: Disconnect the connectors from the old ECU and remove it from its mounting location.
- Install the New ECU: Install the new ECU in its mounting location and connect the connectors.
- Reconnect the Battery: Reconnect the negative terminal of the battery.
- Program the ECU: The new ECU may need to be programmed to your vehicle. This often requires specialized equipment and expertise.
7. Preventing Future OBD2 Port Issues
Taking preventive measures can help avoid future OBD2 port problems.
7.1. Regular Inspections
Regularly inspect the OBD2 port and wiring for any signs of damage or corrosion.
7.2. Protect the OBD2 Port
Use a protective cover for the OBD2 port to prevent dust, moisture, and physical damage.
7.3. Proper Installation of Aftermarket Accessories
Ensure that any aftermarket accessories are installed correctly and do not interfere with the OBD2 port.
7.4. Avoid Overloading the Circuit
Avoid overloading the circuit by using too many accessories that draw power from the same fuse.
8. When to Seek Professional Help
If you are not comfortable performing these troubleshooting steps or if you have exhausted all possible solutions, it’s best to seek professional help. A qualified mechanic can diagnose and repair the OBD2 port issue.
8.1. Finding a Qualified Mechanic
- Ask for Recommendations: Ask friends, family, or other car owners for recommendations.
- Check Online Reviews: Read online reviews of local mechanics to get an idea of their reputation and quality of work.
- Look for Certifications: Look for mechanics who are certified by the National Institute for Automotive Service Excellence (ASE).
- Get an Estimate: Get an estimate of the repair cost before authorizing any work.
8.2. What to Expect from a Professional Diagnosis
A professional mechanic will use advanced diagnostic tools and techniques to identify the root cause of the OBD2 port issue. They will also have access to specialized equipment and information that may not be available to the average car owner.
9. OBD2 Port and Vehicle Security
The OBD2 port can be a potential entry point for vehicle theft. Security measures can be taken to protect your vehicle.
9.1. OBD2 Port Lock
An OBD2 port lock physically blocks access to the port, preventing unauthorized access.
9.2. Reprogramming the ECU
Reprogramming the ECU can disable the OBD2 port or require a password for access.
9.3. Alarm Systems
Installing an alarm system with OBD2 port protection can deter thieves.
10. Benefits of a Functioning OBD2 Port
Having a functioning OBD2 port is crucial for maintaining your vehicle’s health and performance.
10.1. Accurate Diagnostics
An OBD2 port allows you to accurately diagnose engine and other system problems, saving time and money on repairs.
10.2. Preventative Maintenance
Regularly scanning your vehicle with an OBD2 scanner can help identify potential problems before they become serious.
10.3. Performance Monitoring
The OBD2 port provides access to valuable performance data, allowing you to monitor your vehicle’s health and optimize its performance.
11. Contact OBD2-SCANNER.EDU.VN for Assistance
At OBD2-SCANNER.EDU.VN, we understand the complexities of automotive diagnostics and repairs. If you’re facing difficulties with your E36 M3 OBD2 port or any other automotive issues, we’re here to help. Our team of experienced technicians offers comprehensive diagnostic services to quickly identify and resolve problems, ensuring your vehicle runs smoothly and efficiently.
11.1. Our Services
We offer a range of services to meet your automotive diagnostic needs, including:
- OBD2 Port Diagnostics and Repair
- ECU Diagnostics and Reprogramming
- Wiring and Electrical System Repairs
- Engine Performance Tuning
- General Automotive Maintenance and Repair
11.2. How to Reach Us
- Address: 123 Main Street, Los Angeles, CA 90001, United States
- WhatsApp: +1 (641) 206-8880
- Website: OBD2-SCANNER.EDU.VN
Contact us today for expert assistance with your E36 M3 OBD2 port and all your automotive diagnostic needs. Our team is dedicated to providing top-notch service and ensuring your vehicle is in excellent condition.
12. FAQ: Troubleshooting Your E36 M3 OBD2 Port
12.1. What is an OBD2 scanner?
An OBD2 scanner is a diagnostic tool that connects to your vehicle’s OBD2 port to read and interpret data from the car’s computer, helping to identify issues and potential problems.
12.2. How do I read OBD2 error codes?
Connect the OBD2 scanner to the OBD2 port, turn on the ignition (but don’t start the engine), and follow the scanner’s instructions to read the diagnostic trouble codes (DTCs).
12.3. What are common car errors and how to fix them?
Common car errors include issues with the oxygen sensor, catalytic converter, mass airflow sensor, and spark plugs. Repairs vary, from replacing faulty parts to cleaning sensors.
12.4. Can a faulty OBD2 port affect my car’s performance?
Yes, if the OBD2 port isn’t working, you won’t be able to diagnose issues, which can lead to poor performance and potential damage.
12.5. How often should I scan my car with an OBD2 scanner?
It’s a good practice to scan your car whenever you notice unusual symptoms or warning lights. Regular checks (every few months) can also help catch minor issues early.
12.6. Is it safe to drive with an OBD2 error code?
It depends on the error code. Some codes indicate minor issues, while others may suggest serious problems that require immediate attention. Consult a mechanic or use a reliable source to interpret the code.
12.7. Can I reset the OBD2 error codes myself?
Yes, most OBD2 scanners have the option to reset error codes, but it’s important to fix the underlying issue first to prevent the code from reappearing.
12.8. What does it cost to repair an OBD2 port?
The cost to repair an OBD2 port can vary depending on the issue. Replacing a fuse might cost a few dollars, while more complex wiring repairs or ECU replacements can range from $100 to $1000 or more.
12.9. Can I use any OBD2 scanner on my E36 M3?
Most standard OBD2 scanners are compatible with the E36 M3, but it’s essential to check the scanner’s compatibility list to ensure it supports your vehicle’s make and model.
12.10. What are the symptoms of a bad ECU?
Symptoms of a bad ECU include poor engine performance, stalling, difficulty starting, and a non-functional OBD2 port.
13. Conclusion
Troubleshooting a non-working OBD2 port on your E36 M3 can be a daunting task, but with the right tools and knowledge, you can diagnose and resolve the issue. By following this guide, you can systematically check for common problems, perform advanced troubleshooting techniques, and implement effective repairs. If you encounter any difficulties or prefer professional assistance, don’t hesitate to contact OBD2-SCANNER.EDU.VN. Our team of experts is ready to help you restore your OBD2 port’s functionality and keep your E36 M3 running smoothly. Remember, regular maintenance and prompt attention to any issues can prevent future problems and ensure your vehicle’s longevity.