The 1991 Fj80 Land Cruiser 3fe Obd2 system, while not fully OBD2 compliant, still offers valuable diagnostic information to help you maintain your vehicle; at OBD2-SCANNER.EDU.VN, we’re here to guide you through understanding and utilizing these diagnostic capabilities to keep your Land Cruiser running smoothly. Unlock your car’s potential with comprehensive fault code analysis, sensor data interpretation, and repair strategies, ensuring peak performance with our ODB resources.
Contents
- 1. Understanding the 1991 FJ80 Land Cruiser 3FE Diagnostic System
- 1.1. Key Features of the 1991 FJ80 Diagnostic System
- 1.2. OBD1 vs. OBD2: Key Differences
- 1.3. The 3FE Engine and Its Diagnostic Needs
- 2. Locating the Diagnostic Connector on Your 1991 FJ80
- 2.1. Step-by-Step Guide to Finding the Connector
- 2.2. Common Hiding Spots
- 2.3. Using Visual Aids
- 3. Reading Diagnostic Trouble Codes (DTCs)
- 3.1. Preparing to Read Codes
- 3.2. The Jumper Wire Method
- 3.3. Interpreting the Codes
- 4. Common Diagnostic Trouble Codes (DTCs) for the 3FE Engine
- 4.1. Code 12: RPM Signal
- 4.2. Code 14: Igniter Signal
- 4.3. Code 21: Oxygen Sensor
- 4.4. Code 25: Lean Air-Fuel Ratio
- 4.5. Code 31: Air Flow Meter Signal
- 5. Advanced Diagnostic Techniques
- 5.1. Using a Multimeter
- 5.2. Checking Sensor Voltages
- 5.3. Vacuum Leak Detection
- 6. Maintaining Your 1991 FJ80 Land Cruiser 3FE
- 6.1. Regular Oil Changes
- 6.2. Spark Plug Replacement
- 6.3. Air Filter Cleaning and Replacement
- 7. Upgrading Your Diagnostic Capabilities
- 7.1. Aftermarket Diagnostic Tools
- 7.2. Converting to OBD2 (Considerations)
- 7.3. Modernizing Sensors and Components
- 8. Troubleshooting Common Problems
- 8.1. Rough Idling
- 8.2. Poor Fuel Economy
- 8.3. Starting Problems
- 9. Resources and Further Reading
- 9.1. Service Manuals
- 9.2. Online Forums and Communities
- 9.3. Expert Advice
- 10. Frequently Asked Questions (FAQ)
- 10.1. What is an OBD2 Scanner?
- 10.2. Can I Use an OBD2 Scanner on My 1991 FJ80?
- 10.3. How Do I Read Fault Codes Without a Scanner?
- 10.4. What Does the Check Engine Light Mean?
- 10.5. How Do I Reset the Check Engine Light?
- 10.6. What Are Common Causes of Engine Misfires?
- 10.7. How Often Should I Replace My Oxygen Sensor?
- 10.8. What Type of Oil Should I Use?
- 10.9. How Can I Improve My Fuel Economy?
- 10.10. Where Can I Find Reliable Repair Information?
1. Understanding the 1991 FJ80 Land Cruiser 3FE Diagnostic System
What diagnostic system does the 1991 FJ80 Land Cruiser 3FE use? The 1991 FJ80 Land Cruiser 3FE utilizes an early form of onboard diagnostics, predating the standardized OBD2 system; it’s essential to understand its features and limitations for effective vehicle maintenance. This system, while not OBD2, provides crucial data for identifying and addressing potential issues.
1.1. Key Features of the 1991 FJ80 Diagnostic System
What are the main characteristics of the 1991 FJ80’s diagnostic setup? The diagnostic system in the 1991 FJ80 Land Cruiser includes a diagnostic connector in the engine bay, which allows users to retrieve fault codes and perform basic diagnostics, offering a glimpse into the vehicle’s health. Understanding these features helps owners and mechanics troubleshoot issues efficiently.
- Diagnostic Connector Location: Typically found in the engine bay, this connector serves as the interface for retrieving diagnostic information.
- Fault Code Retrieval: By using specific procedures like jumping terminals, users can read fault codes through the blinking Check Engine Light (CEL).
- Basic Sensor Data: While not as comprehensive as OBD2, the system provides access to essential sensor data for troubleshooting.
- Limited Standardization: Unlike OBD2, this system lacks the standardized interface and extensive data parameters.
- Manual Interpretation: Fault codes require manual interpretation using a service manual or online resources.
1.2. OBD1 vs. OBD2: Key Differences
What are the primary distinctions between OBD1 and OBD2? The differences between OBD1 and OBD2 systems lie in standardization, data availability, and diagnostic capabilities; OBD2 offers enhanced features and a universal interface for modern vehicles. Recognizing these differences is crucial for diagnosing older vehicles like the 1991 FJ80 Land Cruiser.
| Feature | OBD1 | OBD2 |
|---|---|---|
| Standardization | Non-standardized; varies by manufacturer | Standardized diagnostic port (SAE J1962), diagnostic trouble codes (DTCs), and communication protocols (SAE J1979) |
| Data Parameters | Limited data parameters; fewer sensors monitored | Extensive data parameters; monitors a wide range of sensors and systems, including emissions-related components, fuel system, ignition system, and transmission |
| Diagnostic Port | Varies by manufacturer; may include multiple connectors or no standardized port | Standardized 16-pin diagnostic port (SAE J1962) |
| Fault Code Reading | Requires specific procedures for each manufacturer; often involves counting the blinks of the CEL | Uses standardized scan tools to read diagnostic trouble codes (DTCs) |
| Communication | Proprietary communication protocols; limited interoperability between different manufacturers’ systems | Standardized communication protocols (e.g., CAN, ISO 9141-2, SAE J1850) |
| Emissions Monitoring | Basic emissions monitoring; less comprehensive than OBD2 | Comprehensive emissions monitoring; monitors catalytic converter efficiency, oxygen sensor performance, evaporative emissions control system, and more |
1.3. The 3FE Engine and Its Diagnostic Needs
Why is understanding the 3FE engine important for diagnostics? The 3FE engine, known for its reliability, requires specific diagnostic approaches; understanding its unique characteristics is crucial for accurate troubleshooting and maintenance. This knowledge helps in pinpointing issues that may not be apparent with generic diagnostic methods.
- Engine Design: The 3FE is a 4.0L inline-6 engine known for its durability and robust construction.
- Fuel Injection System: Understanding the fuel injection system is crucial for diagnosing issues related to fuel delivery and performance.
- Sensor Locations: Familiarize yourself with the locations of key sensors such as the oxygen sensor, throttle position sensor, and coolant temperature sensor.
- Common Issues: Be aware of common problems associated with the 3FE engine, such as vacuum leaks, ignition system issues, and fuel injector failures.
- Maintenance Requirements: Regular maintenance, including spark plug replacement, air filter cleaning, and oil changes, can help prevent diagnostic issues.
2. Locating the Diagnostic Connector on Your 1991 FJ80
Where can I find the diagnostic connector on my 1991 FJ80 Land Cruiser? The diagnostic connector on a 1991 FJ80 Land Cruiser 3FE is typically located in the engine bay, near the back left corner; this gray box serves as the gateway to accessing diagnostic information. Knowing its exact location will save you time and effort during troubleshooting.
2.1. Step-by-Step Guide to Finding the Connector
How can I locate the diagnostic connector in the engine bay? Locating the diagnostic connector involves a systematic search in the engine bay; follow these steps to find it quickly and easily. This will enable you to proceed with diagnostic procedures without delay.
- Open the Hood: Start by opening the hood of your 1991 FJ80 Land Cruiser.
- Locate the Engine Bay: Identify the engine bay area where the engine and related components are housed.
- Check the Back Left Corner: Move to the back left corner of the engine bay (as you face the vehicle from the front).
- Look for a Gray Box: Search for a small gray box or connector, often labeled as “Diagnostic.”
- Inspect the Surrounding Wires: The connector may be hidden under a bunch of wires, so carefully inspect the surrounding area.
- Consult the Service Manual: If you’re having trouble finding the connector, consult the vehicle’s service manual for specific location details.
2.2. Common Hiding Spots
Where might the diagnostic connector be hidden? The diagnostic connector may be hidden under wires or behind other components; knowing these common hiding spots can help you locate it faster. Checking these areas ensures you don’t overlook the connector during your search.
- Under Wires: The connector may be tucked away under a bundle of wires to keep it protected.
- Behind Components: Check behind components such as the air filter box, fuse box, or other engine bay accessories.
- Near the Firewall: Inspect the area near the firewall, as the connector may be mounted close to it.
- Inside a Protective Cover: Some models may have a protective cover or housing around the connector.
- Loosened or Detached: Due to age or previous repairs, the connector may have come loose or detached from its original mounting point.
2.3. Using Visual Aids
How can images help in locating the diagnostic connector? Visual aids such as diagrams and images can significantly assist in locating the diagnostic connector; these resources provide a clear reference point. Using these aids can reduce the time spent searching and ensure you find the connector accurately.
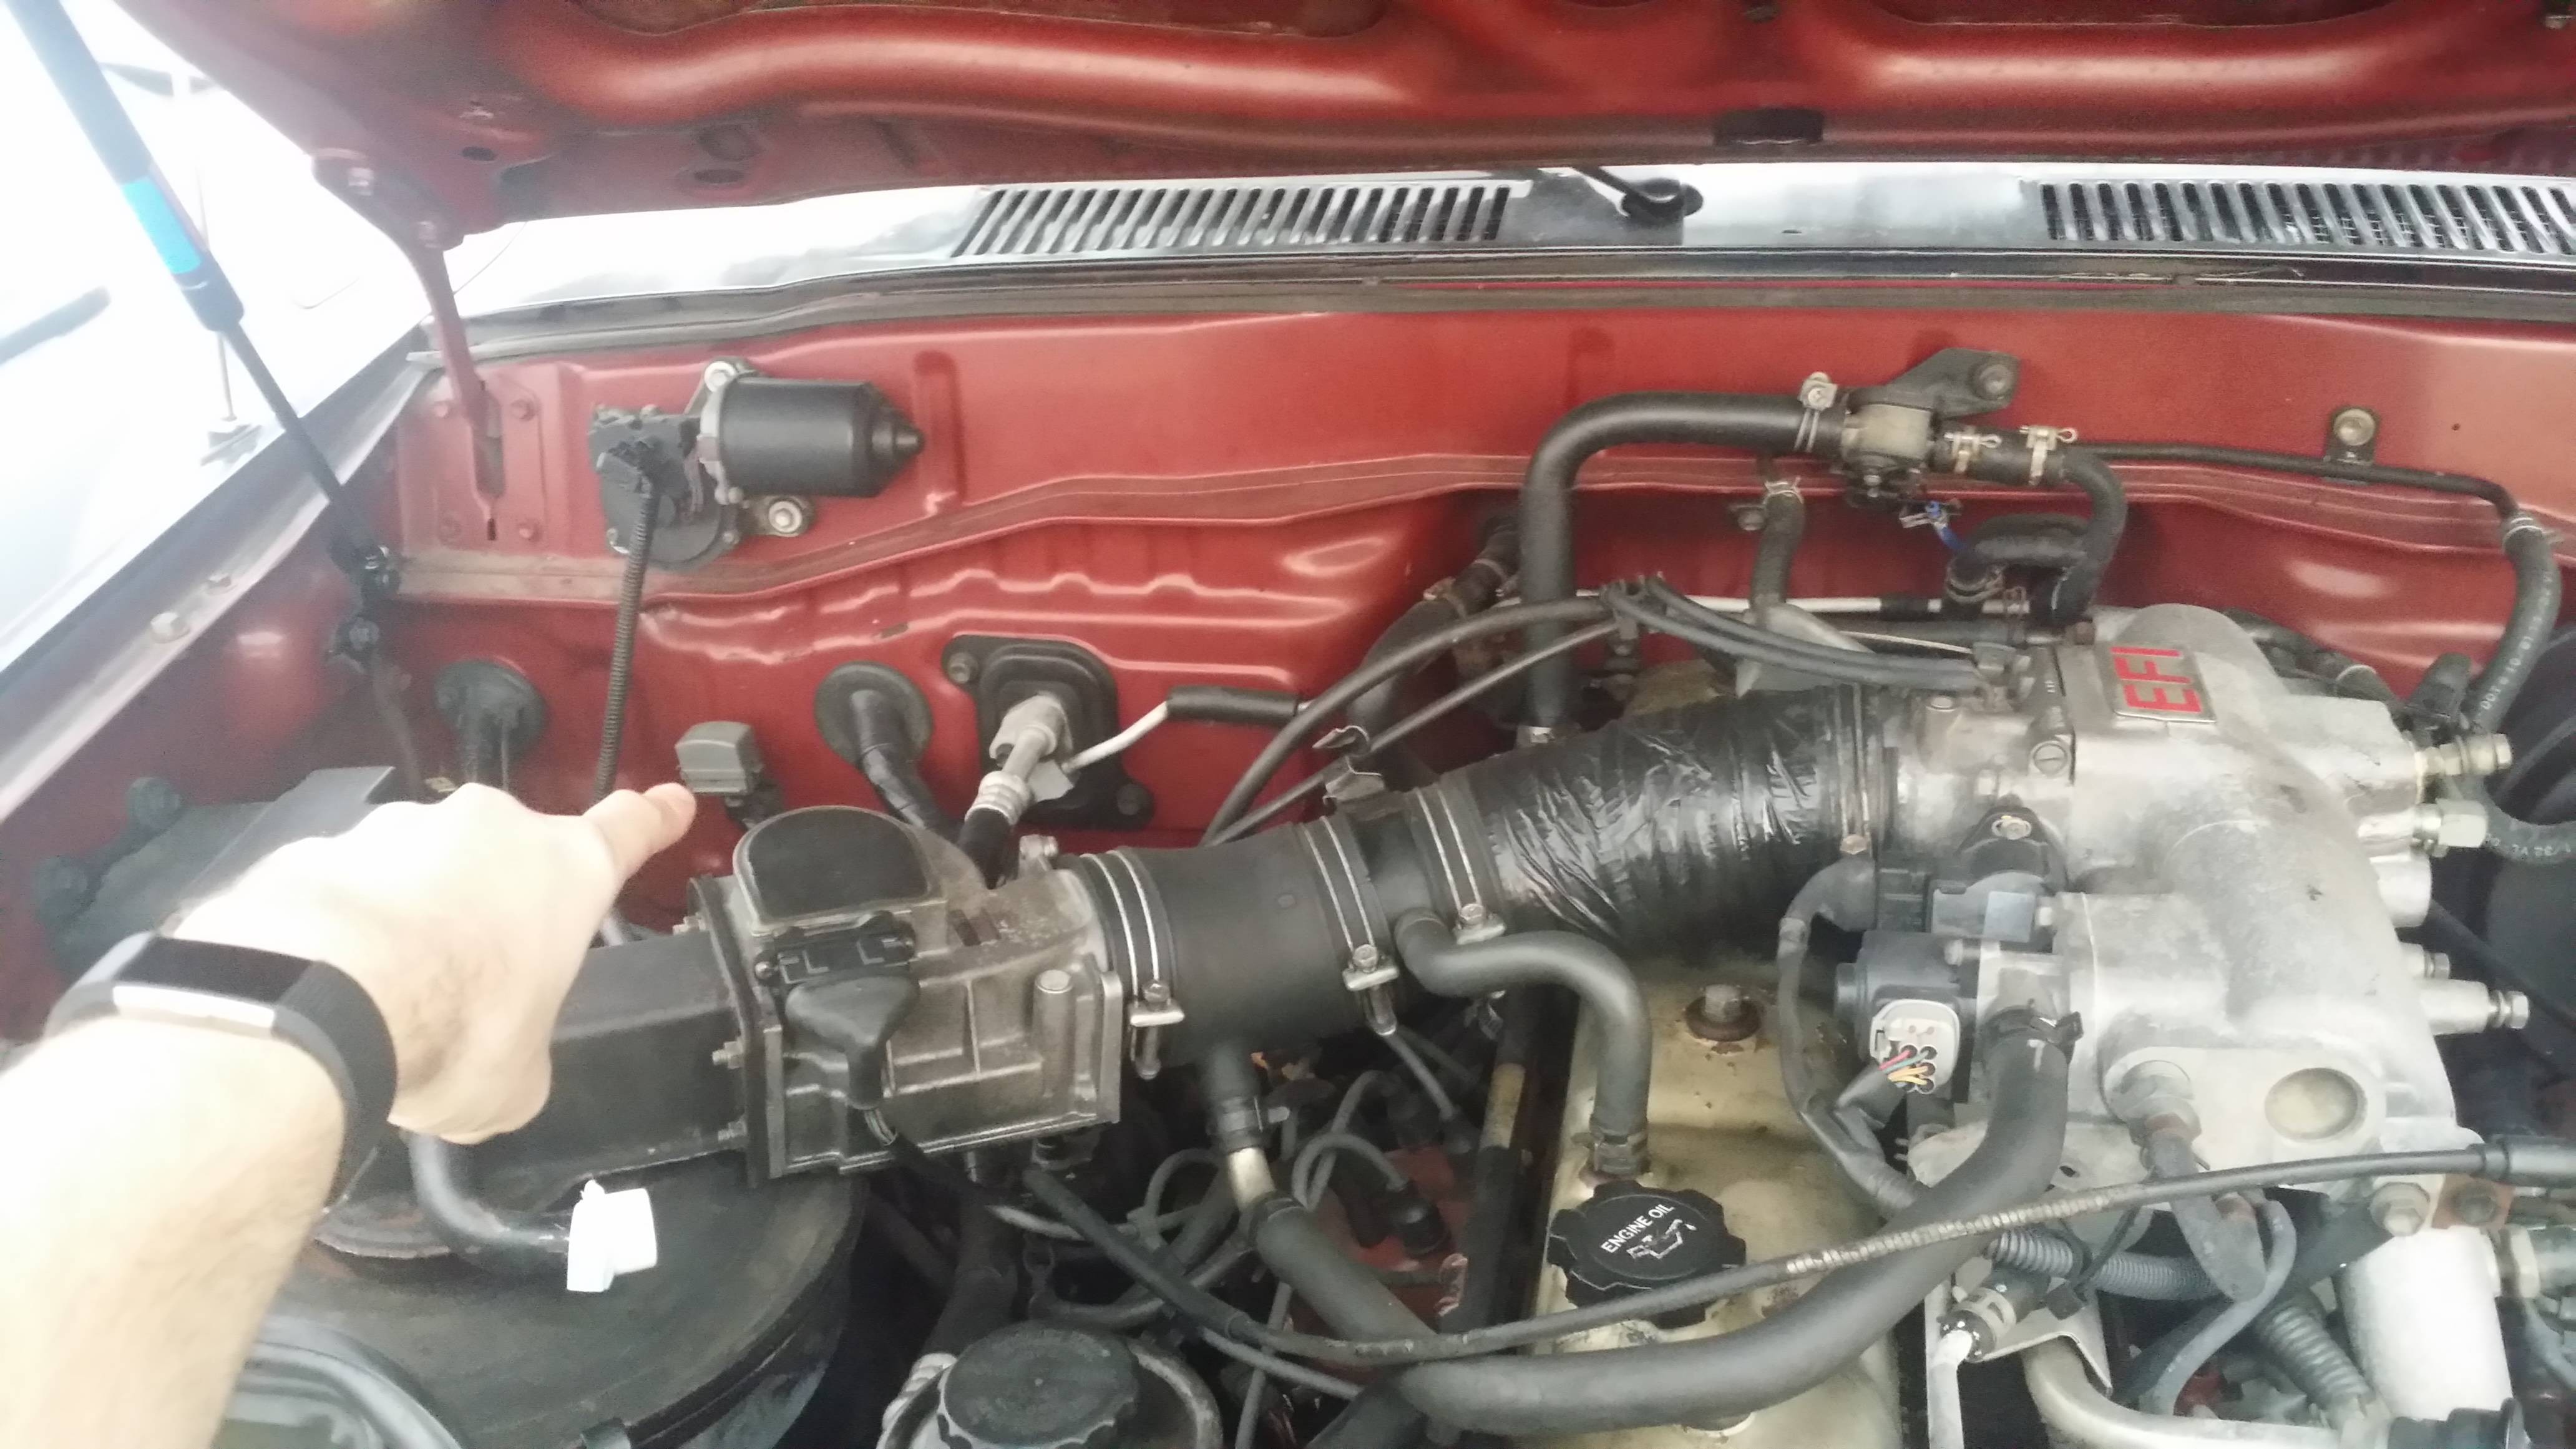 1991 FJ80 Land Cruiser Diagnostic Connector Location – Engine Bay
3. Reading Diagnostic Trouble Codes (DTCs)
How do I read Diagnostic Trouble Codes on a 1991 FJ80 Land Cruiser? Reading DTCs on a 1991 FJ80 Land Cruiser 3FE involves using the Check Engine Light (CEL) to interpret fault codes; this method requires no specialized scan tools. Understanding this process enables you to identify potential issues without expensive equipment.
3.1. Preparing to Read Codes
What steps are needed before reading diagnostic codes? Before reading diagnostic codes, ensure the vehicle is in a suitable state and you have the necessary information; this preparation ensures accurate and safe code retrieval. Proper preparation also helps in avoiding misinterpretations of the codes.
- Locate the Diagnostic Connector: Ensure you have located the diagnostic connector in the engine bay.
- Gather Necessary Tools: Collect the tools you’ll need, including a jumper wire or paperclip, a notepad, and a pen.
- Turn Off the Engine: Make sure the engine is turned off before proceeding with the diagnostic process.
- Consult the Service Manual: Have the vehicle’s service manual or a reliable online resource handy for interpreting the fault codes.
- Ensure Battery Voltage: Verify that the battery voltage is within the normal range (typically around 12 volts).
3.2. The Jumper Wire Method
How can I use a jumper wire to retrieve diagnostic codes? The jumper wire method involves using a wire or paperclip to bridge specific terminals in the diagnostic connector; this action triggers the CEL to blink out the fault codes. This method is simple and effective for reading codes without a scan tool.
- Identify TE1 and E1 Terminals: Locate the TE1 and E1 terminals in the diagnostic connector.
- Insert Jumper Wire: Insert a jumper wire or paperclip into the TE1 and E1 terminals.
- Turn the Ignition On: Turn the ignition key to the “ON” position, but do not start the engine.
- Observe the Check Engine Light (CEL): Watch the CEL on the instrument cluster; it will begin to blink.
- Record the Blinking Pattern: Note the blinking pattern of the CEL, which represents the fault codes.
- Interpret the Codes: Use the vehicle’s service manual or a reliable online resource to interpret the fault codes.
3.3. Interpreting the Codes
How do I interpret the blinking patterns of the Check Engine Light? Interpreting the blinking patterns of the CEL requires understanding the sequence of long and short blinks; these patterns represent specific fault codes. Accurate interpretation is crucial for diagnosing the underlying issues.
- Long Blinks: Represent the tens digit of the fault code.
- Short Blinks: Represent the ones digit of the fault code.
- Example: Two long blinks followed by three short blinks indicate fault code 23.
- Record Each Code: Write down each fault code as it is displayed by the CEL.
- Consult the Service Manual: Use the vehicle’s service manual or a reliable online resource to look up the meaning of each fault code.
4. Common Diagnostic Trouble Codes (DTCs) for the 3FE Engine
What are some common Diagnostic Trouble Codes for the 3FE engine? Familiarizing yourself with common DTCs for the 3FE engine will aid in quicker and more accurate diagnoses; these codes often point to specific issues that are known to occur. Recognizing these codes can save time and reduce diagnostic errors.
4.1. Code 12: RPM Signal
What does Code 12 indicate? Code 12 indicates a problem with the RPM signal, which is crucial for engine control; this can result from issues with the distributor or ECU. Addressing this code promptly is essential for maintaining engine performance.
- Definition: No RPM signal to the ECU.
- Possible Causes:
- Faulty distributor
- Wiring issues
- Faulty ECU
- Troubleshooting Steps:
- Check distributor connections
- Inspect wiring for damage
- Test the distributor
- Replace ECU if necessary
4.2. Code 14: Igniter Signal
What does Code 14 signify? Code 14 signifies an issue with the igniter signal, which can lead to starting problems or engine misfires; diagnosing this code requires checking the igniter and related wiring. Resolving this issue ensures proper ignition and smooth engine operation.
- Definition: No igniter signal to the ECU.
- Possible Causes:
- Faulty igniter
- Wiring issues
- Faulty ECU
- Troubleshooting Steps:
- Check igniter connections
- Inspect wiring for damage
- Test the igniter
- Replace ECU if necessary
4.3. Code 21: Oxygen Sensor
What does Code 21 mean? Code 21 means a problem with the oxygen sensor, affecting fuel efficiency and emissions; diagnosing this code involves checking the sensor and its wiring. Addressing this issue helps maintain optimal engine performance and reduces emissions.
- Definition: Oxygen sensor signal malfunction.
- Possible Causes:
- Faulty oxygen sensor
- Wiring issues
- Exhaust leaks
- Troubleshooting Steps:
- Check oxygen sensor connections
- Inspect wiring for damage
- Test the oxygen sensor
- Repair exhaust leaks
- Replace oxygen sensor if necessary
4.4. Code 25: Lean Air-Fuel Ratio
What does Code 25 imply? Code 25 implies a lean air-fuel ratio, which can cause engine hesitation and reduced performance; troubleshooting involves checking for vacuum leaks and fuel delivery issues. Correcting this imbalance ensures smooth engine operation and optimal fuel economy.
- Definition: Lean air-fuel ratio.
- Possible Causes:
- Vacuum leaks
- Faulty fuel injectors
- Low fuel pressure
- Troubleshooting Steps:
- Check for vacuum leaks
- Test fuel injectors
- Check fuel pressure
- Replace faulty components
4.5. Code 31: Air Flow Meter Signal
What does Code 31 indicate? Code 31 indicates a malfunction with the air flow meter signal, affecting fuel mixture and engine performance; diagnosing this code requires checking the meter and its connections. Resolving this issue ensures accurate air-fuel mixture and optimal engine operation.
- Definition: Air flow meter signal malfunction.
- Possible Causes:
- Faulty air flow meter
- Wiring issues
- Air leaks
- Troubleshooting Steps:
- Check air flow meter connections
- Inspect wiring for damage
- Test the air flow meter
- Replace air flow meter if necessary
5. Advanced Diagnostic Techniques
How can I use advanced diagnostic techniques to troubleshoot my 1991 FJ80? Advanced diagnostic techniques such as multimeter testing and vacuum leak detection can provide deeper insights into your 1991 FJ80’s issues; these methods require some technical knowledge. Mastering these techniques enables more precise and effective troubleshooting.
5.1. Using a Multimeter
How can a multimeter help in diagnosing issues? A multimeter is an invaluable tool for testing electrical components and circuits; it can help identify voltage drops, shorts, and open circuits. Using a multimeter effectively is essential for diagnosing electrical problems in your FJ80.
- Voltage Testing: Measure voltage at various points in the electrical system to identify voltage drops or spikes.
- Continuity Testing: Check continuity of wires and circuits to identify open circuits or shorts.
- Resistance Testing: Measure the resistance of components such as sensors and resistors to ensure they are within specifications.
- Ground Testing: Verify proper grounding of components and circuits to prevent electrical issues.
- Signal Testing: Test signal outputs from sensors and the ECU to ensure they are functioning correctly.
5.2. Checking Sensor Voltages
Why is checking sensor voltages important? Checking sensor voltages is crucial for verifying sensor functionality; incorrect voltages can indicate a faulty sensor or wiring issue. Accurate voltage readings are essential for diagnosing engine performance problems.
- Identify the Sensor: Locate the sensor you want to test, such as the oxygen sensor, throttle position sensor, or coolant temperature sensor.
- Access the Wiring Diagram: Consult the vehicle’s wiring diagram to identify the correct wires for testing.
- Set the Multimeter: Set the multimeter to the appropriate voltage range (DC voltage).
- Connect the Multimeter: Connect the multimeter probes to the sensor’s signal wire and ground wire.
- Turn the Ignition On: Turn the ignition key to the “ON” position, but do not start the engine (unless specified otherwise).
- Read the Voltage: Read the voltage displayed on the multimeter and compare it to the specifications in the service manual.
5.3. Vacuum Leak Detection
How can I detect vacuum leaks in my 1991 FJ80? Vacuum leaks can cause a variety of engine performance issues; methods like using a smoke machine or carburetor cleaner can help pinpoint these leaks. Detecting and fixing vacuum leaks is essential for maintaining optimal engine performance.
- Visual Inspection: Check all vacuum hoses and connections for cracks, damage, or loose fittings.
- Listening for Hissing: Listen for hissing sounds coming from the engine bay, which may indicate a vacuum leak.
- Smoke Machine: Use a smoke machine to introduce smoke into the intake system and observe where it escapes.
- Carburetor Cleaner: Spray carburetor cleaner around vacuum hoses and connections; an increase in engine RPM indicates a leak.
- Professional Testing: If you’re unable to locate the leak, consider taking your vehicle to a professional mechanic for further testing.
6. Maintaining Your 1991 FJ80 Land Cruiser 3FE
What maintenance tasks are essential for keeping my 1991 FJ80 running smoothly? Regular maintenance is key to preventing diagnostic issues and ensuring your 1991 FJ80 Land Cruiser 3FE runs reliably; this includes oil changes, spark plug replacements, and air filter cleaning. Following a consistent maintenance schedule extends the life of your vehicle.
6.1. Regular Oil Changes
Why are regular oil changes necessary? Regular oil changes are crucial for lubricating engine components and removing contaminants; this prevents wear and tear and extends engine life. Consistent oil changes ensure the engine operates efficiently and reliably.
- Frequency: Change the engine oil and filter every 3,000 to 5,000 miles, or as recommended in the vehicle’s service manual.
- Oil Type: Use the recommended oil type and viscosity for the 3FE engine, typically 10W-30 or 10W-40.
- Filter Quality: Use a high-quality oil filter to ensure proper filtration and prevent contaminants from circulating through the engine.
- DIY or Professional: You can perform the oil change yourself or take your vehicle to a professional mechanic.
- Record Keeping: Keep a record of oil changes and other maintenance tasks to track the vehicle’s service history.
6.2. Spark Plug Replacement
How often should I replace the spark plugs? Spark plug replacement is essential for maintaining proper ignition and engine performance; worn spark plugs can cause misfires and reduced fuel economy. Following the recommended replacement interval ensures optimal engine operation.
- Frequency: Replace the spark plugs every 30,000 miles, or as recommended in the vehicle’s service manual.
- Spark Plug Type: Use the recommended spark plug type for the 3FE engine, typically NGK or Denso.
- Gap Setting: Ensure the spark plugs are properly gapped before installation, using a spark plug gapping tool.
- Inspection: Inspect the spark plugs for signs of wear, damage, or fouling.
- DIY or Professional: You can replace the spark plugs yourself or take your vehicle to a professional mechanic.
6.3. Air Filter Cleaning and Replacement
Why is it important to keep the air filter clean? Keeping the air filter clean is crucial for ensuring proper airflow to the engine; a dirty air filter restricts airflow and reduces engine performance. Regular cleaning and replacement help maintain optimal engine efficiency.
- Frequency: Clean the air filter every 15,000 miles and replace it every 30,000 miles, or as recommended in the vehicle’s service manual.
- Cleaning Method: Use compressed air to blow out dirt and debris from the air filter.
- Inspection: Inspect the air filter for signs of damage or excessive dirt buildup.
- Filter Quality: Use a high-quality air filter to ensure proper filtration and prevent contaminants from entering the engine.
- DIY or Professional: You can clean or replace the air filter yourself or take your vehicle to a professional mechanic.
7. Upgrading Your Diagnostic Capabilities
How can I enhance the diagnostic capabilities of my 1991 FJ80? While the 1991 FJ80 predates OBD2, there are ways to enhance its diagnostic capabilities through aftermarket solutions; these upgrades provide more detailed insights into your vehicle’s health. Consider these options for improved diagnostics.
7.1. Aftermarket Diagnostic Tools
What aftermarket diagnostic tools are available for older vehicles? Aftermarket diagnostic tools designed for older vehicles can provide more detailed diagnostic information than the factory system; these tools often include enhanced code reading and data logging capabilities. Investing in a quality tool can significantly improve your diagnostic accuracy.
- OBD1 Scan Tools: Some manufacturers offer scan tools specifically designed for OBD1 vehicles, including the 1991 FJ80 Land Cruiser.
- Code Readers: Basic code readers can retrieve fault codes from the diagnostic connector, providing a starting point for troubleshooting.
- Data Loggers: Advanced data loggers can record sensor data over time, allowing you to analyze engine performance under various conditions.
- Software-Based Diagnostics: Some software programs can interface with the diagnostic connector using a special adapter cable.
- Professional-Grade Tools: Professional-grade diagnostic tools offer advanced features such as bidirectional control and component testing.
7.2. Converting to OBD2 (Considerations)
Is it possible to convert my 1991 FJ80 to OBD2? Converting a 1991 FJ80 to OBD2 is a complex and costly process that may not be feasible for most owners; it involves replacing numerous components and rewiring the vehicle. Carefully consider the pros and cons before attempting such a conversion.
- Complexity: Converting to OBD2 requires extensive modifications to the vehicle’s electrical system, including replacing the ECU, sensors, and wiring harness.
- Cost: The cost of parts and labor for an OBD2 conversion can be significant, potentially exceeding the value of the vehicle.
- Compatibility: Ensuring compatibility between the new OBD2 system and the vehicle’s existing components can be challenging.
- Emissions Regulations: Depending on your location, an OBD2 conversion may not be legal due to emissions regulations.
- Professional Installation: An OBD2 conversion should only be performed by a qualified mechanic with experience in automotive electrical systems.
7.3. Modernizing Sensors and Components
How can modern sensors improve diagnostic accuracy? Modernizing sensors and components can improve the accuracy and reliability of diagnostic information; newer sensors often provide more precise readings. Upgrading these parts can enhance your ability to diagnose and resolve issues effectively.
- Oxygen Sensor: Replacing the original oxygen sensor with a modern, wideband O2 sensor can improve fuel efficiency and emissions control.
- Throttle Position Sensor (TPS): Upgrading the TPS can improve throttle response and engine performance.
- Coolant Temperature Sensor (CTS): A new CTS can provide more accurate temperature readings, preventing overheating and other issues.
- Air Flow Meter (AFM): Replacing the AFM with a modern mass airflow sensor (MAF) can improve engine performance and fuel economy.
- Ignition System: Upgrading the ignition system with modern components such as coil packs and spark plugs can improve engine performance and reliability.
8. Troubleshooting Common Problems
What are the common problems encountered with the 1991 FJ80 Land Cruiser 3FE, and how do I troubleshoot them? Addressing common problems in the 1991 FJ80 Land Cruiser 3FE, such as rough idling and poor fuel economy, requires systematic troubleshooting; this includes checking sensors and vacuum lines. Understanding these issues helps in quicker diagnoses and effective repairs.
8.1. Rough Idling
What causes rough idling in the 3FE engine, and how can I fix it? Rough idling can result from vacuum leaks, faulty sensors, or ignition issues; diagnosing and addressing these causes can restore smooth engine operation. Systematic troubleshooting is key to resolving this issue.
- Possible Causes:
- Vacuum leaks
- Faulty spark plugs
- Dirty air filter
- Faulty oxygen sensor
- Faulty idle air control (IAC) valve
- Troubleshooting Steps:
- Check for vacuum leaks using a smoke machine or carburetor cleaner.
- Inspect and replace spark plugs if necessary.
- Clean or replace the air filter.
- Test the oxygen sensor and replace if faulty.
- Clean or replace the IAC valve.
8.2. Poor Fuel Economy
What factors contribute to poor fuel economy, and how can I improve it? Poor fuel economy can stem from various factors, including faulty sensors, vacuum leaks, and tire pressure; addressing these issues can significantly improve MPG. Regular maintenance and careful driving habits are also crucial.
- Possible Causes:
- Faulty oxygen sensor
- Vacuum leaks
- Dirty air filter
- Low tire pressure
- Aggressive driving habits
- Troubleshooting Steps:
- Test the oxygen sensor and replace if faulty.
- Check for vacuum leaks using a smoke machine or carburetor cleaner.
- Clean or replace the air filter.
- Check and adjust tire pressure to the recommended level.
- Adopt smoother driving habits, such as avoiding hard acceleration and braking.
8.3. Starting Problems
What causes starting problems in the 1991 FJ80, and how can I resolve them? Starting problems can be caused by a weak battery, faulty starter, or issues with the ignition system; diagnosing these components is essential for reliable starts. Regular maintenance and timely repairs can prevent starting issues.
- Possible Causes:
- Weak battery
- Faulty starter motor
- Faulty ignition coil
- Faulty distributor
- Faulty fuel pump
- Troubleshooting Steps:
- Test the battery voltage and charge or replace if necessary.
- Test the starter motor and replace if faulty.
- Test the ignition coil and replace if faulty.
- Test the distributor and replace if faulty.
- Check fuel pressure and replace the fuel pump if necessary.
9. Resources and Further Reading
What resources can help me learn more about diagnosing and repairing my 1991 FJ80 Land Cruiser 3FE? Accessing reliable resources such as service manuals, online forums, and expert advice can greatly enhance your diagnostic skills; these resources provide valuable information. Utilizing these resources can improve your understanding and confidence in maintaining your vehicle.
9.1. Service Manuals
Why is a service manual essential for diagnosing and repairing my FJ80? A service manual provides detailed information on the vehicle’s systems, components, and diagnostic procedures; it is an invaluable resource for troubleshooting. Having a service manual can significantly improve your diagnostic accuracy and repair efficiency.
- Comprehensive Information: Service manuals contain detailed information on the vehicle’s systems, components, and specifications.
- Diagnostic Procedures: Service manuals provide step-by-step diagnostic procedures for troubleshooting various issues.
- Wiring Diagrams: Service manuals include detailed wiring diagrams that are essential for diagnosing electrical problems.
- Torque Specifications: Service manuals provide torque specifications for various components, ensuring proper installation and preventing damage.
- Troubleshooting Tips: Service manuals offer troubleshooting tips and advice from experienced technicians.
9.2. Online Forums and Communities
How can online forums assist in diagnosing and repairing my FJ80? Online forums and communities provide a platform for sharing knowledge, asking questions, and getting advice from experienced owners and mechanics; these resources offer real-world insights. Engaging with these communities can provide valuable support and solutions.
- Shared Knowledge: Online forums allow users to share their knowledge and experience with other owners and enthusiasts.
- Troubleshooting Advice: You can ask questions and get advice from experienced owners and mechanics.
- DIY Guides: Many online forums offer DIY guides and tutorials for performing common repairs and maintenance tasks.
- Product Reviews: You can find reviews and recommendations for aftermarket parts and accessories.
- Local Chapters: Some online forums have local chapters that organize meetups and events.
9.3. Expert Advice
When should I seek expert advice for diagnosing and repairing my FJ80? Seeking expert advice from qualified mechanics can provide accurate diagnoses and effective solutions; complex issues often require professional expertise. Consulting experts ensures the job is done right and can prevent further damage.
- Complex Issues: If you’re unable to diagnose or repair a problem yourself, seek expert advice from a qualified mechanic.
- Specialized Tools: Some diagnostic and repair procedures require specialized tools that you may not have access to.
- Safety Concerns: If you’re not comfortable working on certain systems, such as the fuel system or electrical system, seek professional assistance.
- Warranty Considerations: If your vehicle is still under warranty, have it repaired by an authorized service center to avoid voiding the warranty.
- Peace of Mind: Seeking expert advice can provide peace of mind knowing that the job is being done correctly.
10. Frequently Asked Questions (FAQ)
10.1. What is an OBD2 Scanner?
What is an OBD2 scanner, and how does it work? An OBD2 scanner is a tool used to read diagnostic trouble codes (DTCs) from a vehicle’s computer, providing insights into potential issues; it connects to the OBD2 port and retrieves data. Understanding its function is key to effective vehicle diagnostics.
10.2. Can I Use an OBD2 Scanner on My 1991 FJ80?
Is it possible to use an OBD2 scanner on my 1991 FJ80 Land Cruiser? No, you cannot directly use an OBD2 scanner on a 1991 FJ80 Land Cruiser 3FE, as it predates the OBD2 standard; alternative methods are required. Understanding this limitation helps in using the correct diagnostic approaches.
10.3. How Do I Read Fault Codes Without a Scanner?
What alternative methods can I use to read fault codes without an OBD2 scanner? You can read fault codes on the 1991 FJ80 by using the jumper wire method; this involves connecting specific terminals and interpreting the Check Engine Light (CEL) flashes. This method is cost-effective and requires no specialized tools.
10.4. What Does the Check Engine Light Mean?
What does it mean when the Check Engine Light comes on? The Check Engine Light (CEL) indicates that the vehicle’s computer has detected a problem; reading the fault codes can help identify the specific issue. Promptly addressing the CEL can prevent further damage.
10.5. How Do I Reset the Check Engine Light?
How can I reset the Check Engine Light after fixing the issue? Resetting the Check Engine Light typically involves disconnecting the battery for a period or using a scan tool; this clears the stored fault codes. Ensure the issue is resolved before resetting the light.
10.6. What Are Common Causes of Engine Misfires?
What are the main reasons for engine misfires? Engine misfires can be caused by faulty spark plugs, ignition coils, fuel injectors, or vacuum leaks; diagnosing these components can help identify the cause. Addressing misfires promptly ensures smooth engine operation.
10.7. How Often Should I Replace My Oxygen Sensor?
How frequently should I replace the oxygen sensor in my 1991 FJ80? Replace the oxygen sensor every 60,000 to 100,000 miles to ensure optimal fuel efficiency and emissions control; this helps maintain engine performance. Regular replacement ensures the sensor functions accurately.
10.8. What Type of Oil Should I Use?
What type of oil is recommended for the 1991 FJ80 Land Cruiser 3FE engine? Use 10W-30 or 10W-40 oil, as recommended in the vehicle’s service manual, for the 1991 FJ80 Land Cruiser 3FE engine; this ensures proper lubrication. Using the correct oil type is essential for engine longevity.
10.9. How Can I Improve My Fuel Economy?
What steps can I take to improve the fuel economy of my 1991 FJ80? Improve fuel economy by maintaining proper tire pressure, replacing a faulty oxygen sensor, and avoiding aggressive driving habits; these steps can significantly increase MPG. Regular maintenance and careful driving habits are crucial.
10.10. Where Can I Find Reliable Repair Information?
Where can I find trustworthy information for repairing my 1991 FJ80? Find reliable repair information in the vehicle’s service manual, online forums, and from qualified mechanics; these resources provide valuable insights. Accessing these resources can improve your diagnostic and repair skills.
Understanding the diagnostic system of your 1991 FJ80 Land Cruiser 3FE is crucial for maintaining its reliability and performance. By utilizing the information and techniques provided by OBD2-SCANNER.EDU.VN, you can effectively troubleshoot issues and keep your vehicle running smoothly. Remember, if you encounter complex problems or lack the confidence to perform certain repairs, seeking expert advice is always a wise decision.
For personalized assistance and expert guidance on using OBD2 scanners or addressing specific repair needs for your 1991 FJ80 Land Cruiser, don’t hesitate to reach out to us at OBD2-SCANNER.EDU.VN. Our team is ready to help you navigate any diagnostic or repair challenges. Contact us today at 123 Main Street, Los Angeles, CA 90001, United States, via Whatsapp at +1 (641) 206-8880, or visit our website at OBD2-SCANNER.EDU.VN for immediate support. Let us help you keep your Land Cruiser in top condition!