A 2008 Civic Obd2 Connector Loose In Bracket can lead to intermittent connectivity and inaccurate diagnostic readings; this issue can be resolved by securing the connector within its bracket. OBD2-SCANNER.EDU.VN provides comprehensive guidance and solutions for addressing such problems, ensuring your vehicle’s diagnostic system functions correctly, and that you can keep your check engine light off. For expert assistance and advanced diagnostic tools, consider exploring OBD II port and auto repair services.
Contents
- 1. What Causes a Loose OBD2 Connector in a 2008 Civic?
- 2. How Does a Loose OBD2 Connector Affect Vehicle Diagnostics?
- 3. What Tools Are Needed to Fix a Loose OBD2 Connector?
- 4. How to Secure a Loose 2008 Civic OBD2 Connector in Its Bracket: A Step-by-Step Guide?
- 5. Can a Loose OBD2 Connector Cause Other Electrical Issues?
- 6. What Are the Common Symptoms of a Failing OBD2 Connector?
- 7. How to Test the OBD2 Connector for Connectivity?
- 8. When Should You Replace the Entire OBD2 Connector?
- 9. How Much Does It Cost to Repair or Replace an OBD2 Connector?
- 10. What Are the Benefits of a Properly Functioning OBD2 Connector?
- FAQ: Troubleshooting a Loose OBD2 Connector
- 1. What is an OBD2 scanner?
- 2. How do I read OBD2 error codes?
- 3. What are common car issues detected by an OBD2 scanner?
- 4. Can I fix OBD2 errors myself?
- 5. How often should I use an OBD2 scanner?
- 6. What does it mean when my OBD2 scanner shows a “no communication” error?
- 7. What are the limitations of an OBD2 scanner?
- 8. How can OBD2-SCANNER.EDU.VN help with my car’s diagnostic needs?
- 9. What should I do if my OBD2 connector is damaged?
- 10. Where can I find replacement parts for my OBD2 connector?
1. What Causes a Loose OBD2 Connector in a 2008 Civic?
A loose OBD2 connector in a 2008 Civic is often caused by worn or broken retaining clips, physical damage to the connector or bracket, or disconnections from regular use.
Several factors can contribute to a loose OBD2 connector in your 2008 Honda Civic. Here’s a detailed breakdown:
- Worn or Broken Retaining Clips: The OBD2 connector is held in place by small plastic retaining clips. Over time, these clips can become brittle and break, leading to a loose connection.
- Physical Damage: Accidental impacts or repeated stress on the connector can cause it to loosen or break free from its bracket.
- Frequent Use: Regularly plugging and unplugging diagnostic tools can wear down the connector and its housing, making it less secure.
- Vibration: Constant vehicle vibration can gradually loosen the connector over time.
- Corrosion: Corrosion on the connector or bracket can affect the integrity of the connection, leading to looseness.
- Improper Installation: If the connector was not properly installed or secured during a previous repair, it could become loose.
- Heat Exposure: Extreme temperatures can cause the plastic components of the connector and bracket to warp or degrade, leading to a loose fit.
Understanding these causes will help you diagnose and address the issue effectively, ensuring a stable and reliable connection for your diagnostic tools.
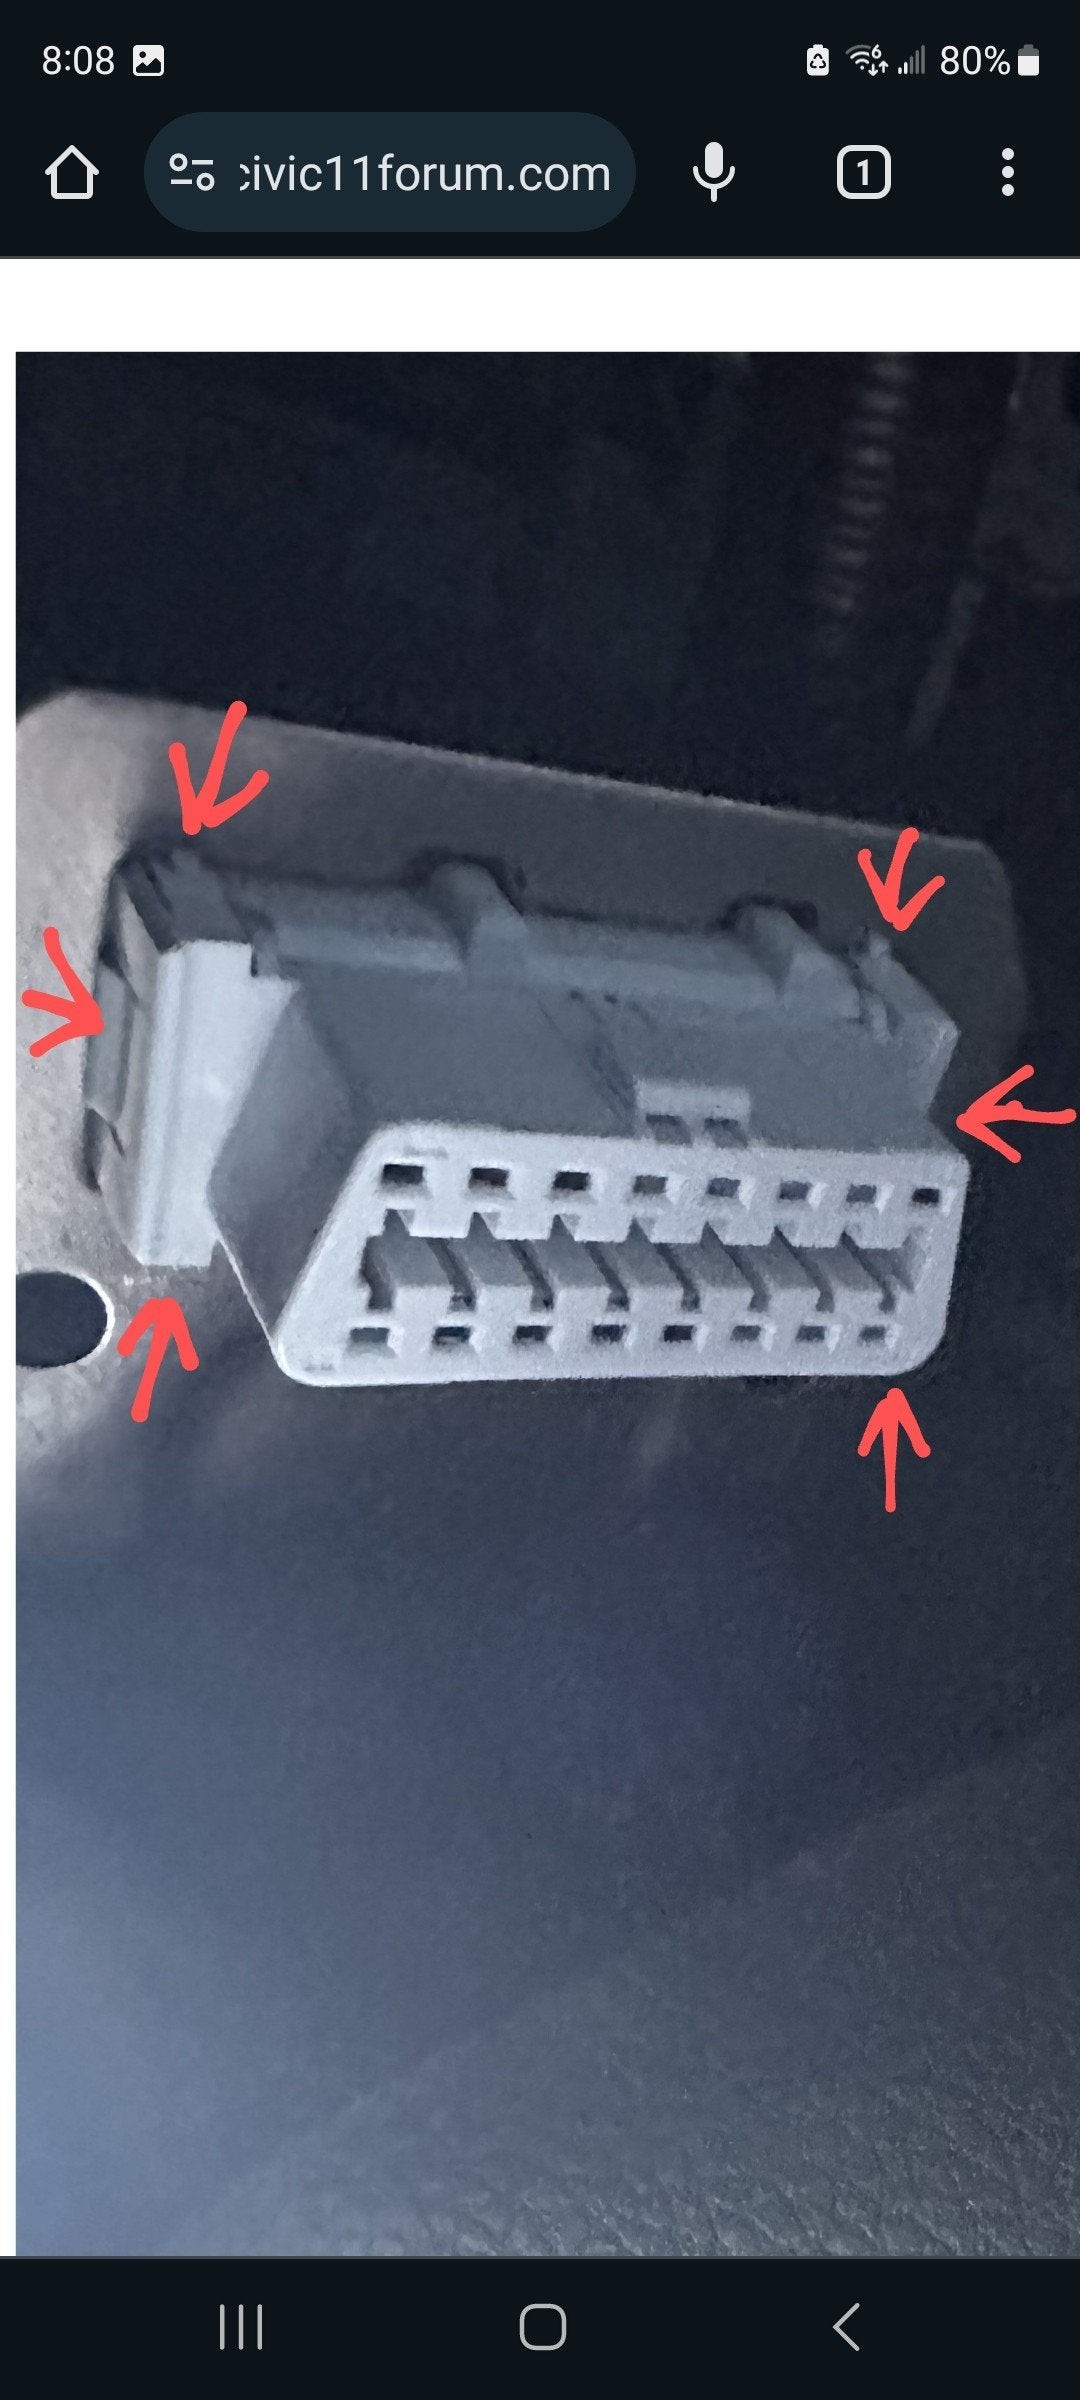 OBD2 Connector Retaining Clips
2. How Does a Loose OBD2 Connector Affect Vehicle Diagnostics?
A loose OBD2 connector can cause intermittent connectivity, preventing accurate data transmission, leading to misdiagnosis, and potentially triggering false error codes.
When your 2008 Civic has a loose OBD2 connector, it can severely impact the vehicle’s diagnostic process. Here’s how:
- Intermittent Connectivity: A loose connector may not maintain a stable connection, leading to inconsistent data flow between the vehicle’s computer and the diagnostic tool.
- Inaccurate Data Transmission: Poor connection can result in corrupted or incomplete data, making it difficult to accurately diagnose the issue.
- Misdiagnosis: Faulty data can lead to incorrect interpretations, causing mechanics to address the wrong problem, wasting time and resources.
- False Error Codes: A loose connection can trigger erroneous diagnostic trouble codes (DTCs), confusing the diagnostic process.
- Communication Errors: The diagnostic tool may fail to communicate with the vehicle’s computer, preventing any diagnostic procedures from being performed.
- Delayed Diagnosis: Intermittent connectivity can make it challenging to pinpoint the exact problem, prolonging the diagnostic process.
- Risk of Further Damage: Misdiagnosis and incorrect repairs can potentially lead to further damage to the vehicle.
According to a study by the National Institute for Automotive Service Excellence (ASE), connection issues account for approximately 20% of diagnostic errors in modern vehicles. A stable and secure OBD2 connection is crucial for accurate and reliable vehicle diagnostics.
3. What Tools Are Needed to Fix a Loose OBD2 Connector?
To fix a loose OBD2 connector, you typically need a small flathead screwdriver, pliers, replacement retaining clips (if necessary), and possibly zip ties for added security.
Here’s a comprehensive list of tools and materials you might need:
- Small Flathead Screwdriver: Useful for gently prying and manipulating retaining clips.
- Pliers: To grip and adjust the connector or bracket.
- Replacement Retaining Clips: If the original clips are broken or missing, replacement clips are essential.
- Zip Ties: For providing additional support and securing the connector in place.
- OBD2 Extension Cable: An extension cable can reduce stress on the original connector.
- Contact Cleaner: To clean the connector and ensure good electrical contact.
- Gloves: To protect your hands during the repair process.
- Safety Glasses: To protect your eyes from debris.
- Flashlight or Work Light: To provide adequate visibility in the work area.
- Small Brush: To remove dirt and debris from the connector and bracket.
- Multi-meter: A multi-meter can test continuity of the OBD2 connector
Having these tools on hand will enable you to address a loose OBD2 connector effectively, ensuring a stable and reliable connection for your diagnostic equipment.
4. How to Secure a Loose 2008 Civic OBD2 Connector in Its Bracket: A Step-by-Step Guide?
To secure a loose OBD2 connector, first inspect the retaining clips and replace any broken ones. Then, gently push the connector back into the bracket until it clicks into place, using zip ties for extra support if needed.
Here’s a detailed, step-by-step guide on how to secure a loose OBD2 connector in your 2008 Civic:
- Gather Your Tools:
- Small flathead screwdriver
- Pliers
- Replacement retaining clips (if necessary)
- Zip ties
- Flashlight or work light
- Prepare the Vehicle:
- Turn off the ignition.
- Engage the parking brake.
- Ensure the vehicle is in a safe location to work on.
- Locate the OBD2 Connector:
- The OBD2 connector is typically located under the dashboard on the driver’s side.
- Use a flashlight to get a clear view of the connector and its bracket.
- Inspect the Retaining Clips:
- Carefully examine the retaining clips that hold the connector in the bracket.
- Look for any signs of damage, such as breaks or cracks.
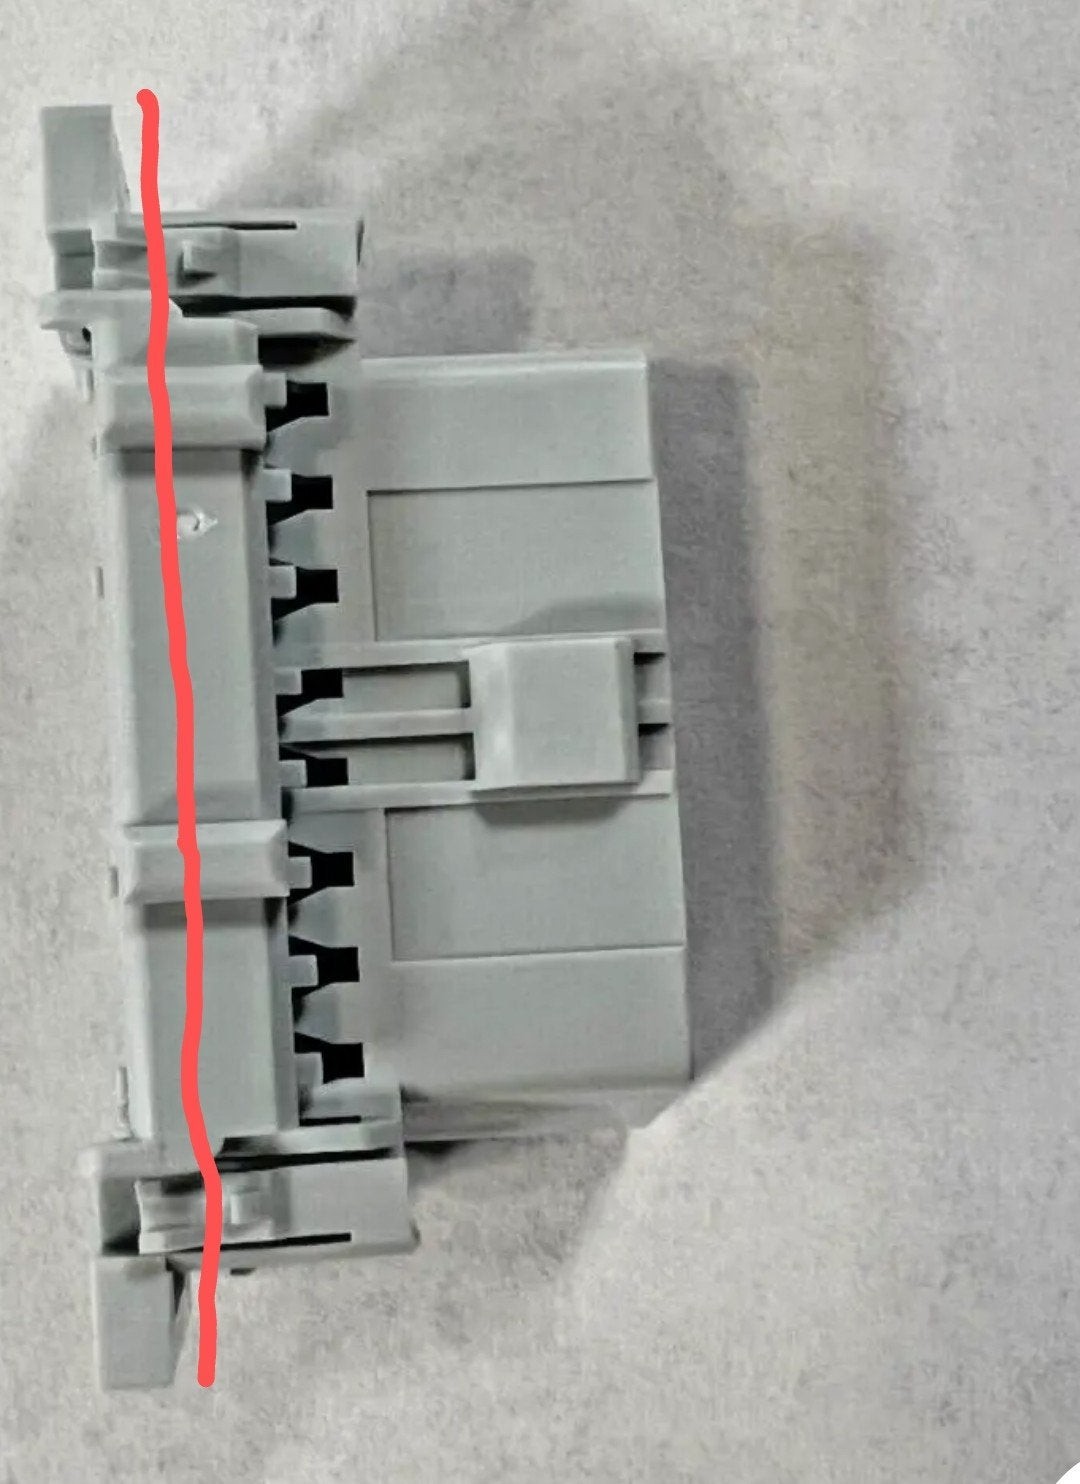 Side View of OBD2 Connector Port
- Replace Broken Retaining Clips (If Necessary):
- If any of the clips are broken, gently remove the old clips using a small flathead screwdriver or pliers.
- Install the new retaining clips, ensuring they are securely in place.
- Clean the Connector and Bracket:
- Use a small brush to remove any dirt or debris from the connector and bracket.
- If there is corrosion, use a contact cleaner to clean the electrical contacts.
- Re-insert the Connector:
- Carefully push the OBD2 connector back into the bracket.
- Ensure the connector is aligned correctly.
- Listen for a click, indicating that the retaining clips have engaged.
- Secure with Zip Ties (If Necessary):
- If the connector is still loose, use zip ties to provide additional support.
- Thread the zip ties through the bracket and around the connector.
- Tighten the zip ties to secure the connector in place, but be careful not to over-tighten and damage the connector or bracket.
- Test the Connection:
- Plug in an OBD2 scanner to test the connection.
- Ensure that the scanner can communicate with the vehicle’s computer without any issues.
- Check for any error codes or connectivity problems.
- Final Inspection:
- Double-check that the connector is securely in place.
- Ensure that all tools and materials have been removed from the work area.
- Document Your Work:
- Keep a record of the steps you took and any parts you replaced.
- This documentation can be helpful for future maintenance and repairs.
Following these steps will help you securely fix a loose OBD2 connector in your 2008 Civic, ensuring reliable and accurate vehicle diagnostics.
5. Can a Loose OBD2 Connector Cause Other Electrical Issues?
Yes, a loose OBD2 connector can sometimes cause seemingly unrelated electrical issues due to its connection to the vehicle’s communication network, potentially affecting other systems.
A loose OBD2 connector may not only affect diagnostics but can also lead to various electrical issues throughout your 2008 Civic. Here’s how:
- Disruption of CAN Bus Communication: The OBD2 port is connected to the vehicle’s Controller Area Network (CAN) bus, which facilitates communication between various electronic control units (ECUs). A loose connection can disrupt this communication, leading to a cascade of issues.
- False Error Codes: Intermittent connectivity can trigger false error codes in other systems, making it difficult to diagnose the real problem.
- Battery Drain: A faulty connection can sometimes cause a parasitic battery drain, as the vehicle’s systems may not properly shut down when the ignition is turned off.
- Sensor Malfunctions: The loose connector can interfere with the signals from various sensors, leading to incorrect readings and system malfunctions.
- Engine Performance Issues: Disrupted communication can affect the engine control unit (ECU), leading to poor engine performance, such as stalling, misfires, or reduced power.
- Transmission Problems: In some cases, a loose OBD2 connector can impact the transmission control unit (TCU), causing shifting problems or transmission failure.
- ABS and Stability Control Issues: The anti-lock braking system (ABS) and stability control systems rely on data transmitted through the CAN bus. A disrupted connection can affect their performance, compromising safety.
- Lighting Problems: A loose OBD2 connector can sometimes cause issues with the vehicle’s lighting systems, such as flickering lights or complete failure.
- Power Window and Door Lock Problems: The body control module (BCM) communicates through the CAN bus, and a disrupted connection can affect the operation of power windows, door locks, and other convenience features.
According to a report by the Society of Automotive Engineers (SAE), electrical faults, including connection issues, account for a significant percentage of vehicle malfunctions. Ensuring a secure and stable OBD2 connection can help prevent these broader electrical problems.
6. What Are the Common Symptoms of a Failing OBD2 Connector?
Common symptoms include intermittent check engine lights, inability to connect with a scan tool, and error codes that appear and disappear randomly.
Identifying a failing OBD2 connector early can save you time and prevent potential diagnostic headaches. Here are some common symptoms to watch for:
- Intermittent Check Engine Light: The check engine light may turn on and off sporadically, indicating inconsistent communication with the vehicle’s computer.
- Inability to Connect with a Scan Tool: When you plug in an OBD2 scanner, it may fail to establish a connection with the vehicle’s system.
- Random Error Codes: Error codes may appear and disappear without any apparent reason, suggesting a fluctuating connection issue.
- Diagnostic Tool Freezing or Crashing: The scan tool may freeze or crash while attempting to read data from the vehicle.
- Communication Errors: The scan tool may display communication error messages, indicating a problem with data transmission.
- Difficulty Retrieving Data: The scan tool may struggle to retrieve data from specific modules or sensors.
- Physical Looseness: The OBD2 connector may feel loose or wobbly when you try to plug in a diagnostic tool.
- Visible Damage: You may notice visible damage to the connector, such as cracks, breaks, or corrosion.
- Bent or Broken Pins: The pins inside the connector may be bent or broken, preventing a proper connection.
- Inconsistent Readings: The scan tool may provide inconsistent or inaccurate readings from various sensors.
If you notice any of these symptoms, it’s important to inspect the OBD2 connector and address any issues promptly to ensure accurate and reliable vehicle diagnostics.
7. How to Test the OBD2 Connector for Connectivity?
You can test the OBD2 connector using a multimeter to check for proper voltage and continuity on the necessary pins, ensuring it’s receiving power and transmitting data correctly.
To ensure your OBD2 connector is functioning correctly, you can perform a series of tests using a multimeter. Here’s a step-by-step guide:
- Gather Your Tools:
- Multimeter
- Vehicle’s wiring diagram (for OBD2 connector pinout)
- Key for the vehicle
- Prepare the Vehicle:
- Turn off the ignition.
- Engage the parking brake.
- Ensure the vehicle is in a safe location to work on.
- Locate the OBD2 Connector:
- The OBD2 connector is typically located under the dashboard on the driver’s side.
- Set Up the Multimeter:
- Set the multimeter to DC voltage mode (usually 20V).
- Check for Power (Pin 16):
- Locate pin 16 on the OBD2 connector (typically the top right pin).
- Connect the red lead of the multimeter to pin 16.
- Connect the black lead to a known good ground (e.g., the vehicle’s chassis).
- Turn the ignition to the “ON” position (but do not start the engine).
- The multimeter should read approximately 12V. If there is no voltage, check the vehicle’s fuses and wiring.
- Check the Ground Connections (Pins 4 and 5):
- Locate pins 4 and 5 on the OBD2 connector (typically ground pins).
- Set the multimeter to continuity mode.
- Connect one lead of the multimeter to pin 4 and the other lead to a known good ground.
- The multimeter should indicate continuity (low resistance).
- Repeat the test for pin 5. If there is no continuity, check the ground connections and wiring.
- Check the Communication Lines (Pins 6 and 14):
- Locate pins 6 and 14 on the OBD2 connector (CAN High and CAN Low).
- Set the multimeter to voltage mode (DC voltage, low range).
- Connect the red lead to pin 6 and the black lead to a known good ground.
- Turn the ignition to the “ON” position (but do not start the engine).
- The multimeter should read approximately 2.5V (this is the bias voltage).
- Repeat the test for pin 14. The multimeter should also read approximately 2.5V.
- Check for Shorts:
- Set the multimeter to resistance mode.
- Check for shorts between the power and ground pins (pin 16 to pins 4 and 5). The resistance should be very high (infinite).
- Check for shorts between the communication lines (pins 6 and 14). The resistance should also be very high.
- Interpret the Results:
- If all tests pass, the OBD2 connector is likely functioning correctly.
- If any tests fail, there may be a problem with the connector, wiring, or related components.
- Consult the vehicle’s service manual for specific troubleshooting steps.
By following these steps, you can effectively test the OBD2 connector for connectivity and identify any potential issues that may be affecting your vehicle’s diagnostics.
According to a technical service bulletin from Honda, proper testing of the OBD2 connector is essential for accurate troubleshooting of electrical and electronic systems.
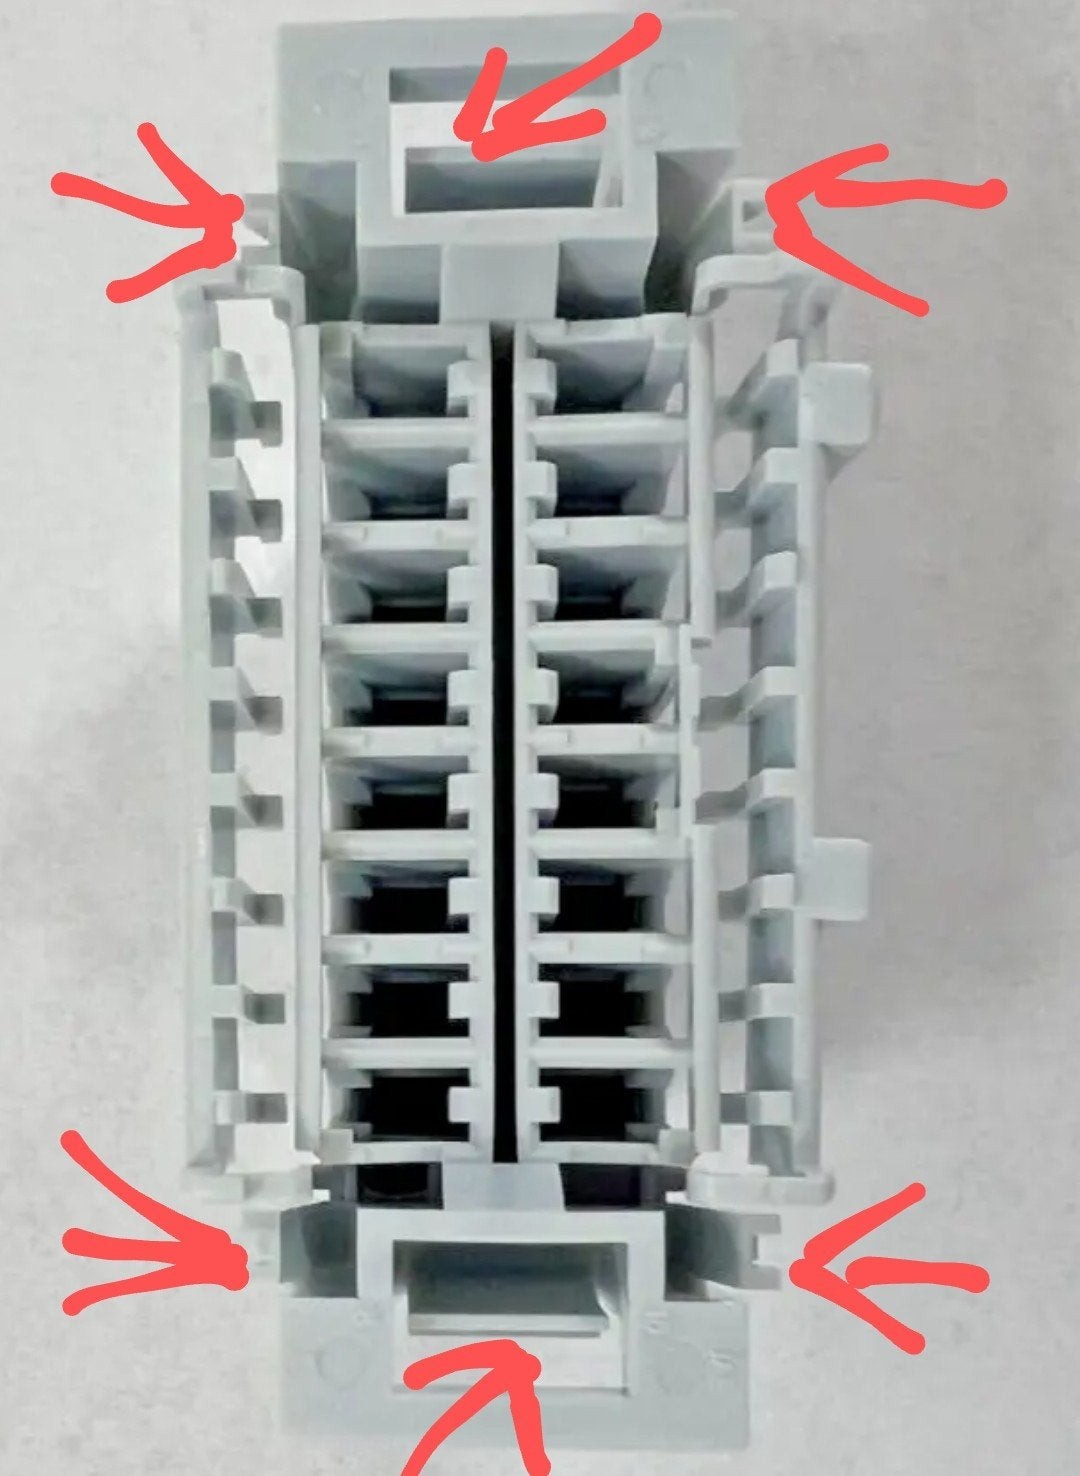 Back View of OBD2 Connector
8. When Should You Replace the Entire OBD2 Connector?
Replace the OBD2 connector if it has significant physical damage, corrosion, or if multiple pins are broken or bent, as these issues can prevent reliable communication.
There are several situations in which replacing the entire OBD2 connector becomes necessary to ensure reliable communication and accurate diagnostics. Here are some key indicators:
- Significant Physical Damage: If the connector has cracks, breaks, or other severe physical damage, it may not be possible to repair it effectively.
- Extensive Corrosion: Corrosion can compromise the electrical connections and lead to intermittent or complete failure of the connector.
- Multiple Broken or Bent Pins: If several pins are broken or bent, it can be difficult to restore them to their original condition, and the connector may not function properly.
- Loose or Damaged Housing: If the housing of the connector is loose or damaged, it may not securely hold the pins in place, leading to connection issues.
- Failed Connectivity Tests: If the connector fails multiple connectivity tests, even after cleaning and minor repairs, it may be time to replace it.
- Intermittent Diagnostic Issues: If you continue to experience intermittent diagnostic issues despite addressing other potential causes, the connector may be the source of the problem.
- Professional Recommendation: If a qualified mechanic or technician recommends replacing the connector based on their assessment, it is wise to follow their advice.
Replacing the OBD2 connector involves disconnecting the old connector, identifying the wiring configuration, and connecting the wires to the new connector in the correct order. This process requires careful attention to detail to avoid damaging the vehicle’s electrical system. According to automotive repair guidelines, using a high-quality replacement connector is essential for ensuring long-term reliability.
9. How Much Does It Cost to Repair or Replace an OBD2 Connector?
The cost can vary, but typically, repairing a loose connector might cost around $50-$150, while replacing the entire connector can range from $100-$300, including parts and labor.
The cost to repair or replace an OBD2 connector can vary based on several factors, including the extent of the damage, the type of repair needed, and the labor rates at your chosen repair shop. Here’s a general breakdown:
- Repairing a Loose Connector:
- Cost: $50 – $150
- Details: This typically involves securing the connector in its bracket, replacing worn or broken retaining clips, and cleaning the electrical contacts.
- Replacing the Entire Connector:
- Cost: $100 – $300
- Details: This includes the cost of the replacement connector (usually $20-$50) and the labor to disconnect the old connector, connect the wires to the new connector, and test the connection.
Here are some additional factors that can affect the cost:
- Labor Rates: Labor rates vary by location and shop. Dealerships and specialized repair shops tend to have higher labor rates than independent garages.
- Parts Quality: The cost of the replacement connector can vary based on the quality and brand. Opting for a high-quality connector can ensure better reliability and longevity.
- Additional Repairs: If the underlying cause of the connector issue is related to other electrical problems, the cost may be higher due to the additional repairs needed.
According to data from RepairPal, the average cost for an OBD2 connector replacement is around $200. Getting a quote from a trusted mechanic can provide a more accurate estimate for your specific situation.
10. What Are the Benefits of a Properly Functioning OBD2 Connector?
A functioning OBD2 connector ensures accurate diagnostics, helps identify issues early, and allows for timely repairs, which can prevent more significant and costly problems.
A properly functioning OBD2 connector is essential for maintaining the health and performance of your 2008 Civic. Here are some key benefits:
- Accurate Diagnostics: A reliable OBD2 connection ensures that diagnostic tools can accurately read and interpret data from the vehicle’s computer, leading to precise diagnoses.
- Early Issue Detection: By providing access to real-time data and error codes, a functioning OBD2 connector enables early detection of potential problems, allowing for timely repairs.
- Prevention of Major Issues: Identifying and addressing issues early can prevent them from escalating into more significant and costly problems, such as engine damage or system failures.
- Optimal Vehicle Performance: Accurate diagnostics and timely repairs can help maintain optimal vehicle performance, including fuel efficiency, engine power, and overall drivability.
- Compliance with Emissions Standards: A functioning OBD2 connector allows for emissions testing and monitoring, ensuring compliance with environmental regulations.
- Safety and Reliability: Proper diagnostics can identify safety-related issues, such as ABS or stability control problems, ensuring the vehicle is safe to operate.
- Ease of Maintenance: A reliable OBD2 connection makes it easier for mechanics and technicians to perform routine maintenance and diagnostics, saving time and money.
- Informed Decision-Making: Accurate diagnostic information empowers vehicle owners to make informed decisions about repairs and maintenance, avoiding unnecessary or incorrect services.
- Resale Value: A well-maintained vehicle with a functioning OBD2 system can command a higher resale value, as potential buyers can verify its condition and performance.
According to the Environmental Protection Agency (EPA), OBD2 systems have significantly reduced vehicle emissions and improved air quality. Ensuring your OBD2 connector is functioning correctly is not only beneficial for your vehicle but also for the environment.
Is your 2008 Civic giving you trouble with diagnostic readings? A loose OBD2 connector could be the culprit. At OBD2-SCANNER.EDU.VN, we offer expert guidance and services to ensure your vehicle’s diagnostic system functions flawlessly. Contact us today at +1 (641) 206-8880 or visit our website at OBD2-SCANNER.EDU.VN for immediate assistance. Our team of experienced technicians is ready to help you diagnose and resolve any issues with your OBD2 connector and ensure your vehicle runs smoothly. Located at 123 Main Street, Los Angeles, CA 90001, United States, we’re here to provide top-notch auto repair services and keep you on the road with confidence. Reach out now and let us help you get your vehicle back in top shape!
FAQ: Troubleshooting a Loose OBD2 Connector
1. What is an OBD2 scanner?
An OBD2 scanner is a diagnostic tool used to read and interpret data from a vehicle’s onboard computer, helping identify potential issues and problems. It retrieves diagnostic trouble codes (DTCs) that can pinpoint specific areas of concern.
2. How do I read OBD2 error codes?
To read OBD2 error codes, plug the scanner into the OBD2 port, turn on the ignition, and follow the scanner’s prompts to retrieve the codes. Consult the vehicle’s service manual or a reliable online resource to interpret the meaning of each code.
3. What are common car issues detected by an OBD2 scanner?
Common issues include engine misfires, faulty oxygen sensors, transmission problems, and emissions system malfunctions. The OBD2 scanner provides specific codes that help diagnose these issues accurately.
4. Can I fix OBD2 errors myself?
Some OBD2 errors can be fixed with simple repairs, such as replacing a faulty sensor or tightening a gas cap. However, more complex issues may require professional diagnosis and repair.
5. How often should I use an OBD2 scanner?
Use an OBD2 scanner whenever the check engine light comes on or if you notice any unusual vehicle behavior. Regular scans can help identify potential problems early.
6. What does it mean when my OBD2 scanner shows a “no communication” error?
A “no communication” error typically indicates a problem with the OBD2 connector, wiring, or the vehicle’s computer. Check the connector for damage or loose connections and ensure the scanner is compatible with your vehicle.
7. What are the limitations of an OBD2 scanner?
OBD2 scanners primarily focus on emissions-related issues and may not detect all possible problems with the vehicle. Some advanced diagnostic procedures require specialized tools and expertise.
8. How can OBD2-SCANNER.EDU.VN help with my car’s diagnostic needs?
OBD2-SCANNER.EDU.VN offers expert guidance, diagnostic tools, and auto repair services to help you accurately diagnose and resolve any issues with your vehicle’s OBD2 system. Our team of experienced technicians is ready to assist you.
9. What should I do if my OBD2 connector is damaged?
If your OBD2 connector is damaged, replace it to ensure reliable communication with diagnostic tools. Follow the steps outlined in this guide or seek professional assistance from OBD2-SCANNER.EDU.VN.
10. Where can I find replacement parts for my OBD2 connector?
You can find replacement retaining clips for the OBD2 connector at most auto parts stores or online retailers. Ensure the replacement parts are compatible with your 2008 Honda Civic.