The 2010 Ford F350 Obd2 P1000 code signifies that the On-Board Diagnostic (OBD) system hasn’t completed its self-testing, indicating the vehicle isn’t ready for emissions testing; however, OBD2-SCANNER.EDU.VN can provide you with resources and support to diagnose and resolve this issue efficiently, ensuring your vehicle meets inspection requirements. Understanding the intricacies of this code, potential causes, and effective troubleshooting steps will help you address the problem and maintain your vehicle’s optimal performance, covering readiness monitors, diagnostic procedures, and expert assistance.
Contents
- 1. Understanding the OBD2 P1000 Code
- 1.1 Definition of OBD2 P1000
- 1.2 Importance of Readiness Monitors
- 1.3 Common Causes of P1000 Code
- 1.4 How P1000 Affects Emissions Testing
- 2. Diagnosing the P1000 Code on a 2010 Ford F350
- 2.1 Essential Tools for Diagnosis
- 2.2 Step-by-Step Diagnostic Process
- 2.3 Using an OBD2 Scanner to Read Readiness Monitors
- 2.4 Interpreting the Results
- 3. Performing a Ford Drive Cycle
- 3.1 Understanding the Ford Drive Cycle
- 3.2 Step-by-Step Guide to Completing a Ford Drive Cycle
- 3.3 Tips for a Successful Drive Cycle
- 3.4 Common Mistakes to Avoid
- 4. Troubleshooting Specific Readiness Monitors
- 4.1 Oxygen Sensor Monitor
- 4.2 Catalytic Converter Monitor
- 4.3 EVAP System Monitor
- 4.4 EGR System Monitor
- 5. Advanced Diagnostic Techniques
- 5.1 Using Ford IDS (Integrated Diagnostic System)
- 5.2 Performing Pinpoint Tests
- 5.3 Checking for Technical Service Bulletins (TSBs)
- 5.4 Verifying Wiring and Connections
- 6. Preventing Future P1000 Code Issues
- 6.1 Regular Vehicle Maintenance
- 6.2 Avoiding Battery Disconnections
- 6.3 Properly Clearing DTCs
- 6.4 Educating Yourself on Ford Drive Cycles
- 7. Real-World Case Studies
- 7.1 Case Study 1: O2 Sensor Issue
- 7.2 Case Study 2: EVAP System Leak
- 7.3 Case Study 3: EGR Valve Problem
- 8. The Role of OBD2-SCANNER.EDU.VN
- 8.1 Providing Expert Guidance
- 8.2 Offering OBD2 Scanner Recommendations
- 8.3 Connecting You with Local Repair Shops
- 8.4 Educational Resources and Articles
- 9. FAQ About OBD2 P1000 Code
- 9.1 What does the OBD2 P1000 code mean?
- 9.2 Can I drive my car with a P1000 code?
- 9.3 How do I clear the P1000 code?
- 9.4 What is a Ford drive cycle?
- 9.5 How long does it take to complete a Ford drive cycle?
- 9.6 What are readiness monitors?
- 9.7 What if the P1000 code won’t clear after performing a drive cycle?
- 9.8 Can a faulty oxygen sensor cause the P1000 code?
- 9.9 Is it safe to ignore the P1000 code?
- 9.10 Where can I get help with diagnosing and resolving the P1000 code?
- 10. Conclusion
1. Understanding the OBD2 P1000 Code
What does the OBD2 P1000 code mean and how does it relate to your 2010 Ford F350? The OBD2 P1000 code means that the On-Board Diagnostic (OBD) system hasn’t completed all required self-tests. It shows the car is not ready for an emissions test. For the 2010 Ford F350, understanding this code is crucial for maintaining optimal performance and meeting regulatory standards.
1.1 Definition of OBD2 P1000
The OBD2 P1000 code indicates that the OBD system hasn’t completed its self-testing process since the last memory clear. This means one or more of the system’s readiness monitors haven’t run. These monitors check various systems, such as the oxygen sensors, catalytic converter, evaporative system, and EGR system. The code doesn’t point to a specific fault but rather that the system hasn’t confirmed everything is working correctly since a reset or battery disconnection.
1.2 Importance of Readiness Monitors
Why are readiness monitors so important in the OBD2 system? Readiness monitors are crucial for ensuring your vehicle meets emissions standards. They perform self-tests on various systems, confirming they operate within acceptable parameters. If these monitors haven’t completed, the vehicle won’t pass an emissions test. Common monitors include:
- Oxygen (O2) Sensor Monitor: Checks the performance of the O2 sensors.
- Catalytic Converter Monitor: Verifies the efficiency of the catalytic converter.
- Evaporative System (EVAP) Monitor: Tests for fuel vapor leaks in the evaporative emissions control system.
- EGR System Monitor: Checks the functionality of the Exhaust Gas Recirculation (EGR) system.
1.3 Common Causes of P1000 Code
What are the common reasons that the P1000 code appears on a 2010 Ford F350? Several factors can cause the P1000 code to appear:
- Recent Battery Disconnection: Disconnecting the battery resets the OBD system, clearing all readiness monitors.
- Clearing Diagnostic Trouble Codes (DTCs): Using a scan tool to clear DTCs also resets the readiness monitors.
- Faulty Sensors or Components: Although the P1000 code itself doesn’t indicate a specific fault, underlying issues with sensors or components can prevent readiness monitors from completing.
- Drive Cycle Interruption: If the vehicle’s drive cycle is interrupted before all monitors complete, the P1000 code will persist.
1.4 How P1000 Affects Emissions Testing
How does the P1000 code affect your vehicle’s ability to pass an emissions test? Because the P1000 code indicates incomplete readiness monitors, your vehicle will likely fail an emissions test. Most jurisdictions require all or most monitors to be in a “ready” state to pass the test. This ensures the vehicle’s emission control systems function correctly and aren’t polluting excessively.
2. Diagnosing the P1000 Code on a 2010 Ford F350
How can you accurately diagnose the P1000 code on your 2010 Ford F350 and pinpoint the underlying issues? Diagnosing the P1000 code involves systematically checking the vehicle’s systems and ensuring all readiness monitors run to completion. Here’s a step-by-step guide to help you through the process:
2.1 Essential Tools for Diagnosis
What tools are necessary for effectively diagnosing the P1000 code? To diagnose the P1000 code, you’ll need the following tools:
- OBD2 Scanner: An OBD2 scanner is essential for reading and clearing diagnostic trouble codes, as well as checking the status of readiness monitors.
- Multimeter: A multimeter is useful for testing the voltage and continuity of various sensors and components.
- Vehicle Repair Manual: A repair manual specific to the 2010 Ford F350 provides detailed information on component locations, testing procedures, and wiring diagrams.
- Internet Access: Access to online forums, technical service bulletins (TSBs), and repair databases can provide valuable insights and troubleshooting tips.
2.2 Step-by-Step Diagnostic Process
How should you approach diagnosing the P1000 code to ensure accurate results? Follow these steps to diagnose the P1000 code effectively:
- Check for Other DTCs:
- Use the OBD2 scanner to check for any other diagnostic trouble codes (DTCs).
- Address any other codes first, as they may be preventing the readiness monitors from running.
- Verify Battery Condition:
- Ensure the battery is in good condition, as a weak battery can cause issues with the OBD system.
- Check the battery voltage with a multimeter. It should be around 12.6 volts with the engine off.
- Inspect Sensor Connections:
- Check all sensor connections for corrosion, damage, or loose connections.
- Pay close attention to the oxygen sensors, mass airflow sensor, and other critical components.
- Review Recent Repairs:
- Consider any recent repairs or maintenance that may have affected the OBD system, such as battery replacement or sensor replacement.
- Perform a Ford Drive Cycle:
- Follow the specific Ford drive cycle procedure for the 2010 F350 to allow the readiness monitors to run.
- Use the OBD2 scanner to monitor the status of the readiness monitors during the drive cycle.
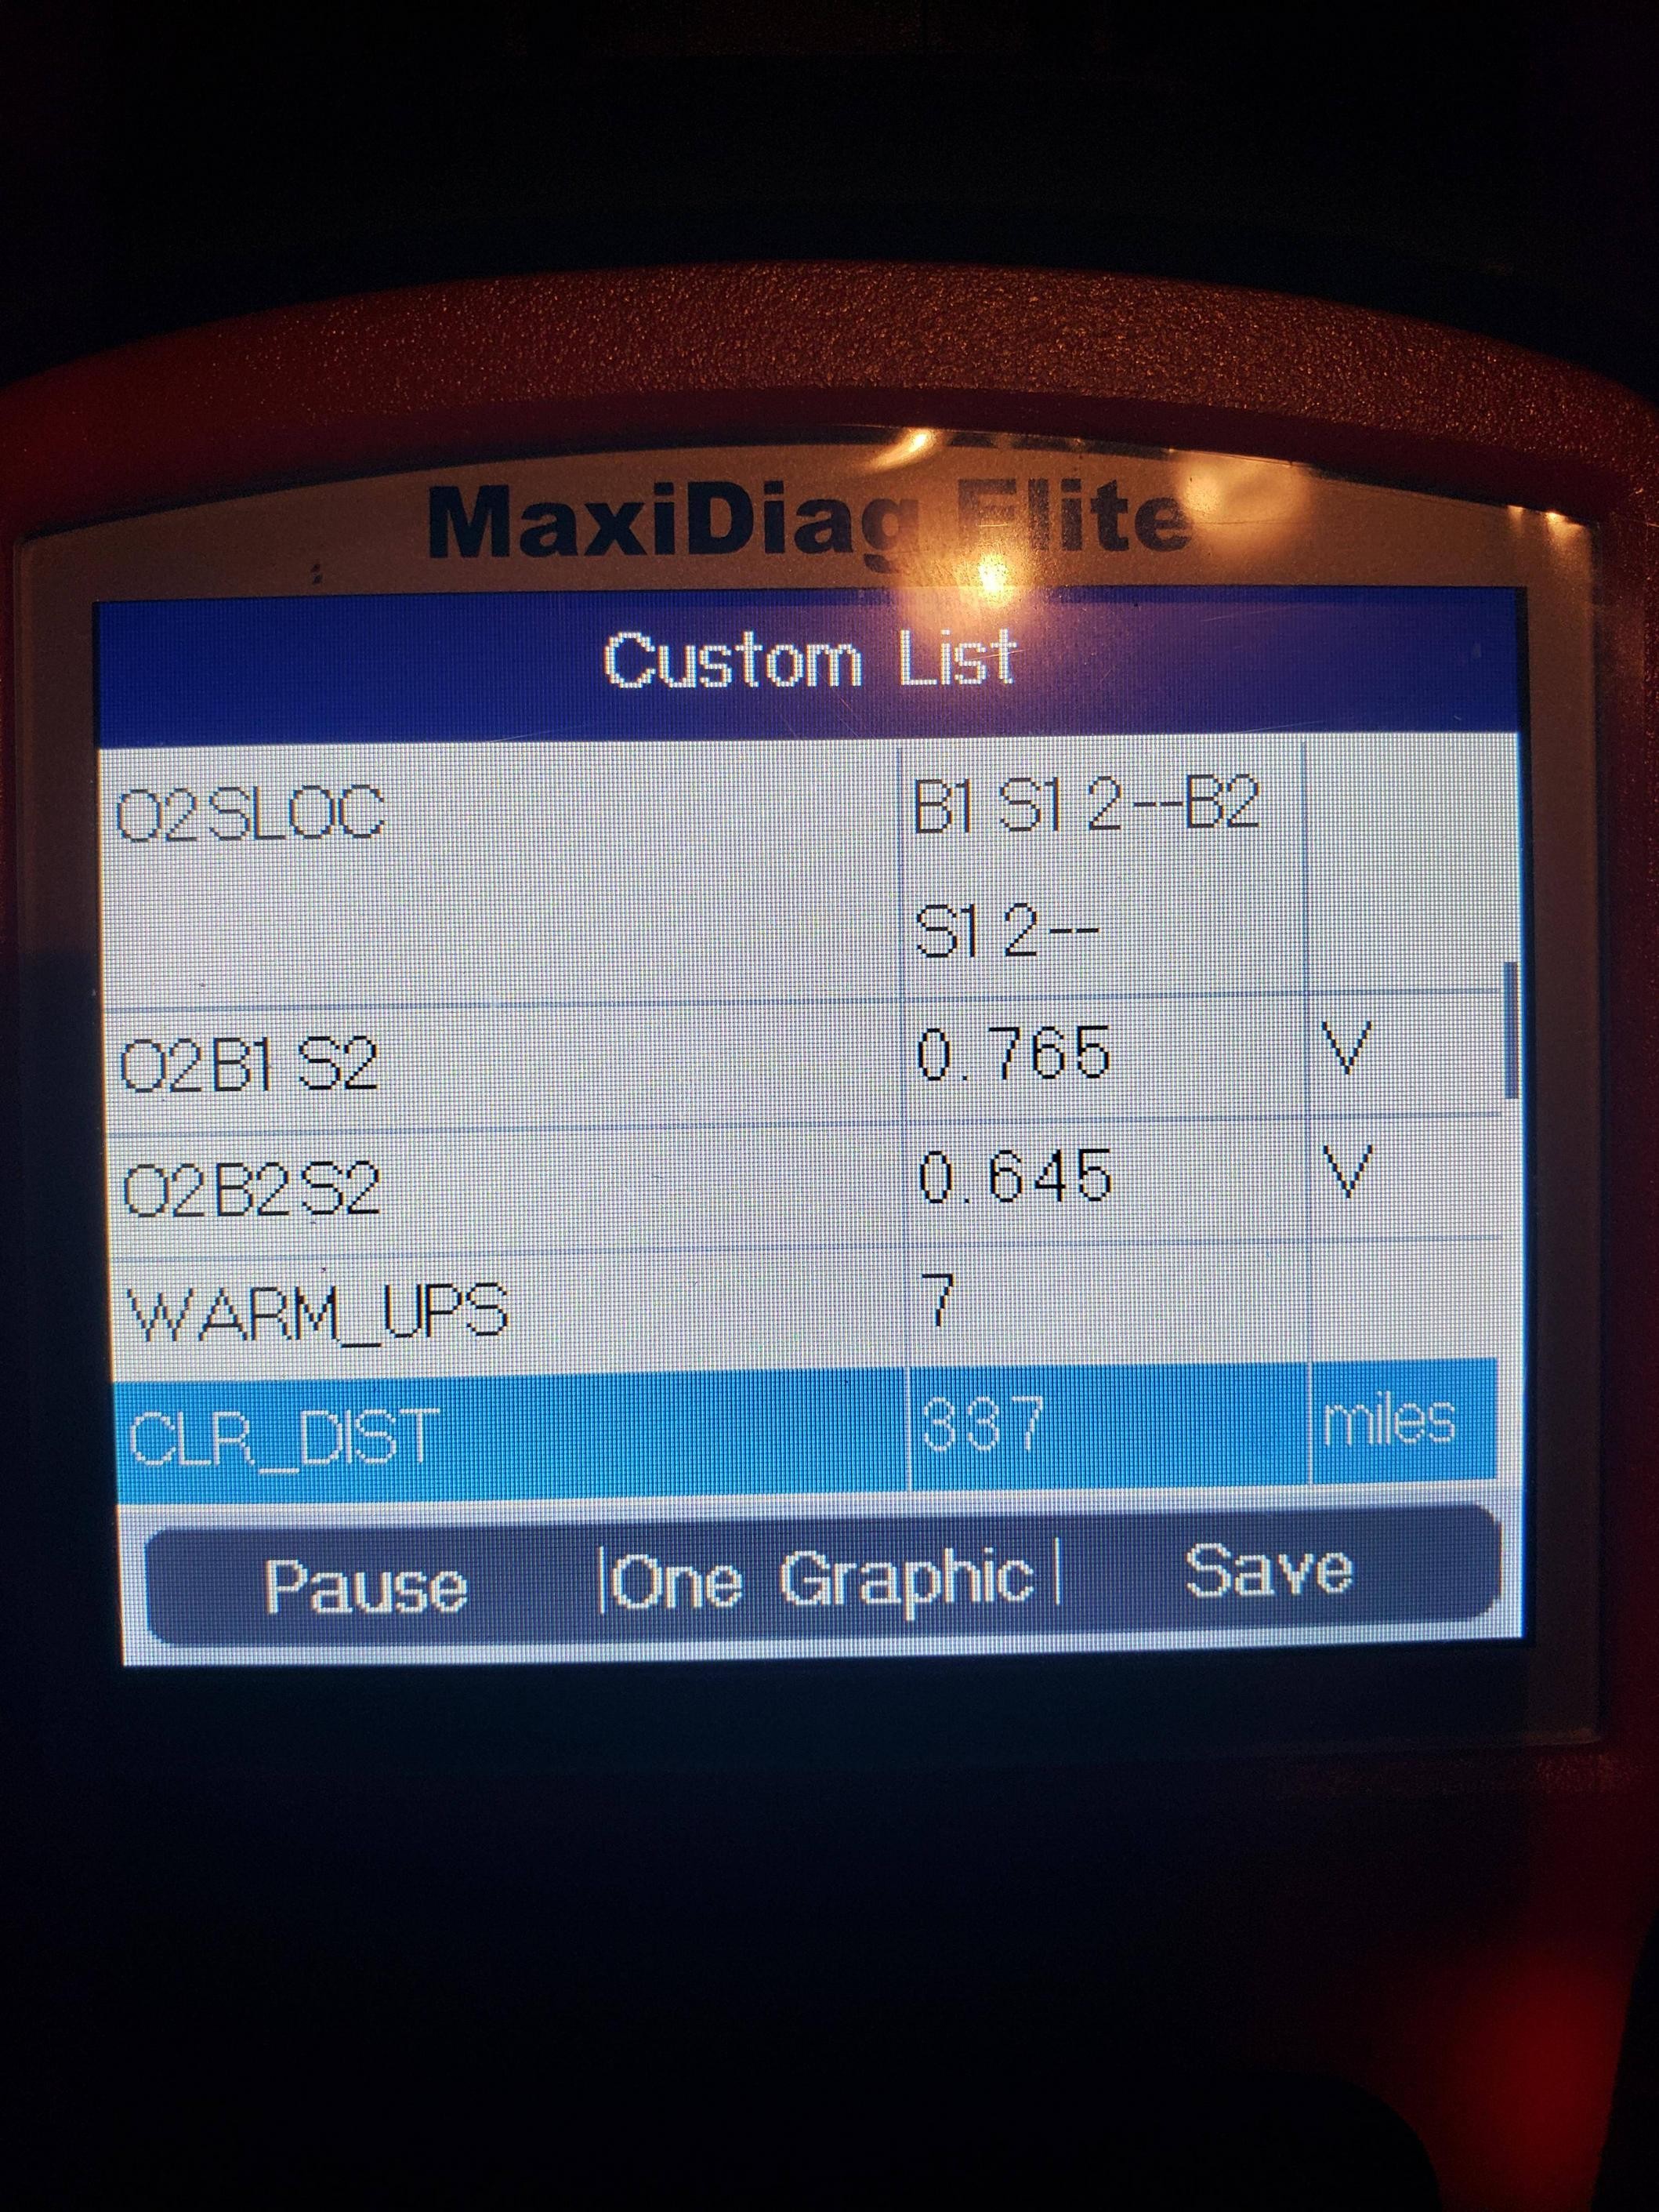
2.3 Using an OBD2 Scanner to Read Readiness Monitors
How can an OBD2 scanner help you understand the status of your vehicle’s readiness monitors? An OBD2 scanner is invaluable for checking the status of readiness monitors. Here’s how to use it:
- Connect the Scanner: Plug the OBD2 scanner into the diagnostic port, typically located under the dashboard on the driver’s side.
- Power On: Turn the ignition key to the “ON” position without starting the engine.
- Select “Readiness Monitors”: Navigate to the “Readiness Monitors” or “I/M Readiness” option in the scanner’s menu.
- Check Monitor Status: The scanner will display the status of each monitor, indicating whether it is “Ready” or “Not Ready” (or “Complete” and “Incomplete”).
2.4 Interpreting the Results
How do you interpret the results from the OBD2 scanner and determine the next steps? Interpreting the results from the OBD2 scanner involves understanding which monitors haven’t completed and addressing any underlying issues.
- All Monitors Ready: If all monitors show as “Ready,” the P1000 code should clear on its own after a few drive cycles.
- One or More Monitors Not Ready: If one or more monitors are “Not Ready,” you’ll need to focus on those specific systems. Further diagnosis may be required to identify and resolve any issues preventing the monitors from running.
For example, if the oxygen sensor monitor is “Not Ready,” you may need to inspect the O2 sensors, check their wiring, and ensure they are functioning correctly. If the EVAP monitor is “Not Ready,” you may need to check for fuel vapor leaks and inspect the EVAP system components.
 OBD2 Scanner Connected to a Car
3. Performing a Ford Drive Cycle
What is a Ford drive cycle and how can it help clear the P1000 code on your 2010 Ford F350? Performing a Ford drive cycle is a specific set of driving conditions designed to allow the vehicle’s On-Board Diagnostic (OBD) system to run all of its readiness monitors, which is essential for clearing the P1000 code.
3.1 Understanding the Ford Drive Cycle
What does a typical Ford drive cycle involve and why is it necessary? A Ford drive cycle involves a sequence of driving maneuvers that create the conditions necessary for each readiness monitor to run and complete its self-test. This typically includes a combination of steady-state driving, acceleration, deceleration, and idle periods.
3.2 Step-by-Step Guide to Completing a Ford Drive Cycle
How can you effectively complete a Ford drive cycle to ensure all readiness monitors are set? Here is a step-by-step guide to performing a Ford drive cycle:
- Preparation:
- Ensure the fuel tank is between 1/4 and 3/4 full.
- Verify there are no other diagnostic trouble codes (DTCs) present.
- Ensure the engine is cold (has been sitting for at least 8 hours).
- Start the Engine:
- Start the engine and allow it to idle for approximately two minutes.
- Accelerate:
- Accelerate to 45 mph (72 km/h) and maintain this speed for eight minutes.
- Decelerate:
- Without using the brake, release the accelerator and allow the vehicle to coast down to 20 mph (32 km/h).
- Accelerate Again:
- Accelerate back to 45 mph (72 km/h) and maintain this speed for another eight minutes.
- Decelerate Again:
- Without using the brake, release the accelerator and allow the vehicle to coast down to a stop.
- Idle:
- Allow the engine to idle for five minutes.
- Check Readiness Monitors:
- Use an OBD2 scanner to check the status of the readiness monitors.
- If any monitors are still “Not Ready,” repeat the drive cycle.
3.3 Tips for a Successful Drive Cycle
What tips can help ensure a successful completion of the Ford drive cycle? Here are some tips to help you successfully complete the Ford drive cycle:
- Follow the Procedure Exactly: Adhere to the specific speeds and time intervals outlined in the drive cycle procedure.
- Avoid Abrupt Actions: Avoid sudden acceleration, braking, or steering maneuvers, as these can interrupt the drive cycle.
- Monitor Traffic Conditions: Choose a route with light traffic to safely perform the drive cycle without interference.
- Use an OBD2 Scanner: Continuously monitor the readiness monitors with an OBD2 scanner to track progress and identify any issues.
3.4 Common Mistakes to Avoid
What common mistakes should you avoid when performing a Ford drive cycle? Avoid these common mistakes to increase your chances of a successful drive cycle:
- Starting with a Warm Engine: The engine must be cold at the beginning of the drive cycle.
- Ignoring Other DTCs: Address any other DTCs before attempting the drive cycle.
- Using the Brake During Deceleration: Allow the vehicle to coast down without using the brake during deceleration phases.
- Not Following Speed and Time Requirements: Adhere to the specified speeds and time intervals for each step of the drive cycle.
4. Troubleshooting Specific Readiness Monitors
How do you troubleshoot specific readiness monitors that are not setting on your 2010 Ford F350? When the P1000 code persists, and specific readiness monitors are not setting, you need to focus on troubleshooting those individual monitors. Here’s how to address some of the most common ones:
4.1 Oxygen Sensor Monitor
What steps can you take to troubleshoot the oxygen sensor monitor? The oxygen (O2) sensor monitor checks the performance of the O2 sensors, which are crucial for fuel efficiency and emissions control.
- Check O2 Sensor Condition:
- Inspect the O2 sensors for physical damage or contamination.
- Ensure the sensors are properly installed and the connections are secure.
- Test O2 Sensor Heater Circuits:
- Use a multimeter to test the heater circuits of the O2 sensors.
- The heater circuits should have the correct voltage and resistance according to the vehicle’s repair manual.
- Monitor O2 Sensor Data:
- Use an OBD2 scanner to monitor the real-time data from the O2 sensors.
- Check for proper voltage fluctuations and response times.
- Check for Exhaust Leaks:
- Inspect the exhaust system for leaks, as exhaust leaks can affect O2 sensor readings.
4.2 Catalytic Converter Monitor
How do you diagnose issues with the catalytic converter monitor? The catalytic converter monitor verifies the efficiency of the catalytic converter in reducing emissions.
- Check for Exhaust Leaks:
- Ensure there are no exhaust leaks before or after the catalytic converter.
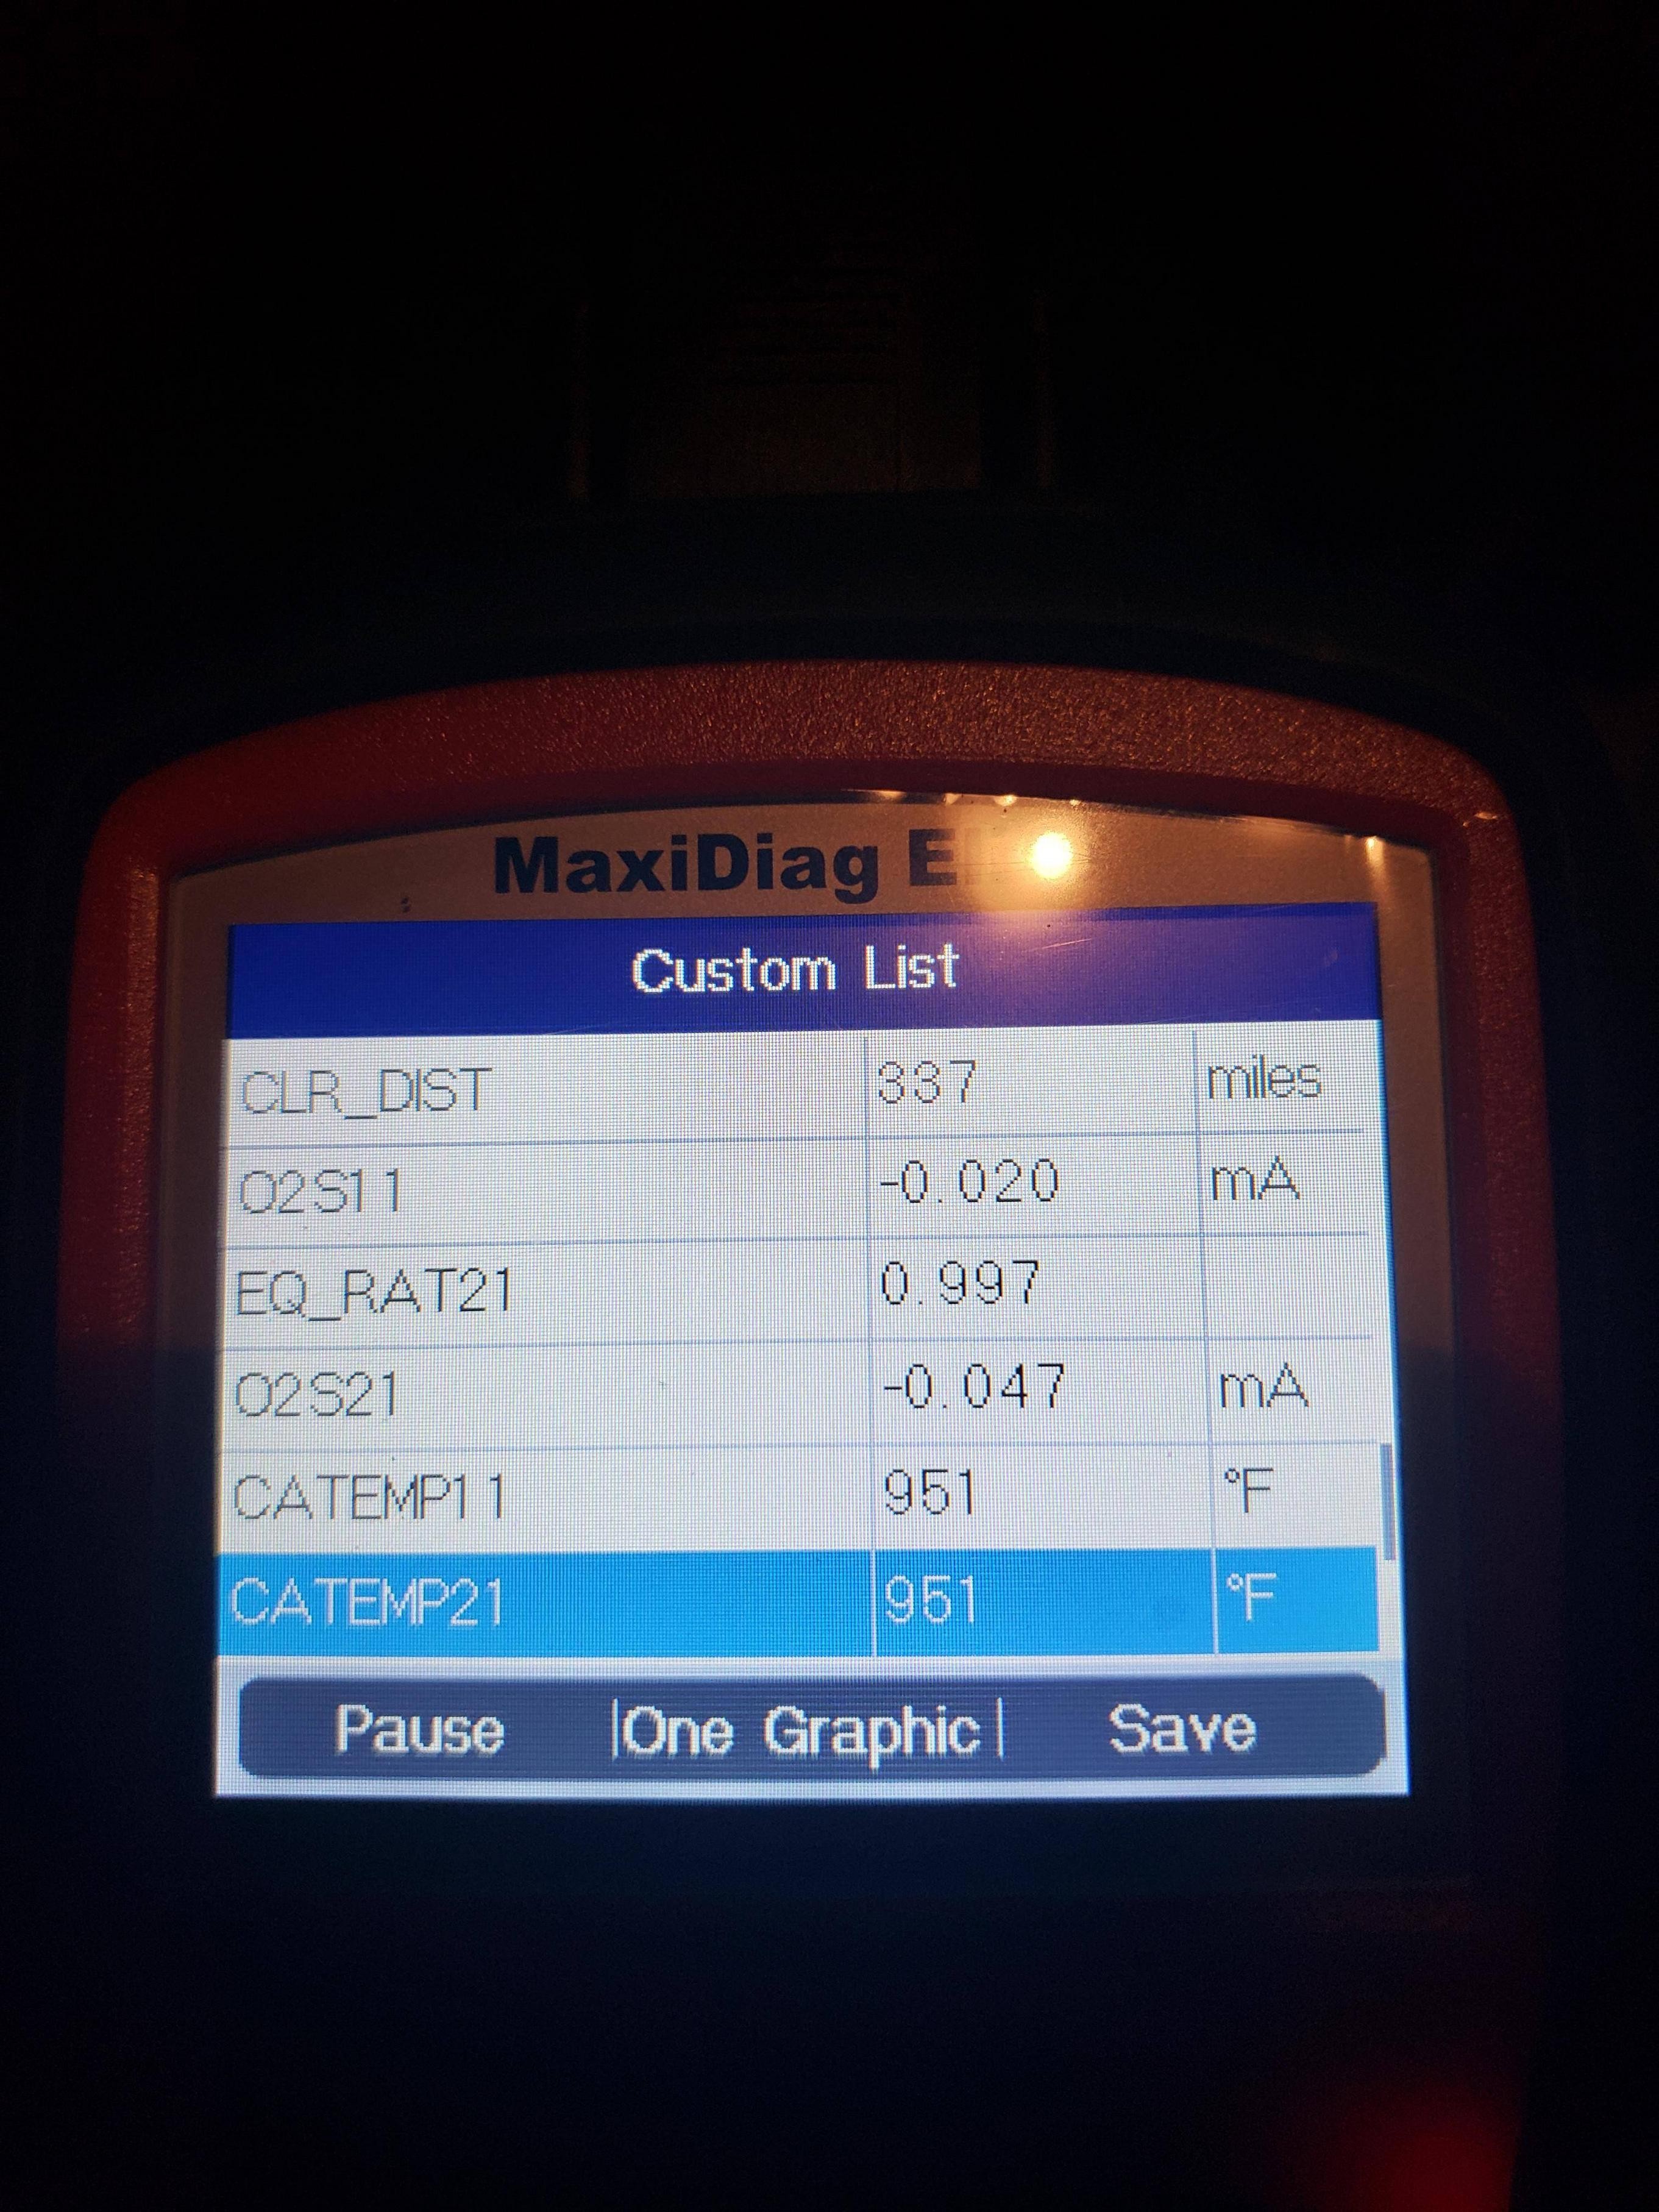
- Monitor Catalytic Converter Temperature:
- Use an OBD2 scanner to monitor the temperature of the catalytic converter.
- The temperature should reach the specified range during operation.
- Test O2 Sensor Readings:
- Compare the readings from the O2 sensors before and after the catalytic converter.
- The downstream O2 sensor should have a more stable reading compared to the upstream sensor.
- Inspect Catalytic Converter Condition:
- Visually inspect the catalytic converter for damage or deterioration.
4.3 EVAP System Monitor
What are the key steps in troubleshooting the EVAP system monitor? The evaporative system (EVAP) monitor tests for fuel vapor leaks in the evaporative emissions control system.
- Check Fuel Cap:
- Ensure the fuel cap is properly tightened and in good condition.
- A loose or damaged fuel cap is a common cause of EVAP system issues.
- Inspect EVAP Hoses and Lines:
- Check all EVAP hoses and lines for cracks, leaks, or damage.
- Pay close attention to connections and fittings.
- Test EVAP System Components:
- Use a smoke machine to test the EVAP system for leaks.
- Check the purge valve and vent valve for proper operation.
- Monitor Fuel Tank Pressure:
- Use an OBD2 scanner to monitor the fuel tank pressure sensor readings.
- Look for any abnormal pressure changes.
4.4 EGR System Monitor
How can you effectively troubleshoot the EGR system monitor? The EGR system monitor checks the functionality of the Exhaust Gas Recirculation (EGR) system, which reduces NOx emissions.
- Inspect EGR Valve:
- Check the EGR valve for proper operation.
- Ensure the valve is not stuck open or closed.
- Check EGR Passages:
- Inspect the EGR passages for blockage or carbon buildup.
- Clean the passages if necessary.
- Test EGR Solenoid:
- Use a multimeter to test the EGR solenoid for proper voltage and resistance.
- Monitor EGR Flow:
- Use an OBD2 scanner to monitor the EGR flow rate.
- Ensure the flow rate is within the specified range during operation.
 Oxygen Sensor
5. Advanced Diagnostic Techniques
What advanced diagnostic techniques can help resolve persistent P1000 codes on your 2010 Ford F350? For particularly stubborn P1000 codes, more advanced diagnostic techniques may be necessary to pinpoint the underlying issue.
5.1 Using Ford IDS (Integrated Diagnostic System)
How does the Ford IDS system enhance diagnostic accuracy? The Ford Integrated Diagnostic System (IDS) is a comprehensive diagnostic tool used by Ford dealerships and authorized repair shops. It provides advanced capabilities beyond those of generic OBD2 scanners.
- Enhanced Diagnostics: The IDS can perform in-depth diagnostics, including pinpoint tests, component testing, and module programming.
- Access to Ford’s Database: The IDS provides access to Ford’s database of technical service bulletins (TSBs), wiring diagrams, and repair procedures.
- Module Reprogramming: The IDS can reprogram vehicle modules, such as the PCM, to update software and address known issues.
5.2 Performing Pinpoint Tests
What are pinpoint tests and how do they aid in diagnosing the P1000 code? Pinpoint tests are detailed diagnostic procedures outlined in the vehicle’s repair manual. They guide technicians through a series of steps to isolate the cause of a specific issue.
- Identify the Relevant Pinpoint Test:
- Consult the vehicle’s repair manual to identify the pinpoint test that corresponds to the readiness monitor that is not setting.
- Follow the Test Procedure:
- Follow the pinpoint test procedure step-by-step, using the specified tools and equipment.
- Interpret the Results:
- Interpret the results of each test step to determine whether the component or system is functioning correctly.
- Take Corrective Action:
- Based on the test results, take the necessary corrective action, such as replacing a faulty sensor or repairing a wiring issue.
5.3 Checking for Technical Service Bulletins (TSBs)
How can TSBs provide valuable diagnostic insights? Technical Service Bulletins (TSBs) are documents issued by the vehicle manufacturer to address common issues or concerns.
- Access TSBs: Check for any TSBs related to the P1000 code or the specific readiness monitors that are not setting.
- Follow Recommendations: Follow the recommendations outlined in the TSB to diagnose and resolve the issue.
- Update Software: Some TSBs may recommend updating the vehicle’s software to address known problems.
5.4 Verifying Wiring and Connections
Why is a thorough inspection of wiring and connections important in advanced diagnostics? Wiring and connection issues can be a common cause of OBD system problems.
- Inspect Wiring Harnesses:
- Check the wiring harnesses for damage, corrosion, or loose connections.
- Pay close attention to areas where the wiring may be exposed to heat, vibration, or moisture.
- Test Continuity:
- Use a multimeter to test the continuity of the wiring circuits.
- Ensure there are no breaks or shorts in the wiring.
- Check Ground Connections:
- Inspect the ground connections for corrosion or loose connections.
- Ensure the ground connections are clean and secure.
6. Preventing Future P1000 Code Issues
What proactive measures can you take to prevent the P1000 code from recurring on your 2010 Ford F350? Preventing future P1000 code issues involves maintaining your vehicle properly and understanding the factors that can trigger the code.
6.1 Regular Vehicle Maintenance
How does regular maintenance contribute to preventing OBD system issues? Regular vehicle maintenance is crucial for preventing OBD system issues and ensuring your vehicle operates efficiently.
- Follow Maintenance Schedule: Adhere to the manufacturer’s recommended maintenance schedule for your 2010 Ford F350.
- Replace Sensors as Needed: Replace sensors, such as oxygen sensors, according to the recommended intervals.
- Check Fluid Levels: Regularly check and maintain proper fluid levels, including engine oil, coolant, and transmission fluid.
- Inspect Hoses and Belts: Inspect hoses and belts for cracks, leaks, or damage, and replace them as needed.
6.2 Avoiding Battery Disconnections
Why should you minimize unnecessary battery disconnections? Battery disconnections can reset the OBD system and clear the readiness monitors, leading to the P1000 code.
- Minimize Disconnections: Avoid disconnecting the battery unless it is absolutely necessary for repairs or maintenance.
- Use a Memory Saver: If you must disconnect the battery, use a memory saver device to preserve the vehicle’s settings and prevent the OBD system from resetting.
6.3 Properly Clearing DTCs
How should you properly clear DTCs to minimize OBD system disruptions? Clearing diagnostic trouble codes (DTCs) can also reset the readiness monitors, so it’s important to do it properly.
- Diagnose the Issue First: Before clearing any DTCs, diagnose the underlying issue and make the necessary repairs.
- Use an OBD2 Scanner: Use an OBD2 scanner to clear the DTCs after the repairs have been completed.
- Verify the Repair: After clearing the DTCs, verify that the issue has been resolved and that the readiness monitors are setting properly.
6.4 Educating Yourself on Ford Drive Cycles
Why is understanding Ford drive cycles important for preventing future P1000 codes? Understanding Ford drive cycles can help you ensure that the readiness monitors are set properly after any event that might reset the OBD system.
- Familiarize Yourself with the Procedure: Take the time to familiarize yourself with the specific Ford drive cycle procedure for your 2010 F350.
- Perform the Drive Cycle When Needed: If the P1000 code appears, perform the Ford drive cycle to allow the readiness monitors to run.
7. Real-World Case Studies
Can you share some real-world examples of diagnosing and resolving the P1000 code on Ford vehicles? Examining real-world case studies can provide valuable insights into diagnosing and resolving the P1000 code.
7.1 Case Study 1: O2 Sensor Issue
Problem: A 2010 Ford F350 with a P1000 code and an oxygen sensor monitor that would not set.
Diagnosis:
- The technician used an OBD2 scanner to check for other DTCs but found none.
- The technician inspected the O2 sensors and found that one of the upstream sensors was contaminated with oil.
- The technician tested the O2 sensor heater circuits and found that the contaminated sensor had a faulty heater circuit.
Solution:
- The technician replaced the contaminated O2 sensor with a new one.
- The technician cleared the P1000 code and performed a Ford drive cycle.
- After the drive cycle, the oxygen sensor monitor set, and the vehicle passed the emissions test.
7.2 Case Study 2: EVAP System Leak
Problem: A 2010 Ford F350 with a P1000 code and an EVAP system monitor that would not set.
Diagnosis:
- The technician used an OBD2 scanner to check for other DTCs but found none.
- The technician inspected the fuel cap and found that it was loose and damaged.
- The technician used a smoke machine to test the EVAP system for leaks and found a small leak in one of the EVAP hoses.
Solution:
- The technician replaced the fuel cap with a new one.
- The technician replaced the damaged EVAP hose.
- The technician cleared the P1000 code and performed a Ford drive cycle.
- After the drive cycle, the EVAP system monitor set, and the vehicle passed the emissions test.
7.3 Case Study 3: EGR Valve Problem
Problem: A 2010 Ford F350 with a P1000 code and an EGR system monitor that would not set.
Diagnosis:
- The technician used an OBD2 scanner to check for other DTCs but found none.
- The technician inspected the EGR valve and found that it was stuck closed due to carbon buildup.
- The technician tested the EGR solenoid and found that it was functioning properly.
Solution:
- The technician cleaned the EGR valve and removed the carbon buildup.
- The technician reinstalled the EGR valve and verified that it was operating smoothly.
- The technician cleared the P1000 code and performed a Ford drive cycle.
- After the drive cycle, the EGR system monitor set, and the vehicle passed the emissions test.
8. The Role of OBD2-SCANNER.EDU.VN
How can OBD2-SCANNER.EDU.VN assist you in resolving the P1000 code on your 2010 Ford F350? OBD2-SCANNER.EDU.VN provides valuable resources and services to help you diagnose and resolve the P1000 code.
8.1 Providing Expert Guidance
What kind of expert guidance can you find at OBD2-SCANNER.EDU.VN? OBD2-SCANNER.EDU.VN offers expert guidance on diagnosing and resolving the P1000 code.
- Diagnostic Tips: Access detailed diagnostic tips and troubleshooting guides.
- Step-by-Step Instructions: Find step-by-step instructions for performing diagnostic tests and repairs.
- Expert Advice: Get expert advice from experienced automotive technicians.
8.2 Offering OBD2 Scanner Recommendations
What OBD2 scanner recommendations does OBD2-SCANNER.EDU.VN offer? OBD2-SCANNER.EDU.VN provides recommendations for high-quality OBD2 scanners that can help you diagnose and clear the P1000 code.
- Scanner Reviews: Read reviews of various OBD2 scanners to find the best one for your needs.
- Compatibility Information: Get information on scanner compatibility with your 2010 Ford F350.
- Purchase Links: Find links to purchase recommended OBD2 scanners.
8.3 Connecting You with Local Repair Shops
How can OBD2-SCANNER.EDU.VN help you find a reliable local repair shop? If you prefer to have a professional diagnose and repair your vehicle, OBD2-SCANNER.EDU.VN can connect you with local repair shops.
- Shop Directory: Use our directory to find reputable repair shops in your area.
- Customer Reviews: Read customer reviews to find a shop with a good reputation.
- Appointment Scheduling: Schedule an appointment with a local repair shop through our website.
8.4 Educational Resources and Articles
What kind of educational resources can you access on OBD2-SCANNER.EDU.VN? OBD2-SCANNER.EDU.VN offers a wealth of educational resources and articles on OBD2 systems, diagnostic trouble codes, and vehicle maintenance.
- Informative Articles: Access informative articles on various automotive topics.
- Troubleshooting Guides: Find detailed troubleshooting guides for common OBD2 codes.
- Maintenance Tips: Get tips on how to properly maintain your vehicle and prevent future issues.
Don’t let the P1000 code keep you off the road. Contact OBD2-SCANNER.EDU.VN today via Whatsapp at +1 (641) 206-8880, visit our website, or stop by our location at 123 Main Street, Los Angeles, CA 90001, United States for expert advice and support to get your 2010 Ford F350 running smoothly and compliant with emissions standards.
9. FAQ About OBD2 P1000 Code
9.1 What does the OBD2 P1000 code mean?
The OBD2 P1000 code indicates that the On-Board Diagnostic (OBD) system hasn’t completed its self-testing, meaning the vehicle isn’t ready for emissions testing.
9.2 Can I drive my car with a P1000 code?
Yes, you can drive your car with a P1000 code, as it doesn’t indicate a specific mechanical problem. However, your vehicle will likely fail an emissions test until the code is resolved.
9.3 How do I clear the P1000 code?
To clear the P1000 code, you need to perform a Ford drive cycle to allow all readiness monitors to complete. You can also use an OBD2 scanner to clear the code after the monitors are set.
9.4 What is a Ford drive cycle?
A Ford drive cycle is a specific set of driving conditions designed to allow the vehicle’s OBD system to run all of its readiness monitors.
9.5 How long does it take to complete a Ford drive cycle?
A Ford drive cycle typically takes 20-30 minutes to complete, but it may take multiple attempts for all readiness monitors to set.
9.6 What are readiness monitors?
Readiness monitors are self-tests performed by the vehicle’s OBD system to ensure that various emission control systems are functioning correctly.
9.7 What if the P1000 code won’t clear after performing a drive cycle?
If the P1000 code won’t clear after performing a drive cycle, there may be an underlying issue preventing the readiness monitors from completing. You may need to diagnose and repair any faulty components or systems.
9.8 Can a faulty oxygen sensor cause the P1000 code?
Yes, a faulty oxygen sensor can prevent the oxygen sensor monitor from setting, which can cause the P1000 code to persist.
9.9 Is it safe to ignore the P1000 code?
While the P1000 code doesn’t indicate an immediate safety issue, it’s important to address it to ensure your vehicle meets emissions standards and to identify any underlying problems that may affect its performance.
9.10 Where can I get help with diagnosing and resolving the P1000 code?
You can get help with diagnosing and resolving the P1000 code from OBD2-SCANNER.EDU.VN, which offers expert guidance, OBD2 scanner recommendations, and connections to local repair shops.
10. Conclusion
Resolving the P1000 code on your 2010 Ford F350 involves understanding the code, diagnosing the cause, and taking appropriate corrective action; with the right tools and knowledge, you can effectively address this issue and ensure your vehicle meets emissions standards and runs smoothly. By following the diagnostic steps outlined in this article, performing a Ford drive cycle, and troubleshooting specific readiness monitors, you can successfully clear the P1000 code and prevent future issues. Remember, resources and expert assistance are available at OBD2-SCANNER.EDU.VN to guide you through the process and connect you with local repair shops if needed, including understanding your vehicle’s diagnostic system.