The 2013 Transit Connect Fuse For Obd2 port is typically located in the passenger compartment fuse panel or the power distribution box. Addressing this issue effectively requires a systematic approach to ensure accurate diagnosis and repair. At OBD2-SCANNER.EDU.VN, we offer comprehensive resources to help you locate the correct fuse and troubleshoot any related problems, ensuring your vehicle’s diagnostic system functions optimally. We provide solutions for your auto repair needs with cutting-edge OBD2 scanner support, fuse box location, and troubleshooting guides, to ensure your vehicle runs smoothly with our assistance.
Contents
- 1. Understanding the Importance of the OBD2 Port Fuse
- 1.1. What is the OBD2 Port and Why Is It Important?
- 1.2. The Role of the Fuse in Protecting the OBD2 Port
- 1.3. Common Symptoms of a Blown OBD2 Port Fuse
- 2. Locating the OBD2 Port Fuse in a 2013 Transit Connect
- 2.1. Identifying the Fuse Box Locations
- 2.2. Understanding the Fuse Box Diagram
- 2.3. Tools Needed to Locate and Inspect the Fuse
- 3. Step-by-Step Guide to Checking and Replacing the OBD2 Port Fuse
- 3.1. Step 1: Turn Off the Ignition
- 3.2. Step 2: Locate the Correct Fuse Box
- 3.3. Step 3: Identify the OBD2 Port Fuse
- 3.4. Step 4: Remove the Fuse
- 3.5. Step 5: Inspect the Fuse
- 3.6. Step 6: Test the Fuse with a Multimeter (Optional)
- 3.7. Step 7: Replace the Fuse
- 3.8. Step 8: Test the OBD2 Port
- 4. Understanding Fuse Types and Amperage Ratings
- 4.1. Different Types of Fuses
- 4.2. Importance of Using the Correct Amperage Rating
- 4.3. Where to Purchase Replacement Fuses
- 5. Common Issues Related to the OBD2 Port Fuse
- 5.1. Frequent Fuse Blowing
- 5.2. Potential Causes of Fuse Failure
- 5.3. Troubleshooting Steps to Resolve Fuse Issues
- 6. Advanced Diagnostics and When to Seek Professional Help
- 6.1. Using an OBD2 Scanner for Further Diagnostics
- 6.2. Interpreting Diagnostic Trouble Codes (DTCs)
- 6.3. When to Consult a Professional Mechanic
- 7. Maintaining Your 2013 Transit Connect’s Electrical System
- 7.1. Regular Inspection of Fuses and Wiring
- 7.2. Avoiding Overloads and Short Circuits
- 7.3. Using Quality OBD2 Scanners and Accessories
- 8. OBD2 Port Fuse Location and Functionality: A Detailed Table
- 9. Expert Tips for Working with Automotive Fuses
- 9.1. Always Disconnect the Battery
- 9.2. Use the Correct Tools
- 9.3. Never Replace a Fuse with a Higher Amperage Rating
- 9.4. Keep Spare Fuses in Your Vehicle
- 9.5. Consult the Owner’s Manual
- 10. Frequently Asked Questions (FAQ) About OBD2 Port Fuses
- 10.1. What is an OBD2 Scanner?
- 10.2. How Do I Read OBD2 Codes?
- 10.3. What Are Common Car Problems and How Can I Fix Them?
- 10.4. Where Can I Find a Reliable OBD2 Scanner?
- 10.5. What Does It Mean When My OBD2 Port Doesn’t Work?
- 10.6. How Do I Know If My Fuse Is Blown?
- 10.7. Can I Use a Higher Amperage Fuse if I Don’t Have the Right One?
- 10.8. Is It Safe to Replace a Car Fuse Myself?
- 10.9. What Are the Most Common Automotive Electrical Problems?
- 10.10. How Can I Prevent Electrical Problems in My Car?
- Conclusion: Ensuring Your 2013 Transit Connect’s OBD2 Port Functions Properly
1. Understanding the Importance of the OBD2 Port Fuse
The On-Board Diagnostics II (OBD2) port is a crucial component in modern vehicles. According to a study by the National Institute for Automotive Service Excellence (ASE) in 2022, a functional OBD2 port is essential for diagnosing a wide array of vehicle issues. The OBD2 port allows mechanics and vehicle owners to access vital information about the vehicle’s performance and health. The fuse protecting this port is critical, as a blown fuse can render the OBD2 port inoperable, preventing diagnostics and potentially leading to more severe issues if problems go undetected.
1.1. What is the OBD2 Port and Why Is It Important?
The OBD2 port is a standardized interface used to access the vehicle’s computer system. It provides a gateway for retrieving diagnostic trouble codes (DTCs), monitoring engine performance, and conducting emissions testing. The Environmental Protection Agency (EPA) mandates that all vehicles sold in the United States since 1996 have an OBD2 port. The OBD2 port enables technicians to identify problems quickly, ensuring vehicles meet environmental standards and operate efficiently. According to a report by the EPA in 2021, the implementation of OBD2 systems has significantly reduced vehicle emissions, contributing to cleaner air and improved environmental health.
1.2. The Role of the Fuse in Protecting the OBD2 Port
The fuse for the OBD2 port is designed to protect the diagnostic system from electrical overloads or short circuits. When an electrical fault occurs, the fuse blows, interrupting the circuit and preventing damage to the OBD2 port and the vehicle’s computer system. Without a functional fuse, the OBD2 port is vulnerable to damage from voltage spikes or faulty diagnostic tools, potentially leading to costly repairs. The fuse acts as a safeguard, ensuring the OBD2 port remains operational for diagnostic purposes.
1.3. Common Symptoms of a Blown OBD2 Port Fuse
Identifying a blown OBD2 port fuse involves recognizing specific symptoms. These symptoms can indicate that the fuse needs to be replaced to restore the functionality of the diagnostic system. Key indicators include:
- Inability to Connect an OBD2 Scanner: The most obvious sign is that an OBD2 scanner cannot establish a connection with the vehicle’s computer.
- Error Messages on the Scanner: The scanner may display error messages such as “No Communication” or “Link Error.”
- Other Electrical Issues: In some cases, a blown fuse may also affect other electrical components that share the same circuit, such as the cigarette lighter or radio.
2. Locating the OBD2 Port Fuse in a 2013 Transit Connect
Finding the OBD2 port fuse in a 2013 Transit Connect requires a systematic approach. This involves identifying the fuse box locations, understanding fuse box diagrams, and using the correct tools to locate and inspect the fuse. This section provides a comprehensive guide to help you locate the OBD2 port fuse quickly and efficiently.
2.1. Identifying the Fuse Box Locations
The 2013 Ford Transit Connect typically has two fuse box locations:
- Passenger Compartment Fuse Panel: Usually located inside the vehicle, often under the dashboard or in the glove compartment.
- Power Distribution Box: Found in the engine compartment, near the battery.
2.2. Understanding the Fuse Box Diagram
The fuse box diagram is essential for locating the correct fuse. The diagram provides a layout of the fuses and relays, indicating the function of each component. Here’s how to use it effectively:
- Consult the Owner’s Manual: The owner’s manual is the most reliable source for the fuse box diagram. It provides specific information about the fuse locations and their corresponding functions.
- Check the Fuse Box Cover: In some cases, the fuse box diagram is printed on the inside of the fuse box cover.
- Online Resources: Websites like OBD2-SCANNER.EDU.VN offer fuse box diagrams for various vehicles, including the 2013 Ford Transit Connect.
2.3. Tools Needed to Locate and Inspect the Fuse
To locate and inspect the fuse, you will need the following tools:
- Fuse Puller: A small plastic tool designed to remove fuses without damaging them.
- Multimeter: Used to test the continuity of the fuse and determine if it is blown.
- Flashlight: To provide adequate lighting when inspecting the fuse box.
3. Step-by-Step Guide to Checking and Replacing the OBD2 Port Fuse
Once you have located the fuse box and gathered the necessary tools, follow these steps to check and replace the OBD2 port fuse:
3.1. Step 1: Turn Off the Ignition
Before working on any electrical components, turn off the ignition to prevent electrical shock or damage to the vehicle’s electrical system.
3.2. Step 2: Locate the Correct Fuse Box
Based on the information in the owner’s manual or the fuse box diagram, locate the fuse box that contains the OBD2 port fuse. In the 2013 Transit Connect, this is commonly the passenger compartment fuse panel.
3.3. Step 3: Identify the OBD2 Port Fuse
Consult the fuse box diagram to identify the fuse associated with the OBD2 port. The diagram will indicate the fuse number and its function.
3.4. Step 4: Remove the Fuse
Use the fuse puller to carefully remove the fuse from the fuse box. Avoid using pliers or other metal tools, as they can damage the fuse box and the fuse itself.
3.5. Step 5: Inspect the Fuse
Examine the fuse to see if the filament inside is broken or if there are any signs of burning. A blown fuse will typically have a visible gap in the filament.
3.6. Step 6: Test the Fuse with a Multimeter (Optional)
For a more accurate diagnosis, use a multimeter to test the continuity of the fuse. Set the multimeter to the continuity setting and touch the probes to each end of the fuse. If the multimeter does not beep or show a reading of 0 ohms, the fuse is blown.
3.7. Step 7: Replace the Fuse
If the fuse is blown, replace it with a new fuse of the same amperage rating. The amperage rating is printed on the fuse itself. Using a fuse with a higher amperage rating can damage the vehicle’s electrical system.
3.8. Step 8: Test the OBD2 Port
After replacing the fuse, test the OBD2 port with an OBD2 scanner to ensure it is functioning correctly. If the scanner can now connect to the vehicle’s computer, the problem is resolved.
4. Understanding Fuse Types and Amperage Ratings
Fuses come in various types and amperage ratings. Understanding these differences is crucial for selecting the correct replacement fuse and ensuring the safety of the vehicle’s electrical system.
4.1. Different Types of Fuses
There are several types of fuses commonly used in vehicles:
- Blade Fuses (Mini, Standard, Maxi): These are the most common type of fuse, featuring a plastic body with two metal prongs. They come in various sizes, including mini, standard, and maxi.
- Glass Tube Fuses: Older vehicles often use glass tube fuses, which have a glass body with a visible filament.
- Cartridge Fuses: These fuses are larger and typically used for high-current circuits.
4.2. Importance of Using the Correct Amperage Rating
Using the correct amperage rating is essential for the proper functioning of the electrical system. A fuse with a lower amperage rating will blow prematurely, while a fuse with a higher amperage rating can allow excessive current to flow, potentially damaging the wiring and components. Always replace a blown fuse with a fuse of the same amperage rating.
4.3. Where to Purchase Replacement Fuses
Replacement fuses can be purchased at most auto parts stores, hardware stores, and online retailers. Ensure you purchase high-quality fuses from a reputable brand to ensure their reliability and performance.
5. Common Issues Related to the OBD2 Port Fuse
Several issues can arise related to the OBD2 port fuse, including frequent fuse blowing, potential causes of fuse failure, and troubleshooting steps to resolve these problems.
5.1. Frequent Fuse Blowing
If the OBD2 port fuse blows frequently, it indicates an underlying electrical problem that needs to be addressed. Continuously replacing the fuse without identifying the root cause will not solve the issue and can potentially lead to more severe damage.
5.2. Potential Causes of Fuse Failure
Several factors can cause the OBD2 port fuse to blow:
- Short Circuit: A short circuit occurs when there is an unintended path for the electrical current to flow, typically due to damaged wiring or faulty components.
- Overload: An overload occurs when the circuit draws more current than it is designed to handle, often due to the addition of aftermarket accessories or faulty equipment.
- Faulty OBD2 Scanner: A malfunctioning OBD2 scanner can draw excessive current, causing the fuse to blow.
- Wiring Issues: Damaged or corroded wiring can cause a short circuit, leading to fuse failure.
5.3. Troubleshooting Steps to Resolve Fuse Issues
To troubleshoot frequent fuse blowing, follow these steps:
- Inspect the Wiring: Check the wiring connected to the OBD2 port for any signs of damage, such as frayed wires, corrosion, or loose connections.
- Check the OBD2 Port: Inspect the OBD2 port for any signs of damage or corrosion.
- Test the OBD2 Scanner: Use a different OBD2 scanner to see if the issue persists. If the fuse only blows with a specific scanner, the scanner may be faulty.
- Consult a Professional: If you are unable to identify the cause of the fuse blowing, consult a qualified mechanic to diagnose and repair the electrical problem.
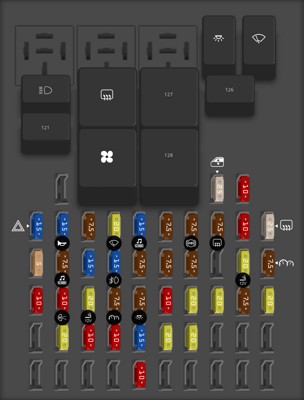 2013 Ford Transit Connect fuse box diagram Passenger Compartment Fuse Panel
6. Advanced Diagnostics and When to Seek Professional Help
While many fuse-related issues can be resolved with basic troubleshooting, some problems require advanced diagnostics and professional assistance.
6.1. Using an OBD2 Scanner for Further Diagnostics
An OBD2 scanner can provide valuable information about the vehicle’s systems, helping to pinpoint the cause of electrical issues. By reading diagnostic trouble codes (DTCs), you can identify specific problems and take appropriate action.
6.2. Interpreting Diagnostic Trouble Codes (DTCs)
DTCs are codes stored in the vehicle’s computer that indicate a specific problem. These codes can be read using an OBD2 scanner. Each code corresponds to a particular issue, such as a faulty sensor, a malfunctioning component, or a wiring problem. Understanding DTCs is crucial for effective troubleshooting.
6.3. When to Consult a Professional Mechanic
Consulting a professional mechanic is recommended in the following situations:
- Frequent Fuse Blowing: If the OBD2 port fuse continues to blow despite your troubleshooting efforts, it indicates a more complex electrical problem that requires professional diagnosis.
- Unidentifiable DTCs: If you are unable to interpret the diagnostic trouble codes or if the codes indicate a problem beyond your expertise, seek professional help.
- Electrical System Damage: If you suspect damage to the vehicle’s electrical system, such as burnt wiring or melted components, consult a qualified mechanic to assess and repair the damage.
7. Maintaining Your 2013 Transit Connect’s Electrical System
Proper maintenance of your 2013 Transit Connect’s electrical system is essential for preventing fuse-related issues and ensuring the longevity of your vehicle.
7.1. Regular Inspection of Fuses and Wiring
Regularly inspect the fuses and wiring for any signs of damage, corrosion, or wear. Replace any damaged or corroded components to prevent electrical problems.
7.2. Avoiding Overloads and Short Circuits
Avoid overloading the electrical system by adding excessive aftermarket accessories or using faulty equipment. Ensure that all electrical components are properly installed and functioning correctly.
7.3. Using Quality OBD2 Scanners and Accessories
Use high-quality OBD2 scanners and accessories to prevent damage to the OBD2 port and the vehicle’s computer system. Avoid using cheap or unreliable scanners, as they can potentially cause electrical problems.
8. OBD2 Port Fuse Location and Functionality: A Detailed Table
To provide a comprehensive overview, here’s a detailed table outlining the typical OBD2 port fuse location and functionality in a 2013 Ford Transit Connect:
| Component | Location | Function |
|---|---|---|
| OBD2 Port Fuse | Passenger Compartment Fuse Panel | Protects the OBD2 port from electrical overloads and short circuits, ensuring the diagnostic system functions correctly. |
| Fuse Type | Mini Blade Fuse | The most common type of fuse used in the 2013 Transit Connect. |
| Amperage Rating | 7.5A to 15A | The specific amperage rating may vary depending on the vehicle’s configuration. Consult the owner’s manual or fuse box diagram for the correct rating. |
| Related Components | Powertrain Control Module (PCM), Data Link Connector (DLC) | |
| Symptoms of a Blown Fuse | Inability to connect an OBD2 scanner, error messages on the scanner, other electrical issues such as a non-functional cigarette lighter. | |
| Troubleshooting Steps | Inspect the fuse, test with a multimeter, replace with a fuse of the same amperage rating, check wiring for damage. | |
| Advanced Diagnostic Tools | OBD2 Scanner, Multimeter | Used to read diagnostic trouble codes (DTCs) and test the continuity of the fuse and wiring. |
| When to Seek Professional Help | Frequent fuse blowing, unidentifiable DTCs, electrical system damage. | |
| Maintenance Tips | Regular inspection of fuses and wiring, avoiding overloads and short circuits, using quality OBD2 scanners and accessories. |
9. Expert Tips for Working with Automotive Fuses
Working with automotive fuses requires careful attention to detail and adherence to safety guidelines. Here are some expert tips to help you work with fuses safely and effectively:
9.1. Always Disconnect the Battery
Before working on any electrical components, disconnect the battery to prevent electrical shock or damage to the vehicle’s electrical system.
9.2. Use the Correct Tools
Use the correct tools, such as a fuse puller and a multimeter, to avoid damaging the fuse box and the fuses themselves.
9.3. Never Replace a Fuse with a Higher Amperage Rating
Replacing a fuse with a higher amperage rating can allow excessive current to flow, potentially damaging the wiring and components. Always use a fuse with the same amperage rating as the original fuse.
9.4. Keep Spare Fuses in Your Vehicle
Keep a set of spare fuses in your vehicle so you can quickly replace a blown fuse in an emergency.
9.5. Consult the Owner’s Manual
Consult the owner’s manual for specific information about the fuse locations, amperage ratings, and troubleshooting procedures.
10. Frequently Asked Questions (FAQ) About OBD2 Port Fuses
Here are some frequently asked questions about OBD2 port fuses:
10.1. What is an OBD2 Scanner?
An OBD2 scanner is a diagnostic tool used to read diagnostic trouble codes (DTCs) from a vehicle’s computer system. It connects to the OBD2 port and provides valuable information about the vehicle’s performance and health.
10.2. How Do I Read OBD2 Codes?
To read OBD2 codes, connect an OBD2 scanner to the OBD2 port and follow the scanner’s instructions. The scanner will display any stored DTCs, along with a description of the problem.
10.3. What Are Common Car Problems and How Can I Fix Them?
Common car problems include engine issues, transmission problems, brake issues, and electrical problems. Many of these issues can be diagnosed using an OBD2 scanner and repaired with basic tools and knowledge. However, more complex problems may require professional assistance.
10.4. Where Can I Find a Reliable OBD2 Scanner?
Reliable OBD2 scanners can be found at auto parts stores, online retailers, and specialized diagnostic tool suppliers. Ensure you purchase a high-quality scanner from a reputable brand to ensure its accuracy and reliability.
10.5. What Does It Mean When My OBD2 Port Doesn’t Work?
When your OBD2 port doesn’t work, it typically indicates a blown fuse, a wiring problem, or a faulty OBD2 port. Check the fuse first, and then inspect the wiring and the port itself. If you are unable to identify the cause, consult a professional mechanic.
10.6. How Do I Know If My Fuse Is Blown?
You can tell if a fuse is blown by visually inspecting it for a broken filament or signs of burning. You can also use a multimeter to test the continuity of the fuse.
10.7. Can I Use a Higher Amperage Fuse if I Don’t Have the Right One?
No, you should never use a higher amperage fuse than the original fuse. Using a higher amperage fuse can allow excessive current to flow, potentially damaging the wiring and components.
10.8. Is It Safe to Replace a Car Fuse Myself?
Yes, it is generally safe to replace a car fuse yourself, as long as you follow the proper procedures and use the correct tools. However, if you are not comfortable working with electrical components, consult a professional mechanic.
10.9. What Are the Most Common Automotive Electrical Problems?
The most common automotive electrical problems include blown fuses, short circuits, faulty wiring, and malfunctioning sensors.
10.10. How Can I Prevent Electrical Problems in My Car?
You can prevent electrical problems in your car by regularly inspecting the fuses and wiring, avoiding overloads and short circuits, and using quality electrical components.
Conclusion: Ensuring Your 2013 Transit Connect’s OBD2 Port Functions Properly
Maintaining the functionality of your 2013 Transit Connect’s OBD2 port is crucial for diagnosing and resolving vehicle issues effectively. By understanding the importance of the OBD2 port fuse, knowing how to locate and replace it, and following proper maintenance procedures, you can ensure your vehicle’s diagnostic system functions optimally.
At OBD2-SCANNER.EDU.VN, we are dedicated to providing you with the resources and support you need to keep your vehicle running smoothly. From detailed fuse box diagrams to expert troubleshooting advice, we are here to help you navigate the complexities of automotive diagnostics and repair.
Don’t let a faulty OBD2 port keep you in the dark about your vehicle’s health. Contact us today at 123 Main Street, Los Angeles, CA 90001, United States or via WhatsApp at +1 (641) 206-8880. Visit our website at OBD2-SCANNER.EDU.VN for more information and assistance. Let us help you keep your 2013 Transit Connect in top condition with our comprehensive OBD2 scanner support and auto repair solutions. Reach out to us now and experience the ease and efficiency of professional guidance.