Yes, an OBD2 harness can work with a 98 Honda Civic, but it depends on the specific harness and what you are trying to accomplish. OBD2-SCANNER.EDU.VN is here to provide a clear guide, discussing compatibility, modifications, and alternative solutions to make your project successful. Choosing the right harness and understanding the necessary adjustments are key to ensuring proper functionality and avoiding potential issues.
Contents
- 1. Understanding OBD2 Systems and Harnesses
- 1.1 What is OBD2?
- 1.2 Key Components of an OBD2 System
- 1.3 Types of OBD2 Harnesses
- 2. OBD2 Harness Compatibility with a 98 Honda Civic
- 2.1 Identifying OBD2a vs OBD2b
- 2.1.1 Visual Differences
- 2.2 Can You Use an OBD2b Harness on a 98 Civic?
- 2.2.1 Using Jumper Harnesses
- 2.3 Reusing the Existing Engine Wire Harness (EWH)
- 2.3.1 IACV Modification
- 2.4 Using a 96-98 5-Speed EX Harness
- 3. Modifications Required for OBD1 Engine Swaps in a 98 Civic
- 3.1 Distributor Plug Conversion
- 3.2 Injector Clip Conversion
- 3.2.1 Alternative Injector Clip Modification
- 3.3 Alternator Plug Conversion
- 3.3.1 Options for Alternator Plug Conversion
- 3.4 IAT Sensor
- 3.5 CKF Sensor
- 3.5.1 CKF Bypass Trick
- 4. ECU Options for a 98 Honda Civic with Engine Swaps
- 4.1 JDM OBD2 ECU
- 4.2 OBD1 ECU Conversion
- 4.3 US OBD2 ECU
- 5. Wiring: Part 1 for 99-00 Civic
- 5.1 Non-VTEC Civic Modifications
- 5.2 IACV Mod for 99-00 Civic
- 5.3 Distributor Plug Change
- 5.4 Switching to a 99-00 Si EWH
- 6. Wiring: Part 2 for 99-00 Civic
- 7. ECU Options for 99-00 Civic
- 7.1 Using a 99-00 Si ECU
- 7.2 Converting to OBD1 ECU
- 7.3 Staying US OBD2b Spec
- 7.4 Running a JDM OBD2 ECU
- 8. OBD2a/OBD2b Integra Wiring
- 8.1 Engine Installation
- 8.2 Wiring
- 8.3 Using a US OBD1 Engine Wire Harness in a 96-01 Integra
- 8.4 ECU Notes for Integra
- 8.5 ECU Options for Integra
- 9. Troubleshooting Common OBD2 Harness Issues
- 9.1 Identifying Damaged Wires
- 9.2 Connector Problems
- 9.3 Grounding Issues
- 9.4 ECU Communication Problems
- 10. OBD2 Scanner Tools and Their Benefits
- 10.1 Basic OBD2 Scanners
- 10.2 Advanced OBD2 Scanners
- 10.3 Using OBD2 Scanners for Diagnostics
- 10.4 Interpreting OBD2 Codes
- 10.4.1 Common OBD2 Codes
- 11. Resources and Further Reading
- 11.1 Online Forums and Communities
- 11.2 Technical Manuals
- 11.3 Professional Mechanics
- 12. Ensuring Smog Compliance After Engine Swaps
- 12.1 CARB Regulations
- 12.2 BAR Referee Inspection
- 12.3 Maintaining Proper Emissions Equipment
- 13. Safety Precautions When Working with Electrical Systems
- 13.1 Disconnect the Battery
- 13.2 Use Proper Tools
- 13.3 Avoid Working in Wet Conditions
- 13.4 Wear Safety Glasses
- 14. Step-by-Step Guide to Swapping an Engine Harness in a 98 Honda Civic
- 14.1 Preparing for the Swap
- 14.2 Disconnecting the Battery
- 14.3 Locating and Disconnecting the Old Harness
- 14.4 Removing the Old Harness
- 14.5 Installing the New Harness
- 14.6 Connecting the New Harness
- 14.7 Testing the Connections
- 14.8 Final Assembly and Testing
- 15. Benefits of Upgrading to an Aftermarket OBD2 Harness
- 15.1 Enhanced Durability
- 15.2 Improved Performance
- 15.3 Customization Options
- 15.4 Easier Installation
- 16. Common Mistakes to Avoid When Working with OBD2 Harnesses
- 16.1 Not Disconnecting the Battery
- 16.2 Incorrect Wiring
- 16.3 Using the Wrong Tools
- 16.4 Neglecting Grounding Points
- 16.5 Ignoring Wiring Diagrams
- 17. The Future of OBD2 Technology
- 17.1 OBD3 and Beyond
- 17.2 Integration with Mobile Devices
- 17.3 Remote Diagnostics
- 18. How OBD2-SCANNER.EDU.VN Can Help with Your OBD2 Needs
- 18.1 Expert Advice and Support
- 18.2 Detailed Guides and Tutorials
- 18.3 Product Recommendations
- 18.4 Troubleshooting Assistance
- 18.5 Contact Information
- 19. Real-World Examples of OBD2 Harness Swaps
- 19.1 Case Study 1: B16 Engine Swap in a 98 Civic
- 19.2 Case Study 2: K20 Engine Swap in a 99 Civic
- 19.3 Case Study 3: OBD1 Engine in an OBD2 Integra
- 20. Common Questions About OBD2 Harnesses
- 20.1 What is an OBD2 Harness?
- 20.2 Can I Use Any OBD2 Harness on My Car?
- 20.3 How Do I Know If My OBD2 Harness Is Damaged?
- 20.4 What Tools Do I Need to Replace an OBD2 Harness?
- 20.5 Can I Modify an OBD2 Harness?
- 20.6 What Is the Difference Between OBD2a and OBD2b?
- 20.7 How Can OBD2-SCANNER.EDU.VN Help Me?
- 20.8 What Are the Benefits of Using an Aftermarket OBD2 Harness?
- 20.9 How Do I Ensure Smog Compliance After an Engine Swap?
- 20.10 What Safety Precautions Should I Take When Working with Electrical Systems?
1. Understanding OBD2 Systems and Harnesses
OBD2 (On-Board Diagnostics II) is a standardized system used in vehicles to monitor and diagnose engine and emissions-related problems. An OBD2 harness is the wiring that connects the car’s computer (ECU) to the various sensors and components throughout the engine and vehicle. Understanding the basics of OBD2 systems is essential before considering any harness modifications or swaps.
1.1 What is OBD2?
OBD2 is a vehicle self-diagnostic and reporting capability. It gives the vehicle owner or repair technician access to the health information of various vehicle subsystems. A primary goal of OBD2 is to monitor the performance of the engine, including emissions control.
1.2 Key Components of an OBD2 System
The OBD2 system includes several key components:
-
ECU (Engine Control Unit): The computer that controls the engine’s operation.
-
Sensors: Various sensors monitor parameters like oxygen levels, temperature, and pressure.
-
OBD2 Port: A diagnostic port, usually located under the dashboard, where you can connect a scanner.
-
Wiring Harness: Connects all the components to the ECU.
1.3 Types of OBD2 Harnesses
There are different types of OBD2 harnesses, including:
- Engine Harness: Connects the engine sensors and components to the ECU.
- Body Harness: Connects the body’s electrical components, such as lights and sensors, to the vehicle’s main electrical system.
- Diagnostic Harness: Specifically designed for diagnostic purposes, connecting the OBD2 port to the diagnostic tools.
2. OBD2 Harness Compatibility with a 98 Honda Civic
The 1998 Honda Civic falls into the OBD2a category (1996-1998 models), which has specific wiring and ECU requirements. Knowing whether an OBD2 harness is compatible with a 98 Civic requires careful consideration.
2.1 Identifying OBD2a vs OBD2b
It is crucial to differentiate between OBD2a (96-98 Civic) and OBD2b (99-00 Civic) harnesses. While they might appear similar, they have significant differences that can prevent them from being interchangeable.
- OBD2a: Used in 1996-1998 Honda Civics and 1996-1999 Integras.
- OBD2b: Used in 1999-2000 Honda Civics and 2000-2001 Integras.
2.1.1 Visual Differences
The connectors and pinouts are different between OBD2a and OBD2b harnesses. Trying to use an incompatible harness can lead to electrical issues and potential ECU damage.
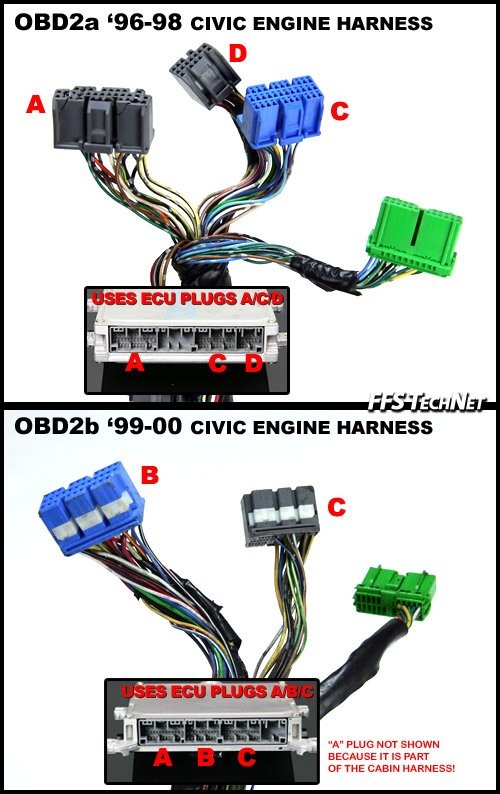 OBD2a vs OBD2b Harness Comparison
Alt text: Comparison of OBD2a and OBD2b harnesses showing connector and pinout differences.
2.2 Can You Use an OBD2b Harness on a 98 Civic?
Technically, you cannot directly plug an OBD2b harness into a 98 Honda Civic (OBD2a) without modifications. The connectors are different, and the ECU will not be compatible.
2.2.1 Using Jumper Harnesses
One workaround is to use an OBD2a to OBD2b jumper harness. This adapter allows you to connect an OBD2b ECU and harness to an OBD2a vehicle. However, this is generally done when swapping ECUs, not just harnesses.
2.3 Reusing the Existing Engine Wire Harness (EWH)
Depending on whether your 98 Civic is a non-VTEC or VTEC model, you might be able to reuse your existing EWH.
- Non-VTEC Civic: You will need to add wiring for VTEC, wire in the knock sensor (KS), and perform the IACV (Idle Air Control Valve) mod.
- VTEC Civic (e.g., 5-speed EX): This is more convenient as the wiring for VTEC and KS is already present. However, the second O2 sensor wiring is part of the cabin harness in an EX, so you might need to wire it in manually if using a US OBD2 ECU.
2.3.1 IACV Modification
The IACV mod involves converting a 3-wire IACV plug to a 2-wire IACV plug. All OBD1 engines and 96-00 5-speed EX Civics use a 2-wire IACV.
2.4 Using a 96-98 5-Speed EX Harness
For non-VTEC Civic owners wary of wiring, a 96-98 5-speed EX EWH is a good option. It is compatible with non-VTEC 96-98 EK chassis. Make sure to get a 5-speed EX harness, not an automatic, as they are wired differently.
3. Modifications Required for OBD1 Engine Swaps in a 98 Civic
If you are swapping an OBD1 engine into your 98 Civic, you will need to make several wiring modifications to ensure compatibility.
3.1 Distributor Plug Conversion
Convert to OBD1 distributor plugs by cutting and splicing OBD1 plugs to your OBD2 EWH, matching the wire colors. Alternatively, use an OBD2 B-series VTEC distributor (any 96-00 B-series VTEC dizzy), which will plug directly into your 96-98 EWH.
3.2 Injector Clip Conversion
Convert to OBD1 injector plugs by cutting and splicing OBD1 injector plugs to your OBD2 EWH, matching the wire colors. Alternatively, use OBD2 injectors (any 96-00 injectors, B-series specifically, but D-series will work too), which will plug directly into your 96-98 EWH.
3.2.1 Alternative Injector Clip Modification
Remove the blue cap inside your OBD2 injector clip and wiggle the clip onto the OBD1 injector. Use a zip tie to secure the clip.
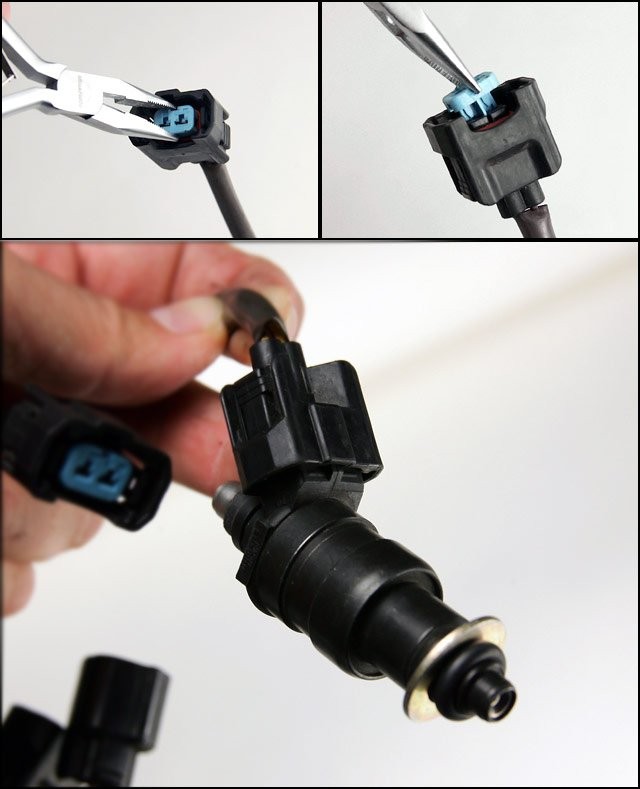 OBD2 Injector Clip Modification
Alt text: Modifying OBD2 injector clip for use with OBD1 injector.
3.3 Alternator Plug Conversion
OBD1 alternators use a round-style plug, while OBD2 alternators use a square plug.
3.3.1 Options for Alternator Plug Conversion
- Cut and splice an OBD1 alternator plug and mate it to your OBD2 EWH.
- Use an OBD2 B-series alternator (any 96-01 B-series alternator), which is plug-and-play.
- Disassemble the OBD1 alternator and swap in an OBD2 alternator’s inner plug.
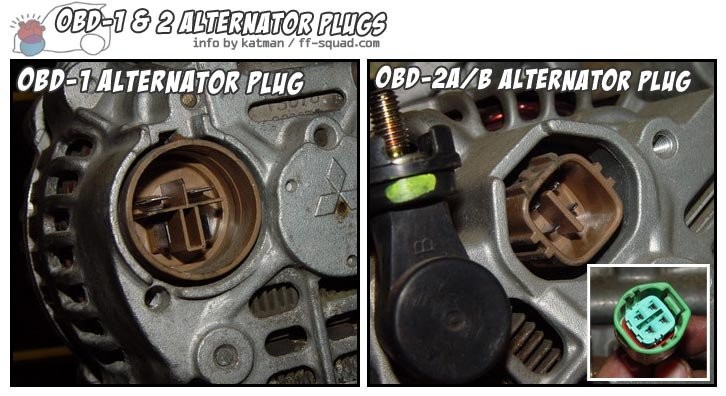 Alternator Plug Types
Alt text: Comparison of OBD1 and OBD2 alternator plug types.
3.4 IAT Sensor
The OBD2 IAT (Intake Air Temperature) sensor plug is different from the OBD1 IAT. You can either keep your existing OBD2 IAT sensor by making a hole in the intake arm or cut and splice the OBD1 IAT plug and mate it to your EWH.
3.5 CKF Sensor
If you are using a US OBD2 ECU to power the OBD1 engine, you need a workaround for the CKF (Crankshaft Flutter) sensor. US OBD2 ECUs look for this sensor, which is integrated into the oil pump.
3.5.1 CKF Bypass Trick
Use a CKF bypass trick to avoid upgrading the oil pump to a US OBD2 oil pump with a CKF sensor.
4. ECU Options for a 98 Honda Civic with Engine Swaps
Choosing the right ECU is crucial for engine swaps. Here are a few options:
4.1 JDM OBD2 ECU
- Pros: Easiest solution, direct plug-and-play.
- Cons: Limited upgrade options, will not pass smog as it does not communicate with US OBD2 scanner tools, 115-120mph speed limiter.
4.2 OBD1 ECU Conversion
Use an OBD2a to OBD1 jumper harness and an OBD1 ECU (JDM or US), such as a reprogrammed P28.
- Pros: OBD1 ECUs are easily reprogrammable and do not require additional sensors (second O2 and CKF).
- Cons: Cannot pass smog, VTPS (VTEC Pressure Switch) needs to be wired in.
4.3 US OBD2 ECU
Use a 96-97 DOHC VTEC Delsol P30 ECU, a 96-99 Integra P72/GSR ECU, or a 96-98 P73/ITR ECU. Alternatively, convert to OBD2b spec via an OBD2a to OBD2b jumper harness and use a 99-00 Civic Si ECU.
- Pros: Can pass smog if the CKF bypass trick is successful.
- Cons: The second O2 sensor needs to be wired in and working.
5. Wiring: Part 1 for 99-00 Civic
For 99-00 Civics, the wiring is similar but slightly different.
5.1 Non-VTEC Civic Modifications
To make a non-VTEC Civic compatible with an OBD1 VTEC engine, perform these mods:
- Add wiring for VTEC.
- Wire in the KS (unless using a P28 ECU).
- Perform the IACV mod.
- Change the distributor plug to that of a 99-00 Si, 96-98 Civic, or 96-01 Integra large-sized distributor plug.
5.2 IACV Mod for 99-00 Civic
The IACV mod involves converting a 3-wire IACV plug to a 2-wire IACV plug, as OBD1 engines use a 2-wire IACV.
Alt text: Wiring diagram for IACV modification in 99-00 Civic.
5.3 Distributor Plug Change
Honda switched to a smaller-style distributor plug on all 99-00 SOHC Civics. This plug needs to be changed if reusing the SOHC EWH on the OBD1 engine. Use a 99-00 Si distributor plug or a 96-98 distributor plug.
5.4 Switching to a 99-00 Si EWH
Switching to a 99-00 Si EWH is similar to using an EX harness in a 96-98 Civic. The second O2 sensor is part of the Si’s cabin harness, so it needs to be wired manually if using a US OBD2 ECU.
6. Wiring: Part 2 for 99-00 Civic
Wiring information from the 96-98 Civic can be applied.
7. ECU Options for 99-00 Civic
7.1 Using a 99-00 Si ECU
- Pros: Easiest solution, direct plug-in.
- Cons: CKF bypass trick required, limited ECU reprogramming options, second O2 sensor required.
7.2 Converting to OBD1 ECU
Use an OBD2b to OBD1 jumper harness and an OBD1 ECU (JDM or US), such as a reprogrammed P28.
- Pros: OBD1 ECUs are easily reprogrammable and do not require additional sensors.
- Cons: Cannot pass smog, VTPS required.
7.3 Staying US OBD2b Spec
Use a 99-00 Si ECU or a 00-01 Integra GSR or ITR ECU (requires immobilizer removal). Alternatively, convert to OBD2b spec via an OBD2a to OBD2b jumper harness and use a 99-00 Civic Si ECU.
- Pros: Can pass smog if the CKF bypass trick is successful.
- Cons: Second O2 sensor needs to be wired in and working.
7.4 Running a JDM OBD2 ECU
Use an OBD2b to OBD2a jumper harness or a JDM CTR (PCT) ECU, which is OBD2b spec and plug-and-play.
- Pros: CKF bypass trick is not required.
- Cons: Requires an OBD2b to OBD2a jumper harness, cannot pass smog, speed limiter at 115-120mph.
8. OBD2a/OBD2b Integra Wiring
8.1 Engine Installation
Reuse all existing engine brackets, mounts, axles, and shift linkage.
8.2 Wiring
Reuse the existing EWH and follow the wiring info for 96-98 Civic for 96-99 Integras or 99-00 Civic for 00-01 Integras.
8.3 Using a US OBD1 Engine Wire Harness in a 96-01 Integra
96-01 Integras all retain a 2-piece wire harness design. The break-off plugs are backward compatible with OBD1 EWHs. If you can get your hands on any of these OBD1 VTEC EWHs:
- 94-95 Integra GSR
- 92-95 Civic Si/EX
- 93-95 DOHC Delsol
Ensure that if you own a non-VTEC Integra, you have VTPS, VTS, and the KS wired in from the ECU plugs out to the shock tower plug.
8.4 ECU Notes for Integra
- 96-01 OBD2 Integras all have the second O2 sensor integrated into the cabin harness, so there’s no need to wire in a second O2 sensor.
- 00-01 Integra ECUs are immobilizer-equipped and cannot be swapped around unless the immobilizer is removed.
8.5 ECU Options for Integra
- (96-99 Integra) JDM OBD2 ECU (direct plug-and-play). Same pros and cons as 96-98 Civic with JDM ECU.
- (00-01 Integra) JDM OBD2 ECU (OBD2b to OBD2a jumper harness required). Same pros and cons as 96-98 Civic with JDM ECU.
- (96-01 Integra) OBD1 ECU conversion; same pros and cons as 96-00 Civic OBD1 conversion.
- (96-99 Integra) OBD2a US ECU; plug-and-play; same pros and cons as 96-98 Civic.
- (00-01 Integra) OBD2a US ECU; same pros and cons as 99-00 Civic.
- (96-99 Integra) OBD2b US ECU; OBD2a to OBD2b jumper harness required; 00-01 Integra ECU will need to have the immobilizer removed for the 96-98 Integra to run.
- (00-01 Integra) OBD2b US ECU; 99-00 Si ECU will be plug-and-play; pin A15 needs to be moved to A16 for fuel pump operation if using 00-01 Integra ECU; 00-01 Integra ECU will also need to have the immobilizer removed or a bypass chip installed for the car to run.
9. Troubleshooting Common OBD2 Harness Issues
When working with OBD2 harnesses, several issues may arise. Knowing how to troubleshoot these problems can save time and prevent further damage.
9.1 Identifying Damaged Wires
Inspect the harness for any frayed, cut, or burnt wires. Use a multimeter to check for continuity and shorts.
9.2 Connector Problems
Ensure all connectors are clean and properly seated. Use contact cleaner to remove any corrosion.
9.3 Grounding Issues
Check all grounding points to ensure they are clean and securely connected. Poor grounding can cause a variety of electrical problems.
9.4 ECU Communication Problems
If the OBD2 scanner cannot communicate with the ECU, check the power and ground connections to the ECU. Also, verify that the OBD2 port is properly wired.
10. OBD2 Scanner Tools and Their Benefits
Having a reliable OBD2 scanner is essential for diagnosing and troubleshooting issues with your car’s electrical and engine systems.
10.1 Basic OBD2 Scanners
These scanners can read and clear diagnostic trouble codes (DTCs). They are suitable for basic diagnostics.
10.2 Advanced OBD2 Scanners
Advanced scanners offer more features, such as live data streaming, component testing, and bi-directional control.
10.3 Using OBD2 Scanners for Diagnostics
Connect the scanner to the OBD2 port, turn on the ignition, and follow the scanner’s instructions to read DTCs and analyze live data.
10.4 Interpreting OBD2 Codes
OBD2 codes consist of a letter followed by four digits. The letter indicates the system (P=Powertrain, B=Body, C=Chassis, U=Network). The digits provide more specific information about the problem.
10.4.1 Common OBD2 Codes
Here are some common OBD2 codes:
| Code | Description | Possible Causes |
|---|---|---|
| P0171 | System Too Lean (Bank 1) | Vacuum leak, faulty O2 sensor, low fuel pressure |
| P0300 | Random/Multiple Misfire Detected | Faulty spark plugs, ignition coils, fuel injectors |
| P0420 | Catalyst System Efficiency Below Threshold | Faulty catalytic converter, O2 sensors |
| P0102 | Mass or Volume Air Flow Circuit Low Input | Dirty or faulty MAF sensor, wiring issues |
11. Resources and Further Reading
11.1 Online Forums and Communities
Honda-Tech and other online forums can provide valuable information and support.
11.2 Technical Manuals
Haynes and Chilton manuals offer detailed repair and wiring information for your vehicle.
11.3 Professional Mechanics
Consulting with a professional mechanic can provide expert advice and assistance with complex wiring and engine swap projects.
12. Ensuring Smog Compliance After Engine Swaps
If you live in an area with smog check requirements, ensure your engine swap complies with local regulations.
12.1 CARB Regulations
The California Air Resources Board (CARB) has specific guidelines for engine swaps. Make sure your swap meets these requirements to pass smog checks.
12.2 BAR Referee Inspection
In California, a Bureau of Automotive Repair (BAR) referee inspection may be required to verify the legality of your engine swap.
12.3 Maintaining Proper Emissions Equipment
Ensure all emissions equipment, such as catalytic converters and O2 sensors, are functioning correctly and properly installed.
13. Safety Precautions When Working with Electrical Systems
Working with electrical systems can be dangerous. Follow these safety precautions to prevent injury:
13.1 Disconnect the Battery
Always disconnect the negative battery terminal before working on any electrical components.
13.2 Use Proper Tools
Use insulated tools to prevent electrical shocks.
13.3 Avoid Working in Wet Conditions
Never work on electrical systems in wet conditions.
13.4 Wear Safety Glasses
Wear safety glasses to protect your eyes from sparks and debris.
14. Step-by-Step Guide to Swapping an Engine Harness in a 98 Honda Civic
Swapping an engine harness can be a complex but manageable task with the right guidance. Here’s a step-by-step guide to help you through the process.
14.1 Preparing for the Swap
Before you begin, gather all the necessary tools and materials. This includes the new engine harness, wire strippers, crimpers, electrical tape, a multimeter, and a set of basic hand tools. Ensure you have a well-lit workspace and a copy of the wiring diagram for your specific Honda Civic model.
14.2 Disconnecting the Battery
The first and most crucial step is to disconnect the negative terminal of the battery. This prevents any accidental electrical shorts during the harness swap. Use a wrench to loosen the nut on the negative terminal, remove the cable, and secure it away from the battery to prevent contact.
14.3 Locating and Disconnecting the Old Harness
Identify all the connection points of the old engine harness. These include connectors to the ECU, sensors, injectors, ignition components, and grounding points. Carefully disconnect each connector, taking note of its location. Labeling each connector with masking tape and a marker can be extremely helpful for reassembly.
14.4 Removing the Old Harness
Once all connectors are disconnected, carefully remove the old harness from the engine bay. Pay attention to how the harness is routed and secured to the engine and chassis. This will help you route the new harness in the same manner. Remove any clips or fasteners holding the harness in place.
14.5 Installing the New Harness
With the old harness removed, it’s time to install the new one. Begin by routing the new harness through the engine bay, following the same path as the old harness. Secure it with clips and fasteners, ensuring it is not in contact with any hot or moving parts.
14.6 Connecting the New Harness
Connect each connector of the new harness to its corresponding component. Use the labels you made earlier to ensure each connector is correctly placed. Double-check the wiring diagram to verify all connections.
14.7 Testing the Connections
Before fully reassembling the engine bay, test all the connections. Reconnect the battery and use a multimeter to check for continuity and voltage at various points in the harness. Ensure all sensors and components are receiving power and signals as expected.
14.8 Final Assembly and Testing
If all connections test positive, proceed with the final assembly. Secure all components, replace any removed parts, and double-check all connections one last time. Start the engine and monitor its performance. Use an OBD2 scanner to check for any error codes and address them as necessary.
15. Benefits of Upgrading to an Aftermarket OBD2 Harness
While OEM harnesses are reliable, aftermarket options can offer enhanced performance and customization.
15.1 Enhanced Durability
Aftermarket harnesses often use higher-quality materials that can withstand extreme temperatures and harsh conditions.
15.2 Improved Performance
Some aftermarket harnesses are designed to optimize electrical conductivity, which can improve engine performance.
15.3 Customization Options
Aftermarket harnesses can be customized to fit specific engine setups and modifications.
15.4 Easier Installation
Some aftermarket harnesses are designed for easier installation, with clearly labeled connectors and detailed instructions.
16. Common Mistakes to Avoid When Working with OBD2 Harnesses
Avoiding common mistakes can save you time and prevent damage to your vehicle’s electrical system.
16.1 Not Disconnecting the Battery
Failing to disconnect the battery can result in electrical shorts and potential injury.
16.2 Incorrect Wiring
Incorrect wiring can cause a variety of problems, from minor inconveniences to serious engine damage.
16.3 Using the Wrong Tools
Using the wrong tools can damage connectors and wires.
16.4 Neglecting Grounding Points
Neglecting grounding points can cause electrical noise and intermittent problems.
16.5 Ignoring Wiring Diagrams
Ignoring wiring diagrams can lead to incorrect connections and system malfunctions.
17. The Future of OBD2 Technology
OBD2 technology continues to evolve, with new features and capabilities being developed.
17.1 OBD3 and Beyond
The next generation of on-board diagnostics, OBD3, may include more advanced monitoring and reporting capabilities.
17.2 Integration with Mobile Devices
OBD2 data can now be accessed and analyzed using mobile devices and apps.
17.3 Remote Diagnostics
Remote diagnostics allow technicians to diagnose and troubleshoot vehicle problems from a distance.
18. How OBD2-SCANNER.EDU.VN Can Help with Your OBD2 Needs
At OBD2-SCANNER.EDU.VN, we provide comprehensive information and resources to help you with all your OBD2-related needs.
18.1 Expert Advice and Support
Our team of experienced technicians can provide expert advice and support for your OBD2 projects.
18.2 Detailed Guides and Tutorials
We offer detailed guides and tutorials on a wide range of OBD2 topics.
18.3 Product Recommendations
We can recommend the best OBD2 scanners and tools for your specific needs.
18.4 Troubleshooting Assistance
We can help you troubleshoot common OBD2 problems and find effective solutions.
18.5 Contact Information
For expert advice and assistance with your OBD2 projects, contact us today.
- Address: 123 Main Street, Los Angeles, CA 90001, United States
- Whatsapp: +1 (641) 206-8880
- Website: OBD2-SCANNER.EDU.VN
19. Real-World Examples of OBD2 Harness Swaps
Understanding how others have approached OBD2 harness swaps can provide valuable insights.
19.1 Case Study 1: B16 Engine Swap in a 98 Civic
A common modification involves swapping a B16 engine into a 98 Civic. This often requires modifying the existing harness or using a conversion harness.
19.2 Case Study 2: K20 Engine Swap in a 99 Civic
Swapping a K20 engine into a 99 Civic involves more complex wiring due to the advanced electronics of the K20.
19.3 Case Study 3: OBD1 Engine in an OBD2 Integra
Using an OBD1 engine in an OBD2 Integra requires adapting the wiring harness to work with the older engine management system.
20. Common Questions About OBD2 Harnesses
Here are some frequently asked questions about OBD2 harnesses and their compatibility.
20.1 What is an OBD2 Harness?
An OBD2 harness is the wiring system that connects the car’s computer (ECU) to various sensors and components, facilitating communication for diagnostics and performance monitoring.
20.2 Can I Use Any OBD2 Harness on My Car?
No, OBD2 harnesses are vehicle-specific and depend on the year, make, and model of your car. Using the wrong harness can cause electrical issues and damage.
20.3 How Do I Know If My OBD2 Harness Is Damaged?
Signs of a damaged OBD2 harness include frayed wires, corroded connectors, and intermittent electrical problems. Use a multimeter to check for continuity and shorts.
20.4 What Tools Do I Need to Replace an OBD2 Harness?
You will need wire strippers, crimpers, electrical tape, a multimeter, and a set of basic hand tools. A wiring diagram for your specific vehicle is also essential.
20.5 Can I Modify an OBD2 Harness?
Yes, but it requires careful attention to detail and a thorough understanding of wiring diagrams. Incorrect modifications can cause serious problems.
20.6 What Is the Difference Between OBD2a and OBD2b?
OBD2a is used in 1996-1998 Honda Civics, while OBD2b is used in 1999-2000 Honda Civics. The connectors and pinouts are different.
20.7 How Can OBD2-SCANNER.EDU.VN Help Me?
OBD2-SCANNER.EDU.VN provides expert advice, detailed guides, product recommendations, and troubleshooting assistance for all your OBD2-related needs.
20.8 What Are the Benefits of Using an Aftermarket OBD2 Harness?
Aftermarket harnesses offer enhanced durability, improved performance, customization options, and easier installation.
20.9 How Do I Ensure Smog Compliance After an Engine Swap?
Ensure your engine swap complies with local regulations, such as CARB guidelines. A BAR referee inspection may be required.
20.10 What Safety Precautions Should I Take When Working with Electrical Systems?
Always disconnect the battery, use proper tools, avoid working in wet conditions, and wear safety glasses.
Understanding the nuances of OBD2 harnesses, especially when considering modifications or engine swaps, is essential for any automotive enthusiast or technician. Remember, OBD2-SCANNER.EDU.VN is here to guide you through every step, ensuring your project is a success. Don’t hesitate to reach out for expert advice and support! Contact us at +1 (641) 206-8880 or visit our website at OBD2-SCANNER.EDU.VN for more information. Let us help you make informed decisions and achieve optimal performance for your vehicle.