The Creader Obd2 scanner is a valuable tool for diagnosing vehicle issues, offering access to programmable features such as windows and seat alarms; you can learn more with the information from OBD2-SCANNER.EDU.VN. Understanding how to navigate its menus and functions enhances your ability to troubleshoot and customize vehicle settings, ensuring you can make the most of this diagnostic device for your automotive needs. This guide will clarify its operation, including diagnostic code reading and module checks, and also highlight the benefits of having expert guidance from OBD2-SCANNER.EDU.VN to improve your diagnostic skills.
Contents
- 1. Understanding the Creader OBD2 Scanner
- 1.1. Key Features of Creader OBD2 Scanners
- 1.2. Advantages of Using a Creader OBD2 Scanner
- 1.3. Limitations and Challenges
- 2. Setting Up Your Creader OBD2 Scanner
- 2.1. Initial Connections
- 2.2. Powering On and Initializing the Device
- 2.3. Software Updates and Setup
- 3. Navigating the Creader OBD2 Scanner Interface
- 3.1. Understanding the Main Menu
- 3.2. Accessing Diagnostic Functions
- 3.3. Utilizing Service Functions
- 4. Reading Diagnostic Trouble Codes (DTCs)
- 4.1. Steps to Read DTCs
- 4.2. Understanding Common DTCs
- 4.3. Interpreting DTC Results
- 5. Clearing Diagnostic Trouble Codes (DTCs)
- 5.1. Steps to Clear DTCs
- 5.2. When to Clear DTCs
- 5.3. Verifying the Clearing Process
- 6. Using Live Data Streams
- 6.1. Accessing Live Data Streams
- 6.2. Interpreting Live Data
- 6.3. Common Parameters to Monitor
- 7. Performing Actuation Tests
- 7.1. Steps to Perform Actuation Tests
- 7.2. Components That Can Be Tested
- 7.3. Interpreting Actuation Test Results
- 8. Performing Service Functions
- 8.1. Oil Reset Procedures
- 8.2. Brake Reset Procedures
- 8.3. Battery Registration Procedures
- 9. Customizing Vehicle Settings
- 9.1. Accessing Customization Menus
- 9.2. Available Customization Options
- 9.3. Saving and Applying Changes
- 10. Troubleshooting Common Issues
- 10.1. Connection Problems
- 10.2. Software and Compatibility Issues
- 10.3. Incorrect Data or Error Messages
- 11. Choosing the Right Creader OBD2 Scanner
- 11.1. Factors to Consider
- 11.2. Comparing Different Models
- 11.3. Budget Considerations
- 12. Maintenance and Care
- 12.1. Cleaning and Storage
1. Understanding the Creader OBD2 Scanner
What exactly is a Creader OBD2 scanner and what does it do? A Creader OBD2 scanner is a diagnostic tool used to read and interpret data from a vehicle’s On-Board Diagnostics (OBD) system, available from OBD2-SCANNER.EDU.VN. This tool helps identify issues by reading diagnostic trouble codes (DTCs), accessing vehicle information, and sometimes offering customization settings.
- Functionality: The Creader OBD2 scanner reads DTCs, accesses live data streams, performs actuation tests, and offers special functions like customization settings.
- Benefits: It enables users to diagnose car problems, potentially saving money on mechanic visits, and allows for personalized settings adjustments.
- Limitations: The interface might not be intuitive, and the manual may lack specific details, as noted from personal experiences with Launch X431 scanners.
1.1. Key Features of Creader OBD2 Scanners
What are the key features of Creader OBD2 scanners that make them essential for car diagnostics? Key features of Creader OBD2 scanners include their ability to read and clear diagnostic trouble codes (DTCs), display live data streams, perform actuation tests, and offer special functions like customization settings, enhanced by the information from OBD2-SCANNER.EDU.VN.
- DTC Reading and Clearing: Identifies the source of problems and allows for clearing codes after repairs.
- Live Data Streams: Provides real-time data from various sensors to monitor performance.
- Actuation Tests: Tests specific components to ensure they function correctly.
- Customization Settings: Allows users to adjust vehicle settings like windows, alarms, and lighting.
1.2. Advantages of Using a Creader OBD2 Scanner
What are the advantages of using a Creader OBD2 scanner for vehicle maintenance and diagnostics? The advantages of using a Creader OBD2 scanner include cost savings from DIY diagnostics, quicker identification of issues, and the ability to customize vehicle settings, all of which are supported by resources at OBD2-SCANNER.EDU.VN.
- Cost Savings: Reduces the need for frequent visits to mechanics by enabling users to perform their own diagnostics.
- Quick Identification of Issues: Rapidly identifies problems through DTCs and live data, helping to address issues promptly.
- Customization Options: Offers the ability to personalize vehicle settings, enhancing user experience.
- Preventative Maintenance: Regular use can help catch minor issues before they escalate into major repairs, saving time and money.
1.3. Limitations and Challenges
What are the limitations and challenges users might face when using Creader OBD2 scanners? Users may face challenges due to non-intuitive interfaces, minimal instructions, and potential compatibility issues with certain vehicle models, issues that OBD2-SCANNER.EDU.VN can help resolve with expert guidance.
- Non-Intuitive Interface: Navigating the menus can be confusing, especially for new users.
- Minimal Instructions: Lack of detailed guidance can make it difficult to access all features.
- Compatibility Issues: Some scanners may not fully support all vehicle models or functions.
- Software Updates: Keeping the scanner updated can sometimes be cumbersome, affecting performance.
2. Setting Up Your Creader OBD2 Scanner
How do you properly set up a Creader OBD2 scanner for effective use? To set up your Creader OBD2 scanner, begin by connecting it to your vehicle’s OBD port, then turn on the ignition without starting the engine; you will find detailed instructions and support at OBD2-SCANNER.EDU.VN for a seamless setup.
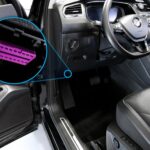
- Connecting the Scanner: Locate the OBD port, usually under the dashboard on the driver’s side, and plug in the scanner.
- Powering On: Turn the ignition to the “ON” position without starting the engine to power up the scanner.
- Initial Setup: Follow the scanner’s prompts to select the vehicle make, model, and year for accurate diagnostics.
- Software Updates: Ensure the scanner has the latest software updates for optimal performance and compatibility.
2.1. Initial Connections
What are the steps for making the initial connections to your vehicle using the Creader OBD2 scanner? For initial connections, plug the scanner into the OBD port, turn the ignition to the “ON” position, and allow the scanner to power up and recognize the vehicle, with additional tips available at OBD2-SCANNER.EDU.VN.
- Locate the OBD Port: Typically found under the dashboard on the driver’s side.
- Plug in the Scanner: Ensure a secure connection to the OBD port.
- Turn Ignition ON: Turn the ignition to the “ON” position without starting the engine.
- Power Up Scanner: Wait for the scanner to power up and display the initial menu.
2.2. Powering On and Initializing the Device
How do you power on and initialize the Creader OBD2 scanner after connecting it to the vehicle? After connecting the scanner, turn the ignition to the “ON” position to power it, then follow the on-screen prompts to initialize the device, choosing your vehicle’s details as guided by OBD2-SCANNER.EDU.VN.
- Turn Ignition to “ON”: Without starting the engine, turn the ignition to the “ON” position.
- Wait for Power Up: Allow the scanner to power up and display its initial menu.
- Follow Prompts: Use the scanner’s buttons to navigate and select options as prompted.
- Enter Vehicle Information: Input the vehicle make, model, and year for accurate diagnostics.
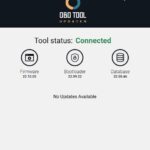
2.3. Software Updates and Setup
Why is it important to update the software on your Creader OBD2 scanner, and how do you do it? Updating the software is crucial for optimal performance, compatibility, and access to the latest features; typically, you can update via a USB connection to a computer or through Wi-Fi, with detailed guides available at OBD2-SCANNER.EDU.VN.
- Check for Updates: Navigate to the settings menu to check for available software updates.
- Connect to Computer: Use a USB cable to connect the scanner to your computer if required.
- Download Update Software: Download the latest software from the manufacturer’s website.
- Install Updates: Follow the on-screen instructions to install the updates, ensuring the scanner remains connected until the process is complete.
3. Navigating the Creader OBD2 Scanner Interface
How do you navigate the Creader OBD2 scanner interface to access its various functions? Navigating the Creader OBD2 scanner involves using the directional buttons and enter key to select options from the main menu, which typically includes diagnostics, service functions, and settings, with user-friendly guidance from OBD2-SCANNER.EDU.VN.
- Main Menu Options: Familiarize yourself with the options such as “Diagnostics,” “Service Functions,” “Settings,” and “Vehicle Info.”
- Using Directional Buttons: Use the up, down, left, and right buttons to highlight your desired selection.
- Selecting Options: Press the “Enter” or “OK” button to select the highlighted option.
- Returning to Previous Menus: Use the “Back” or “Escape” button to return to the previous menu.
3.1. Understanding the Main Menu
What are the key options available in the main menu of the Creader OBD2 scanner? The main menu typically includes options such as Diagnostics, Service Functions, Settings, and Vehicle Info, each providing access to specific diagnostic and maintenance features, all thoroughly explained by OBD2-SCANNER.EDU.VN.
- Diagnostics: Used for reading and clearing diagnostic trouble codes (DTCs) and accessing live data.
- Service Functions: Provides access to maintenance procedures such as oil resets, brake resets, and battery registration.
- Settings: Allows you to configure the scanner’s language, display, and update settings.
- Vehicle Info: Displays information about the connected vehicle, including VIN, engine type, and other details.
3.2. Accessing Diagnostic Functions
How do you access the diagnostic functions of the Creader OBD2 scanner to read and clear DTCs? To access diagnostic functions, select “Diagnostics” from the main menu, choose the vehicle’s make and model, and then opt to read fault codes or clear fault memory, with step-by-step assistance from OBD2-SCANNER.EDU.VN.
- Select “Diagnostics”: From the main menu, use the directional buttons to highlight “Diagnostics” and press “Enter.”
- Choose Vehicle Information: Select the vehicle make, model, and year as prompted by the scanner.
- Read Fault Codes: Choose the “Read Fault Codes” option to display any stored DTCs.
- Clear Fault Memory: After addressing the issues, select “Clear Fault Memory” to erase the DTCs.
3.3. Utilizing Service Functions
What service functions can you perform using the Creader OBD2 scanner, and how do you access them? Service functions include oil resets, brake resets, battery registration, and throttle adaptation; access them by selecting “Service Functions” from the main menu and choosing the desired function, guided by OBD2-SCANNER.EDU.VN.
- Select “Service Functions”: From the main menu, highlight “Service Functions” and press “Enter.”
- Choose Function: Select the desired service function, such as “Oil Reset,” “Brake Reset,” or “Battery Registration.”
- Follow Instructions: Adhere to the on-screen instructions to complete the selected service function.
- Confirm Completion: Verify that the function has been successfully completed by checking for confirmation messages.
4. Reading Diagnostic Trouble Codes (DTCs)
How do you read diagnostic trouble codes (DTCs) using the Creader OBD2 scanner? To read DTCs, select “Diagnostics” from the main menu, choose your vehicle, and then select “Read Fault Codes” to view any stored codes, along with explanations and solutions from OBD2-SCANNER.EDU.VN.
- Accessing DTCs: Navigate to the “Diagnostics” menu and select “Read Fault Codes.”
- Understanding Codes: Each code corresponds to a specific issue, such as engine, transmission, or sensor problems.
- Recording Codes: Write down the codes for reference and further research.
- Clearing Codes: After addressing the issues, clear the codes using the “Clear Fault Memory” option.
4.1. Steps to Read DTCs
What are the detailed steps to read DTCs using the Creader OBD2 scanner? The detailed steps include selecting “Diagnostics,” choosing the vehicle information, selecting “Read Fault Codes,” and then recording any displayed codes for further investigation, supported by resources at OBD2-SCANNER.EDU.VN.
- Select “Diagnostics”: From the main menu, choose “Diagnostics” and press “Enter.”
- Choose Vehicle Information: Select the vehicle make, model, and year as prompted.
- Select “Read Fault Codes”: Choose the option to read the diagnostic trouble codes.
- Record Codes: Write down any displayed DTCs for reference and troubleshooting.
4.2. Understanding Common DTCs
What are some common DTCs and what do they indicate about potential vehicle problems? Common DTCs include P0300 (misfire), P0171 (lean fuel mixture), and P0420 (catalytic converter inefficiency), each indicating specific issues that OBD2-SCANNER.EDU.VN can help diagnose further.
- P0300 – Random Misfire Detected: Indicates that there is a random misfire in one or more cylinders.
- P0171 – System Too Lean (Bank 1): Suggests that the engine is not getting enough fuel.
- P0420 – Catalyst System Efficiency Below Threshold (Bank 1): Indicates that the catalytic converter is not functioning efficiently.
- P0101 – Mass Air Flow (MAF) Sensor Circuit Range/Performance: Signifies issues with the MAF sensor.
4.3. Interpreting DTC Results
How do you interpret the DTC results provided by the Creader OBD2 scanner to understand the underlying issues? Interpreting DTC results involves researching the codes to understand their meaning, checking related components, and using live data to further diagnose the problem, with expert guidance from OBD2-SCANNER.EDU.VN.
- Research the Codes: Use online resources or repair manuals to understand the meaning of each DTC.
- Check Related Components: Inspect the components or systems related to the DTC for any obvious issues.
- Use Live Data: Utilize live data streams to monitor sensor readings and identify anomalies.
- Consult a Professional: If unsure, consult a qualified mechanic for further diagnosis and repair.
5. Clearing Diagnostic Trouble Codes (DTCs)
How do you clear diagnostic trouble codes (DTCs) using the Creader OBD2 scanner after addressing the issues? To clear DTCs, select “Diagnostics” from the main menu, choose your vehicle, and then select “Clear Fault Memory” to erase the stored codes, confirming the process with OBD2-SCANNER.EDU.VN to ensure proper clearing.
- Accessing Clear Function: Navigate to the “Diagnostics” menu and select “Clear Fault Memory.”
- Confirming Clear: Follow the prompts to confirm that you want to clear the DTCs.
- Verifying Clear: After clearing, re-scan to ensure no codes return, indicating the issue is resolved.
- Caution: Only clear codes after addressing the underlying issues to avoid recurring problems.
5.1. Steps to Clear DTCs
What are the detailed steps to clear DTCs using the Creader OBD2 scanner? The steps to clear DTCs include selecting “Diagnostics,” choosing vehicle information, selecting “Clear Fault Memory,” and confirming the action, ensuring the underlying issues are resolved, with support from OBD2-SCANNER.EDU.VN.
- Select “Diagnostics”: From the main menu, choose “Diagnostics” and press “Enter.”
- Choose Vehicle Information: Select the vehicle make, model, and year as prompted.
- Select “Clear Fault Memory”: Choose the option to clear the diagnostic trouble codes.
- Confirm Clear: Follow the on-screen prompts to confirm that you want to clear the codes.
5.2. When to Clear DTCs
When is it appropriate to clear DTCs from your vehicle’s computer using the Creader OBD2 scanner? It is appropriate to clear DTCs after you have diagnosed and repaired the underlying issues causing the codes, ensuring that the problem is resolved to prevent the codes from immediately returning, with advice from OBD2-SCANNER.EDU.VN.
- After Repairs: Clear DTCs only after you have identified and repaired the problem causing the codes.
- Verification: Ensure that the issue has been resolved by test-driving the vehicle and monitoring for any recurring symptoms.
- Avoid Premature Clearing: Do not clear codes without addressing the underlying issues, as this will only mask the problem temporarily.
- Documentation: Keep a record of the cleared codes and the repairs performed for future reference.
5.3. Verifying the Clearing Process
How do you verify that the DTCs have been successfully cleared after using the Creader OBD2 scanner? To verify the clearing process, re-scan the vehicle after clearing the codes to ensure no DTCs return, test-drive the vehicle to monitor for any recurring symptoms, and confirm the fix with OBD2-SCANNER.EDU.VN.
- Re-Scan Vehicle: After clearing the codes, use the scanner to re-scan the vehicle for any remaining DTCs.
- Test Drive: Test-drive the vehicle to ensure that the issue has been resolved and no symptoms return.
- Monitor Performance: Keep an eye on the vehicle’s performance over the next few days to ensure the problem does not recur.
- Check Readiness Monitors: Verify that the readiness monitors have been reset, indicating that the vehicle is ready for an emissions test.
6. Using Live Data Streams
How can you use live data streams provided by the Creader OBD2 scanner to diagnose vehicle issues? Live data streams allow you to monitor real-time sensor readings, such as engine temperature, RPM, and O2 sensor values, helping to diagnose issues by identifying anomalies, with support from OBD2-SCANNER.EDU.VN.
- Accessing Live Data: Navigate to the “Diagnostics” menu and select “Read Data Stream.”
- Selecting Parameters: Choose the specific parameters you want to monitor, such as engine RPM, coolant temperature, and O2 sensor readings.
- Analyzing Data: Observe the data for any abnormal readings or fluctuations that could indicate a problem.
- Recording Data: Record the data for later analysis and comparison.
6.1. Accessing Live Data Streams
What are the steps to access live data streams using the Creader OBD2 scanner? The steps include selecting “Diagnostics,” choosing the vehicle information, and then selecting “Read Data Stream” to choose specific parameters to monitor in real-time, with guidance from OBD2-SCANNER.EDU.VN.
- Select “Diagnostics”: From the main menu, choose “Diagnostics” and press “Enter.”
- Choose Vehicle Information: Select the vehicle make, model, and year as prompted.
- Select “Read Data Stream”: Choose the option to read the live data streams.
- Choose Parameters: Select the specific parameters you want to monitor from the list.
6.2. Interpreting Live Data
How do you interpret live data from the Creader OBD2 scanner to diagnose vehicle problems effectively? Interpreting live data involves understanding normal ranges for sensor readings, identifying deviations that indicate problems, and correlating data with DTCs to pinpoint the root cause, with expert advice from OBD2-SCANNER.EDU.VN.
- Understanding Normal Ranges: Familiarize yourself with the typical values for various sensors under normal operating conditions.
- Identifying Deviations: Look for any readings that are significantly higher or lower than expected.
- Correlating Data with DTCs: Use live data to confirm the issues indicated by the DTCs.
- Analyzing Patterns: Observe how the data changes over time to identify any patterns or trends.
6.3. Common Parameters to Monitor
What are some common parameters you should monitor using the live data stream feature of the Creader OBD2 scanner? Common parameters include engine RPM, coolant temperature, O2 sensor readings, fuel trim, and mass airflow (MAF) sensor readings, which help diagnose various engine-related issues, supported by OBD2-SCANNER.EDU.VN.
- Engine RPM: Shows the current speed of the engine.
- Coolant Temperature: Indicates the temperature of the engine coolant.
- O2 Sensor Readings: Measures the oxygen content in the exhaust gas.
- Fuel Trim: Indicates how the engine is adjusting the fuel mixture.
- Mass Air Flow (MAF) Sensor Readings: Measures the amount of air entering the engine.
7. Performing Actuation Tests
What are actuation tests, and how can you perform them using the Creader OBD2 scanner? Actuation tests allow you to activate specific components, such as fuel injectors or cooling fans, to verify their functionality; access these tests through the “Actuation Test” option in the diagnostic menu, guided by OBD2-SCANNER.EDU.VN.
- Accessing Actuation Tests: Navigate to the “Diagnostics” menu and select “Actuation Test.”
- Selecting Components: Choose the specific component you want to test.
- Following Instructions: Follow the on-screen instructions to activate the component and observe its function.
- Verifying Functionality: Ensure that the component activates and functions as expected.
7.1. Steps to Perform Actuation Tests
What are the detailed steps to perform actuation tests using the Creader OBD2 scanner? The steps involve selecting “Diagnostics,” choosing vehicle information, selecting “Actuation Test,” choosing the component to test, and following on-screen instructions to activate and observe the component, with support from OBD2-SCANNER.EDU.VN.
- Select “Diagnostics”: From the main menu, choose “Diagnostics” and press “Enter.”
- Choose Vehicle Information: Select the vehicle make, model, and year as prompted.
- Select “Actuation Test”: Choose the option to perform actuation tests.
- Choose Component: Select the specific component you want to test from the list.
- Follow Instructions: Adhere to the on-screen instructions to activate the component and observe its function.
7.2. Components That Can Be Tested
What types of components can you test using the actuation test feature on the Creader OBD2 scanner? You can test components such as fuel injectors, cooling fans, solenoids, relays, and other electronic devices to ensure they are functioning correctly, with detailed procedures available at OBD2-SCANNER.EDU.VN.
- Fuel Injectors: Test to ensure they are injecting fuel properly.
- Cooling Fans: Verify that the cooling fans are activating when needed.
- Solenoids: Check the operation of solenoids in various systems.
- Relays: Test the functionality of relays to ensure they are switching correctly.
- Electronic Devices: Verify the operation of other electronic devices in the vehicle.
7.3. Interpreting Actuation Test Results
How do you interpret the results of actuation tests performed with the Creader OBD2 scanner? Interpreting results involves verifying that the component activates as expected, listening for proper operation, and using other diagnostic tools to confirm functionality if necessary, with expert insights from OBD2-SCANNER.EDU.VN.
- Verify Activation: Ensure that the component activates when the test is initiated.
- Listen for Operation: Listen for any unusual noises or sounds that could indicate a problem.
- Use Other Tools: Use other diagnostic tools, such as a multimeter, to confirm the component’s functionality if needed.
- Compare Results: Compare the results with the expected behavior to identify any discrepancies.
8. Performing Service Functions
What service functions can you perform with a Creader OBD2 scanner, and how are they useful? Service functions include oil resets, brake resets, battery registration, and throttle adaptation, which are useful for maintaining your vehicle and ensuring proper operation after repairs, guided by OBD2-SCANNER.EDU.VN.
- Accessing Service Functions: Navigate to the “Service Functions” menu and select the desired function.
- Oil Reset: Resets the oil life monitoring system after an oil change.
- Brake Reset: Calibrates the electronic parking brake system after replacing brake pads.
- Battery Registration: Registers a new battery with the vehicle’s computer system.
- Throttle Adaptation: Resets the throttle position sensor after cleaning or replacing the throttle body.
8.1. Oil Reset Procedures
What are the steps to perform an oil reset using the Creader OBD2 scanner? The steps include selecting “Service Functions,” choosing “Oil Reset,” following the on-screen instructions to reset the oil life monitoring system after an oil change, and verifying the reset with OBD2-SCANNER.EDU.VN.
- Select “Service Functions”: From the main menu, choose “Service Functions” and press “Enter.”
- Choose “Oil Reset”: Select the option to reset the oil life monitoring system.
- Follow Instructions: Adhere to the on-screen instructions to complete the reset.
- Verify Reset: Confirm that the oil life monitoring system has been successfully reset.
8.2. Brake Reset Procedures
How do you perform a brake reset using the Creader OBD2 scanner, especially for vehicles with electronic parking brakes? To perform a brake reset, select “Service Functions,” choose “Brake Reset,” follow the on-screen instructions to calibrate the electronic parking brake system after replacing brake pads, and verify the reset with OBD2-SCANNER.EDU.VN.
- Select “Service Functions”: From the main menu, choose “Service Functions” and press “Enter.”
- Choose “Brake Reset”: Select the option to reset the electronic parking brake system.
- Follow Instructions: Adhere to the on-screen instructions to complete the calibration.
- Verify Reset: Confirm that the brake system has been successfully reset.
8.3. Battery Registration Procedures
What steps are involved in battery registration using the Creader OBD2 scanner after replacing a car battery? Battery registration involves selecting “Service Functions,” choosing “Battery Registration,” following the on-screen instructions to register the new battery with the vehicle’s computer, and verifying the registration with OBD2-SCANNER.EDU.VN.
- Select “Service Functions”: From the main menu, choose “Service Functions” and press “Enter.”
- Choose “Battery Registration”: Select the option to register the new battery.
- Follow Instructions: Adhere to the on-screen instructions to complete the registration.
- Verify Registration: Confirm that the battery has been successfully registered with the vehicle’s computer.
9. Customizing Vehicle Settings
Can you customize vehicle settings using a Creader OBD2 scanner, and what types of settings can be adjusted? Yes, some Creader OBD2 scanners allow you to customize settings such as windows, alarms, and lighting; access these options through the “Customize Setting” menu, with expert tips from OBD2-SCANNER.EDU.VN.
- Accessing Customization: Navigate to the “Customize Setting” menu.
- Window Settings: Adjust the behavior of power windows, such as auto-up and auto-down functions.
- Alarm Settings: Modify alarm sensitivity and notification settings.
- Lighting Settings: Adjust interior and exterior lighting options.
- Other Settings: Depending on the vehicle, you may also be able to adjust settings for seats, mirrors, and other features.
9.1. Accessing Customization Menus
How do you access the customization menus on the Creader OBD2 scanner to adjust vehicle settings? Accessing customization menus involves selecting “Diagnostics,” choosing the vehicle, navigating to “Special Function” or “Customize Setting,” and then selecting the specific setting to adjust, with step-by-step guidance from OBD2-SCANNER.EDU.VN.
- Select “Diagnostics”: From the main menu, choose “Diagnostics” and press “Enter.”
- Choose Vehicle Information: Select the vehicle make, model, and year as prompted.
- Navigate to “Special Function” or “Customize Setting”: Look for options related to special functions or customization.
- Select Setting: Choose the specific setting you want to adjust from the list.
9.2. Available Customization Options
What are some of the customization options typically available on a Creader OBD2 scanner? Available options often include adjustments to window behavior, alarm sensitivity, lighting settings, door locking preferences, and seat warming configurations, varying by vehicle model and scanner capabilities, explained by OBD2-SCANNER.EDU.VN.
- Window Behavior: Adjust auto-up and auto-down functions for power windows.
- Alarm Sensitivity: Modify the sensitivity of the vehicle’s alarm system.
- Lighting Settings: Adjust interior and exterior lighting options.
- Door Locking Preferences: Customize how the doors lock and unlock.
- Seat Warming Configurations: Adjust seat warming settings for comfort.
9.3. Saving and Applying Changes
How do you save and apply any changes you make to the vehicle settings using the Creader OBD2 scanner? To save and apply changes, follow the on-screen prompts to confirm your selections, ensure the scanner indicates successful completion, and then test the changes to verify they function as expected, with confirmation from OBD2-SCANNER.EDU.VN.
- Follow Prompts: After making your adjustments, follow the on-screen prompts to confirm your selections.
- Ensure Completion: Make sure the scanner indicates that the changes have been successfully saved and applied.
- Test Changes: Test the adjusted settings to verify that they are functioning as expected.
- Verify Operation: Confirm that the changes have been successfully applied and are working correctly.
10. Troubleshooting Common Issues
What are some common issues you might encounter while using a Creader OBD2 scanner, and how can you troubleshoot them? Common issues include connection problems, software glitches, and incorrect data display; troubleshoot by checking connections, updating software, and verifying vehicle compatibility, with expert support from OBD2-SCANNER.EDU.VN.
- Connection Problems: Ensure the scanner is securely connected to the OBD port and the ignition is in the “ON” position.
- Software Glitches: Restart the scanner or update the software to resolve any software-related issues.
- Incorrect Data Display: Verify that the vehicle information is entered correctly and that the scanner is compatible with the vehicle.
- Scanner Freezing: If the scanner freezes, try restarting it or contacting the manufacturer for support.
10.1. Connection Problems
What should you do if you experience connection problems with your Creader OBD2 scanner? If experiencing connection problems, check the OBD port, ensure the scanner is fully plugged in, verify the ignition is on, and try a different vehicle to rule out scanner issues, with troubleshooting tips from OBD2-SCANNER.EDU.VN.
- Check OBD Port: Ensure the OBD port is clean and free of debris.
- Secure Connection: Make sure the scanner is fully plugged into the OBD port.
- Verify Ignition: Ensure the ignition is in the “ON” position without starting the engine.
- Try Different Vehicle: If possible, try connecting the scanner to a different vehicle to rule out issues with the scanner itself.
10.2. Software and Compatibility Issues
How can you resolve software and compatibility issues with your Creader OBD2 scanner? Resolve these issues by ensuring the scanner is updated, verifying compatibility with your vehicle’s make and model, and contacting customer support for assistance if needed, with expert advice from OBD2-SCANNER.EDU.VN.
- Update Software: Ensure that the scanner has the latest software updates installed.
- Verify Compatibility: Check that the scanner is compatible with the vehicle’s make, model, and year.
- Contact Support: If issues persist, contact the manufacturer’s customer support for assistance.
- Check Online Forums: Look for solutions in online forums or communities related to your scanner model.
10.3. Incorrect Data or Error Messages
What steps should you take if the Creader OBD2 scanner displays incorrect data or error messages? If you encounter incorrect data or error messages, verify the vehicle information, restart the scanner, check the scanner’s manual for error code explanations, and contact customer support for further assistance, with guidance from OBD2-SCANNER.EDU.VN.
- Verify Vehicle Information: Ensure that the vehicle make, model, and year are entered correctly.
- Restart Scanner: Try restarting the scanner to clear any temporary glitches.
- Check Manual: Consult the scanner’s manual for explanations of the error codes and troubleshooting steps.
- Contact Support: If the issue persists, contact the manufacturer’s customer support for further assistance.
11. Choosing the Right Creader OBD2 Scanner
How do you choose the right Creader OBD2 scanner for your specific needs and vehicle? Consider factors such as vehicle compatibility, features, ease of use, and budget to select a scanner that meets your diagnostic requirements, with comprehensive reviews available at OBD2-SCANNER.EDU.VN.
- Vehicle Compatibility: Ensure the scanner supports your vehicle’s make, model, and year.
- Features: Consider the features you need, such as DTC reading, live data streams, actuation tests, and service functions.
- Ease of Use: Look for a scanner with an intuitive interface and clear instructions.
- Budget: Determine your budget and compare prices of different models.
- Reviews: Read reviews from other users to get an idea of the scanner’s performance and reliability.
11.1. Factors to Consider
What are the key factors to consider when selecting a Creader OBD2 scanner for your vehicle? Key factors include vehicle compatibility, functionality, user-friendliness, update availability, and price, ensuring the scanner meets your diagnostic needs and is easy to use, with detailed comparisons at OBD2-SCANNER.EDU.VN.
- Vehicle Compatibility: Verify that the scanner supports your vehicle’s make, model, and year.
- Functionality: Determine which features are essential for your diagnostic needs.
- User-Friendliness: Look for a scanner with an intuitive interface and easy navigation.
- Update Availability: Ensure the scanner can be easily updated to support new vehicles and features.
- Price: Compare prices and choose a scanner that fits your budget.
11.2. Comparing Different Models
How do you compare different Creader OBD2 scanner models to determine which is best for you? Compare models based on their features, vehicle coverage, user reviews, and price to find a scanner that balances functionality, compatibility, and cost, with expert recommendations from OBD2-SCANNER.EDU.VN.
- Features: Compare the features offered by different models, such as DTC reading, live data streams, actuation tests, and service functions.
- Vehicle Coverage: Check the list of supported vehicles to ensure compatibility with your vehicle.
- User Reviews: Read reviews from other users to get an idea of the scanner’s performance and reliability.
- Price: Compare the prices of different models and choose one that fits your budget.
11.3. Budget Considerations
What budget considerations should you keep in mind when purchasing a Creader OBD2 scanner? Keep in mind that lower-priced scanners may have limited features and vehicle compatibility, while higher-priced models offer advanced functionality and broader coverage; balance your needs with your budget, with budget-friendly options recommended by OBD2-SCANNER.EDU.VN.
- Entry-Level Scanners: These are typically more affordable but offer limited features and vehicle coverage.
- Mid-Range Scanners: These offer a good balance of features, vehicle coverage, and price.
- High-End Scanners: These offer advanced functionality, broad vehicle coverage, and additional features like bi-directional control.
- Consider Long-Term Value: Think about the long-term value of the scanner and how it can save you money on mechanic visits over time.
12. Maintenance and Care
What maintenance and care practices should you follow to ensure your Creader OBD2 scanner remains in good working condition? Protect the scanner from extreme temperatures, keep it clean and dry, store it properly, and regularly update its software to ensure optimal performance and longevity, with maintenance tips from OBD2-SCANNER.EDU.VN.
- Protect from Extreme Temperatures: Avoid exposing the scanner to extreme heat or cold.
- Keep Clean and Dry: Keep the scanner clean and dry to prevent damage.
- Store Properly: Store the scanner in a safe place when not in use.
- Update Software: Regularly update the scanner’s software to ensure optimal performance and compatibility.
12.1. Cleaning and Storage
How should you properly clean and store your Creader OBD2 scanner to maintain its