The Diy Obd2 Port Lt1 project involves creating your own On-Board Diagnostics II (OBD2) port for an LT1 engine, offering a hands-on approach to engine diagnostics and customization. At OBD2-SCANNER.EDU.VN, we guide you through understanding the benefits and steps involved, ensuring a successful integration. Enhance your diagnostic capabilities with personalized solutions, focusing on automotive diagnostics, engine management systems, and vehicle customization.
Contents
- 1. What is a DIY OBD2 Port LT1 and Why Build One?
- 2. Who Benefits Most from a DIY OBD2 Port LT1?
- 3. What are the Essential Components for a DIY OBD2 Port LT1?
- 4. How Do You Wire a DIY OBD2 Port LT1?
- 5. What Tools Do You Need to Assemble a DIY OBD2 Port LT1?
- 6. What are the Benefits of Soldering Connections in a DIY OBD2 Port LT1?
- 7. How to Test Your DIY OBD2 Port LT1?
- 8. What Common Issues Might You Encounter and How to Resolve Them?
- 9. How Does the OBD2 Port Interact with the PCM in an LT1 Engine?
- 10. What Are the Advantages of Using a Premade Fuse Block for a DIY OBD2 Port LT1?
- 11. How Can OBD2-SCANNER.EDU.VN Help You with Your DIY OBD2 Port LT1 Project?
- 12. What Safety Precautions Should You Take When Working on a DIY OBD2 Port LT1?
- 13. How to Choose the Right OBD2 Scanner for Your DIY OBD2 Port LT1?
- 14. What are Some Advanced Diagnostic Techniques You Can Use with a DIY OBD2 Port LT1?
- 15. Can You Use a DIY OBD2 Port LT1 for Performance Tuning?
- 16. How to Integrate a Check Engine Light with Your DIY OBD2 Port LT1?
- 17. What are the Key Differences Between OBD1 and OBD2 for LT1 Engines?
- 18. What Are Some Common OBD2 Error Codes You Might Encounter with an LT1 Engine?
- 19. How Can You Use a DIY OBD2 Port LT1 to Diagnose Emission Problems?
- 20. What Are the Legal Considerations for Using a DIY OBD2 Port LT1?
- 21. How to Stay Updated on the Latest OBD2 Technologies and Information?
- 22. What Future Trends Can Be Expected in OBD2 Technology?
- 23. Can a DIY OBD2 Port LT1 Be Used on Other Vehicle Makes and Models?
- 24. What Are the Alternatives to Building a DIY OBD2 Port LT1?
- 25. Where Can You Find Reliable Wiring Diagrams and Schematics for a DIY OBD2 Port LT1?
- 26. How to Properly Insulate and Protect the Wiring in a DIY OBD2 Port LT1?
- 27. Can You Use a DIY OBD2 Port LT1 for Custom Engine Swaps?
- 28. What are the Ethical Considerations When Using a DIY OBD2 Port LT1?
- 29. How to Document Your DIY OBD2 Port LT1 Project for Future Reference?
- 30. Ready to Build Your DIY OBD2 Port LT1?
1. What is a DIY OBD2 Port LT1 and Why Build One?
A DIY OBD2 port LT1 involves constructing your own diagnostic interface for an LT1 engine. According to a study by the National Institute for Automotive Service Excellence (ASE), custom diagnostic tools can significantly enhance the precision of engine tuning and diagnostics. Building your own offers several advantages:
- Customization: Tailor the port to your specific needs, adding features not available on standard OBD2 ports.
- Cost Savings: Potentially save money compared to purchasing pre-made solutions, especially if you have existing components.
- Educational Experience: Gain a deeper understanding of your engine’s diagnostics and electronics.
- Enhanced Diagnostics: Implement advanced diagnostic features that are not commonly available in off-the-shelf OBD2 scanners.
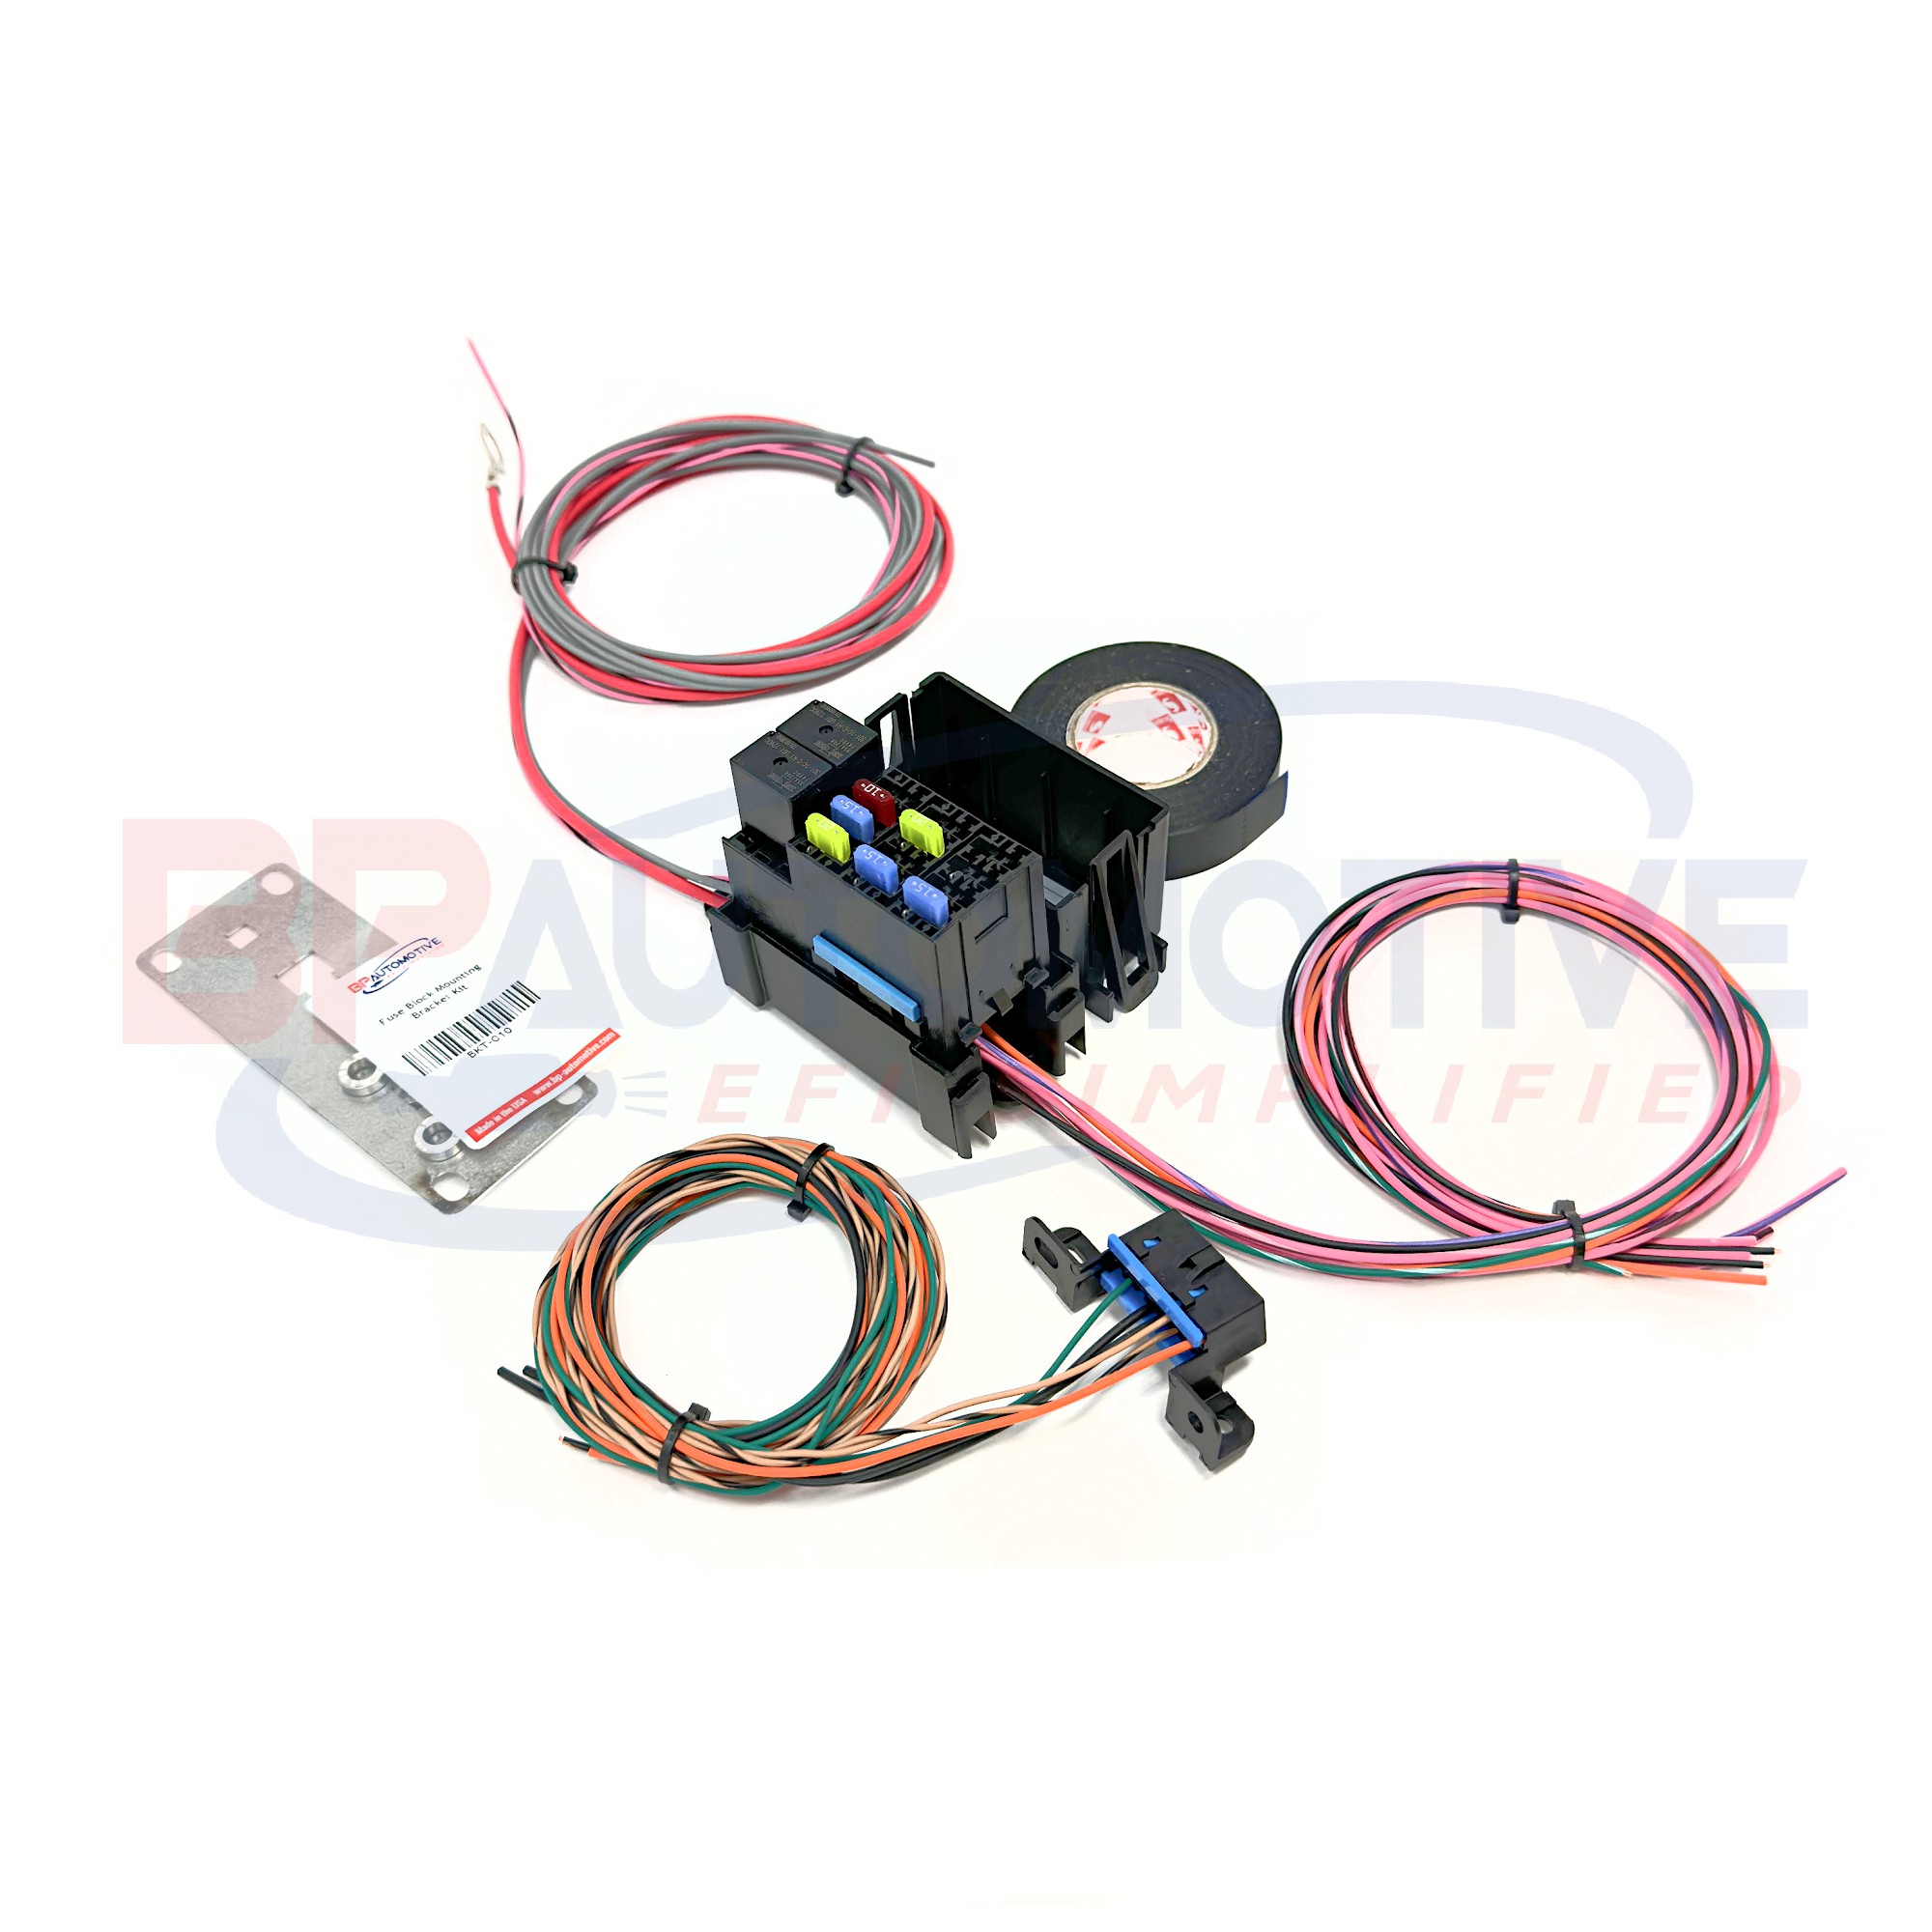 DIY OBD2 Port LT1 Components
2. Who Benefits Most from a DIY OBD2 Port LT1?
The DIY OBD2 port LT1 project is most beneficial for:
- Automotive Enthusiasts: Individuals passionate about cars and eager to understand their engine’s inner workings.
- DIY Mechanics: Mechanics who prefer to customize their tools and have precise control over diagnostic processes.
- Performance Tuners: Those who need specific diagnostic data for performance tuning and optimization.
- Educators: Instructors in automotive programs who want to teach students about engine diagnostics in a hands-on manner.
3. What are the Essential Components for a DIY OBD2 Port LT1?
Building a DIY OBD2 port LT1 requires specific components. A comprehensive list ensures you have everything needed for a successful project.
| Component | Vendor | Part# | Quantity Needed |
|---|---|---|---|
| OBD2 Port Plastic Connector, 16 Pin | www.mouser.com | 829-12110250 | 1 |
| Terminals – for OBD2 port | www.mouser.com | 829-12129373 | 4 |
| Terminal Lock – secures terminals | www.mouser.com | 829-12160437 | 2 |
| Lamp (for check engine light) | www.allelectronics.com | Check lamps/indicators | As Needed |
| Fuse Block Housing kit (terminals included) | www.rockauto.com | 85668 | 1 |
| Relay Socket | www.allelectronics.com | SRLY-2 | 2 |
| Relay 30 Amp | www.allelectronics.com | RLY-351 | 2 |
| Relay Terminal 14-18 AWG | www.mouser.com | 571-42238-2 | 8 |
4. How Do You Wire a DIY OBD2 Port LT1?
Proper wiring is crucial for a functioning DIY OBD2 port LT1. Here’s a step-by-step guide:
-
OBD2 Port Wiring:
- Pin 2: Serial Data – Connect this to the PCM (Powertrain Control Module).
- Pins 4 & 5: Ground – Connect to a reliable ground source. Pin 5 is generally sufficient, but some scan tools require both.
- Pin 16: 12V+ Battery – Connect to a constant 12V power source.
-
LT1 Specific Wiring (for 96-97 LT1 ONLY):
- Pin 6: Diagnostic Request/Field Output Enable
- Pin 9: UART Serial Data
- Note: 1995 LT1 vehicles used an OBD2 port but were not fully OBD2 compliant, using pin 9 for serial data instead of pin 2.
-
Fuse Block Wiring:
- Relay Sockets: Replace the short wires in the relay sockets with new terminals capable of handling the current needs.
- Terminal Connections: Crimp and solder all connections for reliability.
-
Fuse Block Assembly:
- Power Distribution: Cut the 4 terminals bussed together to have 3 together and 1 separate for power distribution.
- Relay Output: Install the terminal into the relay output leg and the 3 bussed fuse terminals into the block.
- Relay Input: Connect the red wire extending from the relay input terminal to a 12V+ battery source. This provides constant power to the fuse on the end of the block.
- Fuel Pump Relay: Install the gray 16 AWG wire into the output leg of the fuel pump relay.
- Key Hot Power: Install the pink wire terminal into the relay coil location to activate the relay with key-on power.
- Ground Connections: Connect the ground for each relay coil using a jumper from the first relay to the second.
5. What Tools Do You Need to Assemble a DIY OBD2 Port LT1?
Assembling a DIY OBD2 port LT1 requires specific tools to ensure precision and safety. Here’s a comprehensive list:
- Crimping Tool: For securely attaching terminals to wires.
- Soldering Iron: For soldering connections to ensure conductivity and durability.
- Wire Strippers: To remove insulation from wires without damaging the conductors.
- Multimeter: To test voltage and continuity.
- Screwdrivers: Various sizes for assembling the fuse block and OBD2 port connector.
- Heat Gun: To apply heat shrink tubing for insulation.
- Safety Glasses: To protect your eyes during soldering and cutting.
- Work Gloves: To protect your hands from heat and sharp objects.
6. What are the Benefits of Soldering Connections in a DIY OBD2 Port LT1?
Soldering connections offers numerous benefits for a DIY OBD2 port LT1:
- Improved Conductivity: Solder creates a strong, low-resistance connection, ensuring efficient current flow.
- Enhanced Durability: Soldered connections are less likely to corrode or loosen over time, providing long-lasting reliability.
- Better Vibration Resistance: Soldering helps the connections withstand vibrations, crucial in automotive applications.
- Reduced Voltage Drop: A solid soldered connection minimizes voltage drop, ensuring consistent performance of connected devices.
- Professional Finish: Soldering provides a clean, professional-looking finish to your wiring, increasing overall build quality.
7. How to Test Your DIY OBD2 Port LT1?
After assembling your DIY OBD2 port LT1, thorough testing is essential. Here’s how to ensure it works correctly:
- Continuity Testing: Use a multimeter to check continuity between the OBD2 port pins and their corresponding connections on the fuse block and PCM.
- Voltage Testing: Verify that the 12V+ battery connection (Pin 16) provides the correct voltage when the vehicle is running.
- Ground Testing: Ensure a solid ground connection at Pins 4 and 5 by testing the resistance to the vehicle chassis.
- Data Signal Testing: With the engine running, use an OBD2 scanner to attempt to read data from the PCM via Pin 2 (or Pin 9 for 1995 LT1).
- Check Engine Light: Confirm that the check engine light illuminates when there is a simulated or actual fault code.
- Functional Testing: Use the OBD2 port to read and clear diagnostic trouble codes (DTCs) to ensure proper functionality.
8. What Common Issues Might You Encounter and How to Resolve Them?
Building a DIY OBD2 port LT1 can present challenges. Here are common issues and how to address them:
-
Issue: No power at OBD2 port.
- Solution: Check the 12V+ connection to Pin 16 and verify the fuse is intact.
-
Issue: Inability to read data from the PCM.
- Solution: Ensure the serial data wire (Pin 2 or Pin 9) is correctly connected to the PCM. Verify the PCM is functioning correctly.
-
Issue: Check engine light not working.
- Solution: Check the wiring to the check engine light and confirm the bulb is functional.
-
Issue: Intermittent connection issues.
- Solution: Re-solder all connections and ensure terminals are securely crimped.
-
Issue: Faulty relay operation.
- Solution: Replace the relay and check the relay socket wiring.
9. How Does the OBD2 Port Interact with the PCM in an LT1 Engine?
The OBD2 port serves as a crucial interface between diagnostic tools and the PCM. Here’s how they interact:
- Data Transmission: The PCM transmits diagnostic data, such as engine speed, sensor readings, and fault codes, to the OBD2 port via the serial data line (Pin 2 or Pin 9).
- Diagnostic Requests: Scan tools send diagnostic requests to the PCM via the OBD2 port, prompting the PCM to respond with the requested data.
- Fault Code Reading: The scan tool reads diagnostic trouble codes (DTCs) stored in the PCM’s memory, providing information about detected issues.
- Code Clearing: The scan tool can clear DTCs from the PCM’s memory, allowing the driver to reset the check engine light after addressing the underlying issue.
- Real-time Monitoring: The OBD2 port enables real-time monitoring of engine parameters, allowing mechanics and tuners to observe performance data as it changes.
According to the Society of Automotive Engineers (SAE), standardized diagnostic protocols ensure compatibility between various scan tools and vehicle systems.
10. What Are the Advantages of Using a Premade Fuse Block for a DIY OBD2 Port LT1?
While building a fuse block from scratch is possible, using a premade fuse block offers several advantages:
- Time Savings: Premade fuse blocks save significant time and effort compared to sourcing individual components and assembling them.
- Reliability: Premade fuse blocks are typically manufactured to high standards, ensuring reliability and consistent performance.
- Safety: They often include built-in safety features such as overcurrent protection and short-circuit protection.
- Ease of Installation: Premade fuse blocks are designed for easy installation, with clear labeling and standardized connections.
- Professional Appearance: They provide a clean, professional-looking solution compared to a DIY setup.
11. How Can OBD2-SCANNER.EDU.VN Help You with Your DIY OBD2 Port LT1 Project?
OBD2-SCANNER.EDU.VN is dedicated to supporting your DIY OBD2 port LT1 project with comprehensive resources and expert guidance. We offer:
- Detailed Guides: Step-by-step instructions and wiring diagrams to help you build and test your OBD2 port.
- Component Recommendations: Advice on selecting the best components and where to source them.
- Troubleshooting Tips: Solutions to common issues encountered during the build process.
- Expert Support: Access to our team of automotive experts who can answer your questions and provide personalized assistance.
- Community Forum: A platform to connect with other DIY enthusiasts, share experiences, and ask for advice.
- Educational Resources: Articles and videos explaining the theory behind OBD2 systems and engine diagnostics.
By leveraging the resources at OBD2-SCANNER.EDU.VN, you can confidently tackle your DIY OBD2 port LT1 project and achieve optimal results.
12. What Safety Precautions Should You Take When Working on a DIY OBD2 Port LT1?
Safety is paramount when working on any automotive project. Here are essential safety precautions for a DIY OBD2 port LT1:
- Disconnect the Battery: Always disconnect the negative battery terminal before working on electrical systems to prevent shorts and electrical shock.
- Use Safety Glasses: Wear safety glasses to protect your eyes from debris and solder splatter.
- Wear Work Gloves: Use work gloves to protect your hands from heat, sharp objects, and chemicals.
- Work in a Well-Ventilated Area: Soldering produces fumes, so work in a well-ventilated area to avoid inhaling harmful substances.
- Use Proper Tools: Use the correct tools for each task to avoid damaging components and causing injury.
- Follow Instructions: Carefully follow instructions and wiring diagrams to ensure proper assembly and avoid electrical hazards.
- Double-Check Connections: Before reconnecting the battery, double-check all connections to ensure they are secure and properly insulated.
- Keep a Fire Extinguisher Nearby: Keep a fire extinguisher nearby in case of electrical fires.
By following these safety precautions, you can minimize the risk of accidents and injuries while working on your DIY OBD2 port LT1 project.
13. How to Choose the Right OBD2 Scanner for Your DIY OBD2 Port LT1?
Selecting the right OBD2 scanner is crucial for effectively using your DIY OBD2 port LT1. Consider these factors:
- Compatibility: Ensure the scanner is compatible with the LT1 engine and OBD2 protocol.
- Functionality: Look for a scanner that supports the features you need, such as reading and clearing DTCs, viewing live data, and performing advanced diagnostics.
- Ease of Use: Choose a scanner with an intuitive interface and clear display.
- Update Capability: Select a scanner that can be updated with the latest vehicle data and diagnostic protocols.
- Portability: Consider a compact, portable scanner for easy use in different locations.
- Price: Balance features and performance with your budget.
Popular OBD2 scanner brands include:
- Autel: Known for their advanced features and comprehensive vehicle coverage.
- Launch: Offers a wide range of scanners for different needs and budgets.
- BlueDriver: A popular Bluetooth scanner that works with smartphones and tablets.
- Actron: Provides reliable scanners for basic and intermediate diagnostics.
By carefully considering these factors, you can choose an OBD2 scanner that complements your DIY OBD2 port LT1 and enhances your diagnostic capabilities.
14. What are Some Advanced Diagnostic Techniques You Can Use with a DIY OBD2 Port LT1?
A DIY OBD2 port LT1 opens up possibilities for advanced diagnostic techniques:
- Custom Data Logging: Configure the OBD2 port to log specific engine parameters for performance analysis and tuning.
- Sensor Calibration: Use the OBD2 port to calibrate sensors and ensure accurate readings.
- Actuator Testing: Test the functionality of actuators such as fuel injectors, solenoids, and valves.
- Mode 6 Diagnostics: Access Mode 6 data for detailed component monitoring and diagnostics.
- OBD2 PID Tuning: Adjust OBD2 PIDs (Parameter IDs) to customize data reporting and diagnostic functions.
- Enhanced Fault Code Analysis: Analyze fault codes in conjunction with live data to pinpoint the root cause of issues.
According to research from the University of Michigan’s Automotive Research Center, advanced diagnostic techniques can significantly improve the accuracy and efficiency of engine diagnostics.
15. Can You Use a DIY OBD2 Port LT1 for Performance Tuning?
Yes, a DIY OBD2 port LT1 can be a valuable tool for performance tuning. By providing access to real-time engine data and diagnostic information, it enables tuners to:
- Monitor Engine Performance: Observe key parameters such as air-fuel ratio, ignition timing, and boost pressure.
- Optimize Fuel Maps: Adjust fuel maps to maximize power and efficiency.
- Tune Ignition Timing: Optimize ignition timing for optimal combustion.
- Adjust Boost Levels: Fine-tune boost levels for turbocharger or supercharger systems.
- Data Logging: Log data during dyno runs or track sessions to analyze performance and identify areas for improvement.
- Fault Code Monitoring: Monitor fault codes to detect issues and prevent engine damage.
By using a DIY OBD2 port LT1 for performance tuning, you can fine-tune your engine for optimal power, efficiency, and reliability.
16. How to Integrate a Check Engine Light with Your DIY OBD2 Port LT1?
Integrating a check engine light (MIL – Malfunction Indicator Lamp) with your DIY OBD2 port LT1 provides visual indication of detected issues. Here’s how to do it:
- Select a Suitable Lamp: Choose a small, bright LED lamp that can be easily mounted in the vehicle.
- Connect the Lamp: Connect one terminal of the lamp to a 12V+ power source and the other terminal to the appropriate pin on the OBD2 port (typically a designated MIL output pin).
- Wire the Circuit: Ensure the wiring is properly insulated and protected to prevent shorts and electrical hazards.
- Test the Circuit: Verify that the lamp illuminates when there is a simulated or actual fault code.
- Mount the Lamp: Securely mount the lamp in a visible location in the vehicle.
By integrating a check engine light with your DIY OBD2 port LT1, you can quickly identify when there is an issue and take appropriate action.
17. What are the Key Differences Between OBD1 and OBD2 for LT1 Engines?
Understanding the differences between OBD1 and OBD2 is crucial when working with LT1 engines:
| Feature | OBD1 | OBD2 |
|---|---|---|
| Standardized Protocol | Limited standardization | Highly standardized, ensuring compatibility across different vehicles and scan tools. |
| Data Parameters | Fewer data parameters available | Expanded data parameters, providing more detailed engine information. |
| Diagnostic Codes | Limited diagnostic codes with less specific definitions | Enhanced diagnostic codes with more specific definitions, facilitating accurate diagnostics. |
| Connector Type | Different connector types depending on the vehicle manufacturer | Standardized 16-pin connector. |
| Communication | Slower communication speeds | Faster communication speeds, enabling real-time data monitoring. |
| Emission Monitoring | Less comprehensive emission monitoring | More comprehensive emission monitoring, ensuring compliance with emission regulations. |
| Onboard Diagnostics | Limited onboard diagnostics | Advanced onboard diagnostics, including continuous monitoring of engine components and systems. |
| Compatibility | Less compatible with modern scan tools | Highly compatible with modern scan tools, enabling advanced diagnostics and tuning. |
| Application | Used in older vehicles (typically pre-1996) | Used in newer vehicles (typically 1996 and later). |
| Complexity | Simpler system with fewer components and diagnostic capabilities | More complex system with advanced components and enhanced diagnostic capabilities. |
| Cost | Generally lower cost for scan tools and components | Generally higher cost for scan tools and components due to advanced technology. |
18. What Are Some Common OBD2 Error Codes You Might Encounter with an LT1 Engine?
Encountering OBD2 error codes is common with LT1 engines. Here are some frequent ones:
| Code | Description | Possible Causes |
|---|---|---|
| P0101 | Mass Air Flow (MAF) Sensor Circuit Range/Performance Problem | Dirty or faulty MAF sensor, vacuum leaks, wiring issues. |
| P0113 | Intake Air Temperature (IAT) Sensor Circuit High Input | Faulty IAT sensor, wiring issues. |
| P0171 | System Too Lean (Bank 1) | Vacuum leaks, faulty oxygen sensor, low fuel pressure. |
| P0300 | Random/Multiple Cylinder Misfire Detected | Faulty spark plugs, ignition coils, fuel injectors, vacuum leaks. |
| P0420 | Catalyst System Efficiency Below Threshold (Bank 1) | Faulty catalytic converter, oxygen sensor issues, exhaust leaks. |
| P0440 | Evaporative Emission Control System Malfunction | Leaking gas cap, faulty purge valve, damaged EVAP system components. |
| P0507 | Idle Air Control (IAC) System RPM Higher Than Expected | Vacuum leaks, faulty IAC valve, throttle body issues. |
| P1133 | HO2S Insufficient Switching Bank 1 Sensor 1 | Faulty oxygen sensor, exhaust leaks, wiring issues. |
| P1345 | Crankshaft Position (CKP)-Camshaft Position (CMP) Correlation | Faulty CKP or CMP sensor, timing chain issues. |
| P1635 | Tire/Axle Ratio Out of Acceptable Range | Incorrect tire size, faulty speed sensor, PCM issues. |
19. How Can You Use a DIY OBD2 Port LT1 to Diagnose Emission Problems?
A DIY OBD2 port LT1 is invaluable for diagnosing emission problems. By:
- Reading Emission-Related DTCs: Identify fault codes related to emission control systems.
- Monitoring Sensor Data: Observe real-time data from oxygen sensors, MAF sensor, and other emission-related components.
- Performing Functional Tests: Conduct tests on EVAP systems, catalytic converters, and other emission control devices.
- Analyzing Freeze Frame Data: Examine freeze frame data to understand the conditions when a fault code was triggered.
- Clearing DTCs: Clear DTCs after addressing the underlying issue to reset the check engine light.
By leveraging these capabilities, you can effectively diagnose and resolve emission problems, ensuring your vehicle complies with emission regulations.
20. What Are the Legal Considerations for Using a DIY OBD2 Port LT1?
When using a DIY OBD2 port LT1, consider these legal aspects:
- Emission Regulations: Ensure any modifications or tuning performed do not violate emission regulations in your area.
- Warranty Considerations: Understand that modifying or tampering with the vehicle’s diagnostic system may void the warranty.
- Data Privacy: Be aware of data privacy issues when logging and analyzing vehicle data.
- Liability: Take responsibility for any consequences resulting from using the DIY OBD2 port, including potential damage to the vehicle.
According to the Environmental Protection Agency (EPA), tampering with emission control systems is illegal and can result in fines and penalties.
21. How to Stay Updated on the Latest OBD2 Technologies and Information?
Staying informed about the latest OBD2 technologies and information is essential for effective diagnostics and tuning:
- Industry Publications: Subscribe to automotive industry publications and magazines.
- Online Forums: Participate in online forums and communities dedicated to OBD2 and automotive diagnostics.
- Professional Training: Attend professional training courses and seminars on OBD2 technologies.
- Vendor Websites: Visit the websites of OBD2 scanner manufacturers and component suppliers.
- SAE Standards: Stay updated on SAE (Society of Automotive Engineers) standards related to OBD2.
- Regulatory Agencies: Monitor updates from regulatory agencies such as the EPA.
By staying informed, you can ensure your DIY OBD2 port LT1 remains a valuable and effective tool for diagnosing and tuning your engine.
22. What Future Trends Can Be Expected in OBD2 Technology?
Several future trends can be expected in OBD2 technology:
- Enhanced Data Parameters: Expansion of data parameters to provide more detailed engine information.
- Wireless Communication: Increased use of wireless communication technologies such as Bluetooth and Wi-Fi.
- Cloud-Based Diagnostics: Integration of cloud-based diagnostic platforms for remote diagnostics and data analysis.
- Artificial Intelligence (AI): Use of AI and machine learning to improve diagnostic accuracy and efficiency.
- Cybersecurity: Enhanced cybersecurity measures to protect against hacking and data breaches.
- Integration with Electric Vehicles (EVs): Adaptation of OBD2 technology for diagnosing and monitoring electric vehicle systems.
- Standardization of Diagnostic Protocols: Continued standardization of diagnostic protocols to ensure compatibility across different vehicles and scan tools.
According to a report by McKinsey & Company, the automotive industry is undergoing a rapid transformation driven by technological advancements, including OBD2 technology.
23. Can a DIY OBD2 Port LT1 Be Used on Other Vehicle Makes and Models?
The extent to which a DIY OBD2 port LT1 can be used on other vehicle makes and models depends on several factors:
- OBD2 Protocol Compatibility: The DIY OBD2 port must be compatible with the specific OBD2 protocol used by the target vehicle.
- Wiring and Connector Compatibility: The wiring and connector configuration must match the target vehicle’s OBD2 port.
- PCM Compatibility: The DIY OBD2 port must be able to communicate with the PCM of the target vehicle.
- Diagnostic Software Compatibility: The diagnostic software or scan tool used with the DIY OBD2 port must be compatible with the target vehicle’s diagnostic system.
While some aspects of a DIY OBD2 port LT1 may be reusable on other vehicles, significant modifications or adaptations may be required to ensure proper functionality.
24. What Are the Alternatives to Building a DIY OBD2 Port LT1?
Several alternatives exist if you choose not to build a DIY OBD2 port LT1:
- Purchase a Premade OBD2 Port: Buy a premade OBD2 port designed for LT1 engines.
- Use a Standard OBD2 Scanner: Utilize a standard OBD2 scanner to access diagnostic data.
- Hire a Professional Mechanic: Consult a professional mechanic for diagnostic and repair services.
- Use a Bluetooth OBD2 Adapter: Use a Bluetooth OBD2 adapter with a smartphone or tablet for basic diagnostics.
- Enroll in an Automotive Program: Take an automotive program to gain hands-on experience with vehicle diagnostics and repair.
The best alternative depends on your specific needs, budget, and technical expertise.
25. Where Can You Find Reliable Wiring Diagrams and Schematics for a DIY OBD2 Port LT1?
Finding reliable wiring diagrams and schematics is crucial for a successful DIY OBD2 port LT1 project. Here are some resources:
- Vehicle Service Manuals: Consult the vehicle service manual for detailed wiring diagrams and schematics.
- Online Automotive Forums: Check online automotive forums and communities for user-submitted diagrams and schematics.
- Automotive Wiring Diagram Databases: Subscribe to online databases that provide access to a wide range of wiring diagrams.
- Component Manufacturers: Visit the websites of component manufacturers for datasheets and schematics.
- Automotive Education Resources: Use automotive education resources such as textbooks and online courses.
By using reliable wiring diagrams and schematics, you can ensure your DIY OBD2 port LT1 is wired correctly and functions properly.
26. How to Properly Insulate and Protect the Wiring in a DIY OBD2 Port LT1?
Proper insulation and protection of wiring are crucial for safety and reliability:
- Use Heat Shrink Tubing: Apply heat shrink tubing to all connections to insulate and protect them from corrosion and damage.
- Use Wire Loom: Use wire loom or convoluted tubing to bundle and protect wires from abrasion and heat.
- Secure Wires with Zip Ties: Secure wires with zip ties to prevent them from rubbing against sharp edges or moving components.
- Use Electrical Tape: Use electrical tape to insulate and protect connections in areas where heat shrink tubing cannot be used.
- Route Wires Carefully: Route wires carefully to avoid areas where they may be exposed to excessive heat, moisture, or vibration.
- Use Grommets: Use grommets to protect wires passing through metal panels or openings.
By properly insulating and protecting the wiring, you can ensure the longevity and reliability of your DIY OBD2 port LT1.
27. Can You Use a DIY OBD2 Port LT1 for Custom Engine Swaps?
Yes, a DIY OBD2 port LT1 can be highly beneficial for custom engine swaps:
- Diagnostic Access: Provides access to diagnostic data from the swapped engine.
- Custom Tuning: Enables custom tuning and calibration of the swapped engine.
- Sensor Integration: Facilitates the integration of sensors and components from the swapped engine.
- Wiring Simplification: Simplifies the wiring process by providing a standardized interface for diagnostic tools.
- Fault Code Monitoring: Allows for monitoring of fault codes to detect issues and prevent engine damage.
By using a DIY OBD2 port LT1 for custom engine swaps, you can ensure the swapped engine functions properly and is easily diagnosed.
28. What are the Ethical Considerations When Using a DIY OBD2 Port LT1?
When using a DIY OBD2 port LT1, ethical considerations are important:
- Respect Vehicle Owners’ Rights: Obtain permission before accessing or modifying diagnostic data on someone else’s vehicle.
- Do Not Tamper with Emission Systems: Avoid tampering with emission control systems to comply with environmental regulations.
- Disclose Modifications: Disclose any modifications or tuning performed when selling or transferring ownership of the vehicle.
- Respect Data Privacy: Protect the privacy of vehicle owners by not sharing or misusing diagnostic data.
- Avoid Illegal Activities: Do not use the DIY OBD2 port for any illegal or unethical activities.
By adhering to these ethical considerations, you can ensure your use of a DIY OBD2 port LT1 is responsible and respectful.
29. How to Document Your DIY OBD2 Port LT1 Project for Future Reference?
Documenting your DIY OBD2 port LT1 project is crucial for future reference and troubleshooting:
- Create a Detailed Wiring Diagram: Create a detailed wiring diagram showing all connections and components.
- Take Photos: Take photos of the project at various stages of assembly.
- Keep a Parts List: Maintain a list of all components used in the project, including part numbers and sources.
- Write Down Assembly Steps: Write down each step of the assembly process in detail.
- Document Testing Procedures: Document the testing procedures used to verify the functionality of the DIY OBD2 port.
- Save All Documentation in a Safe Place: Save all documentation in a safe place, such as a computer or cloud storage.
By documenting your DIY OBD2 port LT1 project, you can easily refer back to it for troubleshooting, modifications, or future projects.
30. Ready to Build Your DIY OBD2 Port LT1?
Building a DIY OBD2 port LT1 can greatly enhance your automotive diagnostic capabilities. At OBD2-SCANNER.EDU.VN, we equip you with the knowledge and resources needed for a successful project.
Need Help? Contact us today for personalized guidance and support:
- Address: 123 Main Street, Los Angeles, CA 90001, United States
- WhatsApp: +1 (641) 206-8880
- Website: OBD2-SCANNER.EDU.VN
Our team is here to assist you at every stage. Reach out now and take the first step towards mastering your engine diagnostics!