How do I use an OBD2 scanner? It’s simple: connect the scan tool to your car’s OBD2 port, turn the ignition on, and follow the on-screen prompts to read diagnostic trouble codes (DTCs) and assess your vehicle’s health with ease. OBD2-SCANNER.EDU.VN empowers you with the knowledge and tools to understand those codes, perform basic diagnostics, and potentially save money on repairs. Learn how to harness the power of OBD2 scanning for effective automotive maintenance.
Contents
- 1. Understanding the Basics: What is an OBD2 Scanner?
- 1.1. Why Use an OBD2 Scanner?
- 1.2. Types of OBD2 Scanners
- 2. Locating the OBD2 Port
- 2.1. Common Locations
- 2.2. Identifying the Port
- 3. Connecting the OBD2 Scanner
- 3.1. Preparing for Connection
- 3.2. Connecting the Scanner
- 3.3. Powering Up the Scanner
- 4. Navigating the OBD2 Scanner Menu
- 4.1. Common Menu Options
- 4.2. Understanding the Display
- 4.3. Using the Buttons
- 5. Reading Diagnostic Trouble Codes (DTCs)
- 5.1. Accessing the “Read Codes” Function
- 5.2. Interpreting the Codes
- 5.3. Using Code Lookup Resources
- 5.4. Prioritizing Multiple Codes
- 6. Understanding Live Data
- 6.1. Accessing the “Live Data” Function
- 6.2. Selecting Parameters to Monitor
- 6.3. Interpreting the Data
- 6.4. Identifying Common Issues with Live Data
- 7. Using Freeze Frame Data
- 7.1. Accessing the “Freeze Frame” Function
- 7.2. Interpreting the Data
- 7.3. Correlating Freeze Frame Data with DTCs
- 8. Clearing Diagnostic Trouble Codes (DTCs)
- 8.1. Accessing the “Erase Codes” Function
- 8.2. Understanding the Risks
- 8.3. When to Clear Codes
- 8.4. Confirming the Clear
- 9. Performing Basic Diagnostics
- 9.1. Identifying the Problem
- 9.2. Gathering Information
- 9.3. Common Problems and Solutions
- 9.4. When to Seek Professional Help
- 10. Advanced OBD2 Scanner Functions
- 10.1. Bi-Directional Controls
- 10.2. Component Testing
- 10.3. Programming Capabilities
- 11. Choosing the Right OBD2 Scanner
- 11.1. Factors to Consider
- 11.2. Budget Considerations
- 11.3. Top OBD2 Scanner Brands
- 12. OBD2 Scanner Safety Tips
- 13. Real-World Examples of OBD2 Scanner Use
- 13.1. Diagnosing a Check Engine Light
- 13.2. Identifying a Misfire
- 13.3. Monitoring Fuel Efficiency
- 14. OBD2 Scanner Maintenance and Care
- 14.1. Cleaning the Scanner
- 14.2. Storing the Scanner
- 14.3. Battery Maintenance
- 15. Resources for Further Learning
- 15.1. Online Forums and Communities
- 15.2. Training Courses and Certifications
- 15.3. OBD2-SCANNER.EDU.VN
- 16. The Future of OBD2 Technology
- 16.1. Advancements in Diagnostics
- 16.2. Integration with Connected Car Technologies
- 16.3. Enhanced Data Security
- 17. Common Myths About OBD2 Scanners
- 17.1. Myth: OBD2 Scanners Can Fix Problems
- 17.2. Myth: All OBD2 Scanners Are the Same
- 17.3. Myth: You Need to Be a Mechanic to Use an OBD2 Scanner
- 18. OBD2 Scanner Troubleshooting
- 18.1. Scanner Won’t Connect
- 18.2. Scanner Won’t Read Codes
- 18.3. Inaccurate Readings
- 19. Tips for Saving Money with an OBD2 Scanner
- 19.1. Diagnosing Issues Early
- 19.2. Performing DIY Repairs
- 19.3. Avoiding Unnecessary Repairs
- 19.4. Price Comparisons
- 20. Frequently Asked Questions (FAQs)
- 20.1. What is an OBD2 scanner?
- 20.2. How do I connect an OBD2 scanner?
- 20.3. How do I read OBD2 codes?
- 20.4. What do OBD2 codes mean?
- 20.5. Can I clear OBD2 codes myself?
- 20.6. Is it safe to drive with the check engine light on?
- 20.7. Where can I buy an OBD2 scanner?
- 20.8. How much does an OBD2 scanner cost?
- 20.9. What is live data?
- 20.10. What is freeze frame data?
1. Understanding the Basics: What is an OBD2 Scanner?
An OBD2 scanner is a diagnostic tool that connects to your vehicle’s On-Board Diagnostics II (OBD2) system to retrieve data about its performance and identify potential issues. According to the Environmental Protection Agency (EPA), OBD2 systems have been standard on all cars and light trucks sold in the United States since 1996. These systems monitor various engine and vehicle parameters, providing valuable information for diagnosing problems.
1.1. Why Use an OBD2 Scanner?
Using an OBD2 scanner offers several benefits:
- Early Problem Detection: Identify minor issues before they escalate into costly repairs.
- Informed Repairs: Understand the root cause of a problem before taking your car to a mechanic.
- Cost Savings: Perform simple repairs yourself and avoid unnecessary shop visits.
- Emissions Readiness: Check if your vehicle is ready for emissions testing.
- Performance Monitoring: Track various vehicle parameters to optimize performance.
1.2. Types of OBD2 Scanners
OBD2 scanners come in various forms, each with its own features and capabilities:
- Basic Code Readers: These scanners read and clear diagnostic trouble codes (DTCs).
- Enhanced Scanners: In addition to reading and clearing codes, these scanners offer live data streaming, freeze frame data, and advanced diagnostics.
- Smartphone Adapters: These devices connect to your smartphone via Bluetooth or Wi-Fi and use a mobile app to display data.
- Professional Scanners: Used by mechanics and technicians, these scanners offer advanced features such as bi-directional controls, component testing, and programming capabilities.
2. Locating the OBD2 Port
The first step in using an OBD2 scanner is to locate the OBD2 port in your vehicle.
2.1. Common Locations
The OBD2 port is typically located under the dashboard on the driver’s side. Common locations include:
- Below the steering wheel column
- Near the pedals
- Inside the glove compartment (less common)
- In the center console (rare)
2.2. Identifying the Port
The OBD2 port is a 16-pin, D-shaped connector. It is standardized across all vehicles, making it easy to identify. Refer to your vehicle’s owner’s manual if you are unsure of the port’s location.
3. Connecting the OBD2 Scanner
Once you have located the OBD2 port, follow these steps to connect the scanner:
3.1. Preparing for Connection
- Turn off the Ignition: Ensure the vehicle’s ignition is turned off before connecting the scanner.
- Locate the OBD2 Port: Find the 16-pin diagnostic port, usually under the driver’s side dashboard.
- Inspect the Connector: Check both the scanner’s connector and the vehicle’s port for any damage or debris.
3.2. Connecting the Scanner
- Align the Connector: Match the shape of the scanner’s connector with the OBD2 port.
- Insert the Connector: Gently push the scanner’s connector into the OBD2 port until it clicks into place.
- Ensure a Secure Connection: Make sure the connection is secure to avoid any interruptions during data retrieval.
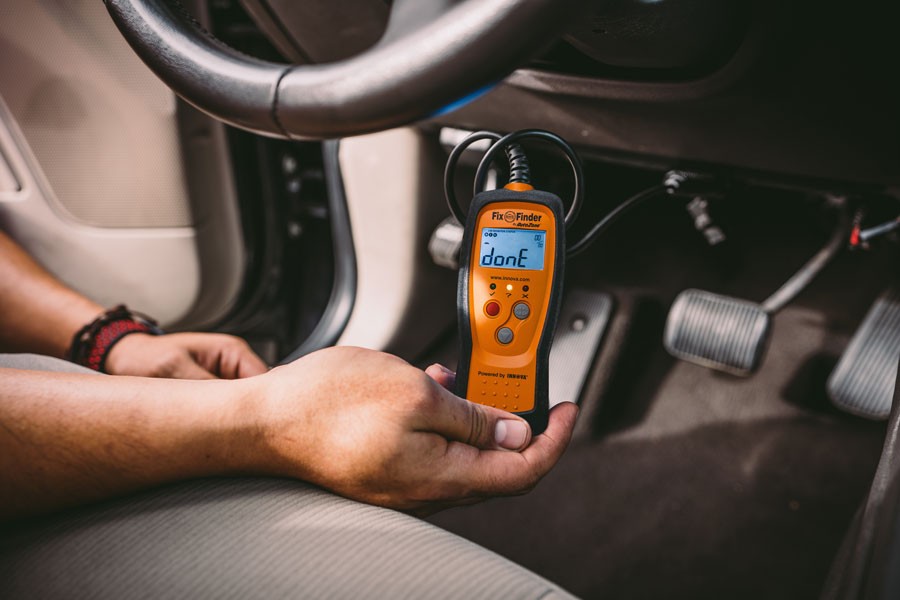 Connecting OBD2 scanner to the car
3.3. Powering Up the Scanner
- Turn the Ignition On: Turn the vehicle’s ignition to the “ON” position without starting the engine. This provides power to the OBD2 system.
- Scanner Activation: The scanner should power up automatically. If not, check the scanner’s power button or consult the user manual.
- Follow On-Screen Prompts: The scanner may display initial prompts or ask for vehicle information. Follow these instructions to proceed.
4. Navigating the OBD2 Scanner Menu
Once the scanner is connected and powered up, you can navigate the menu to access various functions. The menu options may vary depending on the scanner’s make and model, but common options include:
4.1. Common Menu Options
- Read Codes: Retrieves diagnostic trouble codes (DTCs) stored in the vehicle’s computer.
- Erase Codes: Clears DTCs from the vehicle’s computer. Use this function with caution.
- Live Data: Displays real-time data from various sensors and systems.
- Freeze Frame: Captures data from the moment a DTC was triggered.
- Vehicle Information: Displays information about the vehicle, such as the VIN.
- I/M Readiness: Checks if the vehicle is ready for emissions testing.
4.2. Understanding the Display
- DTCs (Diagnostic Trouble Codes): Alphanumeric codes that indicate specific issues.
- Sensor Readings: Real-time data from sensors like O2 sensors, MAF sensors, and coolant temperature sensors.
- Status Indicators: Information about system readiness and test results.
4.3. Using the Buttons
- Navigation Buttons: Use the arrow keys to navigate the menu options.
- Enter/Select Button: Press this button to select a menu option.
- Back/Escape Button: Use this button to return to the previous menu.
5. Reading Diagnostic Trouble Codes (DTCs)
Reading DTCs is the primary function of an OBD2 scanner. These codes provide valuable information about potential issues with your vehicle.
5.1. Accessing the “Read Codes” Function
- Navigate to the Menu: Use the arrow keys to find the “Read Codes” or similar option.
- Select the Option: Press the “Enter” or “Select” button to choose this function.
5.2. Interpreting the Codes
DTCs are five-character alphanumeric codes. The first character indicates the system:
- P: Powertrain (engine, transmission, fuel system)
- B: Body (airbags, interior)
- C: Chassis (suspension, brakes)
- U: Network (communication)
The second character indicates whether the code is generic or manufacturer-specific:
- 0: Generic (SAE) code
- 1: Manufacturer-specific code
The remaining three characters provide further information about the specific fault.
For example, a P0301 code indicates a cylinder 1 misfire.
5.3. Using Code Lookup Resources
While some scanners provide a brief description of the code, it is often necessary to use a code lookup resource to get more detailed information. Reputable resources include:
- OBD2-SCANNER.EDU.VN: Offers a comprehensive database of OBD2 codes and their meanings.
- AutoZone: Provides a free code lookup service online and in-store.
- National Institute for Automotive Service Excellence (ASE): Offers certified mechanic resources.
- Vehicle-Specific Forums: Online communities where users share information about common issues and codes for specific makes and models.
5.4. Prioritizing Multiple Codes
If your scanner displays multiple codes, prioritize them based on severity and frequency. Focus on codes that appear more frequently or that are related to critical systems like the engine or transmission.
6. Understanding Live Data
The live data function allows you to view real-time data from various sensors and systems in your vehicle. This can be useful for diagnosing intermittent problems or monitoring performance.
6.1. Accessing the “Live Data” Function
- Navigate to the Menu: Use the arrow keys to find the “Live Data” or similar option.
- Select the Option: Press the “Enter” or “Select” button to choose this function.
6.2. Selecting Parameters to Monitor
Once you have accessed the live data function, you can select the parameters you want to monitor. Common parameters include:
- Engine RPM: Revolutions per minute of the engine.
- Engine Load: Percentage of maximum engine load.
- Coolant Temperature: Temperature of the engine coolant.
- O2 Sensor Readings: Voltage output of the oxygen sensors.
- MAF Sensor Readings: Mass airflow readings.
- Fuel Trim: Adjustments made to the fuel mixture.
- Vehicle Speed: Current speed of the vehicle.
6.3. Interpreting the Data
Interpreting live data requires some knowledge of how the vehicle’s systems operate. Compare the data to expected values and look for any anomalies or deviations.
For example, if the O2 sensor readings are consistently high or low, it could indicate a problem with the sensor or the fuel mixture.
Consult your vehicle’s service manual or a trusted mechanic for guidance on interpreting live data.
6.4. Identifying Common Issues with Live Data
- Oxygen Sensor Issues: Erratic or out-of-range voltage readings can indicate a faulty O2 sensor.
- Mass Airflow Sensor Problems: Inaccurate airflow readings can cause poor engine performance.
- Coolant Temperature Issues: Overheating or failure to reach operating temperature can point to thermostat or coolant problems.
- Fuel Trim Imbalances: High positive or negative fuel trim values can indicate fuel delivery or vacuum leak issues.
7. Using Freeze Frame Data
Freeze frame data captures a snapshot of the vehicle’s parameters at the moment a DTC was triggered. This can be helpful for diagnosing intermittent problems or understanding the conditions that led to a fault.
7.1. Accessing the “Freeze Frame” Function
- Navigate to the Menu: Use the arrow keys to find the “Freeze Frame” or similar option.
- Select the Option: Press the “Enter” or “Select” button to choose this function.
7.2. Interpreting the Data
Freeze frame data includes the same parameters as live data, but it is a snapshot in time. Analyze the data to see what conditions were present when the DTC was triggered.
For example, if the freeze frame data shows a high engine load and low RPM, it could indicate a problem with the transmission or the engine’s ability to produce power.
7.3. Correlating Freeze Frame Data with DTCs
Compare the freeze frame data with the DTC to gain a better understanding of the issue. This can help you narrow down the possible causes and identify the most likely culprit.
8. Clearing Diagnostic Trouble Codes (DTCs)
The “Erase Codes” function allows you to clear DTCs from the vehicle’s computer. However, it is important to use this function with caution.
8.1. Accessing the “Erase Codes” Function
- Navigate to the Menu: Use the arrow keys to find the “Erase Codes” or similar option.
- Select the Option: Press the “Enter” or “Select” button to choose this function.
8.2. Understanding the Risks
Clearing DTCs will erase the stored information about the fault, including the freeze frame data. This can make it more difficult to diagnose the problem if it recurs.
8.3. When to Clear Codes
Only clear codes after you have:
- Diagnosed and repaired the underlying problem.
- Verified that the problem has been resolved.
- Recorded the DTC and freeze frame data for future reference.
8.4. Confirming the Clear
- Verify Completion: Ensure the scanner indicates that the codes have been successfully cleared.
- Recheck for Codes: After clearing, run the scanner again to confirm that the DTCs do not immediately return.
- Test Drive: If applicable, take the vehicle for a test drive under conditions that previously triggered the code to ensure the issue is resolved.
9. Performing Basic Diagnostics
Using an OBD2 scanner can help you perform basic diagnostics and narrow down the possible causes of a problem.
9.1. Identifying the Problem
Start by reading the DTCs and using a code lookup resource to understand the meaning of the codes. Then, use live data and freeze frame data to gather more information about the problem.
9.2. Gathering Information
- Check Symptoms: Note any drivability issues, unusual noises, or other symptoms.
- Review Maintenance Records: Check for any recent repairs or maintenance that may be related.
- Consult Forums: Look for common issues and solutions for your vehicle make and model.
- Inspect Components: Visually inspect the related components for damage, leaks, or loose connections.
9.3. Common Problems and Solutions
- Misfires: Check spark plugs, ignition coils, and fuel injectors.
- O2 Sensor Issues: Replace the oxygen sensor.
- Vacuum Leaks: Inspect vacuum lines and intake manifold gaskets.
- Catalytic Converter Problems: Replace the catalytic converter.
- Loose Gas Cap: Tighten or replace the gas cap.
9.4. When to Seek Professional Help
If you are unable to diagnose or repair the problem yourself, it is best to seek professional help from a qualified mechanic.
10. Advanced OBD2 Scanner Functions
Advanced OBD2 scanners offer additional functions that can be useful for more in-depth diagnostics and repairs.
10.1. Bi-Directional Controls
Bi-directional controls allow you to send commands to the vehicle’s computer to activate or deactivate certain components. This can be useful for testing actuators, solenoids, and other devices.
10.2. Component Testing
Component testing allows you to test the functionality of individual components, such as sensors and actuators. This can help you determine whether a component is working properly or needs to be replaced.
10.3. Programming Capabilities
Some advanced scanners offer programming capabilities, allowing you to reprogram the vehicle’s computer or install software updates. This function should only be used by experienced technicians.
11. Choosing the Right OBD2 Scanner
Choosing the right OBD2 scanner depends on your needs and budget.
11.1. Factors to Consider
- Features: Determine which features are most important to you, such as live data, freeze frame, and bi-directional controls.
- Compatibility: Make sure the scanner is compatible with your vehicle’s make and model.
- Ease of Use: Choose a scanner that is easy to use and has a clear, intuitive interface.
- Price: Set a budget and compare prices from different vendors.
- Reviews: Read reviews from other users to get an idea of the scanner’s performance and reliability.
11.2. Budget Considerations
- Entry-Level Scanners: Basic code readers can be found for under $50.
- Mid-Range Scanners: Scanners with live data and freeze frame capabilities typically cost between $100 and $300.
- Advanced Scanners: Professional-grade scanners with bi-directional controls and programming capabilities can cost several thousand dollars.
11.3. Top OBD2 Scanner Brands
- Innova: Known for their reliable and easy-to-use scanners.
- Autel: Offers a wide range of scanners, from basic code readers to advanced diagnostic tools.
- Launch: Specializes in professional-grade scanners with advanced features.
- BlueDriver: Offers a Bluetooth scanner that connects to your smartphone.
12. OBD2 Scanner Safety Tips
- Read the Manual: Always read the scanner’s user manual before using it.
- Proper Connection: Ensure the scanner is properly connected to the OBD2 port before turning on the ignition.
- Avoid Distractions: Do not use the scanner while driving.
- Battery Safety: Use caution when working with the vehicle’s battery.
- Professional Advice: Seek professional advice if you are unsure about any aspect of the diagnostic process.
13. Real-World Examples of OBD2 Scanner Use
13.1. Diagnosing a Check Engine Light
A driver notices the check engine light is on. Using an OBD2 scanner, they retrieve a P0420 code, indicating a problem with the catalytic converter. After further inspection, they find a leak in the exhaust system, which is causing the catalytic converter to function improperly.
13.2. Identifying a Misfire
A vehicle is experiencing a rough idle and loss of power. An OBD2 scanner reveals a P0301 code, indicating a misfire in cylinder 1. The technician then checks the spark plug, ignition coil, and fuel injector for cylinder 1, finding a faulty ignition coil.
13.3. Monitoring Fuel Efficiency
A driver wants to improve their fuel efficiency. Using an OBD2 scanner, they monitor the O2 sensor readings and fuel trim values. They notice that the fuel trim values are consistently high, indicating a vacuum leak. After repairing the leak, they see an improvement in fuel efficiency.
14. OBD2 Scanner Maintenance and Care
Proper maintenance and care will help ensure that your OBD2 scanner lasts for many years.
14.1. Cleaning the Scanner
- Use a Soft Cloth: Clean the scanner with a soft, dry cloth to remove dust and dirt.
- Avoid Liquids: Do not use liquids or solvents, as they can damage the scanner.
14.2. Storing the Scanner
- Dry Environment: Store the scanner in a dry, clean environment.
- Protective Case: Use a protective case to prevent damage during storage.
14.3. Battery Maintenance
- Remove Batteries: If the scanner uses batteries, remove them when not in use for extended periods.
- Check Batteries: Regularly check the batteries for corrosion and replace them as needed.
15. Resources for Further Learning
15.1. Online Forums and Communities
- Vehicle-Specific Forums: Online communities where users share information about specific makes and models.
- Automotive Diagnostic Forums: Forums dedicated to automotive diagnostics and repair.
15.2. Training Courses and Certifications
- National Institute for Automotive Service Excellence (ASE): Offers certifications for automotive technicians.
- Community Colleges: Many community colleges offer courses in automotive technology and diagnostics.
15.3. OBD2-SCANNER.EDU.VN
OBD2-SCANNER.EDU.VN offers a wealth of information about OBD2 scanners and automotive diagnostics, including code lookup tools, articles, and tutorials.
16. The Future of OBD2 Technology
OBD2 technology is constantly evolving to meet the demands of modern vehicles.
16.1. Advancements in Diagnostics
Future OBD2 systems will offer more advanced diagnostics, including the ability to predict failures and provide more detailed repair information.
16.2. Integration with Connected Car Technologies
OBD2 systems will increasingly integrate with connected car technologies, allowing for remote diagnostics and over-the-air software updates.
16.3. Enhanced Data Security
Data security will become increasingly important as OBD2 systems become more connected. Future systems will incorporate enhanced security measures to protect against hacking and data breaches.
17. Common Myths About OBD2 Scanners
17.1. Myth: OBD2 Scanners Can Fix Problems
OBD2 scanners can only diagnose problems, not fix them. They provide information that can help you identify the cause of a problem, but you will still need to perform the necessary repairs.
17.2. Myth: All OBD2 Scanners Are the Same
OBD2 scanners vary widely in terms of features, capabilities, and price. Basic code readers offer limited functionality, while advanced scanners offer a wide range of diagnostic tools.
17.3. Myth: You Need to Be a Mechanic to Use an OBD2 Scanner
While some knowledge of automotive systems is helpful, you do not need to be a mechanic to use an OBD2 scanner. Many scanners are designed to be user-friendly and provide clear, easy-to-understand information.
18. OBD2 Scanner Troubleshooting
18.1. Scanner Won’t Connect
- Check Connection: Ensure the scanner is securely connected to the OBD2 port.
- Check Power: Make sure the vehicle’s ignition is turned on and the scanner is receiving power.
- Compatibility: Verify that the scanner is compatible with your vehicle’s make and model.
18.2. Scanner Won’t Read Codes
- Try Again: Try reading the codes again. Sometimes it may take a few attempts.
- Check for Damage: Inspect the OBD2 port and scanner connector for damage or debris.
- Update Software: Make sure the scanner’s software is up to date.
18.3. Inaccurate Readings
- Verify Sensor Readings: Compare the sensor readings to expected values.
- Check for Faulty Sensors: Suspect sensors can be tested or replaced.
- Seek Professional Help: If problems persist, consult a mechanic.
19. Tips for Saving Money with an OBD2 Scanner
19.1. Diagnosing Issues Early
Regularly scanning your vehicle for DTCs can help you identify problems early, before they escalate into costly repairs.
19.2. Performing DIY Repairs
Many common automotive repairs can be performed at home with the help of an OBD2 scanner and some basic tools.
19.3. Avoiding Unnecessary Repairs
An OBD2 scanner can help you avoid unnecessary repairs by providing accurate diagnostic information.
19.4. Price Comparisons
- Get Multiple Quotes: Obtain estimates from several repair shops.
- Question Recommendations: Ask for detailed explanations of recommended services and their necessity.
- Negotiate: Don’t hesitate to negotiate prices or seek discounts.
20. Frequently Asked Questions (FAQs)
20.1. What is an OBD2 scanner?
An OBD2 scanner is a diagnostic tool that connects to your vehicle’s OBD2 system to retrieve data about its performance and identify potential issues.
20.2. How do I connect an OBD2 scanner?
Locate the OBD2 port in your vehicle, typically under the dashboard on the driver’s side. Connect the scanner to the port and turn the ignition on.
20.3. How do I read OBD2 codes?
Use the scanner’s menu to select the “Read Codes” option. The scanner will display any diagnostic trouble codes (DTCs) stored in the vehicle’s computer.
20.4. What do OBD2 codes mean?
OBD2 codes are five-character alphanumeric codes that indicate specific issues with your vehicle. Use a code lookup resource to understand the meaning of the codes.
20.5. Can I clear OBD2 codes myself?
Yes, you can clear OBD2 codes using the “Erase Codes” function on the scanner. However, it is important to do so only after you have diagnosed and repaired the underlying problem.
20.6. Is it safe to drive with the check engine light on?
It depends on the nature of the problem. If the check engine light is flashing, it indicates a serious issue that requires immediate attention. If the light is solid, it is generally safe to drive, but you should have the problem diagnosed as soon as possible.
20.7. Where can I buy an OBD2 scanner?
OBD2 scanners are available at most auto parts stores, as well as online retailers.
20.8. How much does an OBD2 scanner cost?
The cost of an OBD2 scanner can range from under $50 for basic code readers to several thousand dollars for professional-grade scanners.
20.9. What is live data?
Live data is real-time data from various sensors and systems in your vehicle. It can be useful for diagnosing intermittent problems or monitoring performance.
20.10. What is freeze frame data?
Freeze frame data captures a snapshot of the vehicle’s parameters at the moment a DTC was triggered. This can be helpful for diagnosing intermittent problems or understanding the conditions that led to a fault.
Equipped with the knowledge of how to use an OBD2 scanner, you can confidently diagnose and address many of your vehicle’s issues. For personalized guidance and expert automotive service, reach out to OBD2-SCANNER.EDU.VN at 123 Main Street, Los Angeles, CA 90001, United States, via Whatsapp at +1 (641) 206-8880, or visit our website at OBD2-SCANNER.EDU.VN for more in-depth information and immediate assistance. Let us help you keep your vehicle running smoothly with professional support and innovative solutions.