Are you looking for information on how to remove OBD2 ECU pins on your Honda vehicle? This comprehensive guide from OBD2-SCANNER.EDU.VN provides a detailed, step-by-step process for safely and effectively removing ECU pins from various Honda OBD systems. This information is crucial when performing engine swaps, transmission conversions, or any other modifications that require rewiring the ECU.
Contents
- 1. What Tools Are Needed To Remove Honda ECU Pins?
- 2. What Is The OBD0 ECU Pin Removal Process For Honda Vehicles?
- 2.1. How To Remove Pins From OBD0 A Plug
- 2.2. How To Remove Pins From OBD0 B And C Plugs
- 3. How Is OBD1 ECU Pin Removal Done On Honda Cars?
- 4. What Is The Procedure For OBD2A And OBD2B ECU Pin Removal?
- 5. How Does OBD2C ECU Pin Removal Differ?
- 6. What About OBD2D (And Newer) ECU Pin Removal?
- 7. Why Is Precision Important When Removing ECU Pins?
- 8. What Are Common Mistakes To Avoid During ECU Pin Removal?
- 9. How Does Temperature Affect ECU Connector Plastic?
- 10. What Are The Safety Precautions For ECU Pin Removal?
- 11. Can Improper Pin Removal Affect Vehicle Performance?
- 12. How To Inspect ECU Connectors For Damage?
- 13. What Are The Best Practices For Reinserting ECU Pins?
- 14. Can Aftermarket ECU Modifications Affect Pin Removal?
- 15. How Does ECU Connector Locking Mechanisms Vary?
- 16. What Is The Role Of Dielectric Grease In ECU Connections?
- 17. How To Handle Corroded ECU Pins?
- 18. What Is The Cost Of Replacing A Damaged ECU Connector?
- 19. What Diagnostic Trouble Codes (DTCs) Are Related To ECU Connector Issues?
- 20. How Can OBD2-SCANNER.EDU.VN Assist With ECU Pin Issues?
- FAQ: Honda ECU Pin Removal
- Q1: What is an OBD2 scanner?
- Q2: Why would I need to remove ECU pins?
- Q3: Can I use a paper clip instead of a specialized tool?
- Q4: What is the difference between OBD0, OBD1, and OBD2?
- Q5: How do I know which OBD system my Honda has?
- Q6: What happens if I damage an ECU pin?
- Q7: Is it safe to remove ECU pins myself?
- Q8: Do I need to disconnect the battery before removing ECU pins?
- Q9: What is dielectric grease, and why should I use it?
- Q10: Where can I get help if I encounter problems during ECU pin removal?
1. What Tools Are Needed To Remove Honda ECU Pins?
To safely and effectively remove OBD2 ECU pins from your Honda, you’ll need a few essential tools. These include a straight pick tool, a right-angle pick tool, a precision slot screwdriver with a 1 mm-wide blade, and for older OBD0 systems, a specialized Honda ECU pin-removal tool. Using the correct tools minimizes the risk of damaging the connector or the pins themselves, ensuring a successful modification or repair.
- Straight pick tool
- Right-angle pick tool
- Precision slot screwdriver with 1 mm-wide blade
- Honda ECU pin-removal tool (Honda PN o7JAZ-002010A – for OBD0 systems)
2. What Is The OBD0 ECU Pin Removal Process For Honda Vehicles?
The OBD0 system, found in older Honda models from the 1980s to early 1990s, requires a specific approach for ECU pin removal due to its unique connector design. The process varies slightly between the A plug (white) and the B and C plugs (black). Understanding these differences is crucial for a successful and damage-free pin removal.
2.1. How To Remove Pins From OBD0 A Plug
The OBD0 A plug has a retaining tab inside each pin opening that prevents the pin from being pushed out. To remove a pin, insert a straight pick tool into the opening, lift the tab, and gently pull the wire attached to the pin. Avoid pulling the wire before lifting the tab, as this can lock the tab and pin in place.
- Identify the A plug: It is the only white plug out of the three.
- Locate the retaining tab: The tab is located toward the center of the plug, accessible through the opening between the upper and lower pins.
- Insert the straight pick tool: Slide the tool in and against the pin you want to remove until you feel it hit the tab.
- Lift the tab: Gently lift the tab with the pick tool.
- Pull the wire: While lifting the tab, gently pull the wire attached to the pin to remove it.
 OBD0 A plug with pins held in place by retaining tabs
2.2. How To Remove Pins From OBD0 B And C Plugs
The black B and C plugs use smaller pins and require removing a white retaining lock before accessing the pins. Use a pick tool to depress the tabs on the side of the retaining lock and push them out. Then, use the Honda ECU pin-removal tool to slide along the pin, depress the metal tab, and gently pull the wire from the back of the connector.
- Identify the B and C plugs: These are the black plugs.
- Remove the retaining lock: Use a pick tool to depress the tabs on the side of the retaining lock and push them up and out.
- Insert the Honda ECU pin-removal tool: Slide the tool into the rectangular opening between the top and bottom rows of pins, with its finger protrusion oriented toward the pin you want to remove.
- Depress the metal tab: When the tool bottoms out, it will depress the metal tab.
- Pull the wire: Gently pull the wire from the back of the connector.
 OBD0 B plug with retaining lock removed
3. How Is OBD1 ECU Pin Removal Done On Honda Cars?
OBD1 systems, commonly found in 1992-1995 Civics and Integras, feature a different pin removal process. This system requires a straight pick tool and a precision slot screwdriver. The process involves unlocking the flap on the wire-side of the connector and then using the screwdriver to release the individual pins.
- Unlock the flap: Pry the lock flap near the connector’s ends to unlock it.
- Insert the precision slot screwdriver: Slide the screwdriver along the metal pin until you feel the plastic retaining tab.
- Pry the tab: Gently pry the tab away from the pin.
- Slide the wire out: With the tab lifted, slide the wire out of the back.
 OBD1 ECU plug with pin lock open
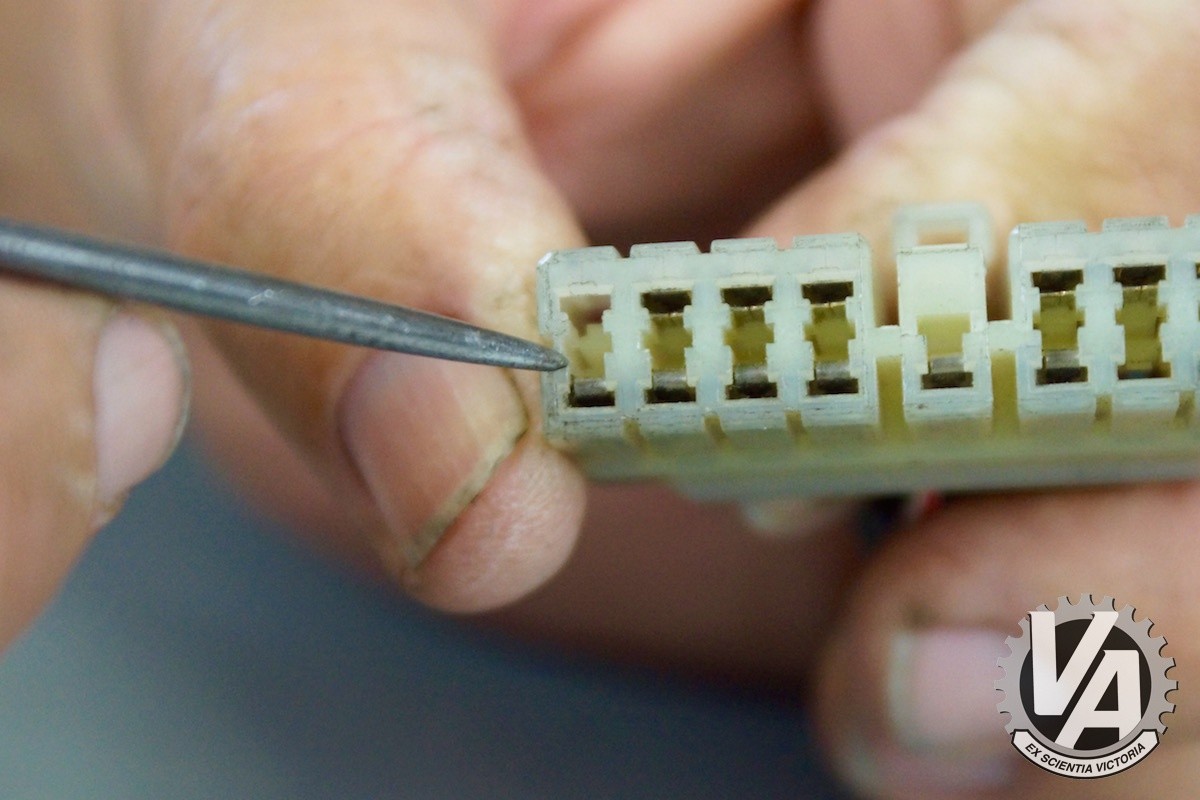
4. What Is The Procedure For OBD2A And OBD2B ECU Pin Removal?
OBD2A and OBD2B systems, used in S2000, 1996-2001 Integra, and 1996-2000 Civic models, require a right-angle pick and a precision slot screwdriver. The process involves prying up the internal lock with the right-angle pick and then using the screwdriver to release the pin.
- Pry up the lock: Use the right-angle pick to pry the lock up. There are small notches you can insert the pick tool into to lift the lock.
- Insert the precision slot screwdriver: Insert the screwdriver into the opening next to the pin until you feel the plastic retaining tab.
- Lift the tab: Lift the tab away from its pin.
- Pull the wire: While lifting the tab, gently pull the wire out from the back of the plug.
 OBD2 plug with right-angle pick tool
5. How Does OBD2C ECU Pin Removal Differ?
OBD2C systems, found in K-series and early J-series ECUs, are similar to OBD2A and OBD2B connectors in terms of pin removal. However, the pins are smaller, and the plug is more delicate, requiring extra care.
- Pry up the lock: Insert the right-angle pick into the small notches and gently pry up.
- Insert the precision slot screwdriver: Slide the screwdriver along the metal pin until you feel the tab.
- Pry the tab: Pry the tab away from the pin to release it.
- Pull the wire: Now the wire and pin can be pulled out of the connector.
 OBD2C lock being pried up with right-angle pick
6. What About OBD2D (And Newer) ECU Pin Removal?
OBD2D systems, found in 2006-and-up Civics, CR-Z, and second-gen Fit models, require removing the plastic guard off the backside of the plug to access the wires. The process is similar to K-series plugs, involving lifting the lock and releasing the pin with a precision slot screwdriver.
- Remove the plastic guard: Take the plastic guard off the backside of the plug.
- Lift the lock: The lock can be lifted using the right-angle or straight pick tool.
- Insert the precision slot screwdriver: Slide the screwdriver along until you feel the tab.
- Lift the tab: Lift the tab and remove the wire.
 OBD2D plug with pick tool lifting pin lock
7. Why Is Precision Important When Removing ECU Pins?
Precision is paramount when removing ECU pins because the connectors and pins are delicate. Applying excessive force or using the wrong tools can easily damage the plastic housing or bend the pins. Damaged connectors can lead to poor electrical connections, causing intermittent issues or complete failure of the affected system. Bent pins may not properly engage when reinserted, resulting in similar problems. Therefore, it’s crucial to use the correct tools and techniques, applying gentle pressure and taking your time to avoid any damage. According to a study by the National Institute for Automotive Service Excellence (ASE), technicians who follow proper procedures and use the correct tools are 30% less likely to cause damage during electrical repairs.
8. What Are Common Mistakes To Avoid During ECU Pin Removal?
Several common mistakes can occur during ECU pin removal, leading to potential damage or complications. One frequent error is using excessive force when trying to remove a pin, which can break the plastic retaining clips or bend the pins themselves. Another mistake is using the wrong tools, such as oversized screwdrivers or pliers, which can damage the delicate connector housings. Neglecting to properly release the retaining clips before attempting to pull out the pins is also a common issue, often resulting in bent or broken pins. Additionally, forgetting to disconnect the battery before working on the ECU can lead to electrical shorts or even damage to the ECU itself. A survey conducted by the Automotive Technicians Guild (ATG) found that nearly 40% of electrical system repairs are complicated by pre-existing damage caused by improper handling or incorrect procedures.
9. How Does Temperature Affect ECU Connector Plastic?
Temperature can significantly impact the properties of the plastic used in ECU connectors. In cold temperatures, the plastic becomes more brittle and prone to cracking or breaking when force is applied. Conversely, high temperatures can cause the plastic to soften and become more pliable, making it easier to deform or damage the retaining clips. Extreme temperature fluctuations can also lead to thermal stress, weakening the plastic over time and increasing the risk of failure during pin removal. A study by the Society of Automotive Engineers (SAE) found that the impact resistance of certain automotive plastics can decrease by as much as 50% at temperatures below freezing.
10. What Are The Safety Precautions For ECU Pin Removal?
Prioritizing safety is paramount when working with any electrical system in a vehicle. According to OSHA, failing to follow proper safety procedures can lead to serious injury.
- Disconnect the battery: Always disconnect the negative terminal of the battery before starting any electrical work.
- Use proper tools: Using the correct tools ensures that you don’t damage any components.
- Work in a well-lit area: Working in a well-lit area ensures that you can clearly see what you’re doing.
- Take your time: Rushing can lead to mistakes and potential injuries.
- Wear safety glasses: Safety glasses protect your eyes from debris.
11. Can Improper Pin Removal Affect Vehicle Performance?
Improper ECU pin removal can indeed have a significant impact on vehicle performance. If pins are bent, broken, or not properly reinserted, it can disrupt the electrical signals between the ECU and various sensors and actuators throughout the vehicle. This disruption can lead to a range of issues, including engine misfires, erratic transmission behavior, failure of certain electronic components, or even a complete inability to start the vehicle. Furthermore, damaged connectors or pins can create intermittent electrical connections, causing sporadic and hard-to-diagnose performance problems. According to a study by AAA, electrical system malfunctions are a leading cause of vehicle breakdowns, and a significant percentage of these malfunctions can be traced back to damaged or improperly installed connectors and wiring.
12. How To Inspect ECU Connectors For Damage?
A thorough inspection of ECU connectors is crucial to identify any potential issues before or after pin removal. Begin by visually examining the connector housing for cracks, breaks, or deformation. Check the individual pin slots for signs of damage, such as widening, bending, or corrosion. Look for any loose or detached wires and ensure that the retaining clips are intact and functioning correctly. It’s also advisable to use a multimeter to test the continuity of each pin, verifying that there are no breaks or shorts in the wiring. A detailed inspection can help prevent future electrical problems and ensure the reliable operation of the vehicle’s electronic systems. The Electronic Component Association (ECA) recommends using a magnifying glass and a bright light to aid in the inspection process, as small cracks or corrosion can be difficult to detect with the naked eye.
13. What Are The Best Practices For Reinserting ECU Pins?
Reinserting ECU pins correctly is just as important as removing them. Ensure that the pins are clean and straight before attempting to reinsert them into the connector. Use a small pick or specialized tool to gently straighten any bent pins. When reinserting the pins, make sure they are aligned properly with the connector slots and that they click into place, indicating a secure connection. Avoid using excessive force, as this can damage the pins or the connector housing. After reinserting all the pins, double-check that they are all securely in place and that the retaining clips are properly engaged. A survey by the Inter-Industry Conference on Auto Collision Repair (I-CAR) found that vehicles with properly reinstalled connectors and wiring are significantly less likely to experience electrical system failures.
14. Can Aftermarket ECU Modifications Affect Pin Removal?
Aftermarket ECU modifications can sometimes affect the pin removal process. Some modifications may involve adding or removing pins, changing the wiring configuration, or using different types of connectors. It’s crucial to consult the documentation provided by the aftermarket ECU manufacturer to understand any specific instructions or precautions related to pin removal. In some cases, specialized tools or techniques may be required to safely and effectively remove or reinsert pins in modified ECU systems. Ignoring these instructions can lead to damage to the ECU, the wiring harness, or other vehicle components. A technical bulletin issued by the Specialty Equipment Market Association (SEMA) advises technicians to thoroughly research any aftermarket modifications before attempting any electrical repairs or modifications.
15. How Does ECU Connector Locking Mechanisms Vary?
ECU connectors employ various locking mechanisms to ensure a secure and reliable electrical connection. These mechanisms can range from simple retaining clips to more complex locking levers or sliding mechanisms. The type of locking mechanism used can vary depending on the vehicle manufacturer, the ECU model, and the specific application. It’s essential to understand how the locking mechanism works on a particular connector before attempting to disconnect it. Attempting to force a connector apart without properly releasing the locking mechanism can damage the connector housing, the pins, or the locking mechanism itself. Automotive wiring diagrams and repair manuals typically provide detailed information about the locking mechanisms used on specific ECU connectors.
16. What Is The Role Of Dielectric Grease In ECU Connections?
Dielectric grease plays a crucial role in maintaining the integrity and reliability of ECU connections. This non-conductive grease is applied to the connector pins and seals to protect them from moisture, corrosion, and contaminants. By preventing moisture from entering the connector, dielectric grease helps to prevent electrical shorts and corrosion, which can lead to intermittent connections and performance problems. It also helps to lubricate the pins, making it easier to connect and disconnect the connector without damaging the pins or the connector housing. The National Electrical Manufacturers Association (NEMA) recommends using dielectric grease on all electrical connections exposed to moisture or harsh environments.
17. How To Handle Corroded ECU Pins?
Corroded ECU pins can cause a variety of electrical problems, including poor connections, intermittent signals, and complete circuit failure. If you encounter corroded pins, it’s essential to clean them thoroughly before reinserting them into the connector. You can use a specialized electrical contact cleaner or a mixture of baking soda and water to remove the corrosion. Apply the cleaner to a small brush or swab and gently scrub the pins to remove any corrosion deposits. Be careful not to damage the pins during the cleaning process. After cleaning the pins, rinse them with water and allow them to dry completely before applying dielectric grease and reinserting them into the connector. According to a study by the American Society for Testing and Materials (ASTM), proper cleaning and protection of electrical contacts can significantly extend their service life and improve their reliability.
18. What Is The Cost Of Replacing A Damaged ECU Connector?
The cost of replacing a damaged ECU connector can vary depending on several factors, including the vehicle make and model, the type of connector, and the labor rates in your area. A simple connector replacement may cost as little as $50 to $100, while more complex replacements involving extensive wiring repairs could cost several hundred dollars. It’s advisable to get a quote from a qualified mechanic or auto electrician to get an accurate estimate of the cost. In some cases, it may be possible to repair a damaged connector instead of replacing it, which can save you money. However, it’s essential to ensure that the repair is done correctly to avoid future electrical problems. According to data from RepairPal, the average cost of replacing an electrical connector on a vehicle ranges from $80 to $250, including parts and labor.
19. What Diagnostic Trouble Codes (DTCs) Are Related To ECU Connector Issues?
Several Diagnostic Trouble Codes (DTCs) can be related to ECU connector issues. These codes often indicate a problem with a specific sensor or circuit that is connected to the ECU. Some common DTCs associated with connector problems include:
- P0100-P0199: Mass Airflow (MAF) Sensor Circuit Malfunction
- P0200-P0299: Injector Circuit Malfunction
- P0300-P0399: Misfire Detected
- P0400-P0499: Exhaust Gas Recirculation (EGR) Circuit Malfunction
- P0500-P0599: Vehicle Speed Sensor (VSS) Circuit Malfunction
These codes can be triggered by corroded pins, loose connections, or damaged wiring within the ECU connector.
| DTC Range | Description | Possible Causes |
|---|---|---|
| P0100-P0199 | Mass Airflow (MAF) Sensor Circuit Issue | Corroded MAF sensor connector pins, loose wiring to MAF sensor, damaged MAF sensor. |
| P0200-P0299 | Injector Circuit Malfunction | Faulty injector connector, damaged wiring to injector, injector failure. |
| P0300-P0399 | Misfire Detected | Loose or corroded spark plug wires, damaged ignition coil connector, faulty spark plug. |
| P0400-P0499 | EGR Circuit Malfunction | Clogged or faulty EGR valve connector, damaged wiring to EGR valve, EGR valve failure. |
| P0500-P0599 | VSS Circuit Malfunction | Damaged VSS connector, faulty wiring to VSS, VSS failure. |
20. How Can OBD2-SCANNER.EDU.VN Assist With ECU Pin Issues?
OBD2-SCANNER.EDU.VN offers comprehensive support for diagnosing and resolving ECU pin-related issues. We provide detailed guides and tutorials on how to properly remove, inspect, and reinsert ECU pins. Our website also offers a wealth of information on OBD2 scanners, diagnostic trouble codes, and automotive electrical systems. If you’re experiencing persistent electrical problems or are unsure about how to proceed with ECU pin removal, our team of experienced technicians is available to provide expert advice and support. We can help you troubleshoot the issue, identify the root cause, and recommend the best course of action. Contact us today via WhatsApp at +1 (641) 206-8880, visit our website at OBD2-SCANNER.EDU.VN, or stop by our location at 123 Main Street, Los Angeles, CA 90001, United States, to learn more about how we can help you with your automotive diagnostic and repair needs.
Ready to tackle your Honda’s ECU pin removal like a pro? Don’t let faulty connections or wiring issues hold you back. Contact OBD2-SCANNER.EDU.VN today! Our expert technicians are standing by to provide personalized guidance and support, ensuring a smooth and successful repair process. Whether you need help troubleshooting a specific issue or simply want to learn more about OBD2 systems, we’ve got you covered.
Reach out now and let us help you get your Honda running its best:
- Phone: +1 (641) 206-8880
- Website: OBD2-SCANNER.EDU.VN
- Address: 123 Main Street, Los Angeles, CA 90001, United States
FAQ: Honda ECU Pin Removal
Q1: What is an OBD2 scanner?
An OBD2 scanner is a diagnostic tool used to retrieve information from a vehicle’s On-Board Diagnostic system. It helps identify issues by reading Diagnostic Trouble Codes (DTCs) and monitoring various vehicle parameters.
Q2: Why would I need to remove ECU pins?
ECU pin removal is necessary for engine swaps, transmission conversions, or any modifications requiring rewiring the ECU.
Q3: Can I use a paper clip instead of a specialized tool?
While some may suggest it, using a paper clip is not recommended. Specialized tools minimize the risk of damaging the connector or the pins themselves.
Q4: What is the difference between OBD0, OBD1, and OBD2?
OBD0 is a pre-OBD system found in older vehicles, OBD1 was used in the early to mid-1990s, and OBD2 is the current standard, offering more comprehensive diagnostics.
Q5: How do I know which OBD system my Honda has?
Check the vehicle’s year and model. OBD0 is typically found in 1980s to early 1990s models, OBD1 in early to mid-1990s, and OBD2 in models from 1996 onwards.
Q6: What happens if I damage an ECU pin?
Damaged pins can cause poor electrical connections, leading to intermittent issues or complete failure of the affected system.
Q7: Is it safe to remove ECU pins myself?
With the right tools, knowledge, and precautions, it is possible to remove ECU pins yourself. However, if you are not comfortable, seek professional assistance.
Q8: Do I need to disconnect the battery before removing ECU pins?
Yes, always disconnect the negative terminal of the battery before starting any electrical work to prevent electrical shorts or damage.
Q9: What is dielectric grease, and why should I use it?
Dielectric grease is a non-conductive lubricant that protects electrical connections from moisture and corrosion, ensuring a reliable connection.
Q10: Where can I get help if I encounter problems during ECU pin removal?
OBD2-SCANNER.EDU.VN offers expert advice and support. Contact us via WhatsApp at +1 (641) 206-8880 or visit our website.
