OBD2 compliance wasn’t mandated until 1996 in the US, so a 1991 vehicle is typically equipped with OBD1, not OBD2. This distinction is crucial because it affects how you diagnose and troubleshoot vehicle issues. At OBD2-SCANNER.EDU.VN, we provide comprehensive information and resources to help you understand the differences between OBD1 and OBD2, ensuring you can effectively diagnose your vehicle. Understanding the nuances of these systems equips you with the knowledge to perform efficient auto repairs and diagnostics. Let’s delve into the specifics of OBD1 and OBD2 systems, diagnostic procedures, and how OBD2-SCANNER.EDU.VN supports your automotive needs.
Contents
- 1. What Is The Difference Between OBD1 and OBD2?
- 1.1 Understanding OBD1 (On-Board Diagnostics 1)
- 1.2 The Advent of OBD2 (On-Board Diagnostics 2)
- 1.3 Key Differences Highlighted
- 1.4 Benefits of OBD2 Over OBD1
- 1.5 Real-World Implications
- 2. How To Diagnose A 1991 Vehicle Without OBD2?
- 2.1 Manual Code Retrieval Methods
- 2.2 Interpreting the Trouble Codes
- 2.3 Common OBD1 Trouble Codes
- 2.4 Using a Voltmeter for Diagnostics
- 2.5 Importance of Accurate Information
- 2.6 Leveraging OBD2-SCANNER.EDU.VN
- 3. What Are The Common Issues Diagnosed On OBD1 Systems?
- 3.1 Sensor Failures
- 3.2 Ignition System Problems
- 3.3 Fuel System Issues
- 3.4 Vacuum Leaks
- 3.5 Electrical Problems
- 3.6 Emission Control System Issues
- 3.7 Benefits Of Using OBD2-SCANNER.EDU.VN
- 4. What Diagnostic Tools Can Be Used On A 1991 Vehicle?
- 4.1 Code Readers For OBD1 Systems
- 4.2 Multimeters For Electrical Testing
- 4.3 Vacuum Gauges For Engine Diagnostics
- 4.4 Fuel Pressure Testers For Fuel System Diagnostics
- 4.5 Timing Lights For Ignition Timing
- 4.6 Compression Testers For Engine Health
- 4.7 How OBD2-SCANNER.EDU.VN Can Assist
- 5. What Are The Benefits Of Upgrading To An OBD2 System?
- 5.1 Enhanced Diagnostic Capabilities
- 5.2 Standardized Diagnostic Interface
- 5.3 Improved Emissions Monitoring
- 5.4 Access To Advanced Diagnostic Tools
- 5.5 Easier Troubleshooting
- 5.6 Why Trust OBD2-SCANNER.EDU.VN?
- 6. What Should I Do If I Cannot Retrieve Codes From My 1991 Vehicle?
- 6.1 Verify The Diagnostic Procedure
- 6.2 Check The ALDL Connector
- 6.3 Examine The Wiring
- 6.4 Test The Ground Connection
- 6.5 Verify Power Supply
- 6.6 Check The ECU (Engine Control Unit)
- 6.7 Seek Professional Assistance
- 6.8 How OBD2-SCANNER.EDU.VN Can Assist
- 7. What Are The Alternatives To Using An OBD1 Scanner?
- 7.1 Using A Multimeter For Component Testing
- 7.2 Vacuum Testing For Engine Issues
- 7.3 Fuel Pressure Testing
- 7.4 Compression Testing
- 7.5 Visual Inspection
- 7.6 Listening For Unusual Noises
- 7.7 Manual Code Retrieval (If Applicable)
- 7.8 Utilizing OBD2-SCANNER.EDU.VN Resources
- 8. How To Maintain A 1991 Vehicle To Prevent Diagnostic Issues?
- 8.1 Regular Oil Changes
- 8.2 Inspect And Replace Filters
- 8.3 Check And Replace Spark Plugs
- 8.4 Inspect And Maintain The Ignition System
- 8.5 Inspect And Maintain The Fuel System
- 8.6 Check And Maintain The Cooling System
- 8.7 Inspect And Maintain The Vacuum System
- 8.8 Regularly Check Fluids
- 8.9 Keep Up With Scheduled Maintenance
- 8.10 Utilize OBD2-SCANNER.EDU.VN Resources
- 9. Can A 1991 Vehicle Be Converted To OBD2?
- 9.1 Understanding The Scope Of The Conversion
- 9.2 Challenges And Difficulties
- 9.3 Required Components And Modifications
- 9.4 Is It Worth The Effort?
- 9.5 Maintaining The Existing OBD1 System
- 9.6 Exploring Alternative Upgrades
- 9.7 Why Choose OBD2-SCANNER.EDU.VN?
- 10. Where Can I Find More Information About OBD1 Systems?
- 10.1 Vehicle Repair Manuals
- 10.2 Online Forums And Communities
- 10.3 Professional Mechanics
- 10.4 Online Databases And Websites
1. What Is The Difference Between OBD1 and OBD2?
A 1991 vehicle typically uses an OBD1 system, while OBD2 became standard in 1996. These systems differ significantly in their capabilities, connector types, and diagnostic procedures. Understanding these distinctions is essential for accurate vehicle diagnostics.
1.1 Understanding OBD1 (On-Board Diagnostics 1)
OBD1, the predecessor to OBD2, was implemented differently by various manufacturers, lacking a standardized diagnostic interface. This meant that each car maker could use their own connectors, protocols, and trouble codes.
- Lack of Standardization: Each manufacturer used different diagnostic connectors, making it challenging to use a universal scanner.
- Limited Data: OBD1 systems typically provided less detailed information compared to OBD2, making pinpointing issues more difficult.
- Manufacturer-Specific Codes: Diagnostic trouble codes (DTCs) varied among manufacturers, necessitating specific diagnostic tools and knowledge for each brand.
1.2 The Advent of OBD2 (On-Board Diagnostics 2)
OBD2 brought standardization to vehicle diagnostics, offering a universal interface and a more comprehensive set of diagnostic parameters. This standardization simplified the diagnostic process and made it easier for mechanics and vehicle owners to identify issues.
- Standardized Connector: OBD2 uses a standard 16-pin Diagnostic Link Connector (DLC), making it universally accessible.
- Comprehensive Data: OBD2 systems monitor a wider range of vehicle parameters, providing more detailed diagnostic information.
- Standardized Codes: OBD2 employs a standardized set of Diagnostic Trouble Codes (DTCs), ensuring consistent interpretation across different vehicle makes and models.
1.3 Key Differences Highlighted
| Feature | OBD1 | OBD2 |
|---|---|---|
| Standardization | Not standardized; varies by manufacturer | Standardized 16-pin DLC and DTCs |
| Data Provided | Limited | Comprehensive, including live data parameters |
| Connector Type | Manufacturer-specific | Standardized DLC |
| Code Definitions | Manufacturer-specific | Standardized DTCs |
| Diagnostic Tools | Manufacturer-specific | Universal OBD2 scanners |
| Implementation | Early to mid-1990s | Standard from 1996 onwards |
| Emission Focus | Less emphasis on emissions | Strong emphasis on monitoring and reducing emissions |
| Global Adoption | Primarily North America | Global standard, including North America, Europe, and Asia |
1.4 Benefits of OBD2 Over OBD1
The transition to OBD2 offered significant advantages, improving vehicle diagnostics and emissions monitoring. The standardization and increased data availability made it easier to diagnose and repair vehicles efficiently.
- Enhanced Diagnostics: OBD2 systems provide more detailed and accurate diagnostic information, reducing guesswork.
- Improved Emissions Monitoring: OBD2 systems closely monitor emissions-related components, helping to identify issues that affect air quality.
- Simplified Repairs: Standardized DTCs and connectors simplify the repair process, saving time and reducing costs.
1.5 Real-World Implications
For a 1991 vehicle owner, understanding that their car uses OBD1 means they need to use specific diagnostic procedures and tools suitable for OBD1 systems. At OBD2-SCANNER.EDU.VN, we offer resources and information to assist with both OBD1 and OBD2 diagnostics, ensuring you have the right tools and knowledge for the job.
2. How To Diagnose A 1991 Vehicle Without OBD2?
Diagnosing a 1991 vehicle without OBD2 requires different techniques, often involving manual code retrieval and careful interpretation. Here’s a step-by-step guide to help you through the process.
2.1 Manual Code Retrieval Methods
Since 1991 vehicles lack a standardized OBD2 port, you’ll need to use manual methods to retrieve diagnostic trouble codes (DTCs). The most common method involves using the ALDL (Assembly Line Diagnostic Link) connector.
- Locate the ALDL Connector: The ALDL connector is typically located under the dashboard, often near the steering column.
- Prepare a Jumper Wire: A simple paper clip or jumper wire can be used to bridge specific terminals on the ALDL connector.
- Ground the Terminals: Insert the paper clip or jumper wire between terminals A and B of the ALDL connector.
- Turn on the Ignition: Turn the ignition key to the “ON” position, but do not start the engine.
- Read the Codes: Observe the “Check Engine” light. The light will flash a series of codes. Code 12 (one flash, a pause, then two flashes) indicates the system is in diagnostic mode. After Code 12, any stored trouble codes will be displayed.
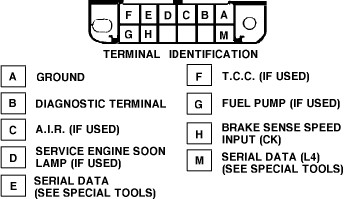 GM ALDL Connector for OBD1 Diagnostics
2.2 Interpreting the Trouble Codes
Once you retrieve the codes, you’ll need to interpret them using a manufacturer-specific code chart. Since OBD1 codes are not standardized, a chart specific to your vehicle’s make and model is essential.
- Code 12: Indicates the system is in diagnostic mode.
- Example Codes: Common codes might include those for the oxygen sensor, coolant temperature sensor, or throttle position sensor.
- Consult a Manual: Refer to a repair manual or online database for your specific vehicle to accurately interpret the codes.
2.3 Common OBD1 Trouble Codes
Here are some common OBD1 trouble codes for GM vehicles, which can serve as a general reference:
| Code | Description |
|---|---|
| 12 | No distributor reference pulse (diagnostic test active) |
| 13 | Oxygen sensor circuit open or no activity |
| 14 | Engine coolant temp sensor error (high temp indicated) |
| 15 | Engine coolant temp sensor error (low temp indicated) |
| 21 | Throttle position sensor error (signal high) |
| 22 | Throttle position sensor error (signal low) |
| 33 | MAP sensor circuit error (signal high indicating low vacuum) |
| 34 | MAP sensor circuit error (signal low indicating high vacuum) |
| 41 | Ignition control error |
| 42 | Ignition bypass circuit error |
| 44 | Oxygen sensor error (lean condition indicated) |
| 45 | Oxygen sensor error (rich condition indicated) |
2.4 Using a Voltmeter for Diagnostics
In addition to reading codes, a voltmeter can be used to diagnose various electrical components. This method involves testing the voltage, continuity, and resistance of sensors and circuits.
- Identify the Component: Determine which sensor or circuit you want to test.
- Locate Test Points: Find the appropriate test points on the component or wiring harness.
- Set Up the Voltmeter: Set the voltmeter to the appropriate setting (voltage, continuity, or resistance).
- Test the Component: Measure the voltage, continuity, or resistance and compare the readings to the manufacturer’s specifications.
2.5 Importance of Accurate Information
Diagnosing a 1991 vehicle accurately depends on having the right information. Repair manuals, wiring diagrams, and manufacturer-specific diagnostic procedures are essential.
2.6 Leveraging OBD2-SCANNER.EDU.VN
At OBD2-SCANNER.EDU.VN, we provide resources to help you diagnose OBD1 vehicles. Our comprehensive guides and expert advice can assist you in retrieving and interpreting trouble codes, ensuring you can effectively troubleshoot your vehicle’s issues. We also offer support for using voltmeters and other diagnostic tools, enhancing your ability to perform accurate diagnostics.
3. What Are The Common Issues Diagnosed On OBD1 Systems?
OBD1 systems, while less sophisticated than OBD2, still help diagnose a variety of vehicle issues. Understanding these common problems can streamline your diagnostic process.
3.1 Sensor Failures
Sensor failures are a frequent issue in OBD1 systems. These sensors monitor critical engine parameters, and their malfunction can trigger trouble codes.
- Oxygen Sensors: Monitor the oxygen content in the exhaust, affecting fuel mixture.
- Coolant Temperature Sensors: Measure the engine coolant temperature, impacting engine performance.
- Throttle Position Sensors: Track the throttle position, influencing fuel delivery and engine response.
- MAP Sensors: Measure manifold absolute pressure, affecting fuel and ignition timing.
3.2 Ignition System Problems
Ignition system issues can also be detected by OBD1. These problems can lead to poor engine performance, misfires, and reduced fuel efficiency.
- Ignition Control Module: Regulates ignition timing and spark delivery.
- Ignition Coil: Provides the high voltage needed to create a spark.
- Distributor: Distributes the spark to the correct cylinder at the right time.
3.3 Fuel System Issues
Problems with the fuel system can significantly impact engine performance. OBD1 can help identify issues with fuel delivery and mixture.
- Fuel Injectors: Deliver fuel into the engine cylinders.
- Fuel Pump: Supplies fuel from the tank to the engine.
- Fuel Pressure Regulator: Maintains consistent fuel pressure.
3.4 Vacuum Leaks
Vacuum leaks can cause a variety of engine issues, including rough idling, poor acceleration, and increased emissions. OBD1 systems can sometimes detect vacuum leaks through sensor readings.
- Hoses and Connectors: Check for cracks, breaks, or loose connections.
- Intake Manifold Gaskets: Inspect for leaks around the intake manifold.
- Vacuum Lines: Examine all vacuum lines for damage or disconnection.
3.5 Electrical Problems
Electrical issues are common in older vehicles, and OBD1 can help pinpoint problems with wiring and connections.
- Wiring Harnesses: Inspect for damaged, corroded, or loose wires.
- Connectors: Check for corrosion or loose connections.
- Grounding Points: Ensure all grounding points are clean and secure.
3.6 Emission Control System Issues
OBD1 systems also monitor components of the emission control system. Issues in this area can lead to increased emissions and failed inspections.
- EGR Valve: Controls the recirculation of exhaust gases.
- Catalytic Converter: Reduces harmful emissions from the exhaust.
- Air Injection System: Adds air to the exhaust to promote cleaner combustion.
3.7 Benefits Of Using OBD2-SCANNER.EDU.VN
At OBD2-SCANNER.EDU.VN, we offer resources and expert advice to help you diagnose and resolve these common OBD1 issues. Our comprehensive guides cover sensor testing, ignition system diagnostics, fuel system troubleshooting, and more. By leveraging our expertise, you can accurately diagnose and repair your 1991 vehicle, ensuring optimal performance and longevity.
4. What Diagnostic Tools Can Be Used On A 1991 Vehicle?
Diagnosing a 1991 vehicle, which typically uses an OBD1 system, requires specific tools. Understanding these tools and their functions is crucial for effective troubleshooting.
4.1 Code Readers For OBD1 Systems
While universal OBD2 scanners won’t work on a 1991 vehicle, there are code readers designed for OBD1 systems. These readers can retrieve diagnostic trouble codes (DTCs) to help you identify issues.
- Actron CP9125: A popular OBD1 code reader that can retrieve and clear codes.
- Innova 3123: Another reliable option for reading OBD1 codes on various vehicle makes and models.
- OTC 3111: A professional-grade OBD1 scanner that provides comprehensive diagnostic capabilities.
4.2 Multimeters For Electrical Testing
A multimeter is an essential tool for diagnosing electrical issues in a 1991 vehicle. It can measure voltage, current, and resistance to help you identify problems with sensors, circuits, and components.
- Voltage Measurement: Used to check the voltage at various points in the electrical system.
- Continuity Testing: Used to verify the integrity of circuits and wiring.
- Resistance Measurement: Used to measure the resistance of components like sensors and resistors.
4.3 Vacuum Gauges For Engine Diagnostics
Vacuum leaks can cause a variety of engine problems, and a vacuum gauge can help you identify these issues. By measuring the engine vacuum, you can diagnose problems like leaks, valve timing issues, and restricted exhaust systems.
- Connecting the Gauge: Attach the vacuum gauge to a vacuum port on the intake manifold.
- Reading the Gauge: Observe the gauge reading to assess the engine’s vacuum level.
- Interpreting the Results: Compare the reading to the manufacturer’s specifications to diagnose potential issues.
4.4 Fuel Pressure Testers For Fuel System Diagnostics
A fuel pressure tester is used to measure the fuel pressure in the fuel system. This tool helps you diagnose problems with the fuel pump, fuel pressure regulator, and fuel injectors.
- Connecting the Tester: Attach the fuel pressure tester to the fuel rail test port.
- Reading the Pressure: Observe the pressure reading with the engine running.
- Comparing to Specs: Compare the reading to the manufacturer’s specifications to identify fuel system issues.
4.5 Timing Lights For Ignition Timing
Proper ignition timing is crucial for engine performance. A timing light is used to check and adjust the ignition timing to ensure the engine runs efficiently.
- Connecting the Light: Attach the timing light to the spark plug wire of the first cylinder.
- Aiming at the Pulley: Aim the timing light at the crankshaft pulley to observe the timing marks.
- Adjusting the Timing: Adjust the distributor to align the timing marks according to the manufacturer’s specifications.
4.6 Compression Testers For Engine Health
A compression tester is used to measure the compression in each cylinder. This tool helps you assess the overall health of the engine and identify issues like worn piston rings, damaged valves, or blown head gaskets.
- Removing Spark Plugs: Remove all spark plugs from the engine.
- Inserting the Tester: Insert the compression tester into each cylinder.
- Cranking the Engine: Crank the engine several times and observe the compression reading.
- Comparing Results: Compare the compression readings for each cylinder to identify potential problems.
4.7 How OBD2-SCANNER.EDU.VN Can Assist
At OBD2-SCANNER.EDU.VN, we provide expert guidance on using these diagnostic tools effectively. Our resources include detailed guides, troubleshooting tips, and product recommendations to help you choose the right tools for your 1991 vehicle. By leveraging our expertise, you can accurately diagnose and repair your vehicle, ensuring optimal performance and reliability.
5. What Are The Benefits Of Upgrading To An OBD2 System?
Although a 1991 vehicle is not equipped with OBD2, understanding the benefits of upgrading can provide insights into modern vehicle diagnostics. While a direct upgrade isn’t usually feasible, knowing the advantages helps appreciate the advancements in automotive technology.
5.1 Enhanced Diagnostic Capabilities
OBD2 systems offer significantly more detailed diagnostic information compared to OBD1. This includes a wider range of sensors, live data monitoring, and more precise trouble codes, making it easier to identify and resolve issues.
- Comprehensive Sensor Monitoring: OBD2 systems monitor more sensors, providing a more complete picture of the engine’s operation.
- Live Data Streaming: OBD2 allows you to view real-time data from various sensors, helping you diagnose intermittent problems.
- Precise Trouble Codes: OBD2 codes are more specific, reducing guesswork and streamlining the diagnostic process.
5.2 Standardized Diagnostic Interface
OBD2 features a standardized 16-pin Diagnostic Link Connector (DLC), making it universally accessible. This standardization simplifies the diagnostic process and allows you to use a wide range of OBD2 scanners.
- Universal Connector: The standardized DLC eliminates the need for manufacturer-specific connectors.
- Wide Compatibility: OBD2 scanners are compatible with most vehicles manufactured from 1996 onwards.
- Easy Access: The DLC is typically located in an easily accessible location under the dashboard.
5.3 Improved Emissions Monitoring
OBD2 systems are designed to closely monitor emissions-related components, helping to identify issues that affect air quality. This is crucial for meeting emissions standards and ensuring environmental compliance.
- Continuous Monitoring: OBD2 systems continuously monitor emissions-related components.
- Early Detection: OBD2 can detect emissions problems early, preventing costly repairs.
- Compliance with Standards: OBD2 helps vehicles meet stringent emissions standards.
5.4 Access To Advanced Diagnostic Tools
With OBD2, you gain access to a wide range of advanced diagnostic tools. These tools offer features like enhanced code reading, live data analysis, and bi-directional control, enabling more thorough diagnostics.
- Enhanced Code Reading: Advanced OBD2 scanners provide detailed information about trouble codes.
- Live Data Analysis: These tools allow you to analyze live data streams to diagnose intermittent issues.
- Bi-Directional Control: Some advanced scanners allow you to control vehicle components for testing purposes.
5.5 Easier Troubleshooting
The combination of enhanced diagnostic capabilities, standardized interface, and access to advanced tools makes troubleshooting much easier with OBD2. This can save time and reduce the cost of repairs.
- Streamlined Diagnostics: The standardized interface and precise trouble codes streamline the diagnostic process.
- Reduced Guesswork: Enhanced diagnostic capabilities reduce guesswork and improve accuracy.
- Faster Repairs: Easier troubleshooting leads to faster and more efficient repairs.
5.6 Why Trust OBD2-SCANNER.EDU.VN?
Although upgrading a 1991 vehicle to OBD2 isn’t practical, understanding the advantages of OBD2 highlights the advancements in vehicle diagnostics. At OBD2-SCANNER.EDU.VN, we provide comprehensive information on OBD2 systems, helping you stay informed about modern automotive technology. Our resources include guides on OBD2 scanners, troubleshooting tips, and expert advice to keep your vehicle running smoothly.
6. What Should I Do If I Cannot Retrieve Codes From My 1991 Vehicle?
If you’re having trouble retrieving codes from your 1991 vehicle, which uses an OBD1 system, several factors could be responsible. Here are steps to troubleshoot the issue and potential solutions.
6.1 Verify The Diagnostic Procedure
Ensure you are following the correct procedure for retrieving codes from your specific vehicle make and model. OBD1 procedures vary, so using the wrong method can prevent you from accessing the diagnostic information.
- Consult the Repair Manual: Refer to the vehicle’s repair manual for the correct diagnostic procedure.
- Check Online Resources: Search online for specific instructions for your vehicle.
- Verify Terminal Connections: Ensure you are using the correct terminals on the ALDL connector.
6.2 Check The ALDL Connector
Inspect the ALDL connector for damage, corrosion, or loose connections. A faulty connector can prevent the code reader or jumper wire from making proper contact, hindering code retrieval.
- Visual Inspection: Look for any signs of damage or corrosion on the connector.
- Clean the Terminals: Use a wire brush or electrical contact cleaner to clean the terminals.
- Ensure Secure Connections: Make sure the jumper wire or code reader is securely connected to the terminals.
6.3 Examine The Wiring
Inspect the wiring connected to the ALDL connector for damage, breaks, or shorts. Damaged wiring can disrupt the diagnostic signal and prevent code retrieval.
- Visual Inspection: Look for any visible damage to the wiring.
- Continuity Testing: Use a multimeter to check the continuity of the wiring.
- Repair Damaged Wires: Repair or replace any damaged wires.
6.4 Test The Ground Connection
A poor ground connection can interfere with the diagnostic process. Ensure the ground terminal on the ALDL connector has a good connection to the vehicle’s chassis.
- Locate the Ground Terminal: Identify the ground terminal on the ALDL connector.
- Check the Connection: Ensure the ground terminal is securely connected to the vehicle’s chassis.
- Clean the Ground Point: Clean the grounding point to ensure a good connection.
6.5 Verify Power Supply
Ensure the ALDL connector is receiving power. A lack of power can prevent the diagnostic system from functioning properly.
- Check the Power Terminal: Use a multimeter to check for voltage at the power terminal on the ALDL connector.
- Inspect Fuses: Check the fuses related to the diagnostic system.
- Replace Blown Fuses: Replace any blown fuses.
6.6 Check The ECU (Engine Control Unit)
The ECU is responsible for storing and transmitting diagnostic trouble codes. A faulty ECU may not be able to provide codes, even if the sensors are functioning correctly.
- Visual Inspection: Look for any signs of damage on the ECU.
- Professional Testing: Have the ECU tested by a qualified technician.
- Consider Replacement: If the ECU is faulty, consider replacing it.
6.7 Seek Professional Assistance
If you’ve tried these steps and are still unable to retrieve codes, it may be time to seek professional assistance. A qualified mechanic can diagnose the issue using specialized tools and expertise.
- Find a Reputable Mechanic: Look for a mechanic with experience in OBD1 systems.
- Explain the Problem: Clearly explain the steps you’ve already taken to diagnose the issue.
- Trust Their Expertise: Trust the mechanic’s diagnosis and recommendations.
6.8 How OBD2-SCANNER.EDU.VN Can Assist
At OBD2-SCANNER.EDU.VN, we provide expert guidance on troubleshooting OBD1 diagnostic issues. Our resources include detailed guides, troubleshooting tips, and access to experienced technicians who can assist you in resolving your vehicle’s diagnostic problems. By leveraging our expertise, you can accurately diagnose and repair your 1991 vehicle, ensuring it runs smoothly.
7. What Are The Alternatives To Using An OBD1 Scanner?
While an OBD1 scanner is the most direct way to retrieve diagnostic trouble codes (DTCs) from a 1991 vehicle, several alternative methods and tools can help diagnose vehicle issues.
7.1 Using A Multimeter For Component Testing
A multimeter is a versatile tool that can be used to test various components in your vehicle’s electrical system. By measuring voltage, current, and resistance, you can diagnose problems with sensors, circuits, and actuators.
- Voltage Measurement: Check for proper voltage at various points in the system.
- Continuity Testing: Verify the integrity of circuits and wiring.
- Resistance Measurement: Measure the resistance of components like sensors and resistors.
7.2 Vacuum Testing For Engine Issues
A vacuum gauge can help diagnose a variety of engine problems by measuring the engine’s vacuum. This tool can identify issues like vacuum leaks, valve timing problems, and restricted exhaust systems.
- Connecting the Gauge: Attach the vacuum gauge to a vacuum port on the intake manifold.
- Reading the Gauge: Observe the gauge reading to assess the engine’s vacuum level.
- Interpreting the Results: Compare the reading to the manufacturer’s specifications to diagnose potential issues.
7.3 Fuel Pressure Testing
A fuel pressure tester is used to measure the fuel pressure in the fuel system. This tool helps diagnose problems with the fuel pump, fuel pressure regulator, and fuel injectors.
- Connecting the Tester: Attach the fuel pressure tester to the fuel rail test port.
- Reading the Pressure: Observe the pressure reading with the engine running.
- Comparing to Specs: Compare the reading to the manufacturer’s specifications to identify fuel system issues.
7.4 Compression Testing
A compression tester measures the compression in each cylinder, helping assess the overall health of the engine. This tool can identify issues like worn piston rings, damaged valves, or blown head gaskets.
- Removing Spark Plugs: Remove all spark plugs from the engine.
- Inserting the Tester: Insert the compression tester into each cylinder.
- Cranking the Engine: Crank the engine several times and observe the compression reading.
- Comparing Results: Compare the compression readings for each cylinder to identify potential problems.
7.5 Visual Inspection
A thorough visual inspection can often reveal obvious problems, such as damaged wiring, leaking fluids, or worn components.
- Check Wiring: Look for damaged, corroded, or loose wires.
- Inspect Hoses: Check for cracks, leaks, or loose connections.
- Examine Components: Look for signs of wear or damage on components like belts, pulleys, and sensors.
7.6 Listening For Unusual Noises
Pay attention to any unusual noises coming from the engine or other parts of the vehicle. Unusual sounds can often indicate specific problems.
- Knocking: May indicate engine knock or rod knock.
- Squealing: May indicate a slipping belt.
- Hissing: May indicate a vacuum leak.
7.7 Manual Code Retrieval (If Applicable)
Some OBD1 systems allow you to retrieve codes manually by using a jumper wire to ground specific terminals on the ALDL connector. This method requires a manufacturer-specific code chart to interpret the codes.
- Locate the ALDL Connector: Find the ALDL connector under the dashboard.
- Ground the Terminals: Use a jumper wire to ground the appropriate terminals.
- Read the Codes: Observe the “Check Engine” light to read the trouble codes.
7.8 Utilizing OBD2-SCANNER.EDU.VN Resources
At OBD2-SCANNER.EDU.VN, we offer a variety of resources to help you diagnose vehicle issues, even without an OBD1 scanner. Our comprehensive guides, troubleshooting tips, and expert advice can assist you in identifying and resolving problems using alternative methods. By leveraging our expertise, you can effectively diagnose and repair your 1991 vehicle.
8. How To Maintain A 1991 Vehicle To Prevent Diagnostic Issues?
Maintaining a 1991 vehicle, which relies on an OBD1 system, requires regular attention to prevent diagnostic issues and ensure reliable performance. Here are key maintenance practices to follow.
8.1 Regular Oil Changes
Regular oil changes are crucial for engine health. Clean oil lubricates engine components, reduces friction, and helps dissipate heat.
- Follow the Recommended Schedule: Adhere to the oil change schedule specified in your vehicle’s manual.
- Use the Correct Oil Type: Use the oil type and viscosity recommended by the manufacturer.
- Replace the Oil Filter: Always replace the oil filter with each oil change.
8.2 Inspect And Replace Filters
Filters play a vital role in keeping your engine running smoothly. Regularly inspect and replace the air filter, fuel filter, and cabin air filter.
- Air Filter: Replace the air filter to ensure proper airflow to the engine.
- Fuel Filter: Replace the fuel filter to prevent contaminants from entering the fuel system.
- Cabin Air Filter: Replace the cabin air filter to improve air quality inside the vehicle.
8.3 Check And Replace Spark Plugs
Spark plugs ignite the air-fuel mixture in the engine cylinders. Over time, they can become worn or fouled, leading to misfires and reduced performance.
- Inspect Spark Plugs: Regularly inspect the spark plugs for wear or damage.
- Replace as Needed: Replace the spark plugs according to the manufacturer’s recommended interval.
- Use the Correct Type: Use the spark plug type specified for your vehicle.
8.4 Inspect And Maintain The Ignition System
The ignition system is responsible for providing the high-voltage spark needed to ignite the air-fuel mixture. Regularly inspect and maintain the ignition components.
- Check Ignition Wires: Inspect the ignition wires for damage or wear.
- Inspect the Distributor Cap: Check the distributor cap for cracks or corrosion.
- Test the Ignition Coil: Test the ignition coil to ensure it is functioning properly.
8.5 Inspect And Maintain The Fuel System
The fuel system delivers fuel to the engine. Regularly inspect and maintain the fuel system components.
- Check Fuel Lines: Inspect the fuel lines for leaks or damage.
- Inspect Fuel Injectors: Check the fuel injectors for proper operation.
- Clean the Fuel System: Use a fuel system cleaner to remove deposits and improve performance.
8.6 Check And Maintain The Cooling System
The cooling system regulates the engine temperature. Regularly inspect and maintain the cooling system components.
- Check Coolant Levels: Check the coolant level regularly and top up as needed.
- Inspect Hoses: Inspect the radiator hoses for cracks or leaks.
- Flush the Cooling System: Flush the cooling system periodically to remove deposits and maintain efficiency.
8.7 Inspect And Maintain The Vacuum System
Vacuum leaks can cause a variety of engine problems. Regularly inspect and maintain the vacuum system.
- Check Vacuum Lines: Inspect the vacuum lines for cracks or leaks.
- Inspect Connections: Ensure all vacuum connections are secure.
- Replace Damaged Components: Replace any damaged vacuum lines or components.
8.8 Regularly Check Fluids
Regularly check the levels of all fluids in your vehicle, including engine oil, coolant, brake fluid, power steering fluid, and transmission fluid.
- Monitor Fluid Levels: Keep an eye on fluid levels and top up as needed.
- Check for Leaks: Look for signs of leaks under the vehicle.
- Follow Maintenance Schedules: Follow the manufacturer’s recommended maintenance schedules for fluid changes.
8.9 Keep Up With Scheduled Maintenance
Adhere to the scheduled maintenance intervals outlined in your vehicle’s manual. This includes tasks like replacing belts, hoses, and other wear items.
- Follow the Manual: Follow the maintenance schedule in your vehicle’s manual.
- Keep Records: Keep records of all maintenance performed on your vehicle.
- Address Issues Promptly: Address any issues or concerns promptly to prevent further damage.
8.10 Utilize OBD2-SCANNER.EDU.VN Resources
At OBD2-SCANNER.EDU.VN, we provide comprehensive resources to help you maintain your 1991 vehicle. Our guides, tips, and expert advice can assist you in performing regular maintenance tasks and preventing diagnostic issues. By leveraging our expertise, you can keep your vehicle running smoothly and reliably for years to come.
9. Can A 1991 Vehicle Be Converted To OBD2?
Converting a 1991 vehicle, originally equipped with an OBD1 system, to OBD2 is a complex and often impractical task. While technically possible, the extensive modifications and costs involved usually outweigh the benefits.
9.1 Understanding The Scope Of The Conversion
Converting to OBD2 involves replacing numerous components and systems in your vehicle. This includes the engine control unit (ECU), sensors, wiring harnesses, and potentially even the engine itself.
- ECU Replacement: The original OBD1 ECU must be replaced with an OBD2-compatible unit.
- Sensor Upgrades: Many sensors need to be upgraded to OBD2-compatible versions.
- Wiring Harness Modifications: The entire wiring harness may need to be replaced or extensively modified.
9.2 Challenges And Difficulties
Several challenges make this conversion difficult:
- Compatibility Issues: Ensuring compatibility between the new OBD2 components and the existing vehicle systems can be challenging.
- Cost: The cost of the required parts and labor can be substantial.
- Complexity: The conversion process is complex and requires specialized knowledge and skills.
- Emissions Compliance: Ensuring the converted vehicle meets emissions standards can be difficult.
9.3 Required Components And Modifications
To convert a 1991 vehicle to OBD2, you would typically need the following:
- OBD2-Compatible ECU: A modern ECU designed for OBD2 systems.
- OBD2 Sensors: Oxygen sensors, coolant temperature sensors, throttle position sensors, and other OBD2-compatible sensors.
- OBD2 Wiring Harness: A complete wiring harness designed for OBD2 systems.
- OBD2 Diagnostic Port: A standard 16-pin OBD2 diagnostic port.
- Exhaust System Modifications: Modifications to the exhaust system to accommodate OBD2 sensors.
9.4 Is It Worth The Effort?
Considering the complexity and cost, converting a 1991 vehicle to OBD2 is generally not worth the effort. It is often more practical and cost-effective to maintain the existing OBD1 system or consider upgrading to a newer vehicle with OBD2.
9.5 Maintaining The Existing OBD1 System
Maintaining the existing OBD1 system can be a more sensible approach. This involves regular maintenance, timely repairs, and using appropriate diagnostic tools and procedures.
- Regular Maintenance: Follow the recommended maintenance schedule in your vehicle’s manual.
- Timely Repairs: Address any issues or concerns promptly to prevent further damage.
- Proper Diagnostic Tools: Use appropriate OBD1 diagnostic tools and procedures.
9.6 Exploring Alternative Upgrades
Instead of converting to OBD2, consider other upgrades that can improve your vehicle’s performance and reliability, such as modernizing the ignition system, upgrading the fuel system, or enhancing the suspension.
9.7 Why Choose OBD2-SCANNER.EDU.VN?
While converting a 1991 vehicle to OBD2 is typically not recommended, understanding the complexities and alternatives is essential. At OBD2-SCANNER.EDU.VN, we provide comprehensive information on OBD1 and OBD2 systems, helping you make informed decisions about your vehicle’s maintenance and upgrades. Our resources include guides on OBD1 diagnostics, maintenance tips, and expert advice to keep your classic vehicle running smoothly.
10. Where Can I Find More Information About OBD1 Systems?
Finding reliable information about OBD1 systems can be challenging, as most resources focus on OBD2. However, several sources can provide valuable insights and assistance.
10.1 Vehicle Repair Manuals
Vehicle repair manuals are an excellent source of information for OBD1 systems. These manuals provide detailed diagnostic procedures, wiring diagrams, and troubleshooting tips specific to your vehicle’s make and model.
- Factory Service Manuals: These are the most comprehensive manuals, providing in-depth information on all aspects of your vehicle.
- Aftermarket Repair Manuals: Brands like Haynes and Chilton offer repair manuals that cover a wide range of vehicles.
- Online Databases: Some online databases offer access to repair manuals and technical information.
10.2 Online Forums And Communities
Online forums and communities dedicated to classic cars and older vehicles can be valuable resources for OBD1 information. These forums often have experienced members who can offer advice and assistance.
- Classic Car Forums: Forums dedicated to classic cars can provide insights into OBD1 systems.
- Vehicle-Specific Forums: Forums specific to your vehicle’s make and model can offer targeted information.
- Online Communities: Online communities of mechanics and car enthusiasts can offer valuable advice.
10.3 Professional Mechanics
Experienced mechanics who have worked on older vehicles can be a valuable source of information. They can provide hands-on assistance and offer insights based on their experience.
- Find a Reputable Mechanic: Look for a mechanic with experience in OBD1 systems.
- Ask Questions: Don’t hesitate to ask questions and seek their advice.
- Trust Their Expertise: Trust the mechanic’s diagnosis and recommendations.
10.4 Online Databases And Websites
Several online databases and websites offer information about OBD1 systems, including trouble code definitions, diagnostic procedures, and troubleshooting tips.
- OBD Code Databases: Websites that provide information on OBD trouble codes.
- Technical Websites: Websites that offer technical information on automotive systems.
- Manufacturer Websites: Some manufacturers offer online resources for older vehicles.