Unlocking your Kawasaki’s diagnostic potential is easier than you think with a Kawasaki Obd2 Adapter 4 Pin. This article, brought to you by OBD2-SCANNER.EDU.VN, dives into the world of motorcycle diagnostics, explaining how this adapter can empower you to read trouble codes, monitor engine performance, and keep your bike running smoothly. Discover the power of on-board diagnostics and motorcycle diagnostic tools!
Contents
- 1. What is a Kawasaki OBD2 Adapter 4 Pin?
- 2. Why Do Kawasaki Motorcycles Use a 4-Pin OBD2 Adapter?
- 3. What are the Benefits of Using a Kawasaki OBD2 Adapter 4 Pin?
- 4. Which Kawasaki Models are Compatible with a 4-Pin OBD2 Adapter?
- 5. How to Identify the 4-Pin OBD2 Connector on Your Kawasaki Motorcycle?
- 6. What Tools are Needed to Use a Kawasaki OBD2 Adapter 4 Pin?
- 7. Step-by-Step Guide on How to Use a Kawasaki OBD2 Adapter 4 Pin
- 8. Understanding OBD2 Protocols for Kawasaki Motorcycles
- 9. Common OBD2 Trouble Codes for Kawasaki Motorcycles
- 10. How to Interpret OBD2 Trouble Codes
- 11. Can You Clear OBD2 Trouble Codes with a 4-Pin Adapter?
- 12. Limitations of Using a 4-Pin OBD2 Adapter
- 13. Choosing the Right OBD2 Scanner for Your Kawasaki Motorcycle
- 14. Connecting a Kawasaki 4 pin OBD2 Adapter to a Generic OBD2 Scanner
- 15. Safety Precautions When Using a Kawasaki OBD2 Adapter 4 Pin
- 16. Where to Buy a Kawasaki OBD2 Adapter 4 Pin?
- 17. The Future of Motorcycle Diagnostics
- 18. Benefits of Professional Motorcycle Diagnostic Services
- 19. Connecting a Kawasaki 4 pin OBD2 Adapter to a Scan Tool
- 20. Where to Find Reliable Information on Motorcycle Diagnostics
- 21. DIY Kawasaki Motorcycle Diagnostics vs. Professional Services
- 22. Advanced Diagnostic Procedures for Kawasaki Motorcycles
- 23. Ensuring Compatibility of the Kawasaki OBD2 Adapter 4 Pin
- 24. Essential Maintenance Tips for Kawasaki Motorcycles
- 25. How a Kawasaki OBD2 Adapter 4 Pin Can Help You Save Money
- 26. Common Mistakes to Avoid When Using a Kawasaki OBD2 Adapter 4 Pin
- 27. How to Troubleshoot Connection Issues with a Kawasaki OBD2 Adapter 4 Pin
- 28. Real-World Examples of Using a Kawasaki OBD2 Adapter 4 Pin
- 29. How a Kawasaki OBD2 Adapter 4 Pin Can Help with Performance Tuning
- 30. Understanding Motorcycle Emissions Standards and OBD2
- 31. Tips for Maintaining Your Kawasaki Motorcycle’s Electrical System
- 32. The Role of Sensors in Motorcycle Diagnostics
- 33. Where to Find Kawasaki Motorcycle Wiring Diagrams
- 34. Benefits of Joining a Kawasaki Motorcycle Owners Group
- 35. Choosing the Right Spark Plugs for Your Kawasaki Motorcycle
- 36. Future Trends in Motorcycle Technology
- 37. How to Prepare Your Kawasaki Motorcycle for Winter Storage
- 38. How to Find a Reputable Motorcycle Mechanic
- 39. Frequently Asked Questions (FAQ) About Kawasaki OBD2 Adapter 4 Pin
- 40. Need Help with Your Kawasaki Motorcycle Diagnostics?
1. What is a Kawasaki OBD2 Adapter 4 Pin?
A Kawasaki OBD2 adapter 4 pin is a specialized connector that bridges the gap between your Kawasaki motorcycle’s diagnostic port and a standard OBD2 scanner. While most cars use a 16-pin OBD2 port, many Kawasaki motorcycles, particularly older models, utilize a 4-pin connector. This adapter allows you to connect a standard OBD2 scanner to your bike, granting access to valuable diagnostic information.
- Definition: It is a bridge connecting a Kawasaki motorcycle’s 4-pin diagnostic port to a standard 16-pin OBD2 scanner.
- Function: Enables reading trouble codes, monitoring engine data, and performing diagnostics.
- Importance: Essential for diagnosing issues on Kawasaki motorcycles with 4-pin diagnostic ports.
2. Why Do Kawasaki Motorcycles Use a 4-Pin OBD2 Adapter?
The use of a 4-pin OBD2 adapter on Kawasaki motorcycles stems from the era of motorcycle diagnostics. Older models predate the standardization of the 16-pin OBD2 port common in cars. Kawasaki chose to implement a simpler, 4-pin diagnostic connector for early diagnostic capabilities. This adapter is therefore necessary for modern OBD2 scanners to interface with these motorcycles.
- Historical Context: Older Kawasaki models were manufactured before the widespread adoption of the 16-pin OBD2 standard.
- Simplicity: The 4-pin connector offered a basic yet functional diagnostic interface.
- Compatibility: An adapter is required to bridge the gap between the older 4-pin system and modern 16-pin OBD2 scanners.
3. What are the Benefits of Using a Kawasaki OBD2 Adapter 4 Pin?
Using a Kawasaki OBD2 adapter 4 pin opens the door to a wealth of benefits for motorcycle owners and technicians. From diagnosing engine problems to monitoring performance data, this adapter empowers you to take control of your bike’s health.
- Cost Savings: Diagnose and fix minor issues yourself, avoiding expensive trips to the mechanic.
- Faster Diagnostics: Quickly identify the source of a problem, reducing downtime and repair time.
- Performance Monitoring: Track engine parameters like temperature, RPM, and sensor readings for optimal performance.
- Proactive Maintenance: Catch potential problems early, preventing costly repairs down the road.
- Enhanced Understanding: Gain a deeper understanding of your motorcycle’s inner workings.
4. Which Kawasaki Models are Compatible with a 4-Pin OBD2 Adapter?
Compatibility with a 4-pin OBD2 adapter depends on the year and model of your Kawasaki motorcycle. Generally, older models, particularly those manufactured before the widespread adoption of OBD2 standardization in motorcycles, are more likely to use the 4-pin connector.
- General Guideline: Older Kawasaki models are more likely to use the 4-pin connector.
- Specific Models: Refer to your motorcycle’s service manual or online resources for definitive compatibility information.
- Year of Manufacture: Motorcycles manufactured before the mid-2000s are more likely to use the 4-pin connector.
- Consult Resources: Check online forums, motorcycle parts websites, or consult with a Kawasaki dealer for specific model compatibility.
5. How to Identify the 4-Pin OBD2 Connector on Your Kawasaki Motorcycle?
The 4-pin OBD2 connector on your Kawasaki motorcycle is typically located under the seat, near the battery, or in the vicinity of the fuse box. It’s a small, rectangular connector with four pins arranged in a row or a square configuration.
- Location: Typically found under the seat, near the battery, or the fuse box.
- Appearance: Small, rectangular connector with four pins.
- Pin Arrangement: Pins may be arranged in a row or a square configuration.
- Reference Manual: Consult your motorcycle’s service manual for the exact location and a diagram of the connector.
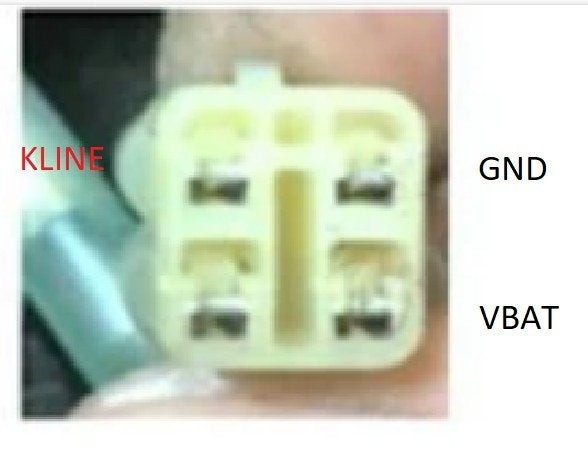 Kawasaki OBD2 Socket
6. What Tools are Needed to Use a Kawasaki OBD2 Adapter 4 Pin?
To effectively use a Kawasaki OBD2 adapter 4 pin, you’ll need a few essential tools. These tools will allow you to connect the adapter to your motorcycle and read the diagnostic data.
- Kawasaki OBD2 Adapter 4 Pin: The adapter itself, which connects to your motorcycle’s diagnostic port.
- OBD2 Scanner: A handheld device or software application that reads and displays diagnostic information.
- Smartphone or Laptop (Optional): If using a Bluetooth or Wi-Fi OBD2 scanner, you’ll need a compatible device to run the scanning app.
7. Step-by-Step Guide on How to Use a Kawasaki OBD2 Adapter 4 Pin
Using a Kawasaki OBD2 adapter 4 pin is a straightforward process. Follow these steps to connect your scanner and access your motorcycle’s diagnostic data:
- Locate the Diagnostic Connector: Find the 4-pin OBD2 connector on your Kawasaki motorcycle.
- Connect the Adapter: Plug the 4-pin end of the adapter into the motorcycle’s diagnostic connector.
- Connect the OBD2 Scanner: Plug the OBD2 end of the adapter into your OBD2 scanner.
- Turn on the Ignition: Turn your motorcycle’s ignition key to the “ON” position.
- Power on the OBD2 Scanner: Turn on your OBD2 scanner and follow the manufacturer’s instructions.
- Select the Correct Protocol: Choose the appropriate vehicle protocol (usually ISO9141 or KWP2000) on your scanner.
- Read Trouble Codes: Instruct the scanner to read diagnostic trouble codes (DTCs).
- Interpret the Codes: Use the scanner or online resources to interpret the meaning of the DTCs.
- Clear Trouble Codes (Optional): If desired, use the scanner to clear the DTCs after addressing the underlying issue.
- Disconnect the Scanner and Adapter: Once finished, disconnect the scanner and adapter from your motorcycle.
8. Understanding OBD2 Protocols for Kawasaki Motorcycles
OBD2 protocols are communication languages used between the scanner and your motorcycle’s computer. Kawasaki motorcycles with 4-pin connectors typically use older protocols like ISO9141 or KWP2000. Selecting the correct protocol on your OBD2 scanner is crucial for successful communication.
- ISO9141: An older OBD2 protocol commonly used in early OBD2 systems.
- KWP2000: Another protocol often found in older vehicles, including some Kawasaki motorcycles.
- Automatic Detection: Some advanced OBD2 scanners can automatically detect the correct protocol.
- Manual Selection: If automatic detection fails, you may need to manually select the protocol in the scanner’s settings.
- Consult Documentation: Refer to your motorcycle’s service manual or the OBD2 scanner’s documentation for guidance on protocol selection.
9. Common OBD2 Trouble Codes for Kawasaki Motorcycles
OBD2 trouble codes (DTCs) are standardized codes that indicate specific problems within your motorcycle’s engine and related systems. Here’s a table of some common OBD2 codes you might encounter on a Kawasaki motorcycle:
| Code | Description | Possible Causes |
|---|---|---|
| P0100 | Mass Air Flow (MAF) Sensor Circuit Malfunction | Dirty or faulty MAF sensor, vacuum leaks, wiring issues |
| P0113 | Intake Air Temperature (IAT) Sensor High Input | Faulty IAT sensor, wiring problems |
| P0170 | Fuel Trim Malfunction (Bank 1) | Vacuum leaks, faulty O2 sensor, fuel injector issues, low fuel pressure |
| P0300 | Random/Multiple Cylinder Misfire Detected | Spark plug issues, ignition coil problems, fuel injector issues, vacuum leaks, low compression |
| P0420 | Catalyst System Efficiency Below Threshold | Faulty catalytic converter, O2 sensor issues, exhaust leaks |
10. How to Interpret OBD2 Trouble Codes
Interpreting OBD2 trouble codes requires understanding the code’s structure and consulting reliable resources. Each code consists of five characters: a letter followed by four numbers.
- First Character: Indicates the system the code relates to:
- P: Powertrain (engine, transmission)
- B: Body (lighting, windows, locks)
- C: Chassis (brakes, suspension, steering)
- U: Network (communication systems)
- Second Character: Indicates whether the code is generic (0) or manufacturer-specific (1).
- Third Character: Specifies the subsystem:
- 1: Fuel and air metering
- 2: Fuel and air metering (injector circuit)
- 3: Ignition system or misfire
- 4: Auxiliary emission controls
- 5: Vehicle speed controls and idle control system
- 6: Computer output circuit
- 7: Transmission
- 8: Transmission
- Last Two Characters: Indicate the specific fault within the subsystem.
- Resources: Use your OBD2 scanner’s built-in code definitions, online databases, or your motorcycle’s service manual to interpret the codes.
11. Can You Clear OBD2 Trouble Codes with a 4-Pin Adapter?
Yes, you can typically clear OBD2 trouble codes using a 4-pin adapter and an OBD2 scanner. However, it’s crucial to address the underlying issue causing the code before clearing it. Clearing codes without fixing the problem will only result in the code reappearing.
- Procedure: Use the “clear codes” or “reset codes” function on your OBD2 scanner.
- Important Note: Clearing codes does not fix the problem.
- Reappearance: The code will likely reappear if the underlying issue is not resolved.
- Underlying Issue: Always diagnose and repair the problem that triggered the code before clearing it.
12. Limitations of Using a 4-Pin OBD2 Adapter
While a 4-pin OBD2 adapter provides valuable diagnostic capabilities, it’s important to be aware of its limitations. These limitations stem from the age of the technology and the capabilities of older motorcycle ECUs.
- Limited Data: Older ECUs may provide less data compared to modern systems.
- Fewer Functions: Some advanced OBD2 functions, such as live data streaming and component testing, may not be supported.
- Protocol Compatibility: Ensure your OBD2 scanner supports the older protocols used by your Kawasaki motorcycle.
- Adapter Quality: The quality of the adapter can affect its reliability and performance.
- Motorcycle Compatibility: Not all Kawasaki motorcycles are compatible with 4-pin OBD2 adapters.
13. Choosing the Right OBD2 Scanner for Your Kawasaki Motorcycle
Selecting the right OBD2 scanner is crucial for successful diagnostics. Consider these factors when choosing a scanner for your Kawasaki motorcycle:
- Protocol Support: Ensure the scanner supports ISO9141 and KWP2000 protocols.
- Compatibility: Verify the scanner is compatible with your motorcycle’s make, model, and year.
- Features: Consider features like code definitions, live data streaming, and component testing.
- Ease of Use: Choose a scanner with a user-friendly interface and clear instructions.
- Price: Balance features and functionality with your budget.
- Reviews: Read online reviews to get insights from other users.
14. Connecting a Kawasaki 4 pin OBD2 Adapter to a Generic OBD2 Scanner
Connecting a Kawasaki 4 pin OBD2 adapter to a generic OBD2 scanner can be accomplished. You need to be sure about wiring connections. As mentioned earlier, there are different adapters with different pinouts. Use a multimeter to check and recheck the connections before connecting it to the bike.
- Wiring: The generic OBD2 scanner has to be connected to the Kawasaki 4-pin adapter
- Check continuity: Use a multimeter to check the connection for a good connection
- Compatibility: Verify the scanner is compatible with your motorcycle’s make, model, and year.
15. Safety Precautions When Using a Kawasaki OBD2 Adapter 4 Pin
Safety should always be a top priority when working on your motorcycle. Follow these precautions when using a Kawasaki OBD2 adapter 4 pin:
- Read the Manuals: Familiarize yourself with the instructions for both the adapter and the OBD2 scanner.
- Disconnect the Battery: Disconnect the negative battery terminal before working on the electrical system.
- Work in a Well-Ventilated Area: Ensure adequate ventilation when working on your motorcycle.
- Wear Safety Glasses: Protect your eyes from debris and fluids.
- Avoid Water: Do not use the adapter or scanner in wet conditions.
- Proper Connections: Ensure all connections are secure and properly insulated.
- Don’t Force Connectors: If a connector doesn’t fit easily, double-check that you have the correct adapter.
- Seek Professional Help: If you’re uncomfortable working on your motorcycle, consult a qualified technician.
16. Where to Buy a Kawasaki OBD2 Adapter 4 Pin?
Kawasaki OBD2 adapters 4 pin are readily available from various sources. Here are some common places to purchase one:
- Online Retailers: Websites like Amazon, eBay, and AliExpress offer a wide selection of adapters.
- Motorcycle Parts Stores: Local motorcycle parts stores may carry adapters or be able to order them for you.
- Kawasaki Dealers: Your local Kawasaki dealer can provide genuine Kawasaki adapters.
- Specialty Automotive Stores: Some automotive stores specializing in diagnostics may carry motorcycle adapters.
17. The Future of Motorcycle Diagnostics
The future of motorcycle diagnostics is moving towards greater integration with smartphones and cloud-based services. Wireless OBD2 scanners, advanced diagnostic apps, and remote diagnostics are becoming increasingly common.
- Wireless Scanners: Bluetooth and Wi-Fi OBD2 scanners offer convenient wireless connectivity.
- Smartphone Apps: Sophisticated apps provide real-time data, code definitions, and diagnostic assistance.
- Cloud Connectivity: Cloud-based services enable data logging, remote diagnostics, and access to vast databases of repair information.
- Advanced Sensors: Future motorcycles will incorporate more sophisticated sensors for comprehensive monitoring.
- Artificial Intelligence: AI-powered diagnostics can analyze data and predict potential problems.
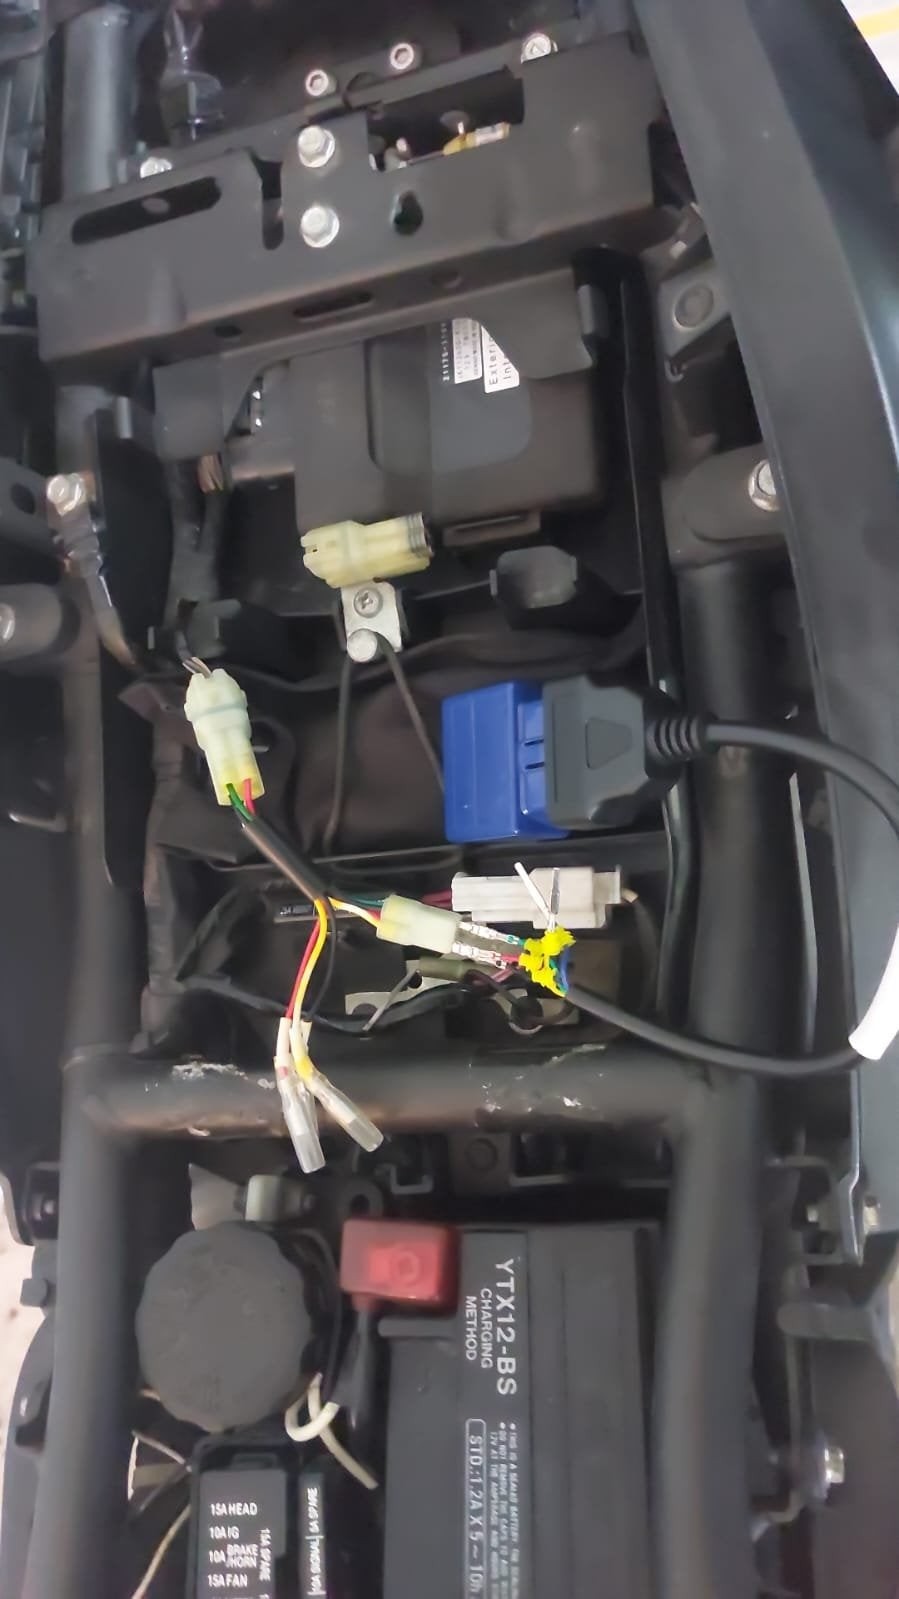 OBD2 Lead
18. Benefits of Professional Motorcycle Diagnostic Services
While DIY diagnostics can be helpful, professional motorcycle diagnostic services offer several advantages:
- Expertise: Trained technicians have the knowledge and experience to accurately diagnose complex problems.
- Specialized Tools: Professional shops have access to advanced diagnostic equipment.
- Comprehensive Testing: Technicians can perform a wide range of tests to pinpoint the root cause of a problem.
- Accurate Repairs: Professionals can perform repairs to factory specifications, ensuring optimal performance and reliability.
- Warranty: Professional repairs often come with a warranty, providing peace of mind.
19. Connecting a Kawasaki 4 pin OBD2 Adapter to a Scan Tool
Connecting a Kawasaki 4-pin OBD2 adapter to a scan tool is very similar to using a generic OBD2 scanner. There might be a small difference in procedure based on the scan tool being used. The process is still the same.
- Locate the Connector: Find the 4-pin OBD2 connector on your Kawasaki motorcycle, usually under the seat or near the battery.
- Attach Adapter: Plug the 4-pin end of the adapter into your motorcycle’s diagnostic connector securely.
- Connect Scan Tool: Plug the OBD2 end of the adapter into your scan tool.
- Turn on Ignition: Turn your motorcycle’s ignition key to the “ON” position but don’t start the engine.
- Power On Scan Tool: Turn on your scan tool and wait for it to boot up.
- Select Vehicle: Choose your vehicle’s make, model, and year from the scan tool menu.
- Read Codes: Select the option to read diagnostic trouble codes (DTCs).
20. Where to Find Reliable Information on Motorcycle Diagnostics
Finding reliable information on motorcycle diagnostics is crucial for accurate troubleshooting and repair. Here are some valuable resources:
- Motorcycle Service Manuals: These manuals contain detailed information on your motorcycle’s systems and diagnostic procedures.
- Online Forums: Online motorcycle forums are a great place to connect with other enthusiasts and share information.
- Technical Websites: Websites specializing in automotive and motorcycle technology offer valuable diagnostic resources.
- OBD2 Code Databases: Online databases provide definitions and troubleshooting tips for OBD2 codes.
- Training Courses: Consider taking a motorcycle diagnostic course to enhance your skills and knowledge.
21. DIY Kawasaki Motorcycle Diagnostics vs. Professional Services
Deciding between DIY Kawasaki motorcycle diagnostics and professional services depends on your skills, experience, and the complexity of the problem.
- DIY Diagnostics:
- Pros: Cost savings, convenience, learning experience.
- Cons: Requires technical skills, time-consuming, potential for misdiagnosis.
- Professional Services:
- Pros: Expertise, specialized tools, accurate diagnosis, warranty.
- Cons: Higher cost, less convenient.
22. Advanced Diagnostic Procedures for Kawasaki Motorcycles
Advanced diagnostic procedures for Kawasaki motorcycles require specialized tools and expertise. These procedures are typically performed by experienced technicians and involve in-depth analysis of the motorcycle’s systems.
- Live Data Analysis: Monitoring real-time data from sensors and components to identify anomalies.
- Component Testing: Testing individual components to verify their functionality.
- Fuel System Analysis: Evaluating fuel pressure, injector performance, and air-fuel ratio.
- Ignition System Analysis: Assessing spark plug condition, ignition coil output, and timing.
- Compression Testing: Measuring cylinder compression to assess engine health.
23. Ensuring Compatibility of the Kawasaki OBD2 Adapter 4 Pin
Making sure that your Kawasaki OBD2 adapter 4 pin is compatible involves a couple of steps. First, consult the manufacturer’s adapter guide or website and second, verify the pinout configuration.
- Consult the manual: Ensure the adapter works with your specific model and year.
- Check Protocols: Confirm it supports the necessary OBD2 protocols.
- Verify pinout: Match the adapter’s pin configuration to your bike’s diagnostic port.
- Test functionality: Once connected, test the adapter with a scan tool to confirm it reads data correctly.
24. Essential Maintenance Tips for Kawasaki Motorcycles
Regular maintenance is essential for keeping your Kawasaki motorcycle running smoothly and preventing costly repairs.
- Regular Oil Changes: Change the oil and filter according to the manufacturer’s recommendations.
- Air Filter Maintenance: Clean or replace the air filter regularly to ensure proper airflow.
- Spark Plug Replacement: Replace spark plugs at the recommended intervals for optimal ignition.
- Chain Maintenance: Keep the chain clean, lubricated, and properly adjusted.
- Brake Maintenance: Inspect brake pads, rotors, and fluid regularly.
- Tire Maintenance: Check tire pressure and tread depth regularly.
- Coolant Flush: Flush and replace the coolant every two years.
25. How a Kawasaki OBD2 Adapter 4 Pin Can Help You Save Money
Using a Kawasaki OBD2 adapter 4 pin can save you money in several ways:
- DIY Diagnostics: Diagnose and fix minor issues yourself, avoiding expensive mechanic fees.
- Early Detection: Catch potential problems early, preventing costly repairs down the road.
- Informed Decisions: Make informed decisions about repairs, avoiding unnecessary services.
- Performance Tuning: Optimize your motorcycle’s performance for better fuel economy.
- Preventive Maintenance: Perform preventive maintenance to extend the life of your motorcycle.
26. Common Mistakes to Avoid When Using a Kawasaki OBD2 Adapter 4 Pin
Avoid these common mistakes when using a Kawasaki OBD2 adapter 4 pin:
- Incorrect Protocol: Selecting the wrong OBD2 protocol.
- Forcing Connectors: Forcing connectors that don’t fit properly.
- Ignoring Codes: Clearing codes without addressing the underlying issue.
- Using Low-Quality Adapters: Using cheap, unreliable adapters.
- Ignoring Safety Precautions: Neglecting safety precautions when working on your motorcycle.
27. How to Troubleshoot Connection Issues with a Kawasaki OBD2 Adapter 4 Pin
Troubleshooting connection issues with a Kawasaki OBD2 adapter 4 pin involves a systematic approach:
- Check Connections: Ensure all connections are secure and properly seated.
- Verify Power: Verify that the OBD2 scanner is receiving power.
- Check the Adapter: Inspect the adapter for damage or corrosion.
- Try a Different Scanner: Try a different OBD2 scanner to rule out scanner issues.
- Check the Motorcycle’s Battery: Ensure the motorcycle’s battery is fully charged.
- Consult a Technician: If you’re unable to resolve the issue, consult a qualified technician.
28. Real-World Examples of Using a Kawasaki OBD2 Adapter 4 Pin
Here are some real-world examples of how a Kawasaki OBD2 adapter 4 pin can be used:
- Diagnosing a Misfire: Identifying a misfiring cylinder and tracing it to a faulty spark plug.
- Troubleshooting a Check Engine Light: Identifying the cause of a check engine light and resolving the issue.
- Monitoring Engine Temperature: Monitoring engine temperature to prevent overheating.
- Diagnosing a Fuel System Problem: Identifying a faulty fuel injector and replacing it.
- Tuning Engine Performance: Optimizing fuel and ignition settings for improved performance.
29. How a Kawasaki OBD2 Adapter 4 Pin Can Help with Performance Tuning
A Kawasaki OBD2 adapter 4 pin can be a valuable tool for performance tuning:
- Monitoring Data: Monitor real-time data like air-fuel ratio, ignition timing, and RPM.
- Identifying Bottlenecks: Identify areas where the engine’s performance can be improved.
- Adjusting Settings: Adjust fuel and ignition settings to optimize performance.
- Verifying Results: Verify the results of tuning adjustments by monitoring data.
- Custom Tuning: Create custom tuning maps for specific riding conditions.
30. Understanding Motorcycle Emissions Standards and OBD2
Motorcycle emissions standards are regulations that limit the amount of pollutants a motorcycle can release into the atmosphere. OBD2 systems play a crucial role in monitoring emissions and ensuring compliance with these standards.
- Emission Standards: Regulations like Euro 5 and EPA standards set limits on pollutants.
- OBD2 Monitoring: OBD2 systems monitor components that affect emissions, such as the catalytic converter and O2 sensors.
- Compliance: OBD2 systems help ensure that motorcycles comply with emissions standards.
- Fault Detection: OBD2 systems detect faults that could increase emissions.
- Reporting: OBD2 systems can report emissions-related faults to the rider.
31. Tips for Maintaining Your Kawasaki Motorcycle’s Electrical System
Maintaining your Kawasaki motorcycle’s electrical system is crucial for reliable operation.
- Check the Battery: Regularly check the battery’s voltage and terminals.
- Inspect Wiring: Inspect wiring for damage, corrosion, and loose connections.
- Clean Connectors: Clean electrical connectors to ensure good contact.
- Protect Wiring: Protect wiring from abrasion and heat.
- Use Dielectric Grease: Apply dielectric grease to connectors to prevent corrosion.
- Fuses: Replace blown fuses with the correct amperage.
32. The Role of Sensors in Motorcycle Diagnostics
Sensors play a vital role in motorcycle diagnostics by providing data about the engine’s performance and condition.
- Types of Sensors: Common sensors include:
- Mass Air Flow (MAF) sensor
- Intake Air Temperature (IAT) sensor
- Oxygen (O2) sensor
- Throttle Position Sensor (TPS)
- Crankshaft Position Sensor (CKP)
- Camshaft Position Sensor (CMP)
- Engine Coolant Temperature (ECT) sensor
- Data Provision: Sensors provide data about various parameters.
- Fault Detection: Faulty sensors can trigger trouble codes.
- Live Data Monitoring: Sensors enable live data monitoring for diagnostics.
33. Where to Find Kawasaki Motorcycle Wiring Diagrams
Kawasaki motorcycle wiring diagrams are essential for troubleshooting electrical problems.
- Service Manuals: The best source is your motorcycle’s service manual.
- Online Forums: Some online forums may have wiring diagrams available.
- Technical Websites: Websites specializing in motorcycle repair may offer diagrams.
- Libraries: Some libraries may have service manuals or wiring diagrams.
- Kawasaki Dealers: Your local Kawasaki dealer may be able to provide diagrams.
34. Benefits of Joining a Kawasaki Motorcycle Owners Group
Joining a Kawasaki motorcycle owners group can provide numerous benefits:
- Knowledge Sharing: Learn from experienced riders and mechanics.
- Technical Assistance: Get help with diagnostics and repairs.
- Community: Connect with other Kawasaki enthusiasts.
- Group Rides: Participate in group rides and events.
- Discounts: Some groups offer discounts on parts and services.
35. Choosing the Right Spark Plugs for Your Kawasaki Motorcycle
Choosing the right spark plugs is essential for optimal engine performance.
- Manufacturer’s Recommendations: Follow the manufacturer’s recommendations for spark plug type and gap.
- Heat Range: Select the correct heat range for your riding style and climate.
- Spark Plug Gap: Ensure the spark plug gap is properly set.
- Spark Plug Condition: Inspect spark plugs regularly for wear and fouling.
- Spark Plug Replacement: Replace spark plugs at the recommended intervals.
36. Future Trends in Motorcycle Technology
Motorcycle technology is constantly evolving. Here are some future trends to watch for:
- Electric Motorcycles: Electric motorcycles are becoming increasingly popular.
- Advanced Rider Assistance Systems (ARAS): Features like adaptive cruise control and blind-spot monitoring are becoming more common.
- Connectivity: Motorcycles are becoming more connected to smartphones and the internet.
- Artificial Intelligence: AI is being used for diagnostics, performance optimization, and rider assistance.
- 3D Printing: 3D printing is being used to create custom parts and accessories.
37. How to Prepare Your Kawasaki Motorcycle for Winter Storage
Proper winter storage is essential for protecting your Kawasaki motorcycle from damage.
- Clean the Motorcycle: Clean the motorcycle thoroughly to remove dirt and grime.
- Change the Oil: Change the oil and filter to remove contaminants.
- Stabilize the Fuel: Add fuel stabilizer to prevent fuel degradation.
- Lubricate Cables: Lubricate cables to prevent corrosion.
- Protect Tires: Protect tires from flat spots.
- Cover the Motorcycle: Cover the motorcycle to protect it from dust and moisture.
- Store in a Dry Place: Store the motorcycle in a dry, protected location.
38. How to Find a Reputable Motorcycle Mechanic
Finding a reputable motorcycle mechanic is crucial for reliable repairs.
- Ask for Recommendations: Ask friends, family, and other riders for recommendations.
- Read Online Reviews: Read online reviews to get insights from other customers.
- Check Certifications: Look for mechanics with relevant certifications.
- Visit the Shop: Visit the shop to assess its cleanliness and organization.
- Ask Questions: Ask the mechanic questions about their experience and qualifications.
- Get a Written Estimate: Get a written estimate before authorizing any repairs.
39. Frequently Asked Questions (FAQ) About Kawasaki OBD2 Adapter 4 Pin
Here are some frequently asked questions about Kawasaki OBD2 adapters 4 pin:
- What is a Kawasaki OBD2 adapter 4 pin?
- It’s an adapter that connects older Kawasaki motorcycles with a 4-pin diagnostic port to standard OBD2 scanners.
- Why do I need a 4-pin adapter for my Kawasaki?
- Older Kawasaki models use a 4-pin connector instead of the standard 16-pin OBD2 port.
- Which Kawasaki models are compatible?
- Generally, models manufactured before the mid-2000s are more likely to use the 4-pin connector.
- Where is the 4-pin connector located on my motorcycle?
- Typically under the seat, near the battery, or the fuse box.
- What OBD2 protocols do Kawasaki motorcycles use?
- Typically ISO9141 or KWP2000.
- Can I clear trouble codes with a 4-pin adapter?
- Yes, but always fix the underlying issue first.
- What are the limitations of using a 4-pin adapter?
- Limited data, fewer functions, and protocol compatibility issues.
- Where can I buy a Kawasaki OBD2 adapter 4 pin?
- Online retailers, motorcycle parts stores, and Kawasaki dealers.
- How much does a Kawasaki OBD2 adapter 4 pin cost?
- Prices vary depending on the brand and features, but typically range from $10 to $50.
- Is it safe to use a Kawasaki OBD2 adapter 4 pin?
- Yes, if you follow safety precautions and the manufacturer’s instructions.
40. Need Help with Your Kawasaki Motorcycle Diagnostics?
Navigating motorcycle diagnostics can be challenging, but you don’t have to do it alone. At OBD2-SCANNER.EDU.VN, we’re here to help you understand and troubleshoot your Kawasaki motorcycle. Whether you’re deciphering trouble codes or need assistance with repairs, our team of experts is ready to assist.
Don’t let diagnostic challenges keep you off the road. Contact us today for personalized support:
- Address: 123 Main Street, Los Angeles, CA 90001, United States
- WhatsApp: +1 (641) 206-8880
- Website: OBD2-SCANNER.EDU.VN
Let OBD2-SCANNER.EDU.VN be your trusted partner in keeping your Kawasaki motorcycle running smoothly. We provide easy-to-understand information and services. Reach out now and experience the difference.