The Kkl Vag-com 409.1 Obd2 Windows 10 is a diagnostic tool for older vehicles, specifically those before 2004, offering basic diagnostic capabilities. This article from OBD2-SCANNER.EDU.VN will guide you through the installation and setup process, highlighting its limitations and suggesting more comprehensive alternatives for modern vehicles. Understand the possibilities with car diagnostics, ECU programming, and check engine light resets.
Contents
- 1. What is a KKL VAG-COM 409.1 OBD2 Cable?
- 2. What are the Key Features of the KKL VAG-COM 409.1?
- 3. What Vehicles are Compatible with the KKL VAG-COM 409.1?
- 4. How to Download and Install VAG-COM KKL 409.1 Drivers on Windows 10?
- 5. What to Do If Drivers Fail to Install?
- 6. How to Determine the COM Port Number?
- 7. Why is the COM Port Number Important for KKL VAG-COM 409.1?
- 8. What if the COM Port Number is Above 4?
- 9. How to Test if the KKL VAG-COM 409.1 Cable is Working?
- 10. What to Do if the Test is Not Successful?
- 11. What are the Limitations of Using VAG-COM 409.1 KKL?
- 12. What are Some Common Error Messages and How to Resolve Them?
- 13. Is it Possible to Upgrade VCDS-Lite Software?
- 14. What are the Alternatives to VAG-COM 409.1 KKL?
- 15. What are the Benefits of Using a Modern OBD2 Scanner?
- 16. How to Properly Connect the KKL VAG-COM 409.1 Cable to Your Car?
- 17. What Safety Precautions Should You Take While Using the KKL VAG-COM 409.1?
- 18. How Can OBD2-SCANNER.EDU.VN Help You with Your Car Diagnostics?
- 19. What are Some Common OBD2 Codes You Might Encounter?
- 20. How to Reset the Check Engine Light After Repair?
- 21. What is the Role of Oxygen Sensors in Your Car’s Performance?
- 22. How Does a Catalytic Converter Work?
- 23. What is the Importance of Regular Car Maintenance?
- 24. How Can I Improve My Car’s Fuel Efficiency?
- 25. What are the Benefits of Using Synthetic Oil?
- 26. What Should I Do If My Car Overheats?
- 27. How Often Should I Replace My Car’s Tires?
- 28. What is the Function of the Mass Air Flow (MAF) Sensor?
- 29. What are the Signs of a Failing Fuel Pump?
- 30. How Does the Anti-Lock Braking System (ABS) Work?
- 31. What is the Function of the Engine Control Unit (ECU)?
1. What is a KKL VAG-COM 409.1 OBD2 Cable?
A KKL VAG-COM 409.1 OBD2 cable is an interface cable designed to connect your computer to older Volkswagen, Audi, Skoda, and SEAT vehicles for diagnostic purposes. It allows you to read diagnostic trouble codes (DTCs), access basic control modules, and perform some limited adaptations. While it’s a cost-effective solution for older cars, it’s important to understand its limitations compared to more modern OBD2 scanners. The Automotive industry heavily relies on these tools.
- Purpose: Primarily used for diagnosing and troubleshooting issues in older VAG (Volkswagen Audi Group) vehicles.
- Functionality: Enables users to read fault codes, view live data, perform basic adaptations, and access certain control modules.
- Compatibility: Designed for vehicles manufactured before the introduction of CAN-BUS systems, typically pre-2004 models.
- Limitations: Offers limited functionality compared to modern OBD2 scanners, especially with newer vehicles using CAN-BUS protocols.
- Cost-Effectiveness: Provides a budget-friendly option for diagnosing older VAG vehicles, but may require additional software purchases for full functionality.
2. What are the Key Features of the KKL VAG-COM 409.1?
The KKL VAG-COM 409.1, while older technology, offers specific features beneficial for diagnosing older vehicles. It’s essential to understand these features to determine if it meets your diagnostic needs.
- Fault Code Reading: Allows reading of diagnostic trouble codes (DTCs) to identify potential issues.
- Live Data Monitoring: Provides real-time data from various sensors and modules.
- Basic Adaptation: Supports basic adaptation functions for certain control modules.
- Software Compatibility: Works with VAG-COM (VCDS-Lite) software, which may require a license for full functionality.
- Vehicle Coverage: Primarily supports older Volkswagen, Audi, Skoda, and SEAT vehicles.
- Simple Interface: Typically easy to install and use, making it accessible for DIY enthusiasts.
3. What Vehicles are Compatible with the KKL VAG-COM 409.1?
The KKL VAG-COM 409.1 OBD2 cable is mainly compatible with older Volkswagen, Audi, Skoda, and SEAT vehicles manufactured before the introduction of CAN-BUS systems. This typically includes models produced before 2004. Compatibility beyond these brands is limited to generic OBD-II functions. Always check your vehicle’s specifications to ensure compatibility before purchasing.
- Volkswagen: Older models before the widespread adoption of CAN-BUS.
- Audi: Pre-2004 models, check specific model years.
- Skoda: Older models using the older diagnostic protocols.
- SEAT: Vehicles predating the CAN-BUS system.
- Generic OBD-II Functions: Limited support for other car brands for basic OBD-II diagnostics.
4. How to Download and Install VAG-COM KKL 409.1 Drivers on Windows 10?
Installing the VAG-COM KKL 409.1 drivers on Windows 10 can be straightforward if you follow these steps carefully. Ensure you download the correct drivers and follow the installation instructions precisely to avoid compatibility issues.
-
Download the Driver Pack: First, download the VAG-COM Driver Pack 1.
-
Uncompress the File: Locate the downloaded ZIP file and extract its contents to a folder on your computer.
-
Run the Installer: In the extracted folder, double-click on “Install.exe” to begin the driver installation process.
-
Connect the Cable: Only after the installation is complete, plug the KKL cable into a USB port on your computer.
-
Automatic Installation: Windows 10 should automatically detect the cable and install the necessary drivers. Wait for this process to finish.
-
Verify Installation: To ensure the drivers are correctly installed, go to Device Manager (Control Panel > System > Device Manager). Look for “USB Serial Port” under “Ports (COM & LPT).” If it appears without any errors, the installation was successful.
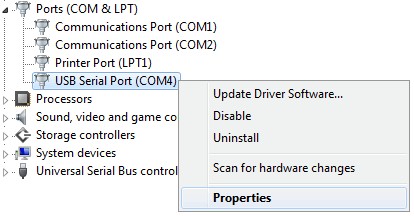 USB Serial Port in Device Manager indicating successful driver installation for KKL VAG-COM 409.1
5. What to Do If Drivers Fail to Install?
If the drivers fail to install automatically, don’t worry; you can manually install them. This involves downloading an alternative driver pack and using Device Manager to point to the driver files.
- Download Alternative Driver Pack: Download the VAG-COM Driver Pack 2.
- Extract the Files: Unzip the downloaded file to a folder on your computer.
- Open Device Manager: Go to Control Panel > System > Device Manager.
- Locate the Device: Look for a device labeled “USB Serial Port” under “Other devices” or “Ports (COM & LPT).” It might have a yellow exclamation mark indicating a driver issue.
- Update Driver Software: Right-click on the “USB Serial Port” device and select “Update Driver Software.”
- Browse My Computer: Choose “Browse my computer for driver software.”
- Select Driver Location: Navigate to the folder where you extracted Driver Pack 2 and select it.
- Install the Driver: Click “Next” to install the driver. Windows will install the driver from the specified location.
- Verify Installation: Check Device Manager again to ensure the “USB Serial Port” is now correctly installed without any errors.
6. How to Determine the COM Port Number?
After installing the drivers, determining the COM port number is crucial for configuring the VAG-COM software. The COM port number allows the software to communicate with the cable.
- Open Device Manager: Go to Control Panel > System > Device Manager.
- Expand Ports (COM & LPT): Look for “Ports (COM & LPT)” and expand the list.
- Locate USB Serial Port: Find “USB Serial Port” in the list. The COM port number will be displayed next to it (e.g., “COM3”).
- Note the Number: Make a note of the COM port number, as you will need it for the software configuration.
7. Why is the COM Port Number Important for KKL VAG-COM 409.1?
The COM port number is essential because it specifies the communication channel through which your computer interacts with the KKL VAG-COM 409.1 cable. If the COM port is not correctly set in the VAG-COM software, the software won’t be able to communicate with the cable, and you won’t be able to diagnose your vehicle.
8. What if the COM Port Number is Above 4?
If the COM port number assigned to the KKL cable is above 4, you may need to change it to ensure compatibility with the VAG-COM software. The software typically works best with COM ports 1-4.
- Open Device Manager: Go to Control Panel > System > Device Manager.
- Expand Ports (COM & LPT): Find “Ports (COM & LPT)” and expand it.
- Right-Click USB Serial Port: Right-click on “USB Serial Port” and select “Properties.”
- Port Settings Tab: Click on the “Port Settings” tab.
- Advanced Button: Click the “Advanced” button.
- Change COM Port Number: In the “Advanced” settings, find the “COM Port Number” option. Use the dropdown menu to select a COM port number between 1 and 4 that is not already in use.
- Confirm Changes: Click “OK” to save the changes and close the properties window.
- Restart Computer: Restart your computer for the changes to take effect.
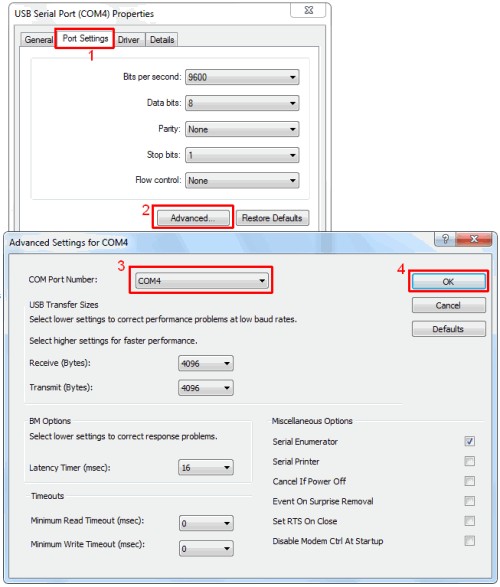 Changing the COM port number in Device Manager for KKL VAG-COM 409.1
9. How to Test if the KKL VAG-COM 409.1 Cable is Working?
Testing the KKL VAG-COM 409.1 cable involves using the VCDS-Lite software to check the connection. This ensures that the cable is properly connected and communicating with your computer.
- Plug in the Cable: Ensure the KKL VAG-COM 409.1 cable is plugged into your computer’s USB port.
- Start VCDS-Lite Software: Open the VCDS-Lite software on your computer.
- Access Options: Click on the “Options” button within the VCDS-Lite software.
- Select COM Port: In the “Options” menu, you will see a “Select COM Port” box. Choose the COM port number you identified in Step 2.
- Test Connection: Click the “Test” button.
- Check Interface Status: If everything is working correctly, the software should display “Interface Status: Found!”. This indicates that the software can communicate with the cable.
- Connect to Car: Now, connect the other end of the cable to your car’s OBD2 port. Turn on the ignition.
10. What to Do if the Test is Not Successful?
If the test is unsuccessful, there are several troubleshooting steps you can take to identify and resolve the issue.
- Check COM Port: Make sure you have selected the correct COM port in the VCDS-Lite software.
- Conflicting Software: Other software or devices using the same COM port may cause conflicts. Uninstall any suspected software or devices.
- Vehicle Compatibility: Ensure your vehicle is compatible with the KKL VAG-COM 409.1 cable. It primarily supports older Audi, Volkswagen, Skoda, and Seat models.
- CAN-BUS System: The KKL VAG-COM 409.1 cable does not work on vehicles running on a CAN-BUS system.
- Ignition Status: Ensure the vehicle’s ignition is turned ON when testing the connection.
- Driver Installation: Double-check that the driver is correctly installed and configured as explained in Step 1.
- COM Port Range: Test the cable with each COM port from 1 to 4 in Windows Device Manager to rule out any COM port issues.
- Baud Rate: If you receive a “Can’t Synch Baud Rate” error, go to Options and set “Start Baud” to 9600. If that doesn’t work, try 4800 and 1200. Turn the vehicle’s ignition OFF and back ON after each attempt.
- Software Conflicts: If you have previously installed VCDS software from another source, uninstall all versions and delete the “C:Ross-Tech” directory before reinstalling VCDS-Lite.
11. What are the Limitations of Using VAG-COM 409.1 KKL?
While the VAG-COM 409.1 KKL cable is useful for older vehicles, it has significant limitations that users should be aware of.
- Limited Vehicle Coverage: Primarily supports older Audi, Volkswagen, Skoda, and SEAT vehicles.
- CAN-BUS Incompatibility: Does not work with vehicles using CAN-BUS systems, typically those manufactured after 2004.
- Software Restrictions: Requires VCDS-Lite software, which may need to be upgraded for full functionality.
- Functionality: Offers limited diagnostic capabilities compared to modern OBD2 scanners.
Due to these limitations, consider investing in a newer, more versatile OBD2 scanner for comprehensive diagnostics.
12. What are Some Common Error Messages and How to Resolve Them?
When using the VAG-COM 409.1 KKL cable, you may encounter some common error messages. Here’s how to troubleshoot them:
- “Can’t Synch Baud Rate”:
- Solution: Go to Options in VCDS-Lite and set “Start Baud” to 9600, 4800, or 1200. Cycle the vehicle’s ignition after each attempt.
- “Interface Not Found”:
- Solution: Ensure the cable is properly connected to the computer and the vehicle. Verify that the correct COM port is selected in the software. Check the driver installation and try reinstalling if necessary.
- “No Response from Controller”:
- Solution: Ensure the vehicle’s ignition is turned on. Check the cable connection to the OBD2 port. Verify that the control module is supported by the software and cable.
- “COM Port Error”:
- Solution: Make sure no other applications are using the same COM port. Change the COM port number in Device Manager to a different port between 1 and 4.
13. Is it Possible to Upgrade VCDS-Lite Software?
Yes, it is possible to upgrade the VCDS-Lite software for additional functionality. Upgrading typically involves purchasing a license from Ross-Tech.
- Benefits of Upgrading:
- Access to advanced diagnostic features.
- Support for more control modules.
- Enhanced troubleshooting capabilities.
- How to Upgrade:
- Visit the Ross-Tech website.
- Purchase a VCDS-Lite license.
- Follow the instructions provided by Ross-Tech to activate the full version of the software.
14. What are the Alternatives to VAG-COM 409.1 KKL?
Given the limitations of the VAG-COM 409.1 KKL cable, especially for newer vehicles, several alternatives provide more comprehensive diagnostic capabilities.
- Modern OBD2 Scanners:
- Offer broader vehicle coverage.
- Support CAN-BUS protocols.
- Provide advanced diagnostic features like live data streaming, component testing, and bi-directional control.
- VCDS (VAG-COM Diagnostic System):
- Developed by Ross-Tech.
- Offers full support for VAG vehicles, including newer models.
- Provides advanced diagnostic and adaptation functions.
- Professional Diagnostic Tools:
- Used by automotive technicians.
- Offer comprehensive diagnostic capabilities.
- Typically come with regular software updates.
15. What are the Benefits of Using a Modern OBD2 Scanner?
Modern OBD2 scanners offer numerous advantages over older interfaces like the VAG-COM 409.1 KKL cable, especially for diagnosing newer vehicles.
- Wider Vehicle Compatibility: Supports a broader range of vehicle makes and models.
- CAN-BUS Support: Fully compatible with vehicles using CAN-BUS protocols.
- Advanced Diagnostics: Provides access to advanced diagnostic functions such as live data streaming, component testing, and bi-directional control.
- Software Updates: Regular software updates ensure compatibility with the latest vehicles and diagnostic protocols.
- User-Friendly Interface: Modern scanners typically feature intuitive interfaces and easy-to-navigate menus.
- Enhanced Features: Many modern scanners offer additional features like built-in code definitions, freeze frame data, and diagnostic reports.
16. How to Properly Connect the KKL VAG-COM 409.1 Cable to Your Car?
Properly connecting the KKL VAG-COM 409.1 cable to your car ensures a reliable connection for accurate diagnostics.
- Locate the OBD2 Port: Find the OBD2 port in your vehicle. It is typically located under the dashboard on the driver’s side.
- Turn Off Ignition: Ensure the vehicle’s ignition is turned off before connecting the cable.
- Plug in the Cable: Plug the OBD2 connector of the KKL VAG-COM 409.1 cable into the vehicle’s OBD2 port.
- Turn On Ignition: Turn the vehicle’s ignition on, but do not start the engine.
- Connect to Computer: Connect the USB end of the cable to your computer.
- Test the Connection: Use the VCDS-Lite software to test the connection, as described in Step 3.
17. What Safety Precautions Should You Take While Using the KKL VAG-COM 409.1?
When using the KKL VAG-COM 409.1 cable, it’s important to take certain safety precautions to protect yourself and your vehicle.
- Proper Environment: Work in a well-ventilated area to avoid exposure to harmful fumes.
- Battery Safety: Be cautious when working around the vehicle’s battery. Avoid touching the battery terminals with metal objects.
- Software Compatibility: Only use compatible software and drivers to avoid damaging the vehicle’s electronic systems.
- Data Backup: Before making any changes to the vehicle’s settings, back up the original data to avoid potential issues.
- Cable Handling: Handle the cable with care to avoid damaging the connectors or wiring.
- Read Instructions: Always read and follow the instructions provided with the cable and software.
18. How Can OBD2-SCANNER.EDU.VN Help You with Your Car Diagnostics?
OBD2-SCANNER.EDU.VN offers comprehensive support for car diagnostics, including detailed guides, troubleshooting tips, and expert advice. Whether you’re using a KKL VAG-COM 409.1 cable or a modern OBD2 scanner, our resources can help you accurately diagnose and resolve vehicle issues.
- Detailed Guides: Step-by-step instructions on using various OBD2 scanners and software.
- Troubleshooting Tips: Solutions for common diagnostic problems and error messages.
- Expert Advice: Guidance from experienced automotive technicians.
- Product Reviews: Reviews and comparisons of different OBD2 scanners and diagnostic tools.
- Diagnostic Codes: Comprehensive database of diagnostic trouble codes (DTCs) and their meanings.
19. What are Some Common OBD2 Codes You Might Encounter?
When using an OBD2 scanner, you’re likely to encounter various diagnostic trouble codes (DTCs). Here are some common ones and their general meanings:
| Code | Description | Possible Causes |
|---|---|---|
| P0171 | System Too Lean (Bank 1) | Vacuum leak, MAF sensor issue, fuel pump problem, clogged fuel filter |
| P0300 | Random/Multiple Cylinder Misfire Detected | Faulty spark plugs, ignition coils, fuel injectors, vacuum leaks, low compression |
| P0420 | Catalyst System Efficiency Below Threshold (Bank 1) | Faulty catalytic converter, oxygen sensor issue, exhaust leak |
| P0101 | Mass Air Flow (MAF) Sensor Performance | Dirty or faulty MAF sensor, intake leak |
| P0113 | Intake Air Temperature Sensor Circuit High Input | Faulty IAT sensor, wiring issue |
| P0301 | Cylinder 1 Misfire Detected | Faulty spark plug, ignition coil, fuel injector, low compression in cylinder 1 |
| P0011 | A Camshaft Position Timing Over-Advanced | Faulty camshaft position actuator, low oil level, timing chain issue |
| P0135 | O2 Sensor Heater Circuit Malfunction (Bank 1, Sensor 1) | Faulty O2 sensor, wiring issue |
| P0401 | Insufficient EGR Flow | Clogged EGR valve, faulty EGR solenoid, vacuum leak |
| P0442 | Evaporative Emission Control System Leak Detected | Loose or faulty fuel cap, damaged EVAP hoses, faulty purge valve |
20. How to Reset the Check Engine Light After Repair?
After addressing the issue that triggered the check engine light, you’ll need to reset it. Here are a few methods:
-
Using an OBD2 Scanner:
- Connect the OBD2 scanner to your vehicle’s OBD2 port.
- Turn on the ignition.
- Navigate to the “Clear Codes” or “Reset Codes” function on the scanner.
- Follow the on-screen instructions to clear the codes.
- Disconnect the scanner and start the vehicle to ensure the check engine light is off.
-
Disconnecting the Battery:
- Turn off the vehicle and remove the key from the ignition.
- Locate the negative terminal on the vehicle’s battery.
- Use a wrench to loosen the nut on the negative terminal clamp.
- Carefully remove the negative terminal clamp from the battery post.
- Wait for 15-20 minutes.
- Reattach the negative terminal clamp to the battery post and tighten the nut.
- Start the vehicle to see if the check engine light is off.
Note: Disconnecting the battery may also reset other electronic systems in your vehicle, such as the radio and clock.
-
Driving the Vehicle:
- In some cases, the check engine light will turn off automatically after the vehicle has been driven for a certain period and the diagnostic system confirms that the issue has been resolved.
- This may take several drive cycles, so be patient.
21. What is the Role of Oxygen Sensors in Your Car’s Performance?
Oxygen sensors play a crucial role in your car’s performance and fuel efficiency. They monitor the amount of oxygen in the exhaust gases and provide feedback to the engine control unit (ECU). This information is used to adjust the air-fuel mixture, ensuring optimal combustion and reducing emissions.
- Location: Oxygen sensors are typically located in the exhaust system, before and after the catalytic converter.
- Function: They measure the oxygen content in the exhaust gases.
- Feedback to ECU: The sensors send signals to the ECU, which adjusts the air-fuel mixture.
- Optimal Combustion: Proper air-fuel mixture ensures efficient combustion and reduces harmful emissions.
- Fuel Efficiency: Accurate oxygen sensor readings help improve fuel economy.
- Emissions Control: Oxygen sensors help ensure that the vehicle meets emissions standards.
22. How Does a Catalytic Converter Work?
A catalytic converter is an essential component in your car’s exhaust system, designed to reduce harmful emissions. It uses chemical reactions to convert pollutants into less harmful substances.
- Location: Located in the exhaust system, typically after the oxygen sensors.
- Function: Converts harmful pollutants into less harmful substances.
- Chemical Reactions: Uses catalysts like platinum, palladium, and rhodium to facilitate chemical reactions.
- Pollutant Conversion: Converts carbon monoxide (CO), hydrocarbons (HC), and nitrogen oxides (NOx) into carbon dioxide (CO2), water (H2O), and nitrogen (N2).
- Emissions Reduction: Helps reduce air pollution and ensures the vehicle meets emissions standards.
- Efficiency Monitoring: Oxygen sensors located after the catalytic converter monitor its efficiency.
23. What is the Importance of Regular Car Maintenance?
Regular car maintenance is essential for ensuring the longevity, reliability, and safety of your vehicle. It involves performing routine checks and services to keep all components in good working condition.
- Longevity: Regular maintenance helps extend the life of your vehicle.
- Reliability: Prevents unexpected breakdowns and ensures reliable performance.
- Safety: Ensures that safety-related components such as brakes, tires, and lights are in good working condition.
- Fuel Efficiency: Proper maintenance can improve fuel economy.
- Reduced Repair Costs: Catching and addressing minor issues early can prevent them from turning into major, costly repairs.
- Resale Value: A well-maintained vehicle typically has a higher resale value.
24. How Can I Improve My Car’s Fuel Efficiency?
Improving your car’s fuel efficiency can save you money on gas and reduce your environmental impact. Here are some tips:
- Regular Maintenance: Keep your vehicle properly maintained with regular oil changes, tune-ups, and tire rotations.
- Tire Pressure: Maintain proper tire pressure to reduce rolling resistance.
- Driving Habits: Avoid aggressive driving, such as rapid acceleration and hard braking.
- Reduce Weight: Remove unnecessary items from your vehicle to reduce weight.
- Aerodynamics: Minimize drag by avoiding roof racks and cargo carriers when not needed.
- Idling: Avoid excessive idling, as it wastes fuel.
- Fuel Type: Use the recommended fuel type for your vehicle.
- Air Filter: Keep the air filter clean to ensure proper airflow to the engine.
25. What are the Benefits of Using Synthetic Oil?
Synthetic oil offers several advantages over conventional oil, providing better protection and performance for your engine.
- Better Lubrication: Synthetic oil provides superior lubrication, reducing friction and wear.
- Higher Viscosity Index: Maintains its viscosity better at extreme temperatures.
- Improved Engine Protection: Offers better protection against engine wear and deposits.
- Extended Oil Change Intervals: Allows for longer oil change intervals, saving you time and money.
- Enhanced Fuel Efficiency: Can improve fuel economy due to reduced friction.
- Better Cold Weather Performance: Flows more easily at cold temperatures, providing better start-up protection.
- Reduced Sludge Buildup: Resists sludge and deposit formation, keeping the engine cleaner.
26. What Should I Do If My Car Overheats?
If your car overheats, it’s crucial to take immediate action to prevent engine damage.
- Pull Over: Safely pull over to the side of the road and turn off the engine.
- Let it Cool: Allow the engine to cool down for at least 30 minutes before attempting to open the hood.
- Check Coolant Level: Once the engine has cooled, carefully open the hood and check the coolant level in the radiator and overflow tank.
- Add Coolant: If the coolant level is low, add a mixture of coolant and water to the system.
- Check for Leaks: Look for any signs of coolant leaks, such as puddles under the vehicle or steam coming from the engine.
- Restart Engine: Restart the engine and monitor the temperature gauge. If the engine continues to overheat, have it towed to a mechanic for further inspection.
27. How Often Should I Replace My Car’s Tires?
The lifespan of your car’s tires depends on several factors, including driving habits, tire type, and road conditions. However, here are some general guidelines:
- Tread Depth: Check the tread depth regularly using a tread depth gauge. Replace the tires when the tread depth reaches 2/32 of an inch.
- Mileage: Most tires are designed to last between 25,000 and 50,000 miles.
- Age: Even if the tread depth is still adequate, tires should be replaced after six years, regardless of mileage.
- Damage: Inspect the tires regularly for signs of damage, such as cuts, bulges, or uneven wear.
- Rotation: Rotate the tires every 6,000 to 8,000 miles to ensure even wear.
28. What is the Function of the Mass Air Flow (MAF) Sensor?
The Mass Air Flow (MAF) sensor is a critical component in your car’s engine management system. It measures the amount of air entering the engine and provides this information to the engine control unit (ECU). The ECU uses this data to calculate the correct amount of fuel to inject for optimal combustion.
- Location: Typically located in the intake system, near the air filter.
- Function: Measures the amount of air entering the engine.
- Feedback to ECU: Sends signals to the ECU, which adjusts the fuel injection.
- Optimal Combustion: Ensures the correct air-fuel mixture for efficient combustion.
- Fuel Efficiency: Accurate MAF sensor readings help improve fuel economy.
- Emissions Control: Helps reduce emissions by ensuring proper combustion.
29. What are the Signs of a Failing Fuel Pump?
A failing fuel pump can cause a variety of issues that affect your car’s performance and reliability. Here are some common signs:
- Difficulty Starting: The engine may take longer to start or may not start at all.
- Stalling: The engine may stall unexpectedly, especially when idling or at low speeds.
- Loss of Power: The engine may lack power, especially when accelerating or climbing hills.
- Rough Idling: The engine may idle roughly or unevenly.
- Poor Fuel Economy: Fuel economy may decrease due to inefficient fuel delivery.
- Whining Noise: You may hear a whining noise coming from the fuel tank.
- Check Engine Light: The check engine light may illuminate, indicating a fuel pump issue.
30. How Does the Anti-Lock Braking System (ABS) Work?
The Anti-Lock Braking System (ABS) is a safety feature that prevents the wheels from locking up during hard braking. This allows you to maintain steering control and reduce stopping distances.
- Wheel Speed Sensors: ABS uses wheel speed sensors to monitor the rotation of each wheel.
- ECU Monitoring: The ECU monitors the wheel speed sensors and detects when a wheel is about to lock up.
- Hydraulic Control: ABS uses hydraulic control to modulate the brake pressure to each wheel, preventing lock-up.
- Steering Control: By preventing wheel lock-up, ABS allows you to maintain steering control during braking.
- Reduced Stopping Distances: ABS can reduce stopping distances on slippery surfaces.
- Safety Feature: ABS is an important safety feature that helps prevent accidents.
31. What is the Function of the Engine Control Unit (ECU)?
The Engine Control Unit (ECU) is the brain of your car’s engine management system. It monitors various sensors and controls various actuators to optimize engine performance, fuel efficiency, and emissions.
- Sensor Monitoring: The ECU monitors sensors such as the MAF sensor, oxygen sensors, and coolant temperature sensor.
- Actuator Control: The ECU controls actuators such as fuel injectors, ignition coils, and the throttle.
- Performance Optimization: The ECU adjusts engine parameters to optimize performance, fuel efficiency, and emissions.
- Fuel Injection: The ECU controls the amount of fuel injected into the engine.
- Ignition Timing: The ECU controls the timing of the ignition spark.
- Diagnostics: The ECU stores diagnostic trouble codes (DTCs) when issues are detected.
Navigating the world of car diagnostics can be complex, but OBD2-SCANNER.EDU.VN is here to help. Our comprehensive resources and expert advice make it easier than ever to understand and address your vehicle’s needs. Whether you’re dealing with a simple check engine light or tackling a more complex issue, we provide the information and support you need to keep your car running smoothly. Contact us today at 123 Main Street, Los Angeles, CA 90001, United States. Whatsapp: +1 (641) 206-8880 or visit our website OBD2-SCANNER.EDU.VN for personalized assistance and expert solutions. Let us help you unlock the full potential of your vehicle’s diagnostic capabilities and ensure a safer, more efficient driving experience.