Ls Obd2 Port Wiring refers to the process of connecting the On-Board Diagnostics II (OBD2) port in an LS-engine-equipped vehicle. Understanding the intricacies of LS OBD2 port wiring is essential for accurate diagnostics and effective repairs, and OBD2-SCANNER.EDU.VN is here to guide you through the process. By understanding the wiring and utilizing diagnostic tools, you can efficiently troubleshoot issues. This guide will provide you with comprehensive insights into LS OBD2 port wiring.
Contents
- 1. Understanding the LS OBD2 Port
- 1.1 What is an OBD2 Port?
- 1.2 Why is the OBD2 Port Important?
- 1.3 Location of the OBD2 Port
- 2. Key Components for LS OBD2 Port Wiring
- 2.1 OBD2 Port Connector
- 2.2 Terminals
- 2.3 Wire
- 2.4 Fuse Block
- 2.5 Relays
- 3. Essential Tools for LS OBD2 Port Wiring
- 3.1 Wire Strippers
- 3.2 Crimping Tool
- 3.3 Multimeter
- 3.4 Soldering Iron
- 3.5 Heat Gun
- 4. Step-by-Step Guide to LS OBD2 Port Wiring
- 4.1 Gathering Components
- 4.2 Preparing the Wires
- 4.3 Crimping the Terminals
- 4.4 Installing the Wires into the OBD2 Port Connector
- 4.5 Connecting the Fuse Block and Relays
- 4.6 Testing the Connections
- 5. LS OBD2 Port Wiring Diagram
- 5.1 Standard OBD2 Pinout
- 5.2 LS-Specific Wiring Considerations
- 5.3 Common Wiring Mistakes to Avoid
- 6. Troubleshooting LS OBD2 Port Wiring Issues
- 6.1 Common Problems
- 6.2 Diagnostic Techniques
- 6.3 Repair Strategies
- 7. Advanced Tips for LS OBD2 Port Wiring
- 7.1 Using High-Quality Components
- 7.2 Proper Grounding Techniques
- 7.3 Protecting the Wiring
- 8. The Role of OBD2 Scanners in Diagnosing LS Engines
- 8.1 How OBD2 Scanners Work
- 8.2 Types of OBD2 Scanners
- 8.3 Choosing the Right OBD2 Scanner
- 9. Common OBD2 Codes for LS Engines
- 9.1 P0101 – Mass Air Flow (MAF) Sensor Circuit Range/Performance
- 9.2 P0171 and P0174 – System Too Lean (Bank 1 and Bank 2)
- 9.3 P0300 – Random Misfire Detected
- 10. Maintaining Your LS OBD2 Port for Optimal Performance
- 10.1 Regular Inspections
- 10.2 Cleaning the OBD2 Port
- 10.3 Protecting the OBD2 Port from Damage
- 11. Benefits of Professional LS OBD2 Port Wiring Services
- 11.1 Expertise and Experience
- 11.2 Quality Assurance
- 11.3 Time Savings
- 12. Future Trends in OBD2 Technology for LS Engines
- 12.1 Enhanced Diagnostic Capabilities
- 12.2 Integration with Mobile Devices
- 12.3 Cybersecurity Measures
- 13. Conclusion: Mastering LS OBD2 Port Wiring
- Ready to take the next step?
- 14. FAQ About LS OBD2 Port Wiring
- 14.1 What is an OBD2 Scanner?
- 14.2 How Do I Read OBD2 Codes?
- 14.3 What are Common OBD2 Error Codes?
- 14.4 Can I Wire an OBD2 Port Myself?
- 14.5 Where Can I Find a Wiring Diagram for My LS Engine?
- 14.6 What Tools Do I Need to Wire an OBD2 Port?
- 14.7 How Do I Test My OBD2 Port?
- 14.8 What Should I Do If My OBD2 Port Isn’t Working?
- 14.9 How Often Should I Inspect My OBD2 Port?
- 14.10 What are the Benefits of Using Professional OBD2 Wiring Services?
1. Understanding the LS OBD2 Port
The OBD2 port is a standardized interface used to access diagnostic data from a vehicle’s engine control unit (ECU). It is typically located under the dashboard on the driver’s side.
1.1 What is an OBD2 Port?
The On-Board Diagnostics II (OBD2) port is a standardized 16-pin connector that provides access to a vehicle’s diagnostic data. Standardized in the mid-1990s, it allows technicians and vehicle owners to retrieve diagnostic trouble codes (DTCs), monitor real-time data, and perform various diagnostic tests.
1.2 Why is the OBD2 Port Important?
The OBD2 port is crucial for diagnosing and troubleshooting automotive issues. It allows users to:
- Retrieve diagnostic trouble codes (DTCs)
- Monitor real-time sensor data
- Perform diagnostic tests
- Verify repairs
1.3 Location of the OBD2 Port
The OBD2 port is typically located under the dashboard on the driver’s side of the vehicle. However, its exact location can vary depending on the make and model of the car. Common locations include:
- Under the steering column
- Inside the glove compartment
- Near the center console
2. Key Components for LS OBD2 Port Wiring
Wiring an LS OBD2 port requires specific components to ensure proper functionality and accurate data transmission.
2.1 OBD2 Port Connector
The OBD2 port connector is a 16-pin female connector that serves as the physical interface for accessing the vehicle’s diagnostic data.
- Specifications: Standardized 16-pin configuration
- Materials: Typically made of durable plastic
- Vendors: Available from automotive parts suppliers like Mouser, RockAuto, and Amazon
2.2 Terminals
Terminals are metal connectors that attach to the wires and insert into the OBD2 port connector, ensuring a secure electrical connection.
- Specifications: Designed to fit specific wire gauges
- Materials: Usually made of brass or copper
- Vendors: Available from electronic component suppliers like Mouser and Digi-Key
2.3 Wire
Proper wiring is essential for transmitting data between the OBD2 port and the vehicle’s ECU.
- Specifications: Automotive-grade wire, typically 18-22 AWG
- Materials: Copper conductors with insulation
- Vendors: Available from automotive parts suppliers and electronic component suppliers
2.4 Fuse Block
A fuse block protects the OBD2 port and related circuits from overcurrent, preventing damage to the ECU and other components.
- Specifications: Multiple fuse slots for different circuits
- Materials: Durable plastic housing with metal terminals
- Vendors: Available from automotive parts suppliers like RockAuto and Dorman
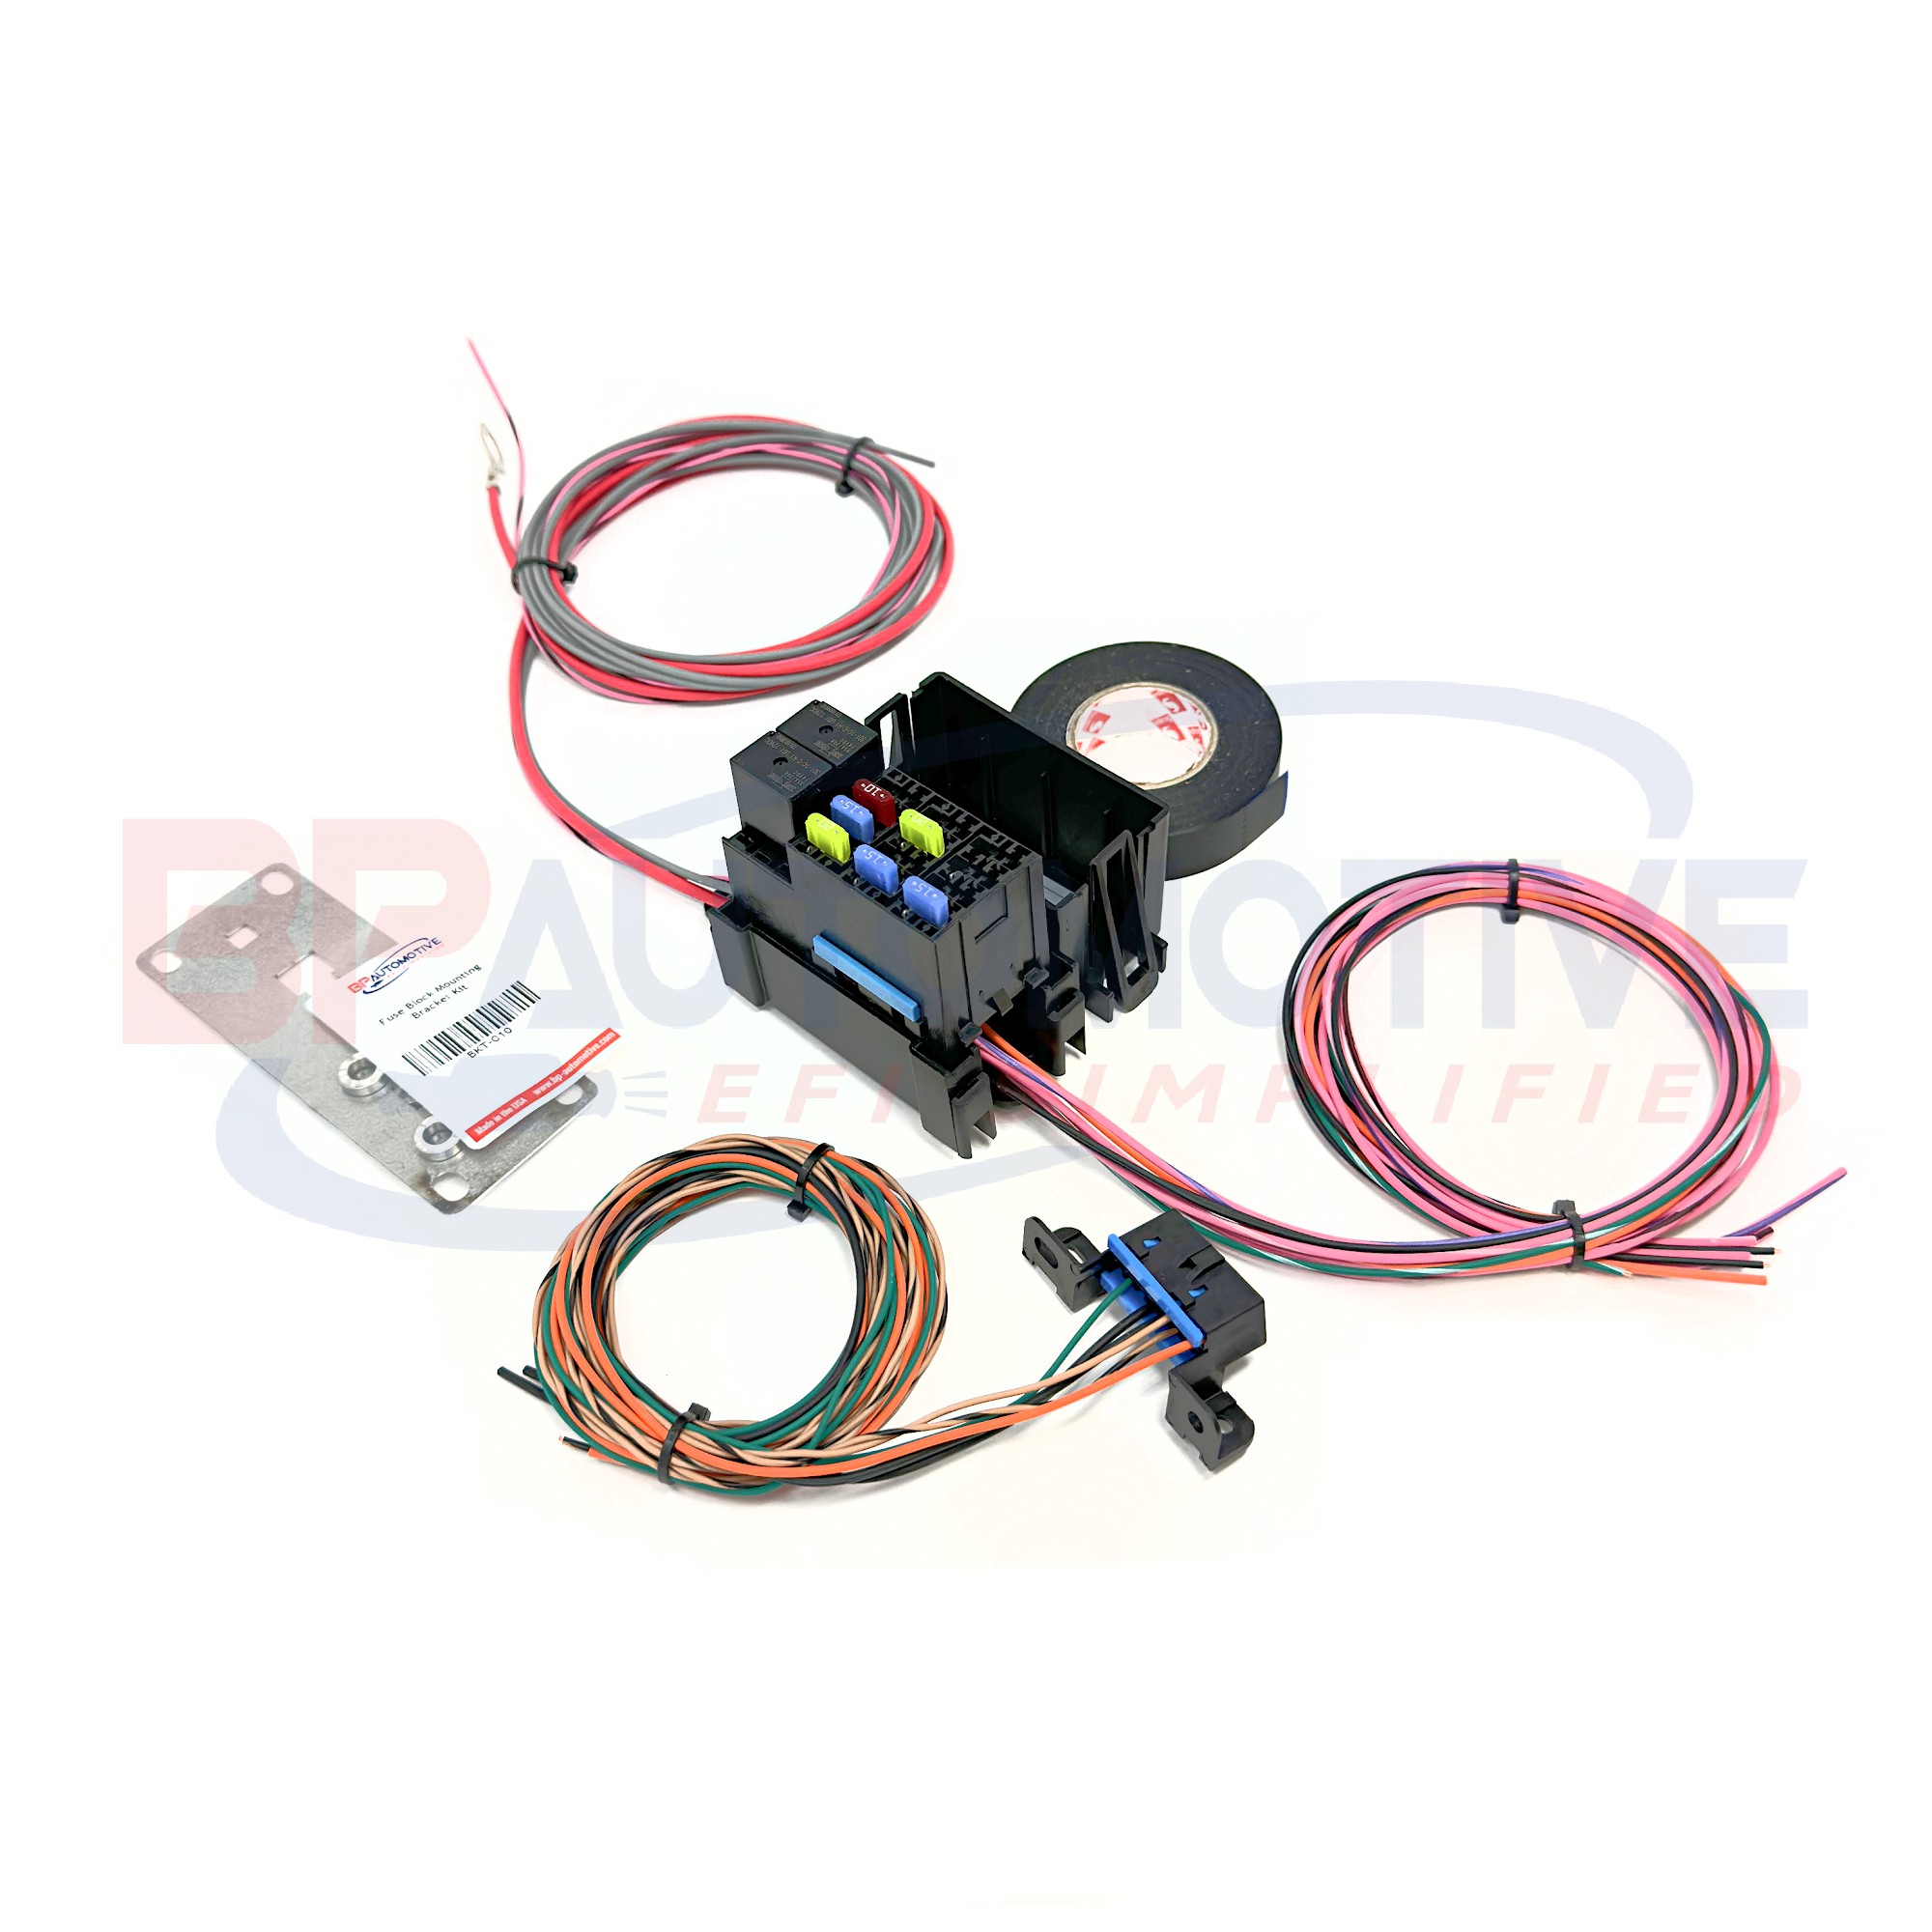 Fuse Block Wiring
2.5 Relays
Relays are used to switch electrical circuits on and off, often used for power-hungry components like fuel pumps and cooling fans.
- Specifications: 12V relays with 30A capacity
- Materials: Plastic housing with metal contacts
- Vendors: Available from electronic component suppliers like AllElectronics and Mouser
3. Essential Tools for LS OBD2 Port Wiring
Having the right tools is crucial for successful LS OBD2 port wiring, ensuring accuracy and safety.
3.1 Wire Strippers
Wire strippers are used to remove the insulation from wires without damaging the conductor.
- Types: Manual and automatic wire strippers
- Features: Adjustable gauge settings
- Brands: Klein Tools, Irwin, and Ideal
3.2 Crimping Tool
A crimping tool is used to securely attach terminals to the wires, ensuring a reliable electrical connection.
- Types: Ratcheting and non-ratcheting crimping tools
- Features: Interchangeable dies for different terminal types
- Brands: Klein Tools, Molex, and Delphi
3.3 Multimeter
A multimeter is used to test voltage, current, and resistance in electrical circuits, helping to identify wiring issues and verify connections.
- Features: Digital display, auto-ranging
- Functions: Measures voltage, current, and resistance
- Brands: Fluke, Klein Tools, and Extech
3.4 Soldering Iron
A soldering iron is used to create a permanent electrical connection between the wires and terminals, providing added reliability.
- Types: Adjustable temperature soldering irons
- Features: Fine tips for precision soldering
- Brands: Weller, Hakko, and Soldering Station
3.5 Heat Gun
A heat gun is used to shrink heat shrink tubing, providing insulation and protection for the electrical connections.
- Types: Electric heat guns with adjustable temperature settings
- Features: Multiple nozzle attachments
- Brands: Wagner, Master Appliance, and Steinel
4. Step-by-Step Guide to LS OBD2 Port Wiring
Follow these steps to wire an LS OBD2 port, ensuring a secure and functional connection.
4.1 Gathering Components
Collect all necessary components, including the OBD2 port connector, terminals, wires, fuse block, and relays.
- Checklist:
- OBD2 port connector
- Terminals
- Automotive-grade wire
- Fuse block
- Relays
4.2 Preparing the Wires
Cut the wires to the appropriate length and strip the insulation from the ends.
- Wire Length: Measure the distance between the OBD2 port and the ECU.
- Stripping: Use wire strippers to remove about 1/4 inch of insulation.
4.3 Crimping the Terminals
Attach the terminals to the wires using a crimping tool.
- Crimping: Insert the wire into the terminal and crimp securely.
- Inspection: Ensure the terminal is firmly attached to the wire.
4.4 Installing the Wires into the OBD2 Port Connector
Insert the terminals into the correct pin locations on the OBD2 port connector.
- Pinout Diagram: Refer to the OBD2 pinout diagram for the correct wire placement.
- Insertion: Push the terminals into the connector until they click into place.
4.5 Connecting the Fuse Block and Relays
Connect the wires from the OBD2 port to the fuse block and relays, following the wiring diagram.
- Fuse Block Wiring: Connect the power and ground wires to the fuse block.
- Relay Wiring: Connect the relay control wires to the appropriate circuits.
4.6 Testing the Connections
Use a multimeter to test the connections and ensure proper voltage and continuity.
- Voltage Test: Verify the voltage at the OBD2 port connector.
- Continuity Test: Check the continuity between the OBD2 port and the ECU.
5. LS OBD2 Port Wiring Diagram
A wiring diagram is essential for accurately connecting the OBD2 port to the vehicle’s electrical system.
5.1 Standard OBD2 Pinout
The standard OBD2 pinout includes the following connections:
| Pin | Description |
|---|---|
| 2 | J1850 Bus Positive |
| 4 | Chassis Ground |
| 5 | Signal Ground |
| 6 | CAN High |
| 7 | K-Line ISO 9141-2 |
| 10 | J1850 Bus Negative |
| 14 | CAN Low |
| 15 | L-Line ISO 9141-2 |
| 16 | Battery Power (12V+) |
5.2 LS-Specific Wiring Considerations
LS engines may have specific wiring requirements for the OBD2 port.
- PCM Connections: Ensure proper connections to the Powertrain Control Module (PCM).
- Sensor Data: Verify that all necessary sensor data is accessible through the OBD2 port.
5.3 Common Wiring Mistakes to Avoid
Avoiding common wiring mistakes is crucial for proper functionality.
- Incorrect Pin Placement: Double-check the pinout diagram to ensure correct wire placement.
- Loose Connections: Ensure all terminals are securely crimped and inserted into the connector.
- Grounding Issues: Verify that all ground connections are properly connected.
6. Troubleshooting LS OBD2 Port Wiring Issues
Troubleshooting is essential for resolving issues with LS OBD2 port wiring.
6.1 Common Problems
Identify common problems that can occur with LS OBD2 port wiring.
- No Power: Check the fuse and power connections.
- No Communication: Verify the data connections to the ECU.
- Intermittent Connection: Inspect the terminals and wiring for loose connections.
6.2 Diagnostic Techniques
Use diagnostic techniques to identify and resolve wiring issues.
- Visual Inspection: Check the wiring and connectors for damage.
- Multimeter Testing: Test the voltage and continuity of the circuits.
- Scan Tool Diagnostics: Use a scan tool to check for communication errors.
6.3 Repair Strategies
Implement effective repair strategies to fix LS OBD2 port wiring issues.
- Replacing Damaged Wires: Replace any damaged or corroded wires.
- Tightening Connections: Ensure all connections are tight and secure.
- Replacing the OBD2 Port Connector: Replace the connector if it is damaged or corroded.
7. Advanced Tips for LS OBD2 Port Wiring
Advanced tips can enhance the performance and reliability of LS OBD2 port wiring.
7.1 Using High-Quality Components
Using high-quality components ensures durability and reliable performance.
- Terminals: Use high-quality terminals that are designed for automotive applications.
- Wire: Use automotive-grade wire that is resistant to heat and chemicals.
- Connectors: Use durable connectors that can withstand harsh conditions.
7.2 Proper Grounding Techniques
Proper grounding is essential for minimizing electrical noise and ensuring accurate data transmission.
- Grounding Points: Connect the ground wires to a clean, solid metal surface.
- Grounding Wires: Use heavy-gauge ground wires to minimize resistance.
7.3 Protecting the Wiring
Protecting the wiring from damage is crucial for long-term reliability.
- Wire Loom: Use wire loom to protect the wiring from abrasion and heat.
- Heat Shrink Tubing: Use heat shrink tubing to insulate and protect the connections.
- Cable Ties: Use cable ties to secure the wiring and prevent it from rubbing against sharp edges.
8. The Role of OBD2 Scanners in Diagnosing LS Engines
OBD2 scanners are essential tools for diagnosing issues in LS engines by reading diagnostic trouble codes (DTCs).
8.1 How OBD2 Scanners Work
OBD2 scanners connect to the OBD2 port and retrieve data from the vehicle’s ECU, displaying DTCs and real-time sensor data.
- Data Retrieval: Scanners read data transmitted by the ECU.
- DTC Interpretation: They translate DTCs into understandable descriptions.
- Real-Time Data: They display live data from various sensors.
8.2 Types of OBD2 Scanners
Different types of OBD2 scanners cater to various needs and budgets.
- Basic Scanners: Read and clear DTCs.
- Mid-Range Scanners: Offer additional features like live data and freeze frame data.
- Professional Scanners: Provide advanced diagnostics and programming capabilities.
8.3 Choosing the Right OBD2 Scanner
Selecting the right scanner depends on the specific needs and complexity of the diagnostic tasks.
- Features: Consider necessary features like live data, ABS, and airbag diagnostics.
- Compatibility: Ensure the scanner is compatible with the vehicle’s make and model.
- Ease of Use: Opt for a scanner with an intuitive interface and clear instructions.
9. Common OBD2 Codes for LS Engines
Understanding common OBD2 codes helps in diagnosing issues specific to LS engines.
9.1 P0101 – Mass Air Flow (MAF) Sensor Circuit Range/Performance
This code indicates an issue with the MAF sensor, which measures the amount of air entering the engine.
- Symptoms: Poor engine performance, rough idle, and stalling.
- Possible Causes: Dirty MAF sensor, vacuum leaks, or faulty wiring.
9.2 P0171 and P0174 – System Too Lean (Bank 1 and Bank 2)
These codes indicate that the engine is running lean, meaning there is too much air and not enough fuel.
- Symptoms: Poor engine performance, hesitation, and stalling.
- Possible Causes: Vacuum leaks, faulty O2 sensors, or a weak fuel pump.
9.3 P0300 – Random Misfire Detected
This code indicates that the engine is experiencing random misfires, which can be caused by various issues.
- Symptoms: Rough idle, poor engine performance, and stalling.
- Possible Causes: Faulty spark plugs, ignition coils, or fuel injectors.
10. Maintaining Your LS OBD2 Port for Optimal Performance
Proper maintenance ensures the LS OBD2 port functions correctly and provides accurate diagnostic data.
10.1 Regular Inspections
Regularly inspect the OBD2 port for damage and corrosion.
- Visual Checks: Look for physical damage or corrosion on the connector.
- Terminal Inspection: Ensure the terminals are clean and free of corrosion.
10.2 Cleaning the OBD2 Port
Clean the OBD2 port to remove dirt and debris that can interfere with the connection.
- Compressed Air: Use compressed air to blow out any loose debris.
- Contact Cleaner: Use a contact cleaner to clean the terminals.
10.3 Protecting the OBD2 Port from Damage
Protect the OBD2 port from damage by using a protective cover.
- OBD2 Port Covers: Install a protective cover to prevent dust and moisture from entering the port.
- Cable Management: Use cable ties to secure the OBD2 scanner cable and prevent it from being damaged.
11. Benefits of Professional LS OBD2 Port Wiring Services
Hiring professional services ensures accurate and reliable LS OBD2 port wiring.
11.1 Expertise and Experience
Professionals have the expertise and experience to handle complex wiring tasks.
- Technical Knowledge: They possess in-depth knowledge of automotive electrical systems.
- Troubleshooting Skills: They can quickly diagnose and resolve wiring issues.
11.2 Quality Assurance
Professional services ensure high-quality workmanship and reliable connections.
- Proper Tools and Equipment: They use professional-grade tools and equipment.
- Quality Control: They follow strict quality control procedures to ensure accurate wiring.
11.3 Time Savings
Hiring professionals saves time and effort compared to DIY wiring.
- Efficient Wiring: They can complete the wiring quickly and efficiently.
- Reduced Errors: They minimize the risk of wiring errors and potential damage to the vehicle.
12. Future Trends in OBD2 Technology for LS Engines
Future trends in OBD2 technology promise enhanced diagnostic capabilities and improved vehicle performance.
12.1 Enhanced Diagnostic Capabilities
Future OBD2 systems will offer more advanced diagnostic features.
- Remote Diagnostics: Remote diagnostics will allow technicians to access vehicle data remotely.
- Predictive Maintenance: Predictive maintenance will use data analysis to anticipate potential issues.
12.2 Integration with Mobile Devices
OBD2 technology will increasingly integrate with mobile devices.
- Smartphone Apps: Smartphone apps will provide real-time vehicle data and diagnostic information.
- Wireless Connectivity: Wireless connectivity will allow for seamless data transfer.
12.3 Cybersecurity Measures
Cybersecurity measures will become increasingly important to protect vehicle data.
- Data Encryption: Data encryption will protect sensitive vehicle information from unauthorized access.
- Secure Communication Protocols: Secure communication protocols will prevent hacking and data breaches.
13. Conclusion: Mastering LS OBD2 Port Wiring
Mastering LS OBD2 port wiring is essential for accurate diagnostics and effective repairs. By following the guidelines outlined in this comprehensive guide, you can confidently tackle LS OBD2 port wiring tasks.
Understanding the LS OBD2 port and its wiring is critical for anyone working with LS engines. Accurate wiring ensures reliable access to diagnostic data, which is essential for troubleshooting and maintaining vehicle performance. By following the steps and tips provided in this guide, you can confidently wire an LS OBD2 port and ensure optimal performance.
Ready to take the next step?
Contact OBD2-SCANNER.EDU.VN today for expert guidance and services related to LS OBD2 port wiring and diagnostics. Our team is ready to assist you with all your automotive diagnostic needs. Reach us at 123 Main Street, Los Angeles, CA 90001, United States, or call us at +1 (641) 206-8880. You can also visit our website at OBD2-SCANNER.EDU.VN for more information. Let OBD2-SCANNER.EDU.VN be your trusted partner in automotive diagnostics and repair.
14. FAQ About LS OBD2 Port Wiring
Here are some frequently asked questions about LS OBD2 port wiring.
14.1 What is an OBD2 Scanner?
An OBD2 scanner is a diagnostic tool used to read and interpret data from a vehicle’s On-Board Diagnostics system.
14.2 How Do I Read OBD2 Codes?
Connect the OBD2 scanner to the OBD2 port, turn on the ignition, and follow the scanner’s instructions to retrieve diagnostic trouble codes (DTCs).
14.3 What are Common OBD2 Error Codes?
Common OBD2 error codes include P0101 (MAF sensor issue), P0171/P0174 (lean system), and P0300 (random misfire).
14.4 Can I Wire an OBD2 Port Myself?
Yes, with the right tools, components, and knowledge, you can wire an OBD2 port yourself. However, professional services are recommended for complex tasks.
14.5 Where Can I Find a Wiring Diagram for My LS Engine?
Wiring diagrams can be found in vehicle-specific repair manuals, online databases, or through professional diagnostic services.
14.6 What Tools Do I Need to Wire an OBD2 Port?
Essential tools include wire strippers, a crimping tool, a multimeter, a soldering iron, and a heat gun.
14.7 How Do I Test My OBD2 Port?
Use a multimeter to test the voltage and continuity of the OBD2 port connections.
14.8 What Should I Do If My OBD2 Port Isn’t Working?
Check the fuse, wiring, and connections. If the issue persists, consult a professional diagnostic service.
14.9 How Often Should I Inspect My OBD2 Port?
Regular inspections should be performed at least every six months to ensure optimal performance.
14.10 What are the Benefits of Using Professional OBD2 Wiring Services?
Professional services offer expertise, quality assurance, and time savings, ensuring accurate and reliable wiring.