Obd2 Tesla Model 3 diagnostics offer valuable insights into your vehicle’s performance, allowing for proactive maintenance and issue resolution through tools like the OBDLink dongle and apps such as Scan My Tesla or TM-Spy which are available at OBD2-SCANNER.EDU.VN, allowing you to access and interpret diagnostic data efficiently. This guide helps you understand how to use the OBD2 scanner effectively, helping you troubleshoot problems and enhance your understanding of your vehicle, with insights on electric vehicle diagnostics, Tesla-specific error codes, and preventive maintenance.
Contents
- 1. Understanding OBD2 and Your Tesla Model 3
- 1.1. Evolution of OBD Systems
- 1.2. Benefits of Using OBD2 for Tesla Model 3
- 1.3. Understanding Tesla-Specific Diagnostics
- 2. Essential Tools for OBD2 Tesla Model 3 Diagnostics
- 2.1. Recommended OBD2 Scanners for Tesla Model 3
- 2.2. Choosing the Right Diagnostic App
- 2.3. Importance of Tesla Diagnostic Cable
- 2.4. Other Useful Tools
- 3. Locating the OBD2 Port in Your Tesla Model 3
- 3.1. Step-by-Step Guide to Accessing the OBD2 Port
- 3.2. Common Mistakes to Avoid
- 3.3. Safety Precautions
- 4. Connecting and Configuring Your OBD2 Scanner
- 4.1. Step-by-Step Connection Guide
- 4.2. Troubleshooting Connection Issues
- 4.3. Software Configuration Tips
- 5. Reading and Interpreting OBD2 Data
- 5.1. Understanding Diagnostic Trouble Codes (DTCs)
- 5.2. Reading Real-Time Data Parameters
- 5.3. Identifying Potential Issues
- 5.4. Clearing Codes
- 6. Common OBD2 Codes and Their Meanings for Tesla Model 3
- 6.1. Interpreting Common Codes
- 6.2. Tesla-Specific Codes
- 6.3. When to Seek Professional Help
- 7. Advanced Diagnostics and Troubleshooting
- 7.1. Live Data Analysis Techniques
- 7.2. Component Testing
- 7.3. Software Updates
- 7.4. Data Logging and Analysis
- 8. Maintaining Your Tesla Model 3 with OBD2
- 8.1. Regular OBD2 Checks
- 8.2. Preventive Maintenance Based on OBD2 Data
- 8.3. Tracking Vehicle Performance Over Time
- 9. Integrating OBD2 Data with Tesla Service
- 9.1. Sharing OBD2 Data with Tesla Service
- 9.2. Seeking Advice from Tesla Service
1. Understanding OBD2 and Your Tesla Model 3
What is OBD2, and why is it important for your Tesla Model 3?
OBD2, or On-Board Diagnostics II, is a standardized system used in most vehicles to monitor and report on various vehicle systems, including engine performance, emissions, and other critical functions. According to the Environmental Protection Agency (EPA), OBD2 was mandated in all cars sold in the United States starting in 1996 to ensure emissions compliance. For Tesla Model 3 owners, OBD2 provides a window into the vehicle’s operational status, allowing you to diagnose potential issues and maintain optimal performance. It is particularly important because it helps identify problems that may not be immediately apparent, preventing minor issues from escalating into major repairs.
1.1. Evolution of OBD Systems
How has OBD technology evolved, and what are the key differences between OBD and OBD2?
The evolution of On-Board Diagnostics (OBD) systems began with the need for standardized emissions monitoring. The original OBD system, introduced in the late 1960s, primarily focused on basic engine functions. OBD-II, introduced in the mid-1990s, marked a significant advancement by standardizing diagnostic trouble codes (DTCs), communication protocols, and connector types. According to a study by the Society of Automotive Engineers (SAE), OBD-II provides more comprehensive monitoring of vehicle systems compared to its predecessor, including detailed emissions-related data. Key differences include:
- Standardization: OBD-II standardized DTCs and communication protocols, making it easier for technicians to diagnose issues across different vehicle makes and models.
- Comprehensive Monitoring: OBD-II monitors a wider range of vehicle systems, including the engine, transmission, and emissions control systems.
- Data Accessibility: OBD-II provides access to a wealth of real-time data, allowing for more accurate and efficient diagnostics.
1.2. Benefits of Using OBD2 for Tesla Model 3
What benefits can you gain from using an OBD2 scanner on your Tesla Model 3?
Using an OBD2 scanner on your Tesla Model 3 offers numerous benefits, including:
- Early Issue Detection: Identifies potential problems before they lead to costly repairs.
- Performance Monitoring: Tracks real-time data to ensure your vehicle operates at peak efficiency.
- DIY Diagnostics: Enables you to diagnose and troubleshoot issues yourself, saving on labor costs.
- Maintenance: Helps maintain your vehicle’s health by providing insights into its operational status.
1.3. Understanding Tesla-Specific Diagnostics
What makes Tesla diagnostics unique, and how does it differ from traditional OBD2 systems?
Tesla diagnostics are unique due to the advanced technology and electric powertrain of the vehicles. While Tesla vehicles utilize the OBD2 port, they also incorporate proprietary diagnostic systems that provide deeper insights into the car’s performance and health. According to Tesla’s service documentation, their diagnostic systems monitor various components, including the battery pack, electric motors, and advanced driver-assistance systems (ADAS). Key differences include:
- Proprietary Codes: Tesla uses specific diagnostic trouble codes (DTCs) that are not found in traditional OBD2 systems.
- Advanced Monitoring: Tesla’s diagnostic systems monitor a broader range of parameters, including battery health, motor performance, and software functions.
- Over-the-Air Updates: Tesla can remotely update diagnostic software, adding new features and improving diagnostic capabilities.
2. Essential Tools for OBD2 Tesla Model 3 Diagnostics
What tools do you need to perform OBD2 diagnostics on your Tesla Model 3 effectively?
To perform OBD2 diagnostics on your Tesla Model 3 effectively, you’ll need a few essential tools:
- OBD2 Scanner/Dongle: This device plugs into the OBD2 port and communicates with the vehicle’s computer.
- Diagnostic App: Software installed on your smartphone or tablet to read and interpret data from the OBD2 scanner.
- Tesla Diagnostic Cable: Required to adapt the standard OBD2 connection to Tesla’s proprietary connector.
- Multimeter: Useful for testing electrical components and circuits.
2.1. Recommended OBD2 Scanners for Tesla Model 3
Which OBD2 scanners are highly recommended for Tesla Model 3 owners?
Several OBD2 scanners are highly recommended for Tesla Model 3 owners, each offering unique features and capabilities:
| Scanner | Features | Pros | Cons |
|---|---|---|---|
| OBDLink MX+ | Advanced diagnostics, Bluetooth connectivity, supports multiple protocols | Fast data transfer, reliable connection, compatible with various apps | Higher price point, may require technical knowledge for advanced features |
| Veepeak Mini Bluetooth | Compact design, Bluetooth connectivity, basic diagnostics | Affordable, easy to use, portable | Limited advanced features, slower data transfer |
| Thinkdiag Mini | Full system diagnostics, bi-directional control, supports multiple languages | Comprehensive diagnostics, access to advanced functions, wide vehicle coverage | Subscription required for full access, can be overwhelming for beginners |
| Autel MaxiCheck MX808 | Full system diagnostics, service functions, touchscreen display | User-friendly interface, extensive diagnostic capabilities, supports special functions like oil reset and EPB reset | Higher price point, larger size may not be as convenient for portable use |
| ScanGauge II | Real-time data monitoring, customizable gauges, trip computer | Easy to install, provides valuable real-time data, helps monitor vehicle performance | Limited diagnostic capabilities compared to full-fledged scanners, display may seem dated to some |
According to product reviews on Amazon and automotive forums, the OBDLink MX+ and Veepeak Mini Bluetooth are popular choices due to their reliability and ease of use.
2.2. Choosing the Right Diagnostic App
What factors should you consider when choosing a diagnostic app for your Tesla Model 3?
When choosing a diagnostic app for your Tesla Model 3, consider the following factors:
- Compatibility: Ensure the app is compatible with your OBD2 scanner and Tesla Model 3.
- Features: Look for features like real-time data monitoring, diagnostic trouble code (DTC) reading, and advanced diagnostics.
- User Interface: Choose an app with a user-friendly interface for easy navigation and data interpretation.
- Reviews and Ratings: Check user reviews and ratings to gauge the app’s reliability and performance.
2.3. Importance of Tesla Diagnostic Cable
Why is a Tesla diagnostic cable essential for OBD2 connectivity in the Model 3?
A Tesla diagnostic cable is essential for OBD2 connectivity in the Model 3 because Tesla uses a proprietary connector that is different from the standard OBD2 port found in most vehicles. This cable acts as an adapter, allowing you to connect a standard OBD2 scanner to your Tesla’s diagnostic port. Without this cable, you cannot access the diagnostic data from your Tesla Model 3.
2.4. Other Useful Tools
What other tools can assist in the diagnostic process?
Other tools that can assist in the diagnostic process include:
- Multimeter: For testing electrical circuits and components.
- Socket Set: A set of sockets and wrenches for removing and installing components.
- Torque Wrench: For tightening bolts to the manufacturer’s specified torque.
- Service Manual: Provides detailed information on vehicle systems and diagnostic procedures.
- Flashlight/Headlamp: To provide adequate lighting in the work area.
3. Locating the OBD2 Port in Your Tesla Model 3
Where is the OBD2 port located in your Tesla Model 3, and how can you access it?
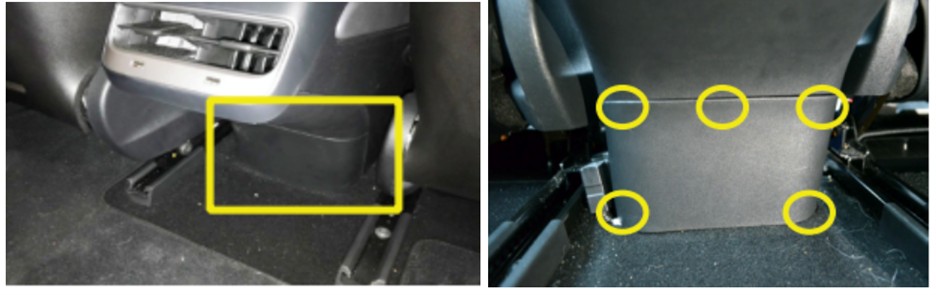
The OBD2 port in the Tesla Model 3 is located at the rear of the center console, under the air vents, accessible from the rear legroom. To access it:
- Slide both front seats all the way forward.
- Locate the small plastic panel at the bottom of the center console between the front seats.
- Remove the panel by applying pressure to release the push-fit clips.
3.1. Step-by-Step Guide to Accessing the OBD2 Port
How can you access the OBD2 port in your Tesla Model 3?
Here is a detailed step-by-step guide to accessing the OBD2 port in your Tesla Model 3:
- Prepare the Vehicle:
- Park your Tesla Model 3 in a safe location and turn off the vehicle. Ensure the car is completely shut down, which can take up to 15 minutes. According to Tesla’s official documentation, failure to properly shut down the vehicle before accessing the diagnostic port can cause damage and errors.
- Position the Front Seats:
- Slide both front seats all the way forward to maximize space in the rear legroom.
- Locate the Plastic Panel:
- Go to the back seat of the vehicle and locate the small plastic panel at the bottom of the center console between the two front seats. This panel covers the diagnostic connector.
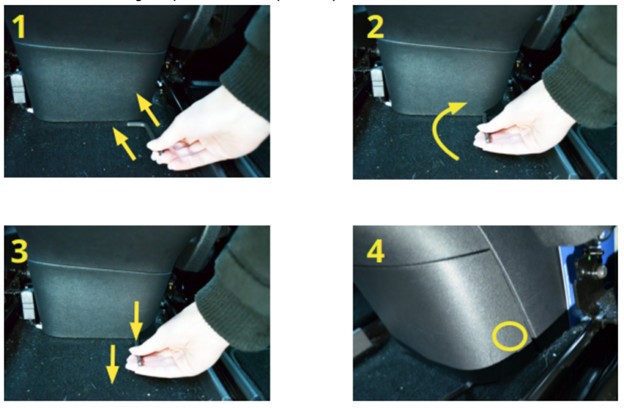
- Remove the Panel:
- The panel is held in place by five push-fit clips. These clips release when pressure is applied, allowing the panel to be opened. The panel is designed to be removed by hand.
- Using an Allen wrench or L-shaped screwdriver, slide the short end of the tool under the panel on the right side.
- Rotate the tool so that the short end is vertical.
- Pull toward you, parallel to the floor. The bottom right clip that holds the panel in place should now be loose.
- Use your hands to pull the panel toward you and loosen the clip at the top right.
- Loosen and open the remaining three clips and pull the panel free.
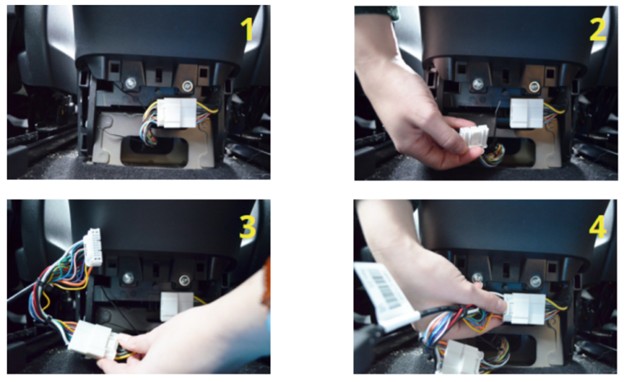
- Access the Diagnostic Connector:
- Inside the panel, you will find the Tesla Proprietary Diagnostic Connector.
- Press the clip that holds the white connector in place and slide to the left to release it.
- Connect the Diagnostic Cable:
- Plug the two white ends of the cables into the corresponding connectors in the vehicle.
- Push until they click into place. The connectors only fit one way.
- Connect the OBD2 Dongle:
- Then you can plug in the OBDLink dongle and connect it to your phone or tablet.
3.2. Common Mistakes to Avoid
What common mistakes should you avoid when accessing the OBD2 port?
Avoid these common mistakes when accessing the OBD2 port in your Tesla Model 3:
- Not Shutting Down the Vehicle: Always ensure the car is completely shut down before plugging in any diagnostic equipment.
- Forcing the Panel: Be gentle when removing the plastic panel to avoid breaking the clips.
- Incorrect Cable Connection: Make sure the diagnostic cable is securely connected to both the Tesla’s diagnostic connector and the OBD2 scanner.
- Ignoring Warning Signs: Pay attention to any warning signs or error messages during the diagnostic process.
3.3. Safety Precautions
What safety precautions should you take when working with the OBD2 port and diagnostic tools?
When working with the OBD2 port and diagnostic tools, take these safety precautions:
- Read the Manuals: Familiarize yourself with the manuals for both your OBD2 scanner and your Tesla Model 3.
- Wear Safety Glasses: Protect your eyes from debris and potential hazards.
- Disconnect the Vehicle: Ensure the vehicle is turned off and, if possible, disconnect the negative battery terminal.
- Use Proper Tools: Use the correct tools for the job to avoid damaging the vehicle or diagnostic equipment.
- Avoid Water: Keep diagnostic tools and electrical connections away from water and moisture.
 Tesla Model 3 OBD2 Port Location
4. Connecting and Configuring Your OBD2 Scanner
How do you connect and configure your OBD2 scanner with your Tesla Model 3?
Connecting and configuring your OBD2 scanner involves a few straightforward steps:
- Connect the Diagnostic Cable: Plug the Tesla diagnostic cable into the vehicle’s diagnostic connector.
- Plug in the OBD2 Scanner: Connect the OBD2 scanner to the diagnostic cable.
- Pair with Your Device: Follow the scanner’s instructions to pair it with your smartphone or tablet via Bluetooth or Wi-Fi.
- Launch the Diagnostic App: Open the diagnostic app and configure it to communicate with the OBD2 scanner.
4.1. Step-by-Step Connection Guide
What is the step-by-step process for connecting your OBD2 scanner to your Tesla Model 3?
Follow this step-by-step guide to connect your OBD2 scanner to your Tesla Model 3:
- Prepare the Vehicle: Ensure your Tesla Model 3 is turned off and completely shut down.
- Access the OBD2 Port: Locate and access the OBD2 port as described in Section 3.
- Connect the Tesla Diagnostic Cable:
- Take the Tesla diagnostic cable and plug the two white ends into the corresponding connectors in the vehicle. Ensure they click into place.
- Connect the OBD2 Scanner:
- Plug your OBD2 scanner into the other end of the Tesla diagnostic cable.
- Turn on the OBD2 Scanner:
- If your OBD2 scanner has a power button, turn it on. Some scanners power on automatically when connected.
- Pair the Scanner with Your Device:
- On your smartphone or tablet, enable Bluetooth or Wi-Fi, depending on the scanner’s connectivity method.
- Open the diagnostic app and follow the app’s instructions to pair with the OBD2 scanner. This usually involves selecting the scanner from a list of available devices.
- Configure the App:
- Once paired, configure the app to communicate with the OBD2 scanner. This may involve selecting your vehicle’s make and model (Tesla Model 3) and choosing the appropriate communication protocol.
- Start Diagnostics:
- With everything connected and configured, you can now start running diagnostics. Follow the app’s instructions to read diagnostic trouble codes (DTCs), view real-time data, and perform other diagnostic functions.
4.2. Troubleshooting Connection Issues
What should you do if you encounter connection issues between the OBD2 scanner and your Tesla Model 3?
If you encounter connection issues between the OBD2 scanner and your Tesla Model 3, try these troubleshooting steps:
- Verify Compatibility: Ensure your OBD2 scanner and diagnostic app are compatible with your Tesla Model 3.
- Check Connections: Double-check all cable connections to ensure they are secure.
- Restart Devices: Restart both the OBD2 scanner and your smartphone or tablet.
- Update Software: Ensure your diagnostic app and OBD2 scanner firmware are up to date.
- Bluetooth/Wi-Fi Issues: If using Bluetooth or Wi-Fi, ensure the devices are properly paired and within range.
- Try a Different App: Try using a different diagnostic app to see if the issue is with the software.
- Consult Documentation: Refer to the OBD2 scanner’s manual or the diagnostic app’s help resources for specific troubleshooting steps.
4.3. Software Configuration Tips
What tips can help you configure the diagnostic software for optimal performance?
To configure the diagnostic software for optimal performance:
- Select the Correct Vehicle Profile: Ensure you have selected the correct vehicle profile for your Tesla Model 3 within the app.
- Customize Data Display: Customize the data display to show the parameters that are most relevant to you.
- Set Up Alerts: Configure alerts to notify you of abnormal readings or potential issues.
- Calibrate Sensors: Calibrate sensors as needed to ensure accurate readings.
- Regular Updates: Keep your diagnostic software updated to benefit from the latest features and bug fixes.
 Connecting OBD2 Scanner to Tesla Model 3
5. Reading and Interpreting OBD2 Data
How do you read and interpret OBD2 data from your Tesla Model 3?
Reading and interpreting OBD2 data involves understanding diagnostic trouble codes (DTCs), real-time data parameters, and other diagnostic information. Here’s how to do it:
- Read Diagnostic Trouble Codes (DTCs):
- Use the diagnostic app to scan for DTCs. These codes indicate specific issues or faults within the vehicle’s systems.
- Interpret DTCs:
- Refer to a DTC lookup table or database to understand the meaning of each code. Online resources like OBD-Codes.com and the National Highway Traffic Safety Administration (NHTSA) website provide detailed information on DTCs.
- View Real-Time Data:
- Monitor real-time data parameters such as battery voltage, motor temperature, and system voltages to assess the vehicle’s performance.
- Analyze Data Patterns:
- Look for patterns or anomalies in the data that may indicate underlying issues.
5.1. Understanding Diagnostic Trouble Codes (DTCs)
What are Diagnostic Trouble Codes (DTCs), and how do you interpret them?
Diagnostic Trouble Codes (DTCs) are alphanumeric codes that indicate a specific problem or fault detected by the vehicle’s onboard diagnostic system. These codes are standardized across the automotive industry, but some manufacturers may also use proprietary codes for more specific issues. According to the Society of Automotive Engineers (SAE), DTCs are structured as follows:
- First Character: Indicates the system the code relates to (e.g., P for Powertrain, B for Body, C for Chassis, U for Network).
- Second Character: Indicates whether the code is generic (0) or manufacturer-specific (1).
- Third Character: Indicates the specific subsystem (e.g., 0 for Fuel and Air Metering, 1 for Ignition System).
- Fourth and Fifth Characters: Specify the particular fault within the subsystem.
To interpret DTCs:
- Read the Code: Use your OBD2 scanner and diagnostic app to read the DTCs from your Tesla Model 3.
- Look Up the Code: Consult a DTC lookup table or database (e.g., OBD-Codes.com) to find the meaning of the code.
- Understand the Issue: Once you know the meaning of the code, you can begin to understand the potential issue affecting your vehicle.
- Further Diagnosis: Perform additional tests and inspections to confirm the issue and identify the root cause.
5.2. Reading Real-Time Data Parameters
What real-time data parameters are important to monitor in a Tesla Model 3?
Important real-time data parameters to monitor in a Tesla Model 3 include:
- Battery Voltage: Indicates the overall health and charge level of the battery.
- Motor Temperature: Monitors the temperature of the electric motors to prevent overheating.
- System Voltages: Monitors the voltage of various electrical systems to identify potential issues.
- Inverter Temperature: Monitors the temperature of the inverter, which converts DC power from the battery to AC power for the motors.
- Cell Balance: Monitors the voltage of individual battery cells to ensure they are balanced and performing optimally.
- Ambient Temperature: Monitors the temperature outside the car
- RPM: Monitors the revolution of the motor
5.3. Identifying Potential Issues
How can you use OBD2 data to identify potential issues in your Tesla Model 3?
You can use OBD2 data to identify potential issues in your Tesla Model 3 by:
- Monitoring DTCs: Regularly checking for DTCs and addressing any codes that appear.
- Analyzing Real-Time Data: Monitoring real-time data parameters for unusual readings or patterns.
- Comparing Data: Comparing current data with historical data to identify deviations.
- Using Diagnostic Apps: Utilizing diagnostic apps to perform advanced tests and analyses.
5.4. Clearing Codes
How to clear OBD2 codes, and when is it appropriate to do so?
To clear OBD2 codes, use your diagnostic app to select the “Clear Codes” or “Erase DTCs” function. However, it is important to clear codes only after addressing the underlying issue that triggered the code. Clearing codes without fixing the problem may cause the code to reappear, and it can also mask underlying issues that could lead to more serious problems. According to automotive experts, it is appropriate to clear codes in the following situations:
- After Repair: Once you have diagnosed and repaired the issue that triggered the DTC, you can clear the code to reset the system.
- False Alarms: If a code was triggered by a temporary glitch or sensor malfunction and does not reappear after verification, it may be safe to clear the code.
- Testing Purposes: During diagnostic testing, you may need to clear codes to see if they reappear, helping you confirm whether a repair was successful.
 Reading Tesla Model 3 OBD2 Data
6. Common OBD2 Codes and Their Meanings for Tesla Model 3
What are some common OBD2 codes for the Tesla Model 3, and what do they signify?
Several OBD2 codes are commonly encountered in the Tesla Model 3. Here are a few examples:
| Code | Description | Possible Causes | Solutions |
|---|---|---|---|
| P0A0F | Drive Motor Performance | Motor malfunction, inverter issue, software glitch | Check motor connections, inspect inverter, update software, consult Tesla service |
| P0A80 | Replace Battery Pack | Battery pack degradation, cell imbalance, high internal resistance | Battery pack replacement, cell balancing, consult Tesla service |
| P1D05 | Battery Management System Internal Fault | BMS malfunction, software issue, wiring problem | Check BMS connections, update software, consult Tesla service |
| P0571 | Cruise Control/Brake Switch A Circuit Malfunction | Faulty brake light switch, wiring issue, cruise control module problem | Replace brake light switch, repair wiring, replace cruise control module |
| B1001 | Electronic Control Unit (ECU) Internal Failure | ECU malfunction, software issue, power supply problem | Check ECU connections, update software, replace ECU |
| C0044 | Steering Angle Sensor Circuit Malfunction | Faulty steering angle sensor, wiring issue, power steering control module problem | Replace steering angle sensor, repair wiring, replace power steering control module |
| U0100 | Lost Communication With Engine Control Module/Powertrain Control Module (ECM/PCM) | Wiring issue, ECM/PCM malfunction, power supply problem | Check wiring, replace ECM/PCM, check power supply |
| P0AA6 | Hybrid Battery Voltage System Isolation Fault | Insulation failure in high-voltage system, coolant leak, wiring issue | Inspect high-voltage components for damage, check coolant lines, repair wiring, consult Tesla service |
| B1490-00 | Airbag malfunction indicator lamp circuit – short circuit to ground | Damaged or faulty airbag module, Wiring harness short circuit, Connector corrosion or loose connection | Inspect the wiring harness and connectors for any signs of damage or corrosion. Replace the airbag module. After any repairs, clear the diagnostic trouble codes and verify the system’s functionality. |
| U0298 | Lost Communication with Drive Motor Control Module | Damaged or disconnected communication wires, Faulty motor control module, Software glitch | Inspect the wiring and connectors for any signs of damage or disconnection. Update the software and Ensure the motor control module is functioning properly. Consult a Tesla service center. |
| C1670 | Traction Control System (TCS) Malfunction | Damaged wheel speed sensors, Faulty TCS module, Brake system malfunction | Inspect the wheel speed sensors and their wiring for damage. Verify the functionality of the TCS module. Check for any brake system issues. |
| P0D3D | Battery Energy Control Module Requested Malfunction Indicator Lamp Illumination | Faulty battery energy control module, High voltage battery pack issue, Software malfunction | Verify the voltage battery pack. Repair or replace the faulty battery energy control module. Update the software. Contact a Tesla service center for assistance. |
| B1494-13 | Front Passenger’s Pretensioner Circuit Open | Damaged passenger’s seat belt pretensioner, Wiring harness issues or open circuit, Corrosion in connector | Inspect the passenger seat belt and ensure the pretensioner circuit. Ensure the connector is in proper condition. Replace the seat belt, and clear all diagnostic trouble codes. |
| U0140 | Lost Communication with Body Control Module (BCM) | Damaged or disconnected communication wires, Body Control Module Failure, Software glitch | Examine the communication wires. Check the BCM. Update the software. Consult a Tesla service center. |
| P1088 | DC-DC Converter Performance | Faulty DC-DC converter, Wiring issues, Battery issue | Inspect the DC-DC converter connections and wiring, Replace the DC-DC converter if necessary, Check the battery status. |
| U0129 | Lost Communication With Brake System Control Module | Damaged or disconnected communication wires, Issue with the Brake System Control Module, ABS system issue | Inspect wiring for wear and tear. Replace the faulty brake system and ABS Module. Seek assistance from Tesla service center. |
| U0001:00 | High Speed CAN Communication Bus | CAN bus wiring issues, Corroded connectors, Electrical noise | Inspect the CAN bus wiring and connectors. Clean all connections to eliminate any corrosion. Shield the CAN bus wires from electrical noise. |
| C0561-72 | System disabling request signal invalid | Issue with an ABS, TCS, or ESC system, Software glitch, Faulty sensor | Check ABS, TCS and ESC system. Upgrade the software. Replace any failed sensors. |
| B1023-13 | Driver seat position sensor circuit open | Damaged driver’s seat position, Faulty wiring, Connector corrosion or loose connection | Inspect the wiring and seat. Check the circuit. Replace the wiring for the seat and resolve the connection issue. |
| U0402-87 | Invalid data received from powertrain control module | Data mismatch, Faulty powertrain control module, Wiring issue | Inspect the wiring harness. Validate the Powertrain Control Module. Replace the faulty powertrain module. |
| P0AFA-13 | Hybrid/Electric Vehicle Battery Voltage High | Battery pack degradation, Cell imbalance, Wiring issue | Check the voltage. Battery pack replacement. Resolve the Wiring issue. Contact Tesla service center. |
| P0532-00 | A/C Refrigerant Pressure Sensor Circuit Low | AC Refrigerant pressure Sensor failure, Refrigerant leak, Wiring issue | Inspect the A/C Refrigerant pressure Sensor, Repair the refrigerant leak. Examine the wiring and resolve the connection issue. |
| U11B3 | Lost Communication with the Vehicle Sensor Interface Module | A malfunctioning sensor interface module, faulty communication wires, software issues | Examine the communication wires. Verify that the sensor interface module is working correctly. Contact Tesla service. |
Disclaimer: This table is intended for informational purposes only and should not be used as a substitute for professional diagnostic services. Always consult with a qualified technician for accurate diagnosis and repair.
6.1. Interpreting Common Codes
How do you interpret these common OBD2 codes for the Tesla Model 3?
To interpret common OBD2 codes for the Tesla Model 3:
- Identify the Code: Use your OBD2 scanner to read the code.
- Look Up the Code: Consult a DTC lookup table or database to find the meaning of the code.
- Understand the Issue: Once you know the meaning of the code, you can begin to understand the potential issue affecting your vehicle.
- Further Diagnosis: Perform additional tests and inspections to confirm the issue and identify the root cause.
6.2. Tesla-Specific Codes
Are there any Tesla-specific OBD2 codes, and how do you handle them?
Yes, Tesla uses specific diagnostic trouble codes (DTCs) that are not found in traditional OBD2 systems. These codes provide deeper insights into the car’s performance and health. To handle Tesla-specific codes:
- Identify Tesla-Specific Codes: Use a diagnostic tool that supports Tesla-specific DTCs.
- Consult Tesla Documentation: Refer to Tesla’s service documentation for detailed information on these codes.
- Seek Expert Advice: Consult with Tesla service or a qualified technician familiar with Tesla vehicles.
6.3. When to Seek Professional Help
When should you seek professional help for OBD2-related issues in your Tesla Model 3?
You should seek professional help for OBD2-related issues in your Tesla Model 3 in the following situations:
- Unfamiliar Codes: If you encounter DTCs that you are unfamiliar with or cannot find information on.
- Complex Issues: If you suspect a complex issue that requires specialized knowledge or tools.
- Recurring Codes: If DTCs reappear even after you have attempted to address the underlying issue.
- Safety Concerns: If the issue affects the safety or drivability of your vehicle.
7. Advanced Diagnostics and Troubleshooting
What advanced diagnostic and troubleshooting techniques can you use with your OBD2 scanner on your Tesla Model 3?
Advanced diagnostic and troubleshooting techniques include:
- Live Data Analysis: Monitor real-time data parameters to identify subtle issues.
- Component Testing: Use the OBD2 scanner to activate and test individual components.
- Software Updates: Update vehicle software to address known issues and improve performance.
- Data Logging: Record data over time to analyze patterns and identify intermittent problems.
7.1. Live Data Analysis Techniques
What live data analysis techniques can help you diagnose complex issues?
Live data analysis techniques include:
- Baseline Comparison: Comparing current data with baseline data to identify deviations.
- Trend Analysis: Monitoring data trends over time to identify patterns and anomalies.
- Correlation Analysis: Analyzing the relationship between different data parameters to identify potential issues.
7.2. Component Testing
How can you use your OBD2 scanner to test specific components in your Tesla Model 3?
You can use your OBD2 scanner to test specific components by:
- Accessing Component Tests: Use the diagnostic app to access component testing functions.
- Selecting the Component: Choose the component you want to test from the list.
- Following Instructions: Follow the app’s instructions to activate and test the component.
- Analyzing Results: Analyze the results to determine if the component is functioning properly.
7.3. Software Updates
How can software updates improve your Tesla Model 3’s performance and diagnostics?
Software updates can improve your Tesla Model 3’s performance and diagnostics by:
- Fixing Bugs: Addressing known software bugs that may cause issues.
- Adding Features: Introducing new features and capabilities.
- Improving Performance: Optimizing vehicle systems for better performance.
- Enhancing Diagnostics: Adding new diagnostic capabilities and improving the accuracy of existing ones.
7.4. Data Logging and Analysis
How can you use data logging to diagnose intermittent issues?
Data logging can help diagnose intermittent issues by:
- Recording Data: Recording data over a period of time while the vehicle is in operation.
- Analyzing Patterns: Analyzing the recorded data to identify patterns and anomalies that may indicate an intermittent issue.
- Identifying Triggers: Identifying the conditions or events that trigger the issue.
8. Maintaining Your Tesla Model 3 with OBD2
How can you use OBD2 data to maintain your Tesla Model 3 and prevent future issues?
You can use OBD2 data to maintain your Tesla Model 3 by:
- Regular Monitoring: Regularly monitoring OBD2 data for potential issues.
- Preventive Maintenance: Performing preventive maintenance based on OBD2 data and manufacturer recommendations.
- Tracking Performance: Tracking vehicle performance over time to identify trends and potential problems.
8.1. Regular OBD2 Checks
How often should you perform OBD2 checks on your Tesla Model 3?
Perform OBD2 checks on your Tesla Model 3:
- Monthly: Conduct a basic check monthly to monitor key parameters.
- Before Long Trips: Perform a thorough check before long trips to ensure vehicle health.
- After Repairs: Check after repairs to verify that the issue has been resolved and no new codes have appeared.
- When Issues Arise: Check immediately when you notice any unusual symptoms or warning lights.
8.2. Preventive Maintenance Based on OBD2 Data
What preventive maintenance tasks can be informed by OBD2 data?
Preventive maintenance tasks informed by OBD2 data include:
- Battery Maintenance: Monitoring battery voltage and cell balance to ensure optimal battery health.
- Motor Maintenance: Monitoring motor temperature and performance to prevent overheating and identify potential issues.
- Software Updates: Keeping vehicle software up to date to address known issues and improve performance.
- Component Inspections: Inspecting components based on DTCs and real-time data readings.
8.3. Tracking Vehicle Performance Over Time
How can you track your Tesla Model 3’s performance over time using OBD2 data?
You can track your Tesla Model 3’s performance over time by:
- Recording Data: Regularly recording OBD2 data parameters such as battery voltage, motor temperature, and system voltages.
- Creating a Log: Creating a log or spreadsheet to track the data over time.
- Analyzing Trends: Analyzing the data to identify trends and potential problems.
- Comparing Data: Comparing current data with historical data to identify deviations and anomalies.
9. Integrating OBD2 Data with Tesla Service
How can you integrate OBD2 data with Tesla service to improve diagnostics and repairs?
Integrating OBD2 data with Tesla service can improve diagnostics and repairs by:
- Sharing Data: Sharing OBD2 data with Tesla service to provide them with valuable diagnostic information.
- Seeking Advice: Seeking advice from Tesla service on interpreting OBD2 data and addressing potential issues.
- Verifying Repairs: Using OBD2 data to verify that repairs have been performed correctly.
9.1. Sharing OBD2 Data with Tesla Service
How can you share OBD2 data with Tesla service to assist in diagnostics?
You can share OBD2 data with Tesla service by:
- Providing DTCs: Providing a list of DTCs and their descriptions.
- Sharing Real-Time Data: Sharing real-time data parameters such as battery voltage, motor temperature, and system voltages.
- Describing Symptoms: Providing a detailed description of the symptoms you are experiencing.
- Including History: Including a history of recent OBD2 checks and maintenance activities.
9.2. Seeking Advice from Tesla Service
When should you seek advice from Tesla service regarding OBD2 data interpretation?
Seek advice from Tesla service regarding OBD2 data interpretation:
- Unfamiliar Codes: When you encounter DTCs that you are unfamiliar with or cannot find information on.
- Complex Issues: When you suspect a complex issue that requires specialized knowledge or tools