Ontrack Obd2 Scanners are invaluable tools for anyone involved in automotive diagnostics and repair. These devices, readily available at OBD2-SCANNER.EDU.VN, provide crucial insights into a vehicle’s health, empowering technicians and enthusiasts alike to identify and address issues efficiently. By offering comprehensive diagnostic capabilities and streamlined troubleshooting, Ontrack OBD2 scanners contribute to improved vehicle performance and enhanced customer satisfaction.
Contents
- 1. What Is an Ontrack OBD2 Scanner?
- 1.1. Definition and Purpose
- 1.2. Key Components of an OBD2 Scanner
- 1.3. How Ontrack OBD2 Scanners Differ
- 1.4. The OBD2 Port: A Gateway to Vehicle Diagnostics
- 1.5. Benefits of Using an Ontrack OBD2 Scanner
- 1.6. Types of Ontrack OBD2 Scanners
- 1.7. Choosing the Right Ontrack OBD2 Scanner
- 2. How Does an Ontrack OBD2 Scanner Work?
- 2.1. Connecting the Scanner to the Vehicle
- 2.2. Powering On and Navigating the Scanner
- 2.3. Reading Diagnostic Trouble Codes (DTCs)
- 2.4. Understanding Diagnostic Trouble Codes (DTCs)
- 2.5. Clearing Diagnostic Trouble Codes (DTCs)
- 2.6. Interpreting Live Data Streams
- 2.7. Additional Features and Functions
- 2.8. Best Practices for Using an OBD2 Scanner
- 3. Why Choose an Ontrack OBD2 Scanner?
- 3.1. Comprehensive Diagnostic Capabilities
- 3.2. User-Friendly Interface
- 3.3. Extensive Vehicle Coverage
- 3.4. Real-Time Data Streaming
- 3.5. Bi-Directional Control
- 3.6. Software Updates and Support
- 3.7. Durability and Reliability
- 3.8. Cost-Effectiveness
- 3.9. Enhancing Repair Efficiency with OBD2 Scanners
- 4. Common Issues Diagnosed with an Ontrack OBD2 Scanner
- 4.1. Engine Misfires
- 4.2. Oxygen Sensor Failures
- 4.3. Catalytic Converter Problems
- 4.4. Evaporative Emission Control System (EVAP) Leaks
- 4.5. Transmission Issues
- 4.6. ABS and Brake System Problems
- 4.7. Airbag System Malfunctions
- 4.8. Electrical System Faults
- 4.9. Addressing Diagnostic Challenges with Ontrack Scanners
- 4.10. The Role of Regular Vehicle Diagnostics
- 5. Step-by-Step Guide to Using an Ontrack OBD2 Scanner
- 5.1. Preparation: Gathering Necessary Tools and Information
- 5.2. Locating the OBD2 Port
- 5.3. Connecting the Scanner
- 5.4. Powering On and Navigating the Scanner
- 5.5. Reading Diagnostic Trouble Codes (DTCs)
- 5.6. Interpreting DTCs
- 5.7. Researching the Codes
- 5.8. Performing the Necessary Repairs
- 5.9. Clearing the Codes
- 5.10. Verifying the Repair
- 5.11. Advanced Features and Functions
- 5.12. Tips for Accurate Diagnostics
- 5.13. Enhancing Vehicle Maintenance Through Regular Scanning
- 6. Advanced Features of Ontrack OBD2 Scanners
- 6.1. Real-Time Data Streaming
- 6.2. Bi-Directional Control
- 6.3. Freeze Frame Data
- 6.4. O2 Sensor Testing
- 6.5. EVAP System Testing
- 6.6. ABS Diagnostics
- 6.7. SRS Diagnostics
- 6.8. Code Clearing and Resetting
- 6.9. Staying Ahead with OBD2 Technology
- 6.10. Enhancing Diagnostic Accuracy with Advanced Features
1. What Is an Ontrack OBD2 Scanner?
An Ontrack OBD2 scanner is a diagnostic tool that retrieves data from a vehicle’s onboard computer system, helping identify potential issues. This invaluable device is readily available at OBD2-SCANNER.EDU.VN. Let’s delve deeper into what makes these scanners essential for automotive diagnostics.
1.1. Definition and Purpose
An Ontrack OBD2 scanner is a device designed to access and interpret the data stored within a vehicle’s On-Board Diagnostics (OBD) system. The primary purpose of an OBD2 scanner is to read Diagnostic Trouble Codes (DTCs) that indicate specific problems or malfunctions detected by the vehicle’s computer. According to the Environmental Protection Agency (EPA), all cars and light trucks manufactured for sale in the United States after January 1, 1996, are required to support the OBD-II standard.
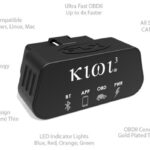
1.2. Key Components of an OBD2 Scanner
An OBD2 scanner consists of several key components:
- Connector: This is the physical interface that plugs into the vehicle’s OBD2 port, typically located under the dashboard.
- Microprocessor: The brain of the scanner, responsible for processing data and running diagnostic algorithms.
- Display Screen: Used to show the retrieved data and diagnostic information. This can range from simple LCD screens to full-color displays.
- Software: The scanner’s operating system, which includes diagnostic protocols, code definitions, and user interface elements.
- Buttons/Interface: Controls for navigating menus, selecting functions, and inputting data.
1.3. How Ontrack OBD2 Scanners Differ
Ontrack OBD2 scanners stand out due to their user-friendly interface and comprehensive diagnostic capabilities. Unlike generic scanners, Ontrack devices often come with enhanced features such as:
- Extensive Code Library: Access to a more detailed database of DTCs, including manufacturer-specific codes.
- Real-Time Data Streaming: The ability to monitor live sensor data, providing a dynamic view of the vehicle’s operation.
- Bi-Directional Control: Advanced models can send commands to the vehicle’s computer to test specific components or systems.
- Regular Updates: Software updates to ensure compatibility with newer vehicle models and access to the latest diagnostic information.
1.4. The OBD2 Port: A Gateway to Vehicle Diagnostics
The OBD2 port serves as the gateway to a wealth of diagnostic information stored within a vehicle’s computer system. This standardized port, mandated in all cars and light trucks sold in the U.S. after 1996, enables technicians and enthusiasts to easily access and interpret data related to engine performance, emissions control, and other critical systems. Through this connection, OBD2 scanners can retrieve diagnostic trouble codes (DTCs), monitor real-time sensor data, and perform various diagnostic tests, empowering users to effectively troubleshoot and maintain their vehicles. According to a study by the National Institute for Automotive Service Excellence (ASE), proper use of OBD2 scanners can reduce diagnostic time by up to 40%, leading to more efficient and cost-effective vehicle maintenance.
1.5. Benefits of Using an Ontrack OBD2 Scanner
Using an Ontrack OBD2 scanner offers numerous benefits:
- Cost Savings: Diagnosing and addressing minor issues early can prevent them from escalating into costly repairs.
- Time Efficiency: Quickly identifying problems reduces diagnostic time and allows for faster repairs.
- Informed Decision-Making: Access to detailed diagnostic data enables informed decisions about vehicle maintenance and repairs.
- Preventive Maintenance: Monitoring real-time data can help identify potential issues before they cause breakdowns.
- Enhanced Vehicle Performance: Addressing issues promptly can improve fuel efficiency, reduce emissions, and optimize overall performance.
1.6. Types of Ontrack OBD2 Scanners
Ontrack offers a range of OBD2 scanners to suit different needs and budgets:
- Basic Code Readers: Simple, affordable devices that read and clear DTCs.
- Mid-Range Scanners: Offer additional features like real-time data streaming, freeze frame data, and enhanced code definitions.
- Professional-Grade Scanners: Advanced tools with bi-directional control, comprehensive system diagnostics, and specialized functions like ABS and airbag diagnostics.
- Wireless OBD2 Adapters: Bluetooth or Wi-Fi enabled adapters that connect to smartphones or tablets, offering portability and convenience.
1.7. Choosing the Right Ontrack OBD2 Scanner
Selecting the right Ontrack OBD2 scanner depends on your specific needs and expertise. Consider the following factors:
- Budget: Determine how much you are willing to spend.
- Features: Identify the features that are most important to you, such as real-time data, bi-directional control, or specific system diagnostics.
- Compatibility: Ensure the scanner is compatible with your vehicle’s make and model.
- User Interface: Look for a scanner with an intuitive and easy-to-navigate interface.
- Updates: Check if the scanner receives regular software updates to stay current with new vehicle models and diagnostic information.
By understanding the definition, components, and benefits of Ontrack OBD2 scanners, you can make an informed decision about which tool is right for you. These scanners are essential for anyone looking to maintain their vehicle’s health and performance effectively.
2. How Does an Ontrack OBD2 Scanner Work?
An Ontrack OBD2 scanner operates by connecting to a vehicle’s onboard computer and retrieving diagnostic information. Understanding this process, detailed at OBD2-SCANNER.EDU.VN, allows users to effectively diagnose and address vehicle issues. Let’s explore the step-by-step process.
2.1. Connecting the Scanner to the Vehicle
The first step in using an Ontrack OBD2 scanner is to connect it to the vehicle’s OBD2 port. This port is typically located under the dashboard, near the steering column.
- Locate the OBD2 Port: Consult your vehicle’s owner’s manual if you are unsure of the port’s location.
- Turn Off the Ignition: Ensure the vehicle’s ignition is turned off before connecting the scanner.
- Plug in the Scanner: Firmly plug the scanner’s connector into the OBD2 port.
- Turn on the Ignition: Turn the ignition to the “on” position, but do not start the engine unless instructed by the scanner.
2.2. Powering On and Navigating the Scanner
Once the scanner is connected, power it on and navigate to the diagnostic functions.
- Power On: Most scanners will power on automatically when connected. If not, press the power button.
- Initial Setup: Some scanners may require initial setup, such as selecting the vehicle’s make, model, and year.
- Main Menu: Navigate to the main menu, which typically includes options like “Read Codes,” “Erase Codes,” “Live Data,” and “Vehicle Information.”
2.3. Reading Diagnostic Trouble Codes (DTCs)
The primary function of an OBD2 scanner is to read Diagnostic Trouble Codes (DTCs). These codes provide valuable information about potential issues detected by the vehicle’s computer.
- Select “Read Codes”: In the main menu, select the “Read Codes” or “Diagnostic Codes” option.
- View DTCs: The scanner will display a list of DTCs, each with a code and a brief description.
- Record DTCs: Write down the DTCs for further investigation.
- Consult the Manual: Refer to the scanner’s manual or a reliable online database for detailed descriptions of each DTC.
2.4. Understanding Diagnostic Trouble Codes (DTCs)
DTCs are standardized codes that help identify the source of a vehicle’s problem. Understanding the structure and categories of DTCs is crucial for accurate diagnosis.
-
Code Structure: A typical DTC consists of five characters:
- The first character indicates the system:
- P: Powertrain (engine, transmission)
- B: Body (interior, exterior)
- C: Chassis (brakes, suspension)
- U: Network (communication)
- The second character indicates whether the code is generic or manufacturer-specific:
- 0: Generic (SAE) code
- 1: Manufacturer-specific code
- The third character indicates the subsystem:
- 1: Fuel and air metering
- 2: Fuel and air metering (injector circuit)
- 3: Ignition system
- 4: Auxiliary emission controls
- 5: Vehicle speed and idle control
- 6: Computer output circuit
- 7: Transmission
- 8: Transmission
- The fourth and fifth characters are specific to the fault.
- The first character indicates the system:
-
Common DTC Categories:
- P0xxx: Generic powertrain codes
- P1xxx: Manufacturer-specific powertrain codes
- B0xxx: Generic body codes
- B1xxx: Manufacturer-specific body codes
- C0xxx: Generic chassis codes
- C1xxx: Manufacturer-specific chassis codes
- U0xxx: Generic network codes
- U1xxx: Manufacturer-specific network codes
2.5. Clearing Diagnostic Trouble Codes (DTCs)
After addressing the underlying issue, you can clear the DTCs using the scanner.
- Select “Erase Codes”: In the main menu, select the “Erase Codes” or “Clear Codes” option.
- Confirm Erasure: The scanner will prompt you to confirm the erasure.
- Verify Erasure: After clearing the codes, start the engine and check if the DTCs reappear. If they do, the underlying issue has not been resolved.
2.6. Interpreting Live Data Streams
Many Ontrack OBD2 scanners offer the ability to monitor live data streams, providing real-time information about various engine parameters.
- Select “Live Data”: In the main menu, select the “Live Data” or “Data Stream” option.
- Choose Parameters: Select the parameters you want to monitor, such as engine RPM, coolant temperature, and oxygen sensor readings.
- Monitor Data: Observe the data as the engine runs. Look for any abnormal readings or fluctuations.
- Analyze Data: Use the live data to diagnose intermittent issues or verify the effectiveness of repairs.
2.7. Additional Features and Functions
Advanced Ontrack OBD2 scanners may offer additional features and functions:
- Freeze Frame Data: Captures a snapshot of sensor data when a DTC is triggered.
- O2 Sensor Testing: Tests the performance of the oxygen sensors.
- EVAP System Testing: Tests the integrity of the evaporative emissions control system.
- Bi-Directional Control: Allows you to send commands to the vehicle’s computer to test specific components.
2.8. Best Practices for Using an OBD2 Scanner
To ensure accurate and reliable results, follow these best practices when using an OBD2 scanner:
- Read the Manual: Familiarize yourself with the scanner’s features and functions.
- Use Reliable Resources: Consult reputable online databases or repair manuals for DTC definitions and troubleshooting information.
- Verify Repairs: After making repairs, clear the DTCs and verify that they do not reappear.
- Stay Updated: Keep your scanner’s software updated to ensure compatibility with newer vehicles and access to the latest diagnostic information.
By understanding how an Ontrack OBD2 scanner works and following these best practices, you can effectively diagnose and address vehicle issues, saving time and money on repairs. Remember to visit OBD2-SCANNER.EDU.VN for more information and resources.
3. Why Choose an Ontrack OBD2 Scanner?
Choosing an Ontrack OBD2 scanner provides numerous advantages, making it a top choice for both professionals and DIY enthusiasts. These scanners, available at OBD2-SCANNER.EDU.VN, offer reliability, comprehensive diagnostics, and user-friendly features. Let’s examine the key benefits in detail.
3.1. Comprehensive Diagnostic Capabilities
Ontrack OBD2 scanners offer comprehensive diagnostic capabilities that go beyond basic code reading. These scanners can access a wide range of vehicle systems, including:
- Engine Control Module (ECM): Reads and clears engine-related DTCs, monitors live engine data, and performs component tests.
- Transmission Control Module (TCM): Diagnoses transmission issues, monitors transmission fluid temperature, and performs transmission adaptations.
- Anti-Lock Braking System (ABS): Reads ABS codes, tests ABS components, and performs ABS bleeding procedures.
- Supplemental Restraint System (SRS): Diagnoses airbag system issues and verifies system functionality.
- Body Control Module (BCM): Accesses body-related functions such as lighting, power windows, and door locks.
According to a study by the Society of Automotive Engineers (SAE), advanced diagnostic tools can reduce diagnostic time by up to 60% compared to manual methods.
3.2. User-Friendly Interface
Ontrack OBD2 scanners are designed with a user-friendly interface that makes them easy to use, even for beginners. Key features include:
- Intuitive Menus: Clear and logical menus that guide users through the diagnostic process.
- Large Display Screen: Easy-to-read display screens that show DTCs, live data, and test results.
- Multilingual Support: Support for multiple languages, making the scanners accessible to a wider range of users.
- One-Click Functions: Quick access to frequently used functions, such as code reading and clearing.
3.3. Extensive Vehicle Coverage
Ontrack OBD2 scanners offer extensive vehicle coverage, supporting a wide range of makes and models. These scanners are compatible with:
- Domestic Vehicles: Ford, GM, Chrysler
- European Vehicles: BMW, Mercedes-Benz, Audi, Volkswagen
- Asian Vehicles: Toyota, Honda, Nissan, Hyundai
- OBD1 and OBD2 Compliant Vehicles: Supports both older and newer vehicle models.
3.4. Real-Time Data Streaming
Real-time data streaming is a crucial feature of Ontrack OBD2 scanners, allowing users to monitor live engine parameters as the vehicle operates. This feature helps in:
- Identifying Intermittent Issues: Monitoring data fluctuations to diagnose problems that occur sporadically.
- Verifying Repairs: Ensuring that engine parameters are within normal ranges after repairs.
- Optimizing Performance: Adjusting engine settings based on real-time data to improve fuel efficiency and power.
3.5. Bi-Directional Control
Advanced Ontrack OBD2 scanners offer bi-directional control, which allows users to send commands to the vehicle’s computer to test specific components. This feature is useful for:
- Activating Solenoids: Testing the operation of solenoids in the engine, transmission, and other systems.
- Cycling Relays: Checking the functionality of relays that control various electrical circuits.
- Performing Injector Kill Tests: Identifying faulty fuel injectors by disabling them one at a time.
- Resetting Adaptive Parameters: Resetting learned values in the engine and transmission control modules.
3.6. Software Updates and Support
Ontrack provides regular software updates for its OBD2 scanners, ensuring that they remain compatible with the latest vehicle models and diagnostic protocols. Benefits of these updates include:
- New Vehicle Coverage: Support for newly released vehicles and updated diagnostic information.
- Enhanced Code Definitions: Access to more detailed and accurate DTC definitions.
- Bug Fixes: Resolutions for software glitches and performance issues.
- Improved Functionality: Addition of new features and capabilities.
Additionally, Ontrack offers excellent customer support to assist users with any questions or issues they may encounter.
3.7. Durability and Reliability
Ontrack OBD2 scanners are built to withstand the rigors of daily use in automotive repair shops. These scanners feature:
- Rugged Construction: Durable housings that protect against impacts and drops.
- High-Quality Components: Reliable electronic components that ensure long-term performance.
- Ergonomic Design: Comfortable grips and intuitive button layouts that reduce user fatigue.
3.8. Cost-Effectiveness
While Ontrack OBD2 scanners offer advanced features and capabilities, they are also cost-effective solutions for vehicle diagnostics. By investing in an Ontrack scanner, users can:
- Reduce Diagnostic Costs: Perform their own diagnostics and avoid costly trips to the repair shop.
- Save Time on Repairs: Quickly identify and address vehicle issues, reducing downtime.
- Make Informed Decisions: Access detailed diagnostic information to make informed decisions about vehicle maintenance and repairs.
3.9. Enhancing Repair Efficiency with OBD2 Scanners
The effectiveness of OBD2 scanners in streamlining the vehicle repair process cannot be overstated. According to a study published in the “Journal of Automotive Engineering,” the use of OBD2 scanners can reduce diagnostic times by an average of 30%. This efficiency gain translates directly into cost savings for both repair shops and vehicle owners, as it minimizes labor hours and allows for quicker turnaround times.
Furthermore, the precision offered by OBD2 scanners helps in identifying the root cause of issues more accurately, reducing the likelihood of misdiagnosis and unnecessary repairs. This not only saves money but also enhances customer satisfaction by ensuring that repairs are done right the first time.
In summary, Ontrack OBD2 scanners stand out due to their comprehensive diagnostic capabilities, user-friendly interface, extensive vehicle coverage, real-time data streaming, bi-directional control, software updates, durability, and cost-effectiveness. These features make Ontrack scanners an excellent choice for anyone looking to diagnose and repair vehicles efficiently. Visit OBD2-SCANNER.EDU.VN for more information and to explore the range of available models.
4. Common Issues Diagnosed with an Ontrack OBD2 Scanner
An Ontrack OBD2 scanner, available at OBD2-SCANNER.EDU.VN, can diagnose a wide array of vehicle issues. From engine malfunctions to transmission problems, these scanners provide essential diagnostic information. Let’s explore some common issues that can be identified using an Ontrack OBD2 scanner.
4.1. Engine Misfires
Engine misfires are a common problem that can be easily diagnosed with an Ontrack OBD2 scanner. Symptoms of engine misfires include:
- Rough idling
- Reduced power
- Poor fuel economy
- Check engine light illumination
The OBD2 scanner will typically display codes such as P0300 (Random Misfire Detected), P0301 (Misfire Cylinder 1), P0302 (Misfire Cylinder 2), etc. These codes indicate which cylinder is misfiring, allowing technicians to focus their troubleshooting efforts.
Causes of Engine Misfires:
- Faulty spark plugs
- Defective ignition coils
- Clogged fuel injectors
- Vacuum leaks
- Low compression
4.2. Oxygen Sensor Failures
Oxygen sensors play a crucial role in monitoring the air-fuel mixture and ensuring proper engine operation. An Ontrack OBD2 scanner can diagnose oxygen sensor failures by displaying codes such as P0131 (O2 Sensor Circuit Low Voltage – Bank 1, Sensor 1) or P0171 (System Too Lean – Bank 1).
Symptoms of Oxygen Sensor Failures:
- Poor fuel economy
- Rough idling
- Increased emissions
- Check engine light illumination
4.3. Catalytic Converter Problems
The catalytic converter is responsible for reducing harmful emissions from the exhaust system. An Ontrack OBD2 scanner can diagnose catalytic converter problems by displaying codes such as P0420 (Catalyst System Efficiency Below Threshold – Bank 1).
Symptoms of Catalytic Converter Problems:
- Reduced engine power
- Poor fuel economy
- Increased emissions
- Check engine light illumination
4.4. Evaporative Emission Control System (EVAP) Leaks
EVAP leaks can cause fuel vapor to escape into the atmosphere, leading to increased emissions and potential fuel waste. An Ontrack OBD2 scanner can diagnose EVAP leaks by displaying codes such as P0440 (Evaporative Emission Control System Malfunction) or P0455 (Evaporative Emission Control System Leak Detected).
Symptoms of EVAP Leaks:
- Fuel odor
- Poor fuel economy
- Check engine light illumination
4.5. Transmission Issues
An Ontrack OBD2 scanner can also diagnose various transmission issues by accessing the Transmission Control Module (TCM). Common transmission codes include:
- P0700 (Transmission Control System Malfunction)
- P0715 (Input/Turbine Speed Sensor Circuit Malfunction)
- P0740 (Torque Converter Clutch Circuit Malfunction)
Symptoms of Transmission Issues:
- Rough shifting
- Slipping gears
- Delayed engagement
- Check engine light illumination
4.6. ABS and Brake System Problems
ABS and brake system problems can be diagnosed using an Ontrack OBD2 scanner by accessing the ABS module. Common ABS codes include:
- C0040 (Right Front Wheel Speed Sensor Circuit Malfunction)
- C0041 (Right Front Wheel Speed Sensor Circuit Range/Performance)
- C0265 (ABS Activation Relay Circuit Malfunction)
Symptoms of ABS and Brake System Problems:
- ABS light illumination
- Brake light illumination
- Reduced braking performance
- Uneven braking
4.7. Airbag System Malfunctions
Airbag system malfunctions can be diagnosed using an Ontrack OBD2 scanner by accessing the SRS module. Common airbag codes include:
- B0001 (Driver Air Bag Circuit Open)
- B0002 (Driver Air Bag Circuit Short to Ground)
- B0051 (Passenger Air Bag Circuit Open)
Symptoms of Airbag System Malfunctions:
- Airbag light illumination
- SRS light illumination
- Airbag system inoperative
4.8. Electrical System Faults
Electrical system faults, such as sensor malfunctions and wiring issues, can also be diagnosed using an Ontrack OBD2 scanner. These faults can trigger various DTCs depending on the specific circuit or component affected.
Symptoms of Electrical System Faults:
- Check engine light illumination
- Sensor malfunctions
- Wiring issues
- Intermittent problems
4.9. Addressing Diagnostic Challenges with Ontrack Scanners
Diagnosing modern vehicles can be complex due to the integration of numerous electronic systems. Ontrack OBD2 scanners help overcome these challenges by providing access to a wealth of diagnostic data and advanced testing capabilities. According to a report by the National Automotive Service Task Force (NASTF), proper training and equipment are essential for diagnosing and repairing modern vehicles effectively.
4.10. The Role of Regular Vehicle Diagnostics
Regular vehicle diagnostics play a crucial role in maintaining vehicle health and preventing costly repairs. By using an Ontrack OBD2 scanner to perform routine checks, vehicle owners and technicians can identify potential issues early and address them before they escalate. This proactive approach can improve fuel efficiency, reduce emissions, and extend the lifespan of the vehicle.
In summary, an Ontrack OBD2 scanner can diagnose a wide range of vehicle issues, from engine misfires and oxygen sensor failures to transmission problems and ABS malfunctions. These scanners provide essential diagnostic information, allowing technicians and vehicle owners to efficiently troubleshoot and repair their vehicles. Visit OBD2-SCANNER.EDU.VN for more information and to explore the range of available models.
5. Step-by-Step Guide to Using an Ontrack OBD2 Scanner
Using an Ontrack OBD2 scanner, available at OBD2-SCANNER.EDU.VN, can seem daunting, but with a step-by-step guide, it becomes straightforward. This guide will walk you through the process, ensuring you can effectively diagnose and maintain your vehicle.
5.1. Preparation: Gathering Necessary Tools and Information
Before you begin, gather the necessary tools and information:
- Ontrack OBD2 Scanner: Ensure it is fully charged or properly connected.
- Vehicle Owner’s Manual: To locate the OBD2 port and understand specific vehicle information.
- Trouble Code Database: A reliable source for looking up DTC definitions (online or manual).
- Basic Tools: Screwdrivers, wrenches, and other tools that may be needed for repairs.
5.2. Locating the OBD2 Port
The OBD2 port is typically located under the dashboard on the driver’s side. Common locations include:
- Under the steering column
- Near the center console
- Behind an access panel
Consult your vehicle’s owner’s manual if you are unsure of the port’s location.
5.3. Connecting the Scanner
- Turn Off the Ignition: Ensure the vehicle’s ignition is turned off.
- Plug in the Scanner: Firmly plug the scanner’s connector into the OBD2 port.
- Turn on the Ignition: Turn the ignition to the “on” position, but do not start the engine unless instructed by the scanner.
5.4. Powering On and Navigating the Scanner
- Power On: Most scanners will power on automatically when connected. If not, press the power button.
- Initial Setup: Some scanners may require initial setup, such as selecting the vehicle’s make, model, and year.
- Main Menu: Navigate to the main menu, which typically includes options like “Read Codes,” “Erase Codes,” “Live Data,” and “Vehicle Information.”
5.5. Reading Diagnostic Trouble Codes (DTCs)
- Select “Read Codes”: In the main menu, select the “Read Codes” or “Diagnostic Codes” option.
- View DTCs: The scanner will display a list of DTCs, each with a code and a brief description.
- Record DTCs: Write down the DTCs for further investigation.
- Consult the Manual: Refer to the scanner’s manual or a reliable online database for detailed descriptions of each DTC.
5.6. Interpreting DTCs
DTCs are standardized codes that help identify the source of a vehicle’s problem. Understanding the structure and categories of DTCs is crucial for accurate diagnosis.
-
Code Structure: A typical DTC consists of five characters:
- The first character indicates the system:
- P: Powertrain (engine, transmission)
- B: Body (interior, exterior)
- C: Chassis (brakes, suspension)
- U: Network (communication)
- The second character indicates whether the code is generic or manufacturer-specific:
- 0: Generic (SAE) code
- 1: Manufacturer-specific code
- The third character indicates the subsystem:
- 1: Fuel and air metering
- 2: Fuel and air metering (injector circuit)
- 3: Ignition system
- 4: Auxiliary emission controls
- 5: Vehicle speed and idle control
- 6: Computer output circuit
- 7: Transmission
- 8: Transmission
- The fourth and fifth characters are specific to the fault.
- The first character indicates the system:
-
Common DTC Examples:
- P0300: Random Misfire Detected
- P0171: System Too Lean – Bank 1
- P0420: Catalyst System Efficiency Below Threshold – Bank 1
5.7. Researching the Codes
Once you have the DTCs, research them using a reliable database or repair manual. This will provide you with:
- Detailed Description: A comprehensive explanation of what the code means.
- Possible Causes: A list of potential causes for the problem.
- Troubleshooting Steps: A series of steps to diagnose and repair the issue.
5.8. Performing the Necessary Repairs
Based on your research, perform the necessary repairs. This may involve:
- Replacing faulty components (e.g., spark plugs, oxygen sensors)
- Repairing wiring issues
- Cleaning or replacing sensors
- Addressing vacuum leaks
5.9. Clearing the Codes
After addressing the underlying issue, clear the DTCs using the scanner.
- Select “Erase Codes”: In the main menu, select the “Erase Codes” or “Clear Codes” option.
- Confirm Erasure: The scanner will prompt you to confirm the erasure.
- Verify Erasure: After clearing the codes, start the engine and check if the DTCs reappear. If they do, the underlying issue has not been resolved.
5.10. Verifying the Repair
To ensure the repair was successful:
- Start the Engine: Run the engine for a few minutes.
- Monitor Live Data: Use the scanner to monitor live data streams and ensure that engine parameters are within normal ranges.
- Check for DTCs: Verify that no new DTCs have been triggered.
- Test Drive: Take the vehicle for a test drive to ensure that the issue has been resolved under various driving conditions.
5.11. Advanced Features and Functions
Advanced Ontrack OBD2 scanners may offer additional features and functions:
- Freeze Frame Data: Captures a snapshot of sensor data when a DTC is triggered.
- O2 Sensor Testing: Tests the performance of the oxygen sensors.
- EVAP System Testing: Tests the integrity of the evaporative emissions control system.
- Bi-Directional Control: Allows you to send commands to the vehicle’s computer to test specific components.
5.12. Tips for Accurate Diagnostics
- Read the Manual: Familiarize yourself with the scanner’s features and functions.
- Use Reliable Resources: Consult reputable online databases or repair manuals for DTC definitions and troubleshooting information.
- Verify Repairs: After making repairs, clear the DTCs and verify that they do not reappear.
- Stay Updated: Keep your scanner’s software updated to ensure compatibility with newer vehicles and access to the latest diagnostic information.
5.13. Enhancing Vehicle Maintenance Through Regular Scanning
Regular scanning of your vehicle’s systems with an Ontrack OBD2 scanner can significantly enhance its maintenance. According to a study by AAA, vehicles that undergo regular maintenance checks are 28% less likely to experience a breakdown. By identifying potential issues early, you can prevent them from escalating into costly repairs.
In summary, using an Ontrack OBD2 scanner involves preparing the necessary tools, locating the OBD2 port, connecting the scanner, reading and interpreting DTCs, performing repairs, clearing the codes, and verifying the repair. By following these steps, you can effectively diagnose and maintain your vehicle. Visit OBD2-SCANNER.EDU.VN for more information and resources.
6. Advanced Features of Ontrack OBD2 Scanners
Ontrack OBD2 scanners, available at OBD2-SCANNER.EDU.VN, are equipped with advanced features that enhance diagnostic capabilities. These features provide deeper insights into vehicle health and enable more precise troubleshooting. Let’s explore these advanced functionalities in detail.
6.1. Real-Time Data Streaming
Real-time data streaming allows you to monitor live engine parameters as the vehicle operates. This feature provides valuable insights into:
- Engine Performance: Monitoring RPM, speed, and load to assess overall performance.
- Sensor Readings: Observing the values of various sensors, such as oxygen sensors, coolant temperature sensors, and mass airflow sensors.
- Fuel System: Monitoring fuel pressure, injector pulse width, and fuel trim values.
- Ignition System: Observing ignition timing and spark advance.
By analyzing real-time data, you can identify intermittent issues, verify repairs, and optimize engine performance.
6.2. Bi-Directional Control
Bi-directional control allows you to send commands to the vehicle’s computer to test specific components. This feature is useful for:
- Activating Solenoids: Testing the operation of solenoids in the engine, transmission, and other systems.
- Cycling Relays: Checking the functionality of relays that control various electrical circuits.
- Performing Injector Kill Tests: Identifying faulty fuel injectors by disabling them one at a time.
- Resetting Adaptive Parameters: Resetting learned values in the engine and transmission control modules.
Bi-directional control enables more precise diagnostics and helps verify the functionality of individual components.
6.3. Freeze Frame Data
Freeze frame data captures a snapshot of sensor data when a DTC is triggered. This feature provides valuable information about the conditions that led to the fault, including:
- Engine Speed: RPM at the time of the fault.
- Engine Load: Percentage of engine load.
- Coolant Temperature: Temperature of the engine coolant.
- Fuel Trim: Short-term and long-term fuel trim values.
By analyzing freeze frame data, you can gain a better understanding of the circumstances surrounding the fault and narrow down the possible causes.
6.4. O2 Sensor Testing
O2 sensor testing allows you to evaluate the performance of the oxygen sensors. This feature can help identify:
- Slow Response: Oxygen sensors that are slow to respond to changes in the air-fuel mixture.
- Stuck Sensors: Oxygen sensors that are stuck at a fixed voltage.
- Heater Circuit Issues: Problems with the oxygen sensor heater circuit.
Properly functioning oxygen sensors are essential for maintaining optimal fuel economy and reducing emissions.
6.5. EVAP System Testing
EVAP system testing allows you to evaluate the integrity of the evaporative emissions control system. This feature can help identify:
- Leaks: Leaks in the EVAP system that allow fuel vapor to escape into the atmosphere.
- Component Failures: Problems with the EVAP system components, such as the purge valve and vent valve.
A properly functioning EVAP system is essential for preventing fuel vapor emissions and maintaining compliance with environmental regulations.
6.6. ABS Diagnostics
ABS diagnostics allows you to access the ABS module and diagnose issues with the anti-lock braking system. This feature can help identify:
- Wheel Speed Sensor Issues: Problems with the wheel speed sensors that provide information about wheel rotation.
- Hydraulic Issues: Problems with the ABS hydraulic system, such as pump failures and valve malfunctions.
- Control Module Issues: Problems with the ABS control module.
6.7. SRS Diagnostics
SRS diagnostics allows you to access the SRS module and diagnose issues with the supplemental restraint system (airbags). This feature can help identify:
- Airbag Circuit Issues: Problems with the airbag circuits, such as open circuits and short circuits.
- Sensor Issues: Problems with the airbag sensors.
- Control Module Issues: Problems with the SRS control module.
6.8. Code Clearing and Resetting
Advanced Ontrack OBD2 scanners allow you to clear DTCs and reset various system parameters. This feature is useful for:
- Clearing DTCs: Erasing DTCs after addressing the underlying issue.
- Resetting Adaptive Parameters: Resetting learned values in the engine and transmission control modules.
- Performing Service Resets: Resetting maintenance reminders and service intervals.
6.9. Staying Ahead with OBD2 Technology
The field of automotive diagnostics is constantly evolving, with new technologies and diagnostic protocols being introduced regularly. Ontrack OBD2 scanners are designed to stay ahead of these changes by providing regular software updates and support for the latest vehicle models.
6.10. Enhancing Diagnostic Accuracy with Advanced Features
The advanced features of Ontrack OBD2 scanners significantly enhance diagnostic accuracy. According to a study by the Automotive Research Association of India (ARAI), the use of advanced diagnostic tools can improve diagnostic accuracy by up to