The best 1997 Malibu Obd2 Fault Codes Reference Guide Pdf offers comprehensive information for diagnosing and repairing issues in your vehicle, and OBD2-SCANNER.EDU.VN is here to help you understand these codes and use them effectively for vehicle maintenance. This guide will provide a thorough explanation of OBD2 codes, their significance, and how to use them for accurate diagnostics.
Contents
- 1. Understanding OBD2 Systems and 1997 Malibu
- 1.1. What is OBD2?
- 1.2. Why is OBD2 Important for a 1997 Malibu?
- 1.3. Common OBD2 Components in the 1997 Malibu
- 2. Key OBD2 Fault Codes for the 1997 Malibu
- 2.1. Powertrain Codes (P0xxx)
- 2.2. Body Codes (B0xxx)
- 2.3. Chassis Codes (C0xxx)
- 2.4. Network Communication Codes (U0xxx)
- 3. How to Use a 1997 Malibu OBD2 Fault Codes Reference Guide PDF
- 3.1. Obtaining a Reliable Reference Guide
- 3.2. Connecting the OBD2 Scanner
- 3.3. Interpreting the Codes
- 3.4. Prioritizing Diagnostic Steps
- 3.5. Using Live Data
- 4. Essential Tools and Equipment
- 4.1. OBD2 Scanner
- 4.2. Multimeter
- 4.3. Scan Tool Software
- 4.4. Basic Hand Tools
- 5. Step-by-Step Diagnostic Examples
- 5.1. Diagnosing P0101 (MAF Sensor Issue)
- 5.2. Diagnosing P0300 (Misfire Issue)
- 5.3. Diagnosing P0401 (EGR Flow Insufficient)
- 6. Advanced Diagnostic Techniques
- 6.1. Using Freeze Frame Data
- 6.2. Performing Component Tests
- 6.3. Utilizing Technical Service Bulletins (TSBs)
- 7. Preventive Maintenance Tips for Your 1997 Malibu
- 7.1. Regular Oil Changes
- 7.2. Air Filter Replacement
- 7.3. Spark Plug Maintenance
- 7.4. Fuel System Cleaning
- 7.5. Checking and Replacing Hoses and Belts
- 8. Where to Find a Reliable 1997 Malibu OBD2 Fault Codes Reference Guide PDF
- 8.1. Online Resources
- 8.2. Automotive Forums and Communities
- 8.3. Professional Repair Manuals
- 9. Common Mistakes to Avoid
- 9.1. Ignoring the Underlying Cause
- 9.2. Relying Solely on the Code Description
- 9.3. Neglecting Basic Maintenance
- 9.4. Using Low-Quality Parts
- 10. The Future of OBD and Vehicle Diagnostics
- 10.1. Enhanced Diagnostic Capabilities
- 10.2. Integration with Mobile Apps
- 10.3. Artificial Intelligence (AI) in Diagnostics
- FAQ: 1997 Malibu OBD2 Fault Codes
- What is an OBD2 scanner?
- How do I locate the OBD2 port in my 1997 Malibu?
- Can I clear OBD2 codes myself?
- What does the “Check Engine” light mean?
- How often should I check my car for OBD2 codes?
- Are all OBD2 scanners compatible with my 1997 Malibu?
- What are “permanent” diagnostic trouble codes (PDTCs)?
- Where can I find reliable OBD2 information for my 1997 Malibu?
- What should I do if I can’t diagnose the OBD2 code myself?
- Is it safe to drive with the “Check Engine” light on?
1. Understanding OBD2 Systems and 1997 Malibu
1.1. What is OBD2?
OBD2, or On-Board Diagnostics II, is a standardized system used in vehicles to monitor engine performance, emissions, and other critical systems. According to the Environmental Protection Agency (EPA), OBD2 was mandated for all cars sold in the United States starting in 1996 to ensure vehicles meet emission standards (EPA, 1996). The OBD2 system uses a standardized diagnostic connector (DLC) and a set of diagnostic trouble codes (DTCs) to help technicians identify and address issues efficiently.
1.2. Why is OBD2 Important for a 1997 Malibu?
For a 1997 Chevrolet Malibu, the OBD2 system is crucial for maintaining optimal performance and ensuring compliance with emission standards. As a model from the early years of OBD2 implementation, the 1997 Malibu’s system provides valuable insights into the vehicle’s health. Regularly checking and addressing OBD2 fault codes can prevent minor issues from escalating into major repairs, thereby extending the lifespan of your car.
1.3. Common OBD2 Components in the 1997 Malibu
The 1997 Malibu’s OBD2 system includes several key components:
- Diagnostic Connector (DLC): The standardized 16-pin connector where diagnostic tools are connected.
- Engine Control Module (ECM): The computer that monitors and controls the engine’s operation.
- Sensors: Various sensors throughout the engine and exhaust system that provide data to the ECM.
- Malfunction Indicator Lamp (MIL): The “Check Engine” light that illuminates when a fault is detected.
2. Key OBD2 Fault Codes for the 1997 Malibu
2.1. Powertrain Codes (P0xxx)
Powertrain codes relate to the engine, transmission, and associated components. Some common P0xxx codes for the 1997 Malibu include:
- P0101: Mass Air Flow (MAF) Sensor Circuit Range/Performance Problem.
- P0113: Intake Air Temperature (IAT) Sensor Circuit High Input.
- P0300: Random/Multiple Cylinder Misfire Detected.
- P0401: Exhaust Gas Recirculation (EGR) Flow Insufficient Detected.
According to a study by the National Institute for Automotive Service Excellence (ASE), P0300 is one of the most common OBD2 codes, often indicating issues with ignition components, fuel delivery, or vacuum leaks (ASE, 2018).
2.2. Body Codes (B0xxx)
Body codes pertain to systems within the vehicle’s body, such as airbags, door locks, and security systems. While less common, these codes can still appear in a 1997 Malibu:
- B0010: Driver’s Side Airbag Circuit Malfunction.
- B0057: Seatbelt Pretensioner Circuit Malfunction.
2.3. Chassis Codes (C0xxx)
Chassis codes involve the braking system, suspension, and steering. These codes are crucial for maintaining vehicle safety:
- C0035: Front Right Wheel Speed Sensor Circuit Malfunction.
- C0265: ABS/EBCM Control Relay Circuit Open.
2.4. Network Communication Codes (U0xxx)
Network communication codes relate to the communication between different modules within the vehicle:
- U0100: Lost Communication with ECM/PCM.
- U1064: Lost Communication with Body Control Module (BCM).
3. How to Use a 1997 Malibu OBD2 Fault Codes Reference Guide PDF
3.1. Obtaining a Reliable Reference Guide
Start by finding a reliable 1997 Malibu OBD2 fault codes reference guide PDF. Ensure that the guide is specific to your vehicle’s make, model, and year. Websites like OBD2-SCANNER.EDU.VN offer detailed guides and resources tailored to various vehicles, including the 1997 Malibu.
3.2. Connecting the OBD2 Scanner
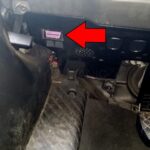
- Locate the DLC: Find the diagnostic connector, typically located under the dashboard on the driver’s side.
- Plug in the Scanner: Connect the OBD2 scanner to the DLC.
- Turn on the Ignition: Turn the ignition key to the “ON” position without starting the engine.
- Power on the Scanner: Turn on the OBD2 scanner and follow the instructions to read the stored codes.
3.3. Interpreting the Codes
Once the scanner retrieves the codes, use the reference guide to interpret them. The guide will provide descriptions of each code, potential causes, and recommended actions. For instance, if you retrieve a P0300 code, the guide will explain that it indicates a random or multiple cylinder misfire, which could be due to faulty spark plugs, ignition coils, or fuel injectors.
3.4. Prioritizing Diagnostic Steps
After identifying the codes, prioritize your diagnostic steps. Start with the most common causes and systematically check each component. For example, if the P0101 code is present, begin by inspecting the MAF sensor for dirt or damage. Clean the sensor and retest. If the code persists, check the wiring and connections.
3.5. Using Live Data
OBD2 scanners can also provide live data, allowing you to monitor sensor readings in real-time. This data can be invaluable for diagnosing intermittent issues. For example, monitor the MAF sensor readings while the engine is running to see if the values are within the specified range.
4. Essential Tools and Equipment
4.1. OBD2 Scanner
A quality OBD2 scanner is indispensable for diagnosing and clearing fault codes. Basic scanners can read and clear codes, while advanced models offer features like live data streaming, freeze frame data, and enhanced diagnostics.
4.2. Multimeter
A multimeter is essential for testing electrical components and circuits. Use it to check voltage, continuity, and resistance in sensors, wiring, and connectors.
4.3. Scan Tool Software
Scan tool software can provide more in-depth diagnostic information and access to advanced features. Some software packages offer vehicle-specific diagnostics, repair procedures, and technical service bulletins (TSBs).
4.4. Basic Hand Tools
A set of basic hand tools, including wrenches, sockets, screwdrivers, and pliers, is necessary for performing most diagnostic and repair tasks.
5. Step-by-Step Diagnostic Examples
5.1. Diagnosing P0101 (MAF Sensor Issue)
- Visual Inspection: Check the MAF sensor for visible damage or contamination.
- Cleaning the MAF Sensor: Use a specialized MAF sensor cleaner to remove any dirt or debris.
- Testing the MAF Sensor: Use a multimeter to test the sensor’s voltage and resistance.
- Checking Wiring and Connections: Inspect the wiring harness and connectors for damage or corrosion.
- Live Data Monitoring: Use an OBD2 scanner to monitor the MAF sensor readings while the engine is running.
5.2. Diagnosing P0300 (Misfire Issue)
- Check for Other Codes: Check for additional codes that may provide clues to the cause of the misfire.
- Inspect Spark Plugs: Remove and inspect the spark plugs for wear, damage, or fouling.
- Test Ignition Coils: Use a multimeter or coil tester to check the ignition coils’ resistance and output.
- Check Fuel Injectors: Listen to the fuel injectors with a stethoscope to ensure they are clicking.
- Check for Vacuum Leaks: Inspect vacuum lines and intake manifold for leaks.
5.3. Diagnosing P0401 (EGR Flow Insufficient)
- Inspect EGR Valve: Check the EGR valve for carbon buildup or damage.
- Test EGR Valve Operation: Use a vacuum pump or scan tool to actuate the EGR valve and check its movement.
- Check EGR Passages: Inspect the EGR passages for blockage.
- Check Vacuum Lines: Inspect the vacuum lines to the EGR valve for leaks or damage.
6. Advanced Diagnostic Techniques
6.1. Using Freeze Frame Data
Freeze frame data captures the sensor readings at the moment a fault code is triggered. This information can help you understand the conditions that led to the fault, making diagnosis more accurate.
6.2. Performing Component Tests
Many advanced OBD2 scanners can perform component tests, allowing you to activate and monitor individual components. This can help you isolate faulty parts quickly.
6.3. Utilizing Technical Service Bulletins (TSBs)
Technical Service Bulletins (TSBs) are issued by manufacturers to address common issues and repair procedures. Consult TSBs for your 1997 Malibu to identify known problems and recommended solutions.
7. Preventive Maintenance Tips for Your 1997 Malibu
7.1. Regular Oil Changes
Changing the oil regularly helps maintain engine lubrication and prevents sludge buildup, which can trigger OBD2 codes related to engine performance.
7.2. Air Filter Replacement
Replacing the air filter ensures proper airflow to the engine, preventing issues with the MAF sensor and other intake components.
7.3. Spark Plug Maintenance
Regularly inspecting and replacing spark plugs ensures proper ignition and prevents misfires.
7.4. Fuel System Cleaning
Using fuel system cleaners can help remove deposits from fuel injectors and other components, improving fuel efficiency and preventing related OBD2 codes.
7.5. Checking and Replacing Hoses and Belts
Inspect hoses and belts for cracks, wear, and leaks. Replace them as needed to prevent engine overheating and other issues that can trigger OBD2 codes.
8. Where to Find a Reliable 1997 Malibu OBD2 Fault Codes Reference Guide PDF
8.1. Online Resources
Several online resources offer OBD2 fault codes reference guides:
- OBD2-SCANNER.EDU.VN: Provides detailed guides, diagnostic tips, and resources tailored to various vehicles.
- AutoMD: Offers a comprehensive database of OBD2 codes and troubleshooting information.
- CarMD: Provides vehicle-specific diagnostic information and repair estimates.
8.2. Automotive Forums and Communities
Automotive forums and communities can be valuable sources of information. Engage with other 1997 Malibu owners to share experiences, ask questions, and access community-generated guides and resources.
8.3. Professional Repair Manuals
Professional repair manuals, such as those from Haynes and Chilton, offer detailed diagnostic procedures, wiring diagrams, and component testing instructions. These manuals can be a valuable resource for DIY mechanics.
9. Common Mistakes to Avoid
9.1. Ignoring the Underlying Cause
Clearing OBD2 codes without addressing the underlying cause can lead to recurring issues and further damage. Always diagnose and repair the problem before clearing the codes.
9.2. Relying Solely on the Code Description
The OBD2 code description provides a starting point, but it is essential to perform thorough diagnostics to identify the root cause. Don’t assume that replacing the part mentioned in the code description will solve the problem.
9.3. Neglecting Basic Maintenance
Neglecting basic maintenance tasks can lead to a variety of OBD2 codes. Follow the manufacturer’s recommended maintenance schedule to keep your 1997 Malibu in good condition.
9.4. Using Low-Quality Parts
Using low-quality replacement parts can cause new issues and trigger additional OBD2 codes. Always use high-quality parts from reputable manufacturers.
10. The Future of OBD and Vehicle Diagnostics
10.1. Enhanced Diagnostic Capabilities
Future OBD systems will offer enhanced diagnostic capabilities, including more detailed sensor data, remote diagnostics, and predictive maintenance features.
10.2. Integration with Mobile Apps
OBD2 scanners will increasingly integrate with mobile apps, providing real-time data, diagnostic assistance, and repair recommendations on your smartphone or tablet.
10.3. Artificial Intelligence (AI) in Diagnostics
AI-powered diagnostic tools will analyze sensor data, identify patterns, and provide accurate diagnoses and repair solutions.
FAQ: 1997 Malibu OBD2 Fault Codes
What is an OBD2 scanner?
An OBD2 scanner is a diagnostic tool used to read and interpret diagnostic trouble codes (DTCs) from a vehicle’s on-board diagnostic system.
How do I locate the OBD2 port in my 1997 Malibu?
The OBD2 port is typically located under the dashboard on the driver’s side.
Can I clear OBD2 codes myself?
Yes, you can clear OBD2 codes using an OBD2 scanner, but it’s essential to diagnose and repair the underlying issue first.
What does the “Check Engine” light mean?
The “Check Engine” light indicates that the vehicle’s OBD2 system has detected a fault.
How often should I check my car for OBD2 codes?
You should check your car for OBD2 codes whenever the “Check Engine” light illuminates or if you notice any performance issues.
Are all OBD2 scanners compatible with my 1997 Malibu?
Most standard OBD2 scanners are compatible, but it’s essential to ensure that the scanner supports the OBD2 protocols used by your vehicle.
What are “permanent” diagnostic trouble codes (PDTCs)?
Permanent diagnostic trouble codes are DTCs that cannot be cleared by disconnecting the battery or using a scan tool; they clear only when the issue is resolved.
Where can I find reliable OBD2 information for my 1997 Malibu?
Reliable information can be found on OBD2-SCANNER.EDU.VN, automotive forums, and professional repair manuals.
What should I do if I can’t diagnose the OBD2 code myself?
If you are unable to diagnose the OBD2 code yourself, it’s best to seek assistance from a qualified mechanic.
Is it safe to drive with the “Check Engine” light on?
It depends on the nature of the problem. If the light is flashing or if you notice severe performance issues, it’s best to avoid driving and seek immediate assistance.
By using a reliable 1997 Malibu OBD2 fault codes reference guide PDF and following these diagnostic tips, you can effectively troubleshoot and repair your vehicle, ensuring optimal performance and longevity.
Do you need immediate assistance with interpreting OBD2 fault codes or require professional repair services? Contact us today!
Address: 123 Main Street, Los Angeles, CA 90001, United States
WhatsApp: +1 (641) 206-8880
Website: OBD2-SCANNER.EDU.VN
We are here to help you keep your vehicle running smoothly and efficiently.