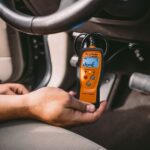
The 2002 Land Rover Discovery Obd2 Location is typically under the dashboard on the driver’s side. Locating your OBD2 port on your 2002 Land Rover Discovery is the initial step toward diagnosing any potential car problems with an OBD II scanner, and OBD2-SCANNER.EDU.VN provides a comprehensive guide to assist you. We also offer in-depth information and guidance to help you understand and address diagnostic trouble codes (DTCs) and utilize diagnostic scanning tools effectively. Utilizing OBD II scanners and diagnostic port, repair procedures, and vehicle maintenance, are essential for every car owner.
Contents
- 1. Understanding the OBD2 Port on Your 2002 Land Rover Discovery
- 1.1. What is an OBD2 Port?
- 1.2. Why is the OBD2 Port Important?
- 1.3. Standard Location of OBD2 Port
- 1.4. Finding the OBD2 Port in Your 2002 Land Rover Discovery
- 1.5. What to Do If You Can’t Find the OBD2 Port?
- 2. Step-by-Step Guide to Using an OBD2 Scanner on Your 2002 Land Rover Discovery
- 2.1. What You’ll Need
- 2.2. Step-by-Step Instructions
- 2.3. Understanding Common OBD2 Codes for Land Rover Discovery
- 2.4. Tips for Accurate Readings
- 3. Common OBD2 Codes and Their Meanings for Land Rover Discovery
- 3.1. Powertrain Codes (P0xxx)
- 3.2. Body Codes (B0xxx)
- 3.3. Chassis Codes (C0xxx)
- 3.4. Network Communication Codes (U0xxx)
- 3.5. Detailed Look at Specific Codes
- 3.5.1. P0171 and P0174 – System Too Lean (Bank 1 and Bank 2)
- 3.5.2. P0300 – Random Misfire Detected
- 3.5.3. P0420 – Catalyst System Efficiency Below Threshold (Bank 1)
- 3.6. Resources for Decoding OBD2 Codes
- 4. Benefits of Using OBD2 Scanner for Your 2002 Land Rover Discovery
- 4.1. Early Problem Detection
- 4.2. Cost Savings
- 4.3. Improved Performance
- 4.4. DIY Repairs
- 4.5. Informed Decision-Making
- 5. Choosing the Right OBD2 Scanner for Your Needs
- 5.1. Basic Code Readers
- 5.2. Enhanced Scanners
- 5.3. Professional-Grade Scanners
- 5.4. Factors to Consider
- 6. Maintaining Your 2002 Land Rover Discovery
- 6.1. Regular Maintenance Tasks
- 6.2. Tips for Long-Term Reliability
- 6.3. The Role of OBD2 Scanners in Maintenance
- 7. Advanced Diagnostics with OBD2 Scanners
- 7.1. Live Data Streaming
- 7.2. Graphing
- 7.3. Bi-Directional Control
- 7.4. Diagnostic Tests
- 8. When to Consult a Professional Mechanic
- 8.1. Complex Issues
- 8.2. Safety-Related Issues
- 8.3. Lack of Experience
- 8.4. Specialized Tools
- 9. Ensuring Proper Maintenance and Repairs
- 9.1. Finding a Reputable Mechanic
- 9.2. Understanding Repair Estimates
- 9.3. Documenting Repairs
- 10. Addressing Common Issues with Your 2002 Land Rover Discovery
- 10.1. Engine Problems
- 10.2. Transmission Problems
- 10.3. Electrical Problems
- 10.4. Suspension Problems
- FAQ: Your Questions About OBD2 Scanners and the 2002 Land Rover Discovery Answered
1. Understanding the OBD2 Port on Your 2002 Land Rover Discovery
1.1. What is an OBD2 Port?
The OBD2 (On-Board Diagnostics II) port is a standardized interface used to access the vehicle’s computer for diagnostics and monitoring. According to the Environmental Protection Agency (EPA), all cars sold in the United States since 1996 are required to have an OBD2 port. This standardization allows mechanics and vehicle owners to use a single tool to diagnose a wide range of vehicles, making car maintenance more accessible.
1.2. Why is the OBD2 Port Important?
The OBD2 port is essential for several reasons:
- Diagnostics: It allows mechanics and car owners to read diagnostic trouble codes (DTCs) that indicate problems within the vehicle.
- Monitoring: It provides real-time data about the vehicle’s performance, such as engine temperature, speed, and fuel efficiency.
- Maintenance: It helps in identifying potential issues before they become major problems, allowing for timely maintenance and repairs.
1.3. Standard Location of OBD2 Port
While the OBD2 port is generally located under the dashboard on the driver’s side, the exact location can vary. Here are some common locations:
- Under the dashboard, near the steering column: This is a very common location, easily accessible to the driver.
- Inside the glove compartment: Some vehicles have the OBD2 port inside the glove compartment for a cleaner look.
- Behind a panel near the center console: In some models, the port is hidden behind a small panel that needs to be opened.
- Near the fuse box: Occasionally, the OBD2 port is located near the fuse box, which is often under the dashboard or in the engine compartment.
1.4. Finding the OBD2 Port in Your 2002 Land Rover Discovery
To find the OBD2 port in your 2002 Land Rover Discovery:
- Check Under the Dashboard: Start by looking under the dashboard on the driver’s side. Use a flashlight to get a better view.
- Look for a 16-Pin Connector: The OBD2 port is a 16-pin connector, usually trapezoidal.
- Consult the Vehicle’s Manual: If you are having trouble locating the port, consult the vehicle’s manual for specific instructions.
1.5. What to Do If You Can’t Find the OBD2 Port?
If you’ve checked all the common locations and still can’t find the OBD2 port, here are some steps to take:
- Double-Check the Manual: Make sure you are looking in the correct area as indicated by the manual.
- Seek Assistance: Contact a local mechanic or Land Rover dealer. They can help you locate the port.
2. Step-by-Step Guide to Using an OBD2 Scanner on Your 2002 Land Rover Discovery
2.1. What You’ll Need
- OBD2 Scanner: A compatible OBD2 scanner. These can range from basic code readers to advanced diagnostic tools.
- Vehicle’s Manual: For reference, to understand specific codes and locations.
2.2. Step-by-Step Instructions
-
Locate the OBD2 Port:
- As mentioned, the OBD2 port is typically located under the dashboard on the driver’s side. Refer to your vehicle’s manual if needed.
-
Prepare Your Vehicle:
- Turn off the ignition.
- Ensure the vehicle is in Park (P) and the parking brake is engaged.
-
Plug in the OBD2 Scanner:
- Insert the OBD2 scanner into the port. Make sure it fits snugly.
-
Turn on the Ignition:
- Turn the ignition to the “ON” position without starting the engine. This provides power to the scanner.
-
Power on the Scanner:
- The scanner should power on automatically. If not, check the power button and ensure it is properly connected.
-
Navigate the Scanner Menu:
- Use the scanner’s menu to select the appropriate options. Common options include “Read Codes,” “Erase Codes,” and “Live Data.”
-
Read Diagnostic Trouble Codes (DTCs):
- Select “Read Codes” to view any stored DTCs. The scanner will display the codes and, in some cases, a brief description of the problem.
- According to a study by the National Institute for Automotive Service Excellence (ASE), accurately reading and interpreting DTCs is crucial for effective vehicle diagnostics.
-
Record the Codes:
- Write down the DTCs and their descriptions. This information will be useful for further diagnosis and repair.
-
Research the Codes:
- Use online resources, repair manuals, or OBD2-SCANNER.EDU.VN to research the meaning of each code. Understanding the codes will help you determine the next steps.
-
Clear the Codes (Optional):
- If you want to clear the codes, select “Erase Codes” from the scanner menu. Be cautious, as this will also reset the vehicle’s computer. It’s a good idea to record the codes before clearing them.
-
Turn Off the Ignition and Remove the Scanner:
- Turn off the ignition and remove the OBD2 scanner from the port.
2.3. Understanding Common OBD2 Codes for Land Rover Discovery
Here are some common OBD2 codes that might appear on your Land Rover Discovery, along with potential causes and solutions:
| Code | Description | Possible Causes | Solutions |
|---|---|---|---|
| P0171 | System Too Lean (Bank 1) | Vacuum leak, faulty MAF sensor, fuel pump issue | Check for vacuum leaks, replace MAF sensor, check fuel pump |
| P0174 | System Too Lean (Bank 2) | Vacuum leak, faulty MAF sensor, fuel pump issue | Check for vacuum leaks, replace MAF sensor, check fuel pump |
| P0300 | Random/Multiple Cylinder Misfire Detected | Worn spark plugs, ignition coil issue, vacuum leak | Replace spark plugs, check ignition coils, check for vacuum leaks |
| P0420 | Catalyst System Efficiency Below Threshold (Bank 1) | Faulty catalytic converter, faulty oxygen sensor, exhaust leak | Replace catalytic converter, replace oxygen sensor, check for exhaust leaks |
| P0440 | Evaporative Emission Control System Malfunction | Faulty gas cap, leak in EVAP system, faulty purge valve | Check gas cap, check EVAP system for leaks, replace purge valve |
| P0507 | Idle Air Control System RPM Higher Than Expected | Faulty IAC valve, vacuum leak, throttle body issue | Replace IAC valve, check for vacuum leaks, clean throttle body |
| P1313/ P1314 | Catalyst Damage Fault | Misfire Detected | Check engine for misfires, check for fuel or exhaust leak issues, check catalytic converter. |
2.4. Tips for Accurate Readings
- Use a Quality Scanner: Invest in a good quality OBD2 scanner for more accurate and reliable readings.
- Ensure Proper Connection: Make sure the scanner is securely connected to the OBD2 port.
- Keep Your Vehicle Maintained: Regular maintenance can prevent false codes caused by minor issues.
- Consult Professionals: If you’re unsure about a code, consult a professional mechanic.
3. Common OBD2 Codes and Their Meanings for Land Rover Discovery
3.1. Powertrain Codes (P0xxx)
Powertrain codes relate to the engine, transmission, and related components. Here are some common ones:
- P0101 – Mass Air Flow (MAF) Sensor Circuit Range/Performance Problem: This code indicates an issue with the MAF sensor, which measures the amount of air entering the engine. Possible causes include a dirty or faulty MAF sensor, vacuum leaks, or wiring issues.
- P0113 – Intake Air Temperature Sensor 1 Circuit High: This code suggests that the intake air temperature sensor is reading higher than expected. Common causes include a faulty sensor or wiring problems.
- P0300 – Random Misfire Detected: This code indicates that the engine is experiencing random misfires. Potential causes include worn spark plugs, faulty ignition coils, vacuum leaks, or low fuel pressure.
3.2. Body Codes (B0xxx)
Body codes relate to the vehicle’s body systems, such as airbags, power windows, and security systems.
- B0081 – Driver Frontal Stage 1 Air Bag Deployment Control: This code indicates a problem with the driver’s side airbag system. Possible causes include wiring issues, a faulty airbag module, or a defective sensor.
3.3. Chassis Codes (C0xxx)
Chassis codes pertain to the vehicle’s chassis systems, such as ABS (Anti-lock Braking System) and traction control.
- C0040 – Right Front Wheel Speed Sensor Circuit Malfunction: This code indicates an issue with the right front wheel speed sensor, which is part of the ABS system. Possible causes include a faulty sensor, wiring problems, or a defective ABS module.
3.4. Network Communication Codes (U0xxx)
Network communication codes relate to communication issues between the vehicle’s various electronic control units (ECUs).
- U0100 – Lost Communication with ECM/PCM “A”: This code indicates a loss of communication with the engine control module (ECM) or powertrain control module (PCM). Possible causes include wiring issues, a faulty ECM/PCM, or a problem with the CAN bus.
3.5. Detailed Look at Specific Codes
Let’s delve deeper into some of the more common codes you might encounter:
3.5.1. P0171 and P0174 – System Too Lean (Bank 1 and Bank 2)
These codes indicate that the engine is running lean, meaning there is too much air and not enough fuel in the air-fuel mixture. Common causes include:
- Vacuum Leaks: Leaks in vacuum lines, intake manifold gaskets, or PCV hoses can allow extra air into the engine.
- Faulty MAF Sensor: A malfunctioning MAF sensor can provide incorrect readings to the ECM, leading to a lean condition.
- Fuel Pump Issues: A weak fuel pump or clogged fuel filter can restrict fuel flow to the engine.
- Faulty Oxygen Sensors: Inaccurate readings from oxygen sensors can cause the ECM to miscalculate the air-fuel mixture.
Troubleshooting Steps:
- Check for Vacuum Leaks: Inspect all vacuum lines and hoses for cracks or damage. Use a smoke machine to detect hard-to-find leaks.
- Test the MAF Sensor: Use a multimeter to check the MAF sensor’s voltage and compare it to the manufacturer’s specifications.
- Check Fuel Pressure: Use a fuel pressure gauge to ensure the fuel pump is delivering the correct pressure.
- Inspect Oxygen Sensors: Use an OBD2 scanner to monitor the oxygen sensors’ readings and check for any abnormalities.
3.5.2. P0300 – Random Misfire Detected
This code indicates that the engine is experiencing random misfires across multiple cylinders. Possible causes include:
- Worn Spark Plugs: Old or worn spark plugs can cause misfires.
- Faulty Ignition Coils: A failing ignition coil can prevent a spark plug from firing.
- Vacuum Leaks: Vacuum leaks can disrupt the air-fuel mixture and cause misfires.
- Low Fuel Pressure: Insufficient fuel pressure can lead to misfires.
- Faulty Fuel Injectors: Clogged or malfunctioning fuel injectors can cause misfires.
Troubleshooting Steps:
- Inspect Spark Plugs: Check the condition of the spark plugs and replace them if necessary.
- Test Ignition Coils: Use a multimeter to check the resistance of the ignition coils.
- Check for Vacuum Leaks: Inspect vacuum lines and hoses for leaks.
- Check Fuel Pressure: Use a fuel pressure gauge to ensure the fuel pump is delivering the correct pressure.
- Inspect Fuel Injectors: Use a fuel injector tester to check the performance of the fuel injectors.
3.5.3. P0420 – Catalyst System Efficiency Below Threshold (Bank 1)
This code indicates that the catalytic converter is not functioning efficiently. Possible causes include:
- Faulty Catalytic Converter: The catalytic converter may be worn out or damaged.
- Faulty Oxygen Sensors: Inaccurate readings from oxygen sensors can cause the ECM to miscalculate the air-fuel mixture.
- Exhaust Leaks: Leaks in the exhaust system can affect the catalytic converter’s performance.
- Misfires: Unresolved misfires can damage the catalytic converter over time.
Troubleshooting Steps:
- Inspect the Catalytic Converter: Check for physical damage or excessive heat.
- Test Oxygen Sensors: Use an OBD2 scanner to monitor the oxygen sensors’ readings.
- Check for Exhaust Leaks: Inspect the exhaust system for leaks.
- Address Misfires: Resolve any misfire issues before replacing the catalytic converter.
3.6. Resources for Decoding OBD2 Codes
To effectively troubleshoot OBD2 codes, it’s important to have access to reliable resources. Here are some valuable resources:
- OBD2-SCANNER.EDU.VN: Our website offers a comprehensive database of OBD2 codes, along with detailed descriptions, possible causes, and troubleshooting steps.
- Vehicle Repair Manuals: Repair manuals specific to your Land Rover Discovery provide detailed information about the vehicle’s systems and components.
- Online Forums: Online forums dedicated to Land Rover vehicles can be a great resource for sharing information and troubleshooting tips with other owners.
4. Benefits of Using OBD2 Scanner for Your 2002 Land Rover Discovery
4.1. Early Problem Detection
An OBD2 scanner can help you detect minor issues before they escalate into major problems. Regular scanning allows you to monitor your vehicle’s performance and address any issues promptly.
4.2. Cost Savings
By identifying and addressing problems early, you can avoid costly repairs down the road. Regular maintenance and timely repairs can extend the life of your vehicle and save you money in the long run.
4.3. Improved Performance
Using an OBD2 scanner helps ensure that your vehicle is running optimally. Addressing issues such as misfires, vacuum leaks, and sensor malfunctions can improve your vehicle’s performance and fuel efficiency.
4.4. DIY Repairs
An OBD2 scanner empowers you to perform your own repairs. By reading and understanding the diagnostic codes, you can tackle many common issues yourself, saving on labor costs.
4.5. Informed Decision-Making
Having access to diagnostic information allows you to make informed decisions about your vehicle’s maintenance and repairs. You can prioritize repairs based on the severity of the issues and avoid unnecessary services.
5. Choosing the Right OBD2 Scanner for Your Needs
5.1. Basic Code Readers
Basic code readers are inexpensive and easy to use. They can read and clear diagnostic trouble codes (DTCs) but offer limited additional features.
5.2. Enhanced Scanners
Enhanced scanners offer more advanced features, such as live data streaming, graphing, and the ability to perform some diagnostic tests.
5.3. Professional-Grade Scanners
Professional-grade scanners are the most comprehensive tools available. They offer advanced diagnostics, bi-directional control, and the ability to program and calibrate vehicle systems.
5.4. Factors to Consider
- Compatibility: Ensure the scanner is compatible with your 2002 Land Rover Discovery.
- Features: Consider the features you need, such as live data, graphing, and bi-directional control.
- Ease of Use: Choose a scanner that is easy to use and navigate.
- Price: Set a budget and choose a scanner that offers the best value for your money.
- Reviews: Read reviews from other users to get an idea of the scanner’s reliability and performance.
6. Maintaining Your 2002 Land Rover Discovery
6.1. Regular Maintenance Tasks
- Oil Changes: Change the engine oil and filter according to the manufacturer’s recommendations.
- Fluid Checks: Regularly check and top off all fluids, including coolant, brake fluid, power steering fluid, and transmission fluid.
- Filter Replacements: Replace air filters, fuel filters, and cabin air filters as needed.
- Tire Maintenance: Check tire pressure regularly and rotate tires to ensure even wear.
- Brake Inspections: Inspect brake pads, rotors, and calipers regularly and replace them as needed.
6.2. Tips for Long-Term Reliability
- Follow the Maintenance Schedule: Adhere to the maintenance schedule outlined in your vehicle’s manual.
- Use Quality Parts: Use high-quality replacement parts and fluids.
- Address Issues Promptly: Address any issues as soon as they arise to prevent them from escalating.
- Keep Your Vehicle Clean: Regularly wash and wax your vehicle to protect it from rust and corrosion.
- Drive Responsibly: Avoid aggressive driving habits that can strain your vehicle’s components.
6.3. The Role of OBD2 Scanners in Maintenance
OBD2 scanners play a crucial role in vehicle maintenance by allowing you to monitor your vehicle’s performance and detect potential issues early. Regular scanning can help you identify problems before they become major and ensure that your vehicle is running optimally.
7. Advanced Diagnostics with OBD2 Scanners
7.1. Live Data Streaming
Live data streaming allows you to monitor various parameters in real-time, such as engine temperature, RPM, and sensor readings. This can be useful for diagnosing intermittent problems and identifying trends.
7.2. Graphing
Graphing allows you to visualize live data over time. This can be helpful for identifying patterns and diagnosing complex issues.
7.3. Bi-Directional Control
Bi-directional control allows you to send commands to the vehicle’s systems and components. This can be useful for testing actuators, solenoids, and other components.
7.4. Diagnostic Tests
Many OBD2 scanners offer diagnostic tests that can help you identify specific problems. These tests may include cylinder balance tests, fuel injector tests, and EVAP system tests.
8. When to Consult a Professional Mechanic
8.1. Complex Issues
If you encounter complex issues that you are unable to diagnose or repair yourself, it’s best to consult a professional mechanic.
8.2. Safety-Related Issues
If you encounter issues related to safety systems, such as brakes, airbags, or steering, it’s important to consult a professional mechanic.
8.3. Lack of Experience
If you lack the experience or knowledge to perform a particular repair, it’s best to leave it to a professional.
8.4. Specialized Tools
Some repairs require specialized tools or equipment that you may not have access to. In these cases, it’s best to consult a professional mechanic.
9. Ensuring Proper Maintenance and Repairs
9.1. Finding a Reputable Mechanic
- Ask for Recommendations: Ask friends, family, and colleagues for recommendations.
- Read Reviews: Read online reviews to get an idea of the mechanic’s reputation and quality of work.
- Check for Certifications: Look for mechanics who are certified by ASE (National Institute for Automotive Service Excellence).
- Get Estimates: Get estimates from multiple mechanics before choosing one.
- Ask Questions: Ask the mechanic questions about their experience, qualifications, and approach to the repair.
9.2. Understanding Repair Estimates
- Review the Estimate Carefully: Review the repair estimate carefully and make sure you understand all the charges.
- Ask for a Breakdown: Ask for a breakdown of the parts and labor costs.
- Get a Written Estimate: Get a written estimate before authorizing any repairs.
- Understand the Warranty: Understand the warranty coverage for the repairs.
9.3. Documenting Repairs
Keep a record of all maintenance and repairs performed on your vehicle. This will be helpful for tracking your vehicle’s history and can be useful when selling the vehicle.
10. Addressing Common Issues with Your 2002 Land Rover Discovery
10.1. Engine Problems
Common engine problems with the 2002 Land Rover Discovery include misfires, vacuum leaks, and sensor malfunctions. Regular maintenance and timely repairs can help prevent these issues.
10.2. Transmission Problems
Transmission problems can include slipping, hard shifting, and failure to engage. Regular fluid changes and proper maintenance can help prevent these issues.
10.3. Electrical Problems
Electrical problems can include faulty sensors, wiring issues, and battery problems. Regular inspections and proper maintenance can help prevent these issues.
10.4. Suspension Problems
Suspension problems can include worn shocks, struts, and bushings. Regular inspections and timely repairs can help maintain your vehicle’s ride quality and handling.
FAQ: Your Questions About OBD2 Scanners and the 2002 Land Rover Discovery Answered
1. What is an OBD2 scanner?
An OBD2 scanner is a diagnostic tool used to read and interpret diagnostic trouble codes (DTCs) from a vehicle’s computer system, helping identify potential issues.
2. Where is the OBD2 port located on a 2002 Land Rover Discovery?
The OBD2 port on a 2002 Land Rover Discovery is typically located under the dashboard on the driver’s side.
3. How do I use an OBD2 scanner?
To use an OBD2 scanner, plug it into the OBD2 port, turn on the ignition, and follow the scanner’s instructions to read and interpret DTCs.
4. What do the OBD2 codes mean?
OBD2 codes provide information about potential issues in the vehicle’s systems, such as the engine, transmission, or emissions.
5. Can I clear OBD2 codes myself?
Yes, you can clear OBD2 codes using a scanner, but it’s essential to understand the underlying issue before doing so.
6. What is a P0171 code?
A P0171 code indicates that the engine is running lean, meaning there is too much air and not enough fuel in the air-fuel mixture.
7. How often should I use an OBD2 scanner?
You should use an OBD2 scanner whenever you notice unusual behavior or warning lights on your dashboard.
8. Can an OBD2 scanner help with vehicle maintenance?
Yes, an OBD2 scanner can help with vehicle maintenance by identifying potential issues early and ensuring optimal performance.
9. What are the benefits of using an OBD2 scanner?
The benefits of using an OBD2 scanner include early problem detection, cost savings, improved performance, and informed decision-making.
10. When should I consult a professional mechanic?
You should consult a professional mechanic for complex issues, safety-related issues, or when you lack the experience to perform a particular repair.
Understanding the OBD2 system and its codes can empower you to take better care of your 2002 Land Rover Discovery. By regularly using an OBD2 scanner and staying informed, you can keep your vehicle running smoothly and avoid costly repairs.
Need more assistance with your 2002 Land Rover Discovery? Contact us today at +1 (641) 206-8880 to speak with one of our knowledgeable service teammates, or visit our website at OBD2-SCANNER.EDU.VN for more information. You can also visit us at 123 Main Street, Los Angeles, CA 90001, United States. We’re here to help you keep your Land Rover in top condition.