The 2007 F150 Obd2 Fuse Location is typically in the interior fuse panel, often situated beneath the dashboard on the driver’s side; however, pinpointing its exact location is essential for diagnosing electrical issues using an OBD2 scanner, and with the help of OBD2-SCANNER.EDU.VN, you can accurately locate and troubleshoot any fuse-related problems. Addressing these issues promptly ensures your vehicle operates reliably and safely by having a functional OBD2 port for diagnostics and repairs.
Contents
- 1. Understanding the Importance of the OBD2 Port and Fuses in Your 2007 F-150
- 1.1 What is the OBD2 Port?
- 1.2 Why is the OBD2 Port Important?
- 1.3 What are Fuses and Why are They Important?
- 1.4 Common Symptoms of a Blown OBD2 Fuse
- 1.5 How Fuses Protect the OBD2 Port
- 2. Locating the OBD2 Fuse in Your 2007 Ford F-150
- 2.1 Where is the Main Fuse Box Located in a 2007 F-150?
- 2.2 Step-by-Step Guide to Finding the Interior Fuse Panel
- 2.3 Using the Owner’s Manual to Identify the OBD2 Fuse Location
- 2.4 Common Fuse Locations for the OBD2 Port in 2007 F-150 Models
- 2.5 Visual Inspection of the Fuse Box and Fuse Layout
- 3. Identifying the Correct Fuse
- 3.1 Understanding Fuse Types and Ratings
- 3.2 Visual Inspection: What to Look For
- 3.3 Using a Test Light or Multimeter to Check Fuse Continuity
- 3.4 Common Misconceptions About Fuses
- 3.5 How to Differentiate Between a Good and Blown Fuse
- 4. Replacing a Blown Fuse
- 4.1 Tools Needed for Fuse Replacement
- 4.2 Step-by-Step Guide to Replacing the Fuse
- 4.3 Safety Precautions During Fuse Replacement
- 4.4 What to Do if the Fuse Blows Again Immediately
- 4.5 Proper Disposal of Old Fuses
- 5. Common Issues Related to the OBD2 Port and Fuses
- 5.1 Electrical Shorts and Overloads
- 5.2 Damaged Wiring or Connectors
- 5.3 Faulty OBD2 Scanners or Accessories
- 5.4 Water Damage and Corrosion
- 5.5 Loose Connections
- 6. Advanced Troubleshooting Techniques
- 6.1 Using a Multimeter to Test for Shorts and Open Circuits
- 6.2 Diagnosing Electrical Problems with Wiring Diagrams
- 6.3 Checking the Ground Connections
- 6.4 Testing the OBD2 Port for Power and Ground
- 6.5 When to Seek Professional Help
- 7. Maintaining Your 2007 F-150’s Electrical System
- 7.1 Regular Inspection of Fuses and Wiring
- 7.2 Keeping the Fuse Box Clean and Dry
- 7.3 Using Dielectric Grease on Connectors
- 7.4 Avoiding Overloading Electrical Circuits
- 7.5 Importance of Professional Electrical System Servicing
- 8. OBD2 Scanner Recommendations for Your 2007 F-150
- 8.1 Features to Look For in an OBD2 Scanner
- 8.2 Top OBD2 Scanner Brands and Models
- 8.3 How to Properly Use an OBD2 Scanner
- 8.4 Interpreting OBD2 Codes and Data
- 8.5 Common OBD2 Code Meanings
- 9. Resources for 2007 F-150 Owners
- 9.1 Online Forums and Communities
- 9.2 Repair Manuals and Guides
- 9.3 Official Ford Resources
- 9.4 Local Mechanics and Repair Shops
- 9.5 OBD2-SCANNER.EDU.VN Resources
- 10. Frequently Asked Questions (FAQs) About the 2007 F150 OBD2 Fuse Location
- 10.1. Where can I find the OBD2 port fuse in my 2007 Ford F-150?
- 10.2. What amperage should the OBD2 port fuse be for a 2007 F-150?
- 10.3. How do I check if the OBD2 fuse is blown?
- 10.4. Can a blown OBD2 fuse affect other electrical components?
- 10.5. What causes the OBD2 fuse to blow in a 2007 F-150?
- 10.6. Is it safe to replace a blown OBD2 fuse myself?
- 10.7. What should I do if the replacement OBD2 fuse blows immediately after installation?
- 10.8. Where can I find a fuse diagram for my 2007 Ford F-150?
- 10.9. What type of OBD2 scanner is best for a 2007 F-150?
- 10.10. How often should I inspect the fuses in my 2007 F-150?
1. Understanding the Importance of the OBD2 Port and Fuses in Your 2007 F-150
The On-Board Diagnostics II (OBD2) port in your 2007 Ford F-150 is a crucial interface, allowing mechanics and vehicle owners to access the vehicle’s computer system for diagnostics. According to research published in the SAE International Journal of Engines, effective use of the OBD2 port can significantly reduce diagnostic time. Fuses play a vital role in protecting your truck’s electrical circuits, including the OBD2 port. When a fuse blows, it interrupts the electrical current, preventing damage to sensitive components. Knowing the 2007 F150 OBD2 fuse location is essential for quick troubleshooting and repair, ensuring your diagnostic tools work when you need them.
1.1 What is the OBD2 Port?
The OBD2 port, standardized across vehicles since 1996, is a diagnostic interface that allows access to your vehicle’s onboard computer. It’s the gateway for reading diagnostic trouble codes (DTCs), monitoring performance data, and performing various tests to diagnose and resolve issues.
1.2 Why is the OBD2 Port Important?
The OBD2 port is crucial for several reasons:
- Diagnostics: It allows mechanics and vehicle owners to quickly identify problems by reading DTCs.
- Monitoring: It provides real-time data on engine performance, fuel efficiency, and other critical parameters.
- Maintenance: It helps in performing necessary maintenance tasks, ensuring your vehicle runs efficiently.
1.3 What are Fuses and Why are They Important?
Fuses are safety devices designed to protect electrical circuits from overcurrent. They contain a wire that melts and breaks the circuit if the current exceeds a safe level, preventing damage to components.
- Protection: Fuses safeguard the OBD2 port and other electrical components from damage due to electrical surges.
- Troubleshooting: When a component stops working, checking the fuse is often the first step in diagnosing the problem.
- Safety: Fuses prevent electrical fires and other hazards caused by short circuits or overloads.
1.4 Common Symptoms of a Blown OBD2 Fuse
Recognizing the symptoms of a blown OBD2 fuse can save you time and hassle. Common signs include:
- OBD2 Scanner Not Powering On: If your OBD2 scanner doesn’t turn on when plugged into the port, the fuse might be blown.
- No Communication with the Vehicle’s Computer: The scanner powers on but fails to establish a connection with the vehicle’s computer.
- Other Electrical Issues: Sometimes, a blown OBD2 fuse is linked to other electrical problems, such as issues with the cigarette lighter or radio.
1.5 How Fuses Protect the OBD2 Port
Fuses are essential for protecting the OBD2 port from:
- Overcurrent: High current flow can damage the sensitive electronics within the OBD2 port.
- Short Circuits: A short circuit can cause a sudden surge of current, which the fuse interrupts.
- Voltage Spikes: Voltage spikes can occur due to various electrical issues, and fuses prevent these spikes from reaching the OBD2 port.
2. Locating the OBD2 Fuse in Your 2007 Ford F-150
Finding the OBD2 fuse in your 2007 Ford F-150 involves a few simple steps. The fuse is usually located in the interior fuse panel, but it’s crucial to confirm its exact position using your owner’s manual.
2.1 Where is the Main Fuse Box Located in a 2007 F-150?
The primary fuse box in a 2007 Ford F-150 is typically located inside the cabin. Specifically, it’s often found:
- Under the Dashboard: On the driver’s side, beneath the steering wheel.
- Behind a Panel: You may need to remove a plastic panel to access the fuse box.
2.2 Step-by-Step Guide to Finding the Interior Fuse Panel
Here’s how to find the interior fuse panel:
- Locate the Driver’s Side Dashboard: Look under the dashboard on the driver’s side.
- Identify the Panel: Find the plastic panel covering the fuse box. It usually has a notch or a release tab.
- Remove the Panel: Gently pry the panel open or use the release tab to remove it.
- Expose the Fuse Box: The fuse box should now be visible.
2.3 Using the Owner’s Manual to Identify the OBD2 Fuse Location
The owner’s manual is your best resource for identifying the exact OBD2 fuse location. Here’s how to use it:
- Find the Fuse Diagram: Look for the section on fuses in the owner’s manual.
- Locate the Fuse Diagram: The diagram shows the layout of the fuses in the fuse box.
- Identify the OBD2 Fuse: Find the fuse labeled for the “OBD2 port,” “diagnostic connector,” or similar description.
- Note the Fuse Number and Amperage: Record the fuse number and its amperage rating for replacement.
2.4 Common Fuse Locations for the OBD2 Port in 2007 F-150 Models
While the exact location can vary, some common fuse locations for the OBD2 port in 2007 F-150 models include:
- Fuse Number: Check fuses like number 20, 41, or similar, as they often correlate with the diagnostic port.
- Amperage: The fuse is typically rated between 10A and 20A.
2.5 Visual Inspection of the Fuse Box and Fuse Layout
Once you’ve accessed the fuse box, take a close look at the fuse layout:
- Diagram on the Fuse Box Cover: Many fuse boxes have a diagram printed on the inside of the cover.
- Matching the Diagram: Compare the diagram to the physical layout of the fuses to locate the OBD2 fuse.
- Fuse Markings: Look for labels or markings near the fuses that indicate their function.
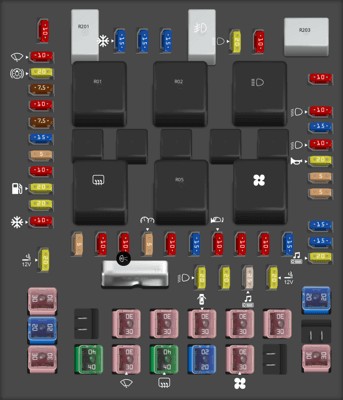 2007 Ford F-150 interior fuse box under dashboard, revealing the location of the OBD2 diagnostic fuse
3. Identifying the Correct Fuse
After locating the fuse box, identifying the correct fuse involves visual inspection and understanding fuse types and ratings.
3.1 Understanding Fuse Types and Ratings
Fuses come in various types and amperage ratings. Common types include:
- Mini Fuses: Small, blade-style fuses commonly used in modern vehicles.
- ATO/ATC Fuses: Standard blade-style fuses.
- Maxi Fuses: Larger fuses used for high-current circuits.
The amperage rating (e.g., 5A, 10A, 20A) indicates the maximum current the fuse can handle before blowing.
3.2 Visual Inspection: What to Look For
When inspecting fuses, look for these signs:
- Broken Filament: A blown fuse typically has a visible break in the wire or filament inside.
- Darkened or Melted Appearance: The fuse may look darkened or melted, indicating it has blown due to overcurrent.
- Intact Fuse: A good fuse has an unbroken filament and a clear appearance.
3.3 Using a Test Light or Multimeter to Check Fuse Continuity
A test light or multimeter can confirm whether a fuse is good or blown:
- Test Light: Clip the test light to a ground point and touch the probe to both test points on the fuse. If the light illuminates on both points, the fuse is good.
- Multimeter: Set the multimeter to the continuity setting. Touch the probes to both test points on the fuse. If the meter shows continuity (usually a beep or a reading close to zero ohms), the fuse is good.
3.4 Common Misconceptions About Fuses
Avoid these common misconceptions:
- Replacing with a Higher Amperage Fuse: Never replace a fuse with one of a higher amperage rating. This can overload the circuit and cause damage or fire.
- Assuming All Fuses are the Same: Different circuits require different amperage ratings. Always use the correct fuse for the specific circuit.
- Ignoring the Root Cause: If a fuse blows repeatedly, there’s likely an underlying issue that needs to be addressed.
3.5 How to Differentiate Between a Good and Blown Fuse
Here’s a quick guide to differentiating between good and blown fuses:
- Good Fuse: Clear appearance, unbroken filament, continuity with a test light or multimeter.
- Blown Fuse: Broken filament, darkened or melted appearance, no continuity with a test light or multimeter.
4. Replacing a Blown Fuse
Replacing a blown fuse is a straightforward process. Ensure you have the correct replacement fuse and follow these steps carefully.
4.1 Tools Needed for Fuse Replacement
Gather these tools before starting:
- Replacement Fuse: The correct amperage rating for the OBD2 port.
- Fuse Puller: A small tool designed to remove fuses without damaging them.
- Needle-Nose Pliers: Useful if you don’t have a fuse puller.
- Owner’s Manual: For reference.
4.2 Step-by-Step Guide to Replacing the Fuse
Follow these steps to replace the blown fuse:
- Turn Off the Ignition: Ensure the vehicle’s ignition is turned off to prevent electrical surges.
- Locate the Blown Fuse: Use the methods described earlier to find the OBD2 fuse.
- Remove the Blown Fuse: Use the fuse puller or needle-nose pliers to gently remove the blown fuse.
- Inspect the Replacement Fuse: Ensure the replacement fuse has the correct amperage rating and is in good condition.
- Install the Replacement Fuse: Align the replacement fuse with the fuse box terminals and gently push it into place.
- Test the OBD2 Port: Plug in your OBD2 scanner to ensure it powers on and communicates with the vehicle’s computer.
4.3 Safety Precautions During Fuse Replacement
Take these safety precautions:
- Disconnect the Battery: For added safety, disconnect the negative terminal of the battery before replacing fuses.
- Avoid Metal Objects: Do not use metal objects to remove or install fuses, as this can cause short circuits.
- Wear Gloves: Consider wearing gloves to protect your hands.
4.4 What to Do if the Fuse Blows Again Immediately
If the replacement fuse blows immediately, it indicates a more significant electrical issue:
- Short Circuit: There may be a short circuit in the OBD2 port wiring or connected components.
- Overload: The circuit may be overloaded due to a faulty component.
- Professional Inspection: Consult a qualified mechanic to diagnose and repair the underlying issue.
4.5 Proper Disposal of Old Fuses
Dispose of old fuses properly:
- Recycling: Check if your local recycling center accepts fuses.
- Household Waste: If recycling isn’t an option, dispose of the fuse with your regular household waste.
5. Common Issues Related to the OBD2 Port and Fuses
Understanding common issues can help you diagnose and resolve problems efficiently.
5.1 Electrical Shorts and Overloads
Electrical shorts and overloads are frequent causes of blown OBD2 fuses:
- Short Circuit: Occurs when a wire comes into contact with a ground point, causing a sudden surge of current.
- Overload: Happens when a circuit draws more current than it’s designed to handle, often due to a faulty component.
5.2 Damaged Wiring or Connectors
Damaged wiring or connectors can lead to electrical issues:
- Insulation Damage: Worn or damaged insulation can expose wires, causing short circuits.
- Corroded Connectors: Corrosion can increase resistance and cause components to malfunction.
5.3 Faulty OBD2 Scanners or Accessories
A faulty OBD2 scanner or accessory can also cause problems:
- Defective Scanners: A malfunctioning scanner can draw excessive current, blowing the fuse.
- Incompatible Accessories: Using incompatible accessories with the OBD2 port can lead to electrical issues.
5.4 Water Damage and Corrosion
Water damage and corrosion can wreak havoc on electrical systems:
- Corrosion: Moisture can corrode connectors and wires, causing resistance and malfunctions.
- Short Circuits: Water can create conductive paths, leading to short circuits.
5.5 Loose Connections
Loose connections can cause intermittent electrical problems:
- Vibration: Vehicle vibrations can loosen connections over time.
- Poor Installation: Improperly installed connectors can come loose.
6. Advanced Troubleshooting Techniques
For more complex issues, advanced troubleshooting techniques may be necessary.
6.1 Using a Multimeter to Test for Shorts and Open Circuits
A multimeter is an invaluable tool for advanced electrical troubleshooting:
- Testing for Shorts: Disconnect the battery and use the multimeter to check for continuity between the circuit and ground.
- Testing for Open Circuits: Check for continuity along the circuit path to identify breaks or disconnected wires.
6.2 Diagnosing Electrical Problems with Wiring Diagrams
Wiring diagrams provide a detailed map of the vehicle’s electrical system:
- Tracing Circuits: Use the diagram to trace the circuit from the power source to the OBD2 port.
- Identifying Components: Locate all components in the circuit, including fuses, relays, and connectors.
6.3 Checking the Ground Connections
Proper grounding is essential for electrical system performance:
- Location: Find the ground connections for the OBD2 port and related circuits.
- Inspection: Check for corrosion, loose connections, and damage.
6.4 Testing the OBD2 Port for Power and Ground
Ensure the OBD2 port is receiving power and ground:
- Power Test: Use a multimeter to check for voltage at the power pin of the OBD2 port.
- Ground Test: Verify a good ground connection at the ground pin of the OBD2 port.
6.5 When to Seek Professional Help
Know when to seek professional help:
- Complex Issues: If you’re uncomfortable working with electrical systems or the problem is complex.
- Repeated Fuse Failures: If the fuse continues to blow after troubleshooting.
- Safety Concerns: If you suspect a significant electrical issue that could pose a safety risk.
7. Maintaining Your 2007 F-150’s Electrical System
Regular maintenance can prevent electrical problems and ensure your vehicle runs smoothly.
7.1 Regular Inspection of Fuses and Wiring
Inspect fuses and wiring regularly:
- Visual Checks: Look for signs of damage, corrosion, or wear.
- Fuse Testing: Periodically test fuses to ensure they are in good condition.
7.2 Keeping the Fuse Box Clean and Dry
Keep the fuse box clean and dry:
- Moisture Prevention: Protect the fuse box from water and moisture.
- Cleaning: Clean the fuse box with a dry cloth to remove dirt and debris.
7.3 Using Dielectric Grease on Connectors
Apply dielectric grease to connectors:
- Protection: Dielectric grease protects connectors from corrosion and moisture.
- Application: Apply a small amount of grease to the connector terminals before reassembling.
7.4 Avoiding Overloading Electrical Circuits
Avoid overloading electrical circuits:
- Proper Accessories: Use accessories that are compatible with your vehicle’s electrical system.
- Power Limits: Do not exceed the recommended power limits for circuits.
7.5 Importance of Professional Electrical System Servicing
Schedule professional electrical system servicing:
- Regular Checks: Have a qualified mechanic inspect your vehicle’s electrical system periodically.
- Early Detection: Professional servicing can detect and address potential issues before they become major problems.
8. OBD2 Scanner Recommendations for Your 2007 F-150
Choosing the right OBD2 scanner can make diagnostics easier and more efficient.
8.1 Features to Look For in an OBD2 Scanner
Consider these features when selecting an OBD2 scanner:
- Compatibility: Ensure the scanner is compatible with your 2007 Ford F-150.
- Functionality: Look for features like DTC reading, live data streaming, and advanced diagnostic tests.
- Ease of Use: Choose a scanner with a user-friendly interface and clear instructions.
- Updates: Opt for a scanner that receives regular software updates to support new vehicles and features.
8.2 Top OBD2 Scanner Brands and Models
Here are some top OBD2 scanner brands and models:
- INNOVA: Known for reliability and user-friendly interfaces.
- Autel: Offers advanced diagnostic capabilities for professional use.
- BlueDriver: A Bluetooth scanner that works with your smartphone.
8.3 How to Properly Use an OBD2 Scanner
Follow these steps to use an OBD2 scanner:
- Connect the Scanner: Plug the scanner into the OBD2 port.
- Turn On the Ignition: Turn the vehicle’s ignition to the “on” position without starting the engine.
- Follow the Scanner Instructions: Follow the scanner’s prompts to read DTCs, view live data, or perform tests.
- Interpret the Results: Use the scanner’s documentation or online resources to interpret the results.
8.4 Interpreting OBD2 Codes and Data
Understanding OBD2 codes and data is crucial for effective diagnostics:
- DTCs: Diagnostic Trouble Codes provide information about specific issues.
- Live Data: Real-time data on engine performance helps in diagnosing problems.
8.5 Common OBD2 Code Meanings
Here are some common OBD2 code meanings:
- P0171: System Too Lean (Bank 1)
- P0300: Random/Multiple Cylinder Misfire Detected
- P0420: Catalyst System Efficiency Below Threshold (Bank 1)
9. Resources for 2007 F-150 Owners
Leverage these resources to keep your 2007 F-150 running smoothly.
9.1 Online Forums and Communities
Online forums and communities offer valuable information and support:
- Ford F-150 Forums: Connect with other F-150 owners and share experiences.
- Automotive Repair Forums: Get advice from experienced mechanics and DIYers.
9.2 Repair Manuals and Guides
Repair manuals and guides provide detailed instructions for maintenance and repair:
- Haynes Repair Manuals: Comprehensive manuals covering various vehicle systems.
- Chilton Repair Manuals: Detailed guides with step-by-step instructions.
9.3 Official Ford Resources
Access official Ford resources for accurate information:
- Ford Owner’s Manual: Refer to your vehicle’s owner’s manual for important information.
- Ford Service Website: Find service information, recalls, and technical service bulletins.
9.4 Local Mechanics and Repair Shops
Build a relationship with a trusted local mechanic or repair shop:
- Professional Service: Get expert advice and professional repairs.
- Preventive Maintenance: Schedule regular maintenance to keep your vehicle in top condition.
9.5 OBD2-SCANNER.EDU.VN Resources
Explore resources at OBD2-SCANNER.EDU.VN:
- Diagnostic Tools: Find the right OBD2 scanner for your needs.
- Expert Advice: Get guidance on diagnosing and resolving vehicle issues.
- Maintenance Tips: Learn how to keep your vehicle running smoothly.
10. Frequently Asked Questions (FAQs) About the 2007 F150 OBD2 Fuse Location
10.1. Where can I find the OBD2 port fuse in my 2007 Ford F-150?
The OBD2 port fuse in your 2007 Ford F-150 is typically located in the interior fuse panel, usually found beneath the dashboard on the driver’s side. Consult your owner’s manual for the precise location and fuse number.
10.2. What amperage should the OBD2 port fuse be for a 2007 F-150?
The OBD2 port fuse for a 2007 F-150 is typically rated between 10A and 20A. Always refer to your owner’s manual or the fuse box diagram for the correct amperage.
10.3. How do I check if the OBD2 fuse is blown?
To check if the OBD2 fuse is blown, visually inspect the fuse for a broken filament or darkened appearance. You can also use a test light or multimeter to check for continuity.
10.4. Can a blown OBD2 fuse affect other electrical components?
Yes, a blown OBD2 fuse can sometimes affect other electrical components, as it may be part of a shared circuit. Check your owner’s manual for related components.
10.5. What causes the OBD2 fuse to blow in a 2007 F-150?
The OBD2 fuse can blow due to electrical shorts, overloads, damaged wiring, or a faulty OBD2 scanner. Identifying and addressing the root cause is essential to prevent repeated fuse failures.
10.6. Is it safe to replace a blown OBD2 fuse myself?
Yes, it is generally safe to replace a blown OBD2 fuse yourself, provided you follow safety precautions and use the correct replacement fuse with the appropriate amperage.
10.7. What should I do if the replacement OBD2 fuse blows immediately after installation?
If the replacement OBD2 fuse blows immediately after installation, it indicates a significant electrical issue, such as a short circuit or overload. Seek professional help from a qualified mechanic to diagnose and repair the problem.
10.8. Where can I find a fuse diagram for my 2007 Ford F-150?
You can find the fuse diagram for your 2007 Ford F-150 in the owner’s manual or on the inside cover of the fuse box.
10.9. What type of OBD2 scanner is best for a 2007 F-150?
The best type of OBD2 scanner for a 2007 F-150 is one that is compatible with the vehicle, offers essential features like DTC reading and live data, and is easy to use. Brands like INNOVA, Autel, and BlueDriver are popular choices.
10.10. How often should I inspect the fuses in my 2007 F-150?
You should inspect the fuses in your 2007 F-150 regularly, especially if you experience electrical issues. A visual check during routine maintenance can help identify potential problems early.
Finding the 2007 F150 OBD2 fuse location is crucial for maintaining your vehicle’s diagnostic capabilities. By following the steps outlined in this guide, you can quickly locate, identify, and replace the fuse, ensuring your OBD2 port functions correctly. Regular maintenance and prompt attention to electrical issues will keep your 2007 F-150 running smoothly and reliably. Remember, OBD2-SCANNER.EDU.VN is here to support you with expert advice, diagnostic tools, and resources to help you maintain your vehicle’s electrical system.
Are you still facing issues locating the OBD2 fuse or diagnosing electrical problems in your 2007 F-150? Contact OBD2-SCANNER.EDU.VN for expert guidance and solutions. Our team of experienced technicians can provide personalized assistance to help you resolve your vehicle’s issues quickly and efficiently. Reach out to us today:
- Address: 123 Main Street, Los Angeles, CA 90001, United States
- WhatsApp: +1 (641) 206-8880
- Website: OBD2-SCANNER.EDU.VN