OBD2 not connecting on your 2009 Honda Pilot can be a frustrating issue, but it’s often resolvable with the right troubleshooting steps. This guide will walk you through the common causes and solutions, helping you diagnose and fix the problem efficiently. At OBD2-SCANNER.EDU.VN, we specialize in helping you understand and utilize OBD2 technology for optimal vehicle maintenance. Whether it’s a faulty scanner, a communication issue, or a deeper problem within your car’s system, we’ve got you covered with practical tips and insights. Understanding common diagnostic trouble codes (DTCs) and employing effective scan tools are crucial for pinpointing problems.
Contents
- 1. What Causes a 2009 Honda Pilot OBD2 Port to Not Connect?
- 1.1 Faulty Scan Tool
- 1.1.1 How to Identify a Faulty Scan Tool
- 1.1.2 Solutions for a Faulty Scan Tool
- 1.2 Damaged OBD2 Port
- 1.2.1 How to Identify a Damaged OBD2 Port
- 1.2.2 Solutions for a Damaged OBD2 Port
- 1.3 Blown Fuse
- 1.3.1 How to Identify a Blown Fuse
- 1.3.2 Solutions for a Blown Fuse
- 1.4 ECU (Engine Control Unit) Issues
- 1.4.1 How to Identify ECU Issues
- 1.4.2 Solutions for ECU Issues
- 1.5 Wiring Problems
- 1.5.1 How to Identify Wiring Problems
- 1.5.2 Solutions for Wiring Problems
- 2. Step-by-Step Troubleshooting Guide for 2009 Honda Pilot OBD2 Connection Issues
- 2.1 Initial Checks
- 2.2 Inspect the OBD2 Port
- 2.3 Check the Fuses
- 2.4 Scan Tool Diagnostics
- 2.5 Wiring and Connections
- 2.6 ECU Inspection
- 3. Common OBD2 Diagnostic Trouble Codes (DTCs) for Honda Pilot
- 3.1 Powertrain Codes (P-Codes)
- 3.2 Body Codes (B-Codes)
- 3.3 Chassis Codes (C-Codes)
- 3.4 Network Communication Codes (U-Codes)
- 4. Using a Multimeter to Diagnose OBD2 Port Issues
- 4.1 Testing for Power
- 4.2 Testing for Ground
- 4.3 Testing for Continuity
- 5. Advanced Diagnostic Techniques
- 5.1 CAN Bus Diagnostics
- 5.2 ECU Reflashing
- 5.3 Professional Diagnostic Services
- 6. Preventive Maintenance for the OBD2 Port
- 6.1 Regular Inspections
- 6.2 Proper Use of Scan Tools
- 6.3 Protect from Environmental Factors
- 7. Why Choose OBD2-SCANNER.EDU.VN for Your Diagnostic Needs
- 7.1 Expert Advice and Guidance
- 7.2 Quality Products and Services
- 7.3 Commitment to Customer Satisfaction
- 8. Real-World Scenarios and Solutions
- 8.1 Scenario 1: Faulty Scan Tool Cable
- 8.2 Scenario 2: Corroded OBD2 Port
- 8.3 Scenario 3: Blown Fuse
- 9. OBD2 Scanner Brands Compatible with 2009 Honda Pilot
- 9.1 Top OBD2 Scanner Brands
- 9.2 Features to Look For
- 9.3 Scanner Comparison Table
- 10. FAQ: Troubleshooting OBD2 Connection Problems
- 10.1 What is an OBD2 scanner?
- 10.2 How do I know if my OBD2 port is not working?
- 10.3 Can a blown fuse cause the OBD2 port to stop working?
- 10.4 How do I check the OBD2 port fuse?
- 10.5 What does it mean when the scan tool says “link error”?
- 10.6 Can a damaged OBD2 port be repaired?
- 10.7 What are the common causes of ECU failure?
- 10.8 How can I prevent OBD2 port problems?
- 10.9 Is it safe to drive with a faulty OBD2 port?
- 10.10 How much does it cost to repair an OBD2 port?
1. What Causes a 2009 Honda Pilot OBD2 Port to Not Connect?
A 2009 Honda Pilot OBD2 port may fail to connect due to a faulty scan tool, damaged OBD2 port, blown fuse, ECU issues, or wiring problems. Understanding each of these potential causes is crucial for effective troubleshooting.
1.1 Faulty Scan Tool
A malfunctioning scan tool is one of the most common reasons why your 2009 Honda Pilot’s OBD2 port might not connect. The scan tool itself could have internal issues, such as damaged circuits or outdated software, preventing it from establishing a connection with the vehicle’s computer.
1.1.1 How to Identify a Faulty Scan Tool
- Test on Another Vehicle: The most straightforward way to determine if your scan tool is the problem is to try connecting it to another vehicle. If it fails to connect to a known working OBD2 port on a different car, the scan tool is likely faulty.
- Check the Scan Tool’s Display: If the scan tool’s display is blank, flickering, or showing error messages, it may indicate a hardware or software issue within the tool itself.
- Inspect the Cable and Connector: Examine the cable for any signs of damage, such as cuts, frayed wires, or bent pins on the connector. Even minor damage to the cable can disrupt the communication between the scan tool and the vehicle.
- Software Issues: Ensure that your scan tool’s software is up to date. Outdated software may not be compatible with the 2009 Honda Pilot’s computer system. Check the manufacturer’s website for updates.
1.1.2 Solutions for a Faulty Scan Tool
- Update Software: If the scan tool has outdated software, updating it to the latest version can resolve compatibility issues.
- Replace the Cable: If the cable is damaged, replacing it with a new one can restore the connection. Ensure the replacement cable is compatible with your scan tool.
- Try a Different Scan Tool: If you suspect a hardware issue with the scan tool, try using a different one to see if it connects to your Honda Pilot. This will help you determine whether the problem lies with the tool or the vehicle.
- Professional Repair: If you’re unable to resolve the issue with basic troubleshooting, consider having the scan tool professionally inspected and repaired.
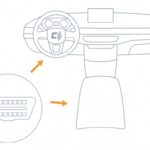
1.2 Damaged OBD2 Port
A damaged OBD2 port on your 2009 Honda Pilot can prevent the scan tool from making a proper connection. The port is located under the dashboard, typically on the driver’s side, and is susceptible to physical damage or corrosion.
1.2.1 How to Identify a Damaged OBD2 Port
- Visual Inspection: Carefully inspect the OBD2 port for any signs of physical damage, such as bent or broken pins, cracks, or loose connections. Use a flashlight to get a better view.
- Corrosion: Check for corrosion inside the port. Corrosion can build up over time due to moisture and environmental factors, disrupting the electrical connection.
- Loose Connection: Try wiggling the scan tool connector while it’s plugged into the OBD2 port. If the connection is loose or intermittent, the port may be damaged.
- Difficulty Plugging In: If you experience unusual resistance or difficulty when plugging in the scan tool connector, it could indicate that the port is damaged or misaligned.
1.2.2 Solutions for a Damaged OBD2 Port
- Clean the Port: Use a contact cleaner specifically designed for electronic components to clean the OBD2 port. Spray the cleaner into the port and use a small brush or cotton swab to remove any dirt or corrosion.
- Straighten Bent Pins: If you notice any bent pins, carefully straighten them using a small, fine-tipped tool. Be extremely gentle to avoid breaking the pins.
- Replace the Port: If the OBD2 port is severely damaged or corroded, it may need to be replaced. You can purchase a new OBD2 port and either replace it yourself or have a professional do it.
1.3 Blown Fuse
A blown fuse is another common reason why the OBD2 port might not be working on your 2009 Honda Pilot. The OBD2 port is typically powered by a fuse, and if that fuse blows, the port will not function.
1.3.1 How to Identify a Blown Fuse
- Locate the Fuse Box: Consult your Honda Pilot’s owner’s manual to find the location of the fuse box that contains the OBD2 port fuse. It’s usually located under the dashboard or in the engine compartment.
- Inspect the Fuse: Once you’ve located the fuse, visually inspect it. A blown fuse will typically have a broken filament or a dark, burnt appearance.
- Use a Multimeter: For a more accurate assessment, use a multimeter to test the fuse. Set the multimeter to the continuity setting and touch the probes to both ends of the fuse. If the multimeter doesn’t show continuity (usually indicated by a beep or a reading of 0 ohms), the fuse is blown.
1.3.2 Solutions for a Blown Fuse
- Replace the Fuse: Replace the blown fuse with a new fuse of the same amperage. Ensure you use the correct amperage to avoid damaging the electrical system.
- Check for Underlying Issues: If the fuse blows again immediately after replacement, it indicates a more significant underlying issue in the electrical system, such as a short circuit. In this case, further diagnosis by a professional is necessary.
1.4 ECU (Engine Control Unit) Issues
The ECU, or Engine Control Unit, is the central computer that manages various functions of your 2009 Honda Pilot. If the ECU has issues, it can prevent the OBD2 port from functioning correctly.
1.4.1 How to Identify ECU Issues
- Check Engine Light: A persistent check engine light, even after clearing codes, can indicate an issue with the ECU.
- Other Symptoms: Other symptoms of ECU problems include poor engine performance, stalling, difficulty starting, and decreased fuel efficiency.
- Diagnostic Trouble Codes (DTCs): Use a scan tool (if it connects) to check for specific DTCs related to the ECU. Codes such as P0600, P0601, P0602, P0603, P0604, P0605, P0606, P0607, P0608, and P0609 often point to ECU malfunctions.
- Professional Diagnosis: Diagnosing ECU issues typically requires advanced diagnostic equipment and expertise. If you suspect an ECU problem, it’s best to consult a professional mechanic.
1.4.2 Solutions for ECU Issues
- Reset the ECU: Sometimes, a simple reset can resolve minor ECU glitches. Disconnect the negative battery cable for about 15-20 minutes, then reconnect it. This can clear temporary errors.
- Update the ECU Software: In some cases, updating the ECU software to the latest version can fix known issues. This typically requires specialized equipment and software available at dealerships or authorized service centers.
- Replace the ECU: If the ECU is severely damaged or malfunctioning, it may need to be replaced. ECU replacement is a complex procedure that often requires programming the new ECU to match the vehicle’s specific parameters.
1.5 Wiring Problems
Wiring problems, such as damaged, corroded, or disconnected wires, can also prevent the OBD2 port from connecting on your 2009 Honda Pilot. The OBD2 port requires a stable electrical connection to function correctly.
1.5.1 How to Identify Wiring Problems
- Visual Inspection: Inspect the wiring harness connected to the OBD2 port for any signs of damage, such as cuts, frays, or exposed wires.
- Corrosion: Check for corrosion on the wiring connectors. Corrosion can disrupt the electrical connection and prevent the OBD2 port from functioning.
- Loose Connections: Ensure that all wiring connectors are securely connected to the OBD2 port and other related components.
- Continuity Testing: Use a multimeter to perform continuity testing on the wires connected to the OBD2 port. This will help you identify any breaks or shorts in the wiring. Refer to the wiring diagram for your 2009 Honda Pilot to identify the correct wires to test.
1.5.2 Solutions for Wiring Problems
- Repair Damaged Wires: If you find any damaged wires, repair them using electrical tape, heat shrink tubing, or wire connectors. Ensure the repair is secure and well-insulated.
- Clean Corroded Connectors: Clean any corroded connectors using a contact cleaner and a small brush. Ensure the connectors are completely dry before reconnecting them.
- Secure Loose Connections: Ensure that all wiring connectors are securely connected. If a connector is loose, try tightening it or replacing it with a new one.
- Replace Damaged Wiring Harness: If the wiring harness is severely damaged, it may need to be replaced. Replacing the wiring harness can be a complex task, so it’s best to have it done by a professional mechanic.
2. Step-by-Step Troubleshooting Guide for 2009 Honda Pilot OBD2 Connection Issues
Follow these steps to diagnose and resolve OBD2 connection problems in your 2009 Honda Pilot.
2.1 Initial Checks
Before diving into more complex troubleshooting steps, perform these initial checks to rule out simple issues.
- Verify the Ignition is On: Ensure that the ignition is turned to the “ON” position, but the engine does not need to be running. Some OBD2 systems only activate when the ignition is on.
- Check the Scan Tool Connection: Make sure the scan tool is securely plugged into the OBD2 port. A loose connection can prevent communication.
- Try a Different Scan Tool: If you have access to another scan tool, try using it to see if it connects. This will help you determine whether the problem lies with the scan tool or the vehicle.
- Consult the Owner’s Manual: Refer to your Honda Pilot’s owner’s manual for the location of the OBD2 port and any relevant information about the vehicle’s diagnostic system.
2.2 Inspect the OBD2 Port
A thorough inspection of the OBD2 port can reveal physical damage or corrosion that may be preventing a connection.
- Visual Inspection: Use a flashlight to carefully inspect the OBD2 port for any signs of damage, such as bent or broken pins, cracks, or loose connections.
- Check for Corrosion: Look for corrosion inside the port. Corrosion can build up over time due to moisture and environmental factors, disrupting the electrical connection.
- Test the Ground and Power: Use a multimeter to check the ground and power connections at the OBD2 port. The port should have a good ground connection and receive power. Refer to the wiring diagram for your 2009 Honda Pilot to identify the correct pins to test. Pin 16 should have 12V, and pins 4 and 5 should be ground.
2.3 Check the Fuses
A blown fuse can disable the OBD2 port. Checking the fuses is a simple and essential step in troubleshooting connection issues.
- Locate the Fuse Box: Consult your Honda Pilot’s owner’s manual to find the location of the fuse box that contains the OBD2 port fuse. It’s usually located under the dashboard or in the engine compartment.
- Identify the OBD2 Fuse: Refer to the fuse box diagram in the owner’s manual to identify the fuse that powers the OBD2 port.
- Inspect the Fuse: Visually inspect the fuse for any signs of damage, such as a broken filament or a dark, burnt appearance.
- Test the Fuse: Use a multimeter to test the fuse for continuity. If the multimeter doesn’t show continuity, the fuse is blown and needs to be replaced.
2.4 Scan Tool Diagnostics
If the scan tool connects but fails to read data, further diagnostics may be necessary.
- Verify Scan Tool Compatibility: Ensure that your scan tool is compatible with the 2009 Honda Pilot. Some scan tools may not support all vehicle makes and models.
- Update Scan Tool Software: Make sure your scan tool has the latest software updates. Outdated software may not be able to communicate with the vehicle’s computer system.
- Check for Diagnostic Trouble Codes (DTCs): Use the scan tool to check for any DTCs stored in the vehicle’s computer. These codes can provide valuable information about the underlying issue.
2.5 Wiring and Connections
Inspecting the wiring and connections related to the OBD2 port can uncover hidden issues that may be preventing a connection.
- Inspect Wiring Harness: Visually inspect the wiring harness connected to the OBD2 port for any signs of damage, such as cuts, frays, or exposed wires.
- Check Connectors: Ensure that all wiring connectors are securely connected to the OBD2 port and other related components.
- Test Wiring Continuity: Use a multimeter to perform continuity testing on the wires connected to the OBD2 port. This will help you identify any breaks or shorts in the wiring.
2.6 ECU Inspection
If all other checks fail, the ECU may be the source of the problem.
- Check for ECU-Related DTCs: Use a scan tool (if it connects) to check for specific DTCs related to the ECU. Codes such as P0600, P0601, P0602, P0603, P0604, P0605, P0606, P0607, P0608, and P0609 often point to ECU malfunctions.
- Look for Physical Damage: Visually inspect the ECU for any signs of physical damage, such as water damage, burnt components, or corrosion.
- Professional Diagnosis: Diagnosing ECU issues typically requires advanced diagnostic equipment and expertise. If you suspect an ECU problem, it’s best to consult a professional mechanic.
3. Common OBD2 Diagnostic Trouble Codes (DTCs) for Honda Pilot
Understanding common DTCs can help you pinpoint specific issues.
3.1 Powertrain Codes (P-Codes)
These codes relate to the engine, transmission, and related components.
| Code | Description | Possible Causes |
|---|---|---|
| P0101 | Mass Air Flow (MAF) Sensor Range/Performance Problem | Dirty or faulty MAF sensor, air leaks, wiring issues |
| P0113 | Intake Air Temperature (IAT) Sensor Circuit High Input | Faulty IAT sensor, wiring issues |
| P0171 | System Too Lean (Bank 1) | Vacuum leaks, faulty oxygen sensor, low fuel pressure, faulty MAF sensor |
| P0300 | Random/Multiple Cylinder Misfire Detected | Faulty spark plugs, ignition coils, fuel injectors, vacuum leaks, low compression |
| P0420 | Catalyst System Efficiency Below Threshold (Bank 1) | Faulty catalytic converter, faulty oxygen sensors, exhaust leaks |
3.2 Body Codes (B-Codes)
These codes relate to body systems, such as airbags, power windows, and security systems.
| Code | Description | Possible Causes |
|---|---|---|
| B1001 | Driver Airbag Deployment Loop Resistance High | Faulty airbag module, wiring issues, damaged connector |
| B1005 | Passenger Airbag Deployment Loop Resistance High | Faulty airbag module, wiring issues, damaged connector |
| B1188 | Lost Communication With Driver Door Control Unit | Wiring issues, faulty door control unit, CAN bus problems |
| B1241 | Low Refrigerant in A/C System | Refrigerant leak, faulty pressure sensor, compressor issues |
| B2205 | Central Locking System Malfunction | Faulty door lock actuator, wiring issues, central locking module problems |
3.3 Chassis Codes (C-Codes)
These codes relate to chassis systems, such as ABS, traction control, and suspension.
| Code | Description | Possible Causes |
|---|---|---|
| C0031 | Left Front Wheel Speed Sensor Circuit Malfunction | Faulty wheel speed sensor, wiring issues, ABS module problems |
| C0034 | Right Front Wheel Speed Sensor Circuit Malfunction | Faulty wheel speed sensor, wiring issues, ABS module problems |
| C0040 | Left Rear Wheel Speed Sensor Circuit Malfunction | Faulty wheel speed sensor, wiring issues, ABS module problems |
| C0043 | Right Rear Wheel Speed Sensor Circuit Malfunction | Faulty wheel speed sensor, wiring issues, ABS module problems |
| C1121 | ABS Hydraulic Pump Motor Control Circuit Malfunction | Faulty ABS pump motor, wiring issues, ABS module problems |
3.4 Network Communication Codes (U-Codes)
These codes relate to communication between different modules in the vehicle.
| Code | Description | Possible Causes |
|---|---|---|
| U0001 | High Speed CAN Communication Bus | Wiring issues, faulty control modules, CAN bus problems |
| U0100 | Lost Communication With ECM/PCM | Wiring issues, faulty ECM/PCM, CAN bus problems |
| U0121 | Lost Communication With Anti-Lock Brake System (ABS) Control Module | Wiring issues, faulty ABS module, CAN bus problems |
| U0155 | Lost Communication With Instrument Panel Cluster (IPC) Control Module | Wiring issues, faulty IPC, CAN bus problems |
| U0401 | Invalid Data Received From ECM/PCM | Wiring issues, faulty ECM/PCM, CAN bus problems |
4. Using a Multimeter to Diagnose OBD2 Port Issues
A multimeter is an essential tool for diagnosing electrical issues with the OBD2 port.
4.1 Testing for Power
Ensure the OBD2 port is receiving power.
- Set the Multimeter: Set the multimeter to the DC voltage setting (20V range).
- Locate Pin 16: Identify pin 16 on the OBD2 port. This pin should provide 12V power.
- Ground the Multimeter: Connect the black lead of the multimeter to a known good ground (e.g., the vehicle’s chassis).
- Test Pin 16: Touch the red lead of the multimeter to pin 16. The multimeter should read approximately 12V when the ignition is turned on. If there is no voltage, check the fuse and wiring.
4.2 Testing for Ground
Verify the OBD2 port has a proper ground connection.
- Set the Multimeter: Set the multimeter to the continuity setting.
- Locate Pins 4 and 5: Identify pins 4 and 5 on the OBD2 port. These pins should be ground connections.
- Test Continuity: Touch one lead of the multimeter to pin 4 and the other lead to a known good ground (e.g., the vehicle’s chassis). The multimeter should show continuity (a beep or a reading of 0 ohms). Repeat this test for pin 5. If there is no continuity, check the wiring and ground connections.
4.3 Testing for Continuity
Check the continuity of the wiring between the OBD2 port and the ECU.
- Disconnect the Battery: Disconnect the negative battery cable to prevent electrical damage.
- Locate the Wires: Refer to the wiring diagram for your 2009 Honda Pilot to identify the wires connected to the OBD2 port and the ECU.
- Set the Multimeter: Set the multimeter to the continuity setting.
- Test Continuity: Touch one lead of the multimeter to one end of the wire at the OBD2 port and the other lead to the corresponding end of the wire at the ECU. The multimeter should show continuity. Repeat this test for all relevant wires. If there is no continuity, there is a break in the wiring.
5. Advanced Diagnostic Techniques
For complex issues, consider these advanced techniques.
5.1 CAN Bus Diagnostics
The CAN (Controller Area Network) bus is a communication network that allows different modules in the vehicle to communicate with each other. Problems with the CAN bus can prevent the OBD2 port from functioning.
- Check CAN Bus Wiring: Inspect the CAN bus wiring for any signs of damage, such as cuts, frays, or corrosion.
- Test CAN Bus Voltage: Use an oscilloscope or a specialized CAN bus diagnostic tool to test the voltage levels on the CAN bus. The voltage levels should be within the specified range.
- Identify Faulty Modules: Use a scan tool that supports CAN bus diagnostics to identify any modules that are not communicating correctly.
5.2 ECU Reflashing
ECU reflashing involves reprogramming the ECU with updated software. This can sometimes resolve issues that are preventing the OBD2 port from functioning.
- Use a Reputable Reflashing Service: ECU reflashing should only be performed by a reputable service with the necessary equipment and expertise.
- Ensure Correct Software: Make sure the reflashing service uses the correct software for your 2009 Honda Pilot.
- Follow Instructions Carefully: Follow the reflashing service’s instructions carefully to avoid damaging the ECU.
5.3 Professional Diagnostic Services
If you’re unable to resolve the OBD2 connection issue yourself, it’s best to seek professional diagnostic services.
- Find a Qualified Mechanic: Look for a qualified mechanic with experience in diagnosing and repairing OBD2 and ECU issues.
- Provide Detailed Information: Provide the mechanic with as much information as possible about the problem, including any symptoms you’ve noticed and any troubleshooting steps you’ve already taken.
- Ask for a Detailed Estimate: Ask the mechanic for a detailed estimate of the cost of the diagnostic and repair services.
6. Preventive Maintenance for the OBD2 Port
Regular maintenance can help prevent future OBD2 port issues.
6.1 Regular Inspections
Periodically inspect the OBD2 port for any signs of damage or corrosion.
- Visual Check: Perform a visual check of the OBD2 port every few months to look for any signs of damage, such as bent or broken pins, cracks, or loose connections.
- Clean the Port: Clean the OBD2 port with a contact cleaner to remove any dirt or corrosion.
6.2 Proper Use of Scan Tools
Use scan tools correctly to avoid damaging the OBD2 port.
- Secure Connection: Ensure the scan tool is securely connected to the OBD2 port before turning on the ignition.
- Avoid Force: Avoid using excessive force when plugging in or unplugging the scan tool.
- Use Quality Scan Tools: Use high-quality scan tools that are compatible with your vehicle.
6.3 Protect from Environmental Factors
Protect the OBD2 port from moisture and extreme temperatures.
- Keep Dry: Keep the interior of your vehicle dry to prevent moisture from damaging the OBD2 port.
- Avoid Extreme Temperatures: Avoid exposing the OBD2 port to extreme temperatures, such as direct sunlight for extended periods.
- Use a Protective Cover: Consider using a protective cover for the OBD2 port to shield it from dust, dirt, and moisture.
7. Why Choose OBD2-SCANNER.EDU.VN for Your Diagnostic Needs
OBD2-SCANNER.EDU.VN is your trusted resource for all things OBD2.
7.1 Expert Advice and Guidance
We provide expert advice and guidance on OBD2 technology and vehicle diagnostics.
- Comprehensive Articles: Our website features a wealth of comprehensive articles, guides, and tutorials on OBD2 systems, diagnostic trouble codes, and troubleshooting techniques.
- Expert Team: Our team of experienced automotive technicians and diagnostic specialists is dedicated to providing you with accurate and reliable information.
- Personalized Support: We offer personalized support to help you diagnose and resolve OBD2 connection issues.
7.2 Quality Products and Services
We offer high-quality OBD2 scan tools and diagnostic services.
- Wide Selection of Scan Tools: We offer a wide selection of OBD2 scan tools to meet your specific needs and budget.
- Professional Diagnostic Services: We provide professional diagnostic services to help you identify and resolve complex OBD2 issues.
- Reliable Repairs: We offer reliable repair services for OBD2 ports, wiring, and other related components.
7.3 Commitment to Customer Satisfaction
Customer satisfaction is our top priority.
- Responsive Support: We provide responsive support to answer your questions and address your concerns.
- Satisfaction Guarantee: We offer a satisfaction guarantee on all our products and services.
- Positive Reviews: Our satisfied customers consistently leave positive reviews about our products and services.
8. Real-World Scenarios and Solutions
Learn from these real-world examples of OBD2 connection issues and their resolutions.
8.1 Scenario 1: Faulty Scan Tool Cable
Problem: A 2009 Honda Pilot owner reported that their OBD2 scan tool would not connect to the vehicle. They had recently purchased a new scan tool but were still experiencing the same issue.
Diagnosis: After inspecting the scan tool cable, it was discovered that the cable had a small cut near the connector. This cut was causing intermittent connectivity.
Solution: The scan tool cable was replaced with a new one. The new cable resolved the connection issue, and the scan tool was able to communicate with the vehicle.
8.2 Scenario 2: Corroded OBD2 Port
Problem: A 2009 Honda Pilot owner noticed that their OBD2 port was not working. They had tried multiple scan tools, but none of them could establish a connection.
Diagnosis: Upon inspection, the OBD2 port was found to be heavily corroded. The corrosion was preventing the scan tools from making a proper connection.
Solution: The OBD2 port was cleaned with a contact cleaner and a small brush. The corrosion was removed, and the port was able to establish a connection with the scan tools.
8.3 Scenario 3: Blown Fuse
Problem: A 2009 Honda Pilot owner reported that their OBD2 port suddenly stopped working. They had not made any recent changes to the vehicle.
Diagnosis: After checking the fuses, it was discovered that the fuse for the OBD2 port had blown.
Solution: The blown fuse was replaced with a new fuse of the same amperage. The new fuse resolved the issue, and the OBD2 port was able to function normally.
9. OBD2 Scanner Brands Compatible with 2009 Honda Pilot
Choosing the right OBD2 scanner is essential for effective diagnostics.
9.1 Top OBD2 Scanner Brands
- Autel: Autel scanners are known for their advanced features and comprehensive vehicle coverage.
- Launch: Launch scanners are popular among professional mechanics for their reliability and ease of use.
- BlueDriver: BlueDriver is a Bluetooth-based scanner that connects to your smartphone or tablet.
- INNOVA: INNOVA scanners are a good option for DIYers and hobbyists.
- OBDLink: OBDLink scanners are known for their accurate data and reliable performance.
9.2 Features to Look For
- Compatibility: Ensure the scanner is compatible with the 2009 Honda Pilot.
- Diagnostic Trouble Codes (DTCs): The scanner should be able to read and clear DTCs.
- Live Data: The scanner should be able to display live data from the vehicle’s sensors.
- Bi-Directional Control: Some scanners offer bi-directional control, allowing you to command certain functions of the vehicle.
- Software Updates: The scanner should be able to receive software updates to ensure compatibility with the latest vehicles.
9.3 Scanner Comparison Table
| Brand | Model | Compatibility | Features | Price |
|---|---|---|---|---|
| Autel | MaxiCOM MK808 | Excellent | Reads/clears DTCs, live data, bi-directional control, software updates | $500-$700 |
| Launch | CRP129E | Excellent | Reads/clears DTCs, live data, oil reset, ABS/SRS diagnostics, software updates | $200-$400 |
| BlueDriver | Bluetooth | Good | Reads/clears DTCs, live data, repair reports, compatible with iOS/Android | $100-$120 |
| INNOVA | 3100RS | Good | Reads/clears DTCs, live data, battery and charging system test | $75-$100 |
| OBDLink | MX+ | Excellent | Reads/clears DTCs, live data, advanced diagnostics, compatible with iOS/Android | $120-$150 |
10. FAQ: Troubleshooting OBD2 Connection Problems
10.1 What is an OBD2 scanner?
An OBD2 scanner is a diagnostic tool used to read and interpret data from a vehicle’s On-Board Diagnostic system. It helps identify issues by reading diagnostic trouble codes (DTCs) stored in the vehicle’s computer.
10.2 How do I know if my OBD2 port is not working?
If your OBD2 scanner fails to connect to your vehicle’s computer, or if you see a “link error” or “communication error” message, your OBD2 port may not be working. Other signs include a blown fuse, damaged port, or ECU issues.
10.3 Can a blown fuse cause the OBD2 port to stop working?
Yes, a blown fuse can cause the OBD2 port to stop working. The OBD2 port is typically powered by a fuse, and if that fuse blows, the port will not function. Check your vehicle’s owner’s manual for the location of the OBD2 port fuse.
10.4 How do I check the OBD2 port fuse?
To check the OBD2 port fuse, locate the fuse box (usually under the dashboard or in the engine compartment) and identify the fuse for the OBD2 port using the fuse box diagram in your owner’s manual. Visually inspect the fuse for a broken filament or use a multimeter to test for continuity.
10.5 What does it mean when the scan tool says “link error”?
A “link error” message typically indicates that the scan tool is unable to establish a connection with the vehicle’s computer. This can be caused by a faulty scan tool, damaged OBD2 port, blown fuse, or ECU issues.
10.6 Can a damaged OBD2 port be repaired?
Yes, a damaged OBD2 port can often be repaired. Minor damage, such as bent pins or corrosion, can be fixed by cleaning the port or straightening the pins. However, severe damage may require replacing the entire OBD2 port.
10.7 What are the common causes of ECU failure?
Common causes of ECU failure include water damage, electrical surges, extreme temperatures, and physical damage. Symptoms of ECU failure include a persistent check engine light, poor engine performance, and difficulty starting the vehicle.
10.8 How can I prevent OBD2 port problems?
To prevent OBD2 port problems, regularly inspect the port for damage or corrosion, use scan tools correctly to avoid damaging the port, and protect the port from moisture and extreme temperatures.
10.9 Is it safe to drive with a faulty OBD2 port?
It depends on the underlying issue. If the OBD2 port is simply not working, but the vehicle is running normally, it may be safe to drive. However, if the OBD2 port issue is related to a more significant problem, such as an ECU malfunction, it’s best to avoid driving the vehicle until the issue is resolved.
10.10 How much does it cost to repair an OBD2 port?
The cost to repair an OBD2 port can vary depending on the extent of the damage and the labor rates in your area. Minor repairs, such as cleaning the port or straightening pins, may cost $50-$100. Replacing the entire OBD2 port can cost $100-$300 or more.
Experiencing OBD2 connection issues with your 2009 Honda Pilot can be frustrating, but with the right knowledge and tools, you can diagnose and resolve the problem effectively. From checking the fuses to inspecting the wiring and ECU, each step in this guide is designed to help you pinpoint the issue. At OBD2-SCANNER.EDU.VN, we are committed to providing you with the expertise and resources you need to keep your vehicle running smoothly.
Don’t let OBD2 connection problems keep you off the road. Contact us today at +1 (641) 206-8880 or visit our website at OBD2-SCANNER.EDU.VN for expert assistance. Our team is ready to help you diagnose and resolve any OBD2 issues you may be experiencing. Located at 123 Main Street, Los Angeles, CA 90001, United States, we’re here to help you get back on the road with confidence.