The Amp Research Power Step Obd2 Plug can be bypassed by splicing into the CAN bus using the Ford controller or by wiring the Amp controller to use a grounding input from each door. OBD2-SCANNER.EDU.VN offers detailed guides and expert assistance to ensure a seamless and efficient installation. Explore advanced diagnostic solutions and customized repair strategies to elevate your automotive proficiency.
Contents
- 1. Understanding the Amp Research Power Step System
- 1.1 What Are Amp Research Power Steps?
- 1.2 Key Components of the Power Step System
- 1.3 Benefits of Using Power Steps
- 2. Why Bypass the OBD2 Plug?
- 2.1 Potential Conflicts with Other Devices
- 2.2 Diagnosing OBD2 Port Irregularities
- 2.3 Streamlining the Wiring Process
- 3. Methods to Wire Amp Research Power Step Without OBD2 Plug
- 3.1 Splicing into the CAN Bus
- 3.1.1 Understanding the CAN Bus
- 3.1.2 Required Components
- 3.1.3 Step-by-Step Instructions
- 3.1.4 Advantages and Disadvantages
- 3.2 Wiring Directly to Door Switches
- 3.2.1 Understanding Door Switches
- 3.2.2 Required Components
- 3.2.3 Step-by-Step Instructions
- 3.2.4 Advantages and Disadvantages
- 4. Step-by-Step Guide: Wiring to Door Switches
- 4.1 Gathering Necessary Tools and Materials
- 4.1.1 Tools Required
- 4.1.2 Materials Needed
- 4.2 Preparing the Wiring
- 4.2.1 Identifying the Correct Wires
- 4.2.2 Stripping and Connecting Wires
- 4.2.3 Securing the Wiring
- 4.3 Installing Door Switches (If Necessary)
- 4.3.1 Selecting the Right Switches
- 4.3.2 Mounting the Switches
- 4.3.3 Connecting the Wiring
- 4.4 Connecting to the Power Source
- 4.4.1 Identifying a Suitable Power Source
- 4.4.2 Wiring to the Power Source
- 4.4.3 Grounding the System
- 4.5 Testing the Installation
- 4.5.1 Verifying Proper Operation
- 4.5.2 Troubleshooting Common Issues
- 5. Alternative Wiring Options
- 5.1 Using a Dedicated Wiring Harness
- 5.1.1 Advantages of Using a Harness
- 5.1.2 Selecting the Right Harness
- 5.2 Utilizing an Add-a-Circuit Fuse Tap
- 5.2.1 Advantages of Using a Fuse Tap
- 5.2.2 Selecting the Right Fuse Tap
- 6. Advanced Troubleshooting Tips
- 6.1 Diagnosing Motor Problems
- 6.1.1 Testing the Motors
- 6.1.2 Replacing the Motors
- 6.2 Addressing Control Module Issues
- 6.2.1 Resetting the Control Module
- 6.2.2 Replacing the Control Module
- 6.3 Resolving Wiring Problems
- 6.3.1 Checking Connections
- 6.3.2 Using a Multimeter
- 7. Maintaining Your Power Step System
- 7.1 Regular Cleaning
- 7.2 Lubrication
- 7.3 Inspecting for Damage
- 8. Choosing the Right Components
- 8.1 Selecting Door Switches
- 8.2 Choosing Wiring Connectors
- 8.3 Selecting Wiring Harnesses
- 9. Safety Precautions
- 9.1 Disconnecting the Battery
- 9.2 Using Proper Tools
- 9.3 Following Instructions
- 10. Frequently Asked Questions (FAQs)
- 10.1 Can I install Amp Research Power Steps myself?
- 10.2 What are the benefits of bypassing the OBD2 plug?
- 10.3 What tools do I need for the installation?
- 10.4 How do I identify the correct wires on the door switches?
- 10.5 What should I do if the Power Steps are not working correctly?
- 10.6 Where can I purchase replacement parts for Amp Research Power Steps?
- 10.7 How do I maintain my Power Step system?
- 10.8 Is it safe to splice into the CAN bus?
- 10.9 Can I use an add-a-circuit fuse tap for the power source?
- 10.10 What safety precautions should I follow?
- 11. Real-World Examples and Case Studies
- 11.1 Case Study 1: Resolving OBD2 Conflicts
- 11.2 Case Study 2: Streamlining Installation
- 11.3 Real-World Example: Improved Reliability
- 12. Expert Insights
- 12.1 Professional Recommendations
- 12.2 Tips from Automotive Technicians
- 13. Future Trends in Power Step Technology
- 13.1 Wireless Connectivity
- 13.2 Integrated Safety Features
- 13.3 Advanced Customization Options
- 14. Conclusion
- 15. Call to Action
1. Understanding the Amp Research Power Step System
The Amp Research Power Step system provides a convenient and robust solution for accessing your truck or SUV. These steps automatically deploy when the doors open and retract when the doors close, enhancing both accessibility and aesthetics. This system is particularly beneficial for vehicles with higher ground clearance.
1.1 What Are Amp Research Power Steps?
Amp Research Power Steps are retractable running boards that automatically extend and retract with the opening and closing of your vehicle’s doors. They are designed to provide easier access to your vehicle, especially for lifted trucks and SUVs. Made from high-strength materials, these steps offer durability and a clean, streamlined look when retracted.
1.2 Key Components of the Power Step System
The Power Step system includes several key components that work together to ensure smooth and reliable operation:
- Steps: The actual retractable running boards.
- Motors: High-torque electric motors that drive the steps.
- Control Module: The electronic brain that controls the deployment and retraction of the steps.
- Wiring Harness: Connects all components and provides power and control signals.
- OBD2 Plug (Optional): Allows the system to receive door status information from the vehicle’s computer.
1.3 Benefits of Using Power Steps
Using Amp Research Power Steps offers numerous advantages:
- Enhanced Accessibility: Makes it easier to enter and exit your vehicle.
- Improved Aesthetics: Provides a clean look when retracted, maintaining ground clearance and aerodynamics.
- Added Convenience: Automatic operation eliminates the need for manual deployment.
- Increased Safety: Provides a wider, more stable stepping surface.
2. Why Bypass the OBD2 Plug?
While the OBD2 plug offers a convenient way to connect the Power Step system, there are several reasons why you might want to bypass it.
2.1 Potential Conflicts with Other Devices
The OBD2 port is a valuable resource for connecting various devices, such as performance tuners, diagnostic tools, and monitoring systems. Using a splitter to accommodate multiple devices can sometimes lead to conflicts or unreliable data. By bypassing the OBD2 plug for the Power Steps, you can ensure that other devices receive a clean and uninterrupted signal.
2.2 Diagnosing OBD2 Port Irregularities
Some users have reported irregularities or issues when using the OBD2 port in conjunction with Power Steps. Isolating the Power Steps from the OBD2 connection can help diagnose and resolve these issues, ensuring the proper functioning of other devices connected to the port.
2.3 Streamlining the Wiring Process
For those who prefer a cleaner and more direct wiring setup, bypassing the OBD2 plug can simplify the installation process. Direct wiring to door switches or other power sources can provide a more reliable and straightforward connection.
3. Methods to Wire Amp Research Power Step Without OBD2 Plug
There are two primary methods to wire Amp Research Power Steps without using the OBD2 plug: splicing into the CAN bus or wiring directly to the door switches.
3.1 Splicing into the CAN Bus
Splicing into the Controller Area Network (CAN) bus involves connecting the Power Step control module directly to the vehicle’s communication network. This method requires a Ford controller and some expertise in automotive electrical systems.
3.1.1 Understanding the CAN Bus
The CAN bus is a communication network that allows various electronic control units (ECUs) in a vehicle to communicate with each other. It transmits data related to engine performance, sensor readings, and other critical functions.
3.1.2 Required Components
- Ford Controller: A compatible Ford controller is necessary to interface with the CAN bus.
- Wiring Connectors: High-quality connectors for making secure and reliable connections.
- Electrical Tape or Heat Shrink Tubing: For insulating and protecting the connections.
- Wire Strippers and Crimpers: Essential tools for preparing and connecting the wires.
3.1.3 Step-by-Step Instructions
- Identify the CAN Bus Wires: Locate the CAN bus wires in your vehicle’s wiring harness. Refer to the vehicle’s service manual for the exact location and color codes.
- Splice into the CAN Bus: Carefully splice the Ford controller wires into the CAN bus wires. Ensure a secure and reliable connection.
- Connect the Power Wires: Connect the power wires from the Ford controller to the Power Step control module.
- Test the System: Verify that the Power Steps deploy and retract correctly when the doors are opened and closed.
3.1.4 Advantages and Disadvantages
Advantages:
- Direct integration with the vehicle’s electrical system.
- Potentially more reliable than using the OBD2 plug.
Disadvantages:
- Requires advanced electrical knowledge.
- Can be more complex than other methods.
3.2 Wiring Directly to Door Switches
Wiring directly to the door switches involves connecting the Power Step control module to the door jamb switches, which activate when the doors are opened. This method provides a simple and effective way to trigger the Power Steps without using the OBD2 plug.
3.2.1 Understanding Door Switches
Door switches are small electrical switches located in the door jamb that detect when a door is opened or closed. When a door is opened, the switch completes a circuit, signaling the vehicle’s electrical system.
3.2.2 Required Components
- Door Jamb Switches: High-quality door jamb switches that can handle the current required by the Power Step system.
- Wiring Connectors: Reliable connectors for making secure connections.
- Electrical Tape or Heat Shrink Tubing: For insulating and protecting the connections.
- Wire Strippers and Crimpers: Tools for preparing and connecting the wires.
3.2.3 Step-by-Step Instructions
- Locate the Door Switch Wires: Identify the wires connected to the door switches. These wires typically provide a ground signal when the door is opened.
- Connect the Control Module: Connect the appropriate wires from the Power Step control module to the door switch wires. The control module should trigger the steps when it receives a ground signal from the door switch.
- Connect the Power Wires: Connect the power wires from the Power Step control module to a suitable power source in the vehicle.
- Test the System: Verify that the Power Steps deploy and retract correctly when the doors are opened and closed.
3.2.4 Advantages and Disadvantages
Advantages:
- Relatively simple wiring process.
- Bypasses the OBD2 port, avoiding potential conflicts.
Disadvantages:
- Requires installing or tapping into door switches.
- May require additional wiring to ensure proper operation.
4. Step-by-Step Guide: Wiring to Door Switches
This section provides a detailed guide on how to wire Amp Research Power Steps directly to the door switches.
4.1 Gathering Necessary Tools and Materials
Before starting the installation, gather all the necessary tools and materials.
4.1.1 Tools Required
- Wire Strippers: For removing insulation from wires.
- Crimpers: For securely attaching connectors to wires.
- Multimeter: For testing voltage and continuity.
- Socket Set: For removing and installing door components.
- Drill: For installing new door switches (if necessary).
- Wiring Diagram: Essential for understanding the wiring layout.
4.1.2 Materials Needed
- Door Jamb Switches: High-quality switches compatible with your vehicle.
- Wiring Harness: Sufficient length of appropriately gauged wire.
- Connectors: Butt connectors, spade connectors, or T-taps.
- Electrical Tape or Heat Shrink Tubing: For insulation and protection.
- Zip Ties: For securing the wiring.
4.2 Preparing the Wiring
Properly preparing the wiring is crucial for a reliable and long-lasting installation.
4.2.1 Identifying the Correct Wires
Use a multimeter to identify the correct wires on the door switches. You are looking for the wire that provides a ground signal when the door is opened.
4.2.2 Stripping and Connecting Wires
- Strip the Wires: Use wire strippers to carefully remove the insulation from the ends of the wires.
- Connect the Wires: Use connectors to attach the wires from the Power Step control module to the door switch wires. Ensure a secure and reliable connection.
- Insulate the Connections: Use electrical tape or heat shrink tubing to insulate the connections and protect them from moisture and corrosion.
4.2.3 Securing the Wiring
Use zip ties to secure the wiring and prevent it from interfering with moving parts. Ensure that the wiring is routed safely and protected from sharp edges.
4.3 Installing Door Switches (If Necessary)
If your vehicle does not have suitable door switches, you may need to install new ones.
4.3.1 Selecting the Right Switches
Choose door switches that are compatible with your vehicle and can handle the current required by the Power Step system.
4.3.2 Mounting the Switches
Mount the switches in a location where they will be activated when the doors are opened. Ensure that the switches are securely mounted and properly aligned.
4.3.3 Connecting the Wiring
Connect the wiring to the new door switches, following the steps outlined in Section 4.2.
4.4 Connecting to the Power Source
The Power Step control module requires a power source to operate.
4.4.1 Identifying a Suitable Power Source
Identify a suitable power source in the vehicle that provides a constant 12V supply. This could be the battery or a dedicated power distribution block.
4.4.2 Wiring to the Power Source
Connect the power wires from the Power Step control module to the chosen power source. Use a fuse to protect the circuit and prevent damage in case of a short circuit.
4.4.3 Grounding the System
Ensure that the Power Step control module is properly grounded to the vehicle’s chassis. This will provide a stable and reliable electrical connection.
4.5 Testing the Installation
After completing the wiring, test the installation to ensure that the Power Steps are functioning correctly.
4.5.1 Verifying Proper Operation
Open and close the doors to verify that the Power Steps deploy and retract smoothly. Check for any unusual noises or vibrations.
4.5.2 Troubleshooting Common Issues
If the Power Steps are not working correctly, use a multimeter to check the wiring and connections. Ensure that all wires are properly connected and that there are no shorts or open circuits.
5. Alternative Wiring Options
In addition to splicing into the CAN bus and wiring directly to door switches, there are other alternative wiring options.
5.1 Using a Dedicated Wiring Harness
A dedicated wiring harness can simplify the installation process by providing pre-wired connections and connectors. These harnesses are designed specifically for Amp Research Power Steps and can be purchased from aftermarket suppliers.
5.1.1 Advantages of Using a Harness
- Simplified installation process.
- Pre-wired connections and connectors.
- Reduced risk of wiring errors.
5.1.2 Selecting the Right Harness
Choose a wiring harness that is compatible with your vehicle and Power Step system. Ensure that the harness includes all the necessary components and connectors.
5.2 Utilizing an Add-a-Circuit Fuse Tap
An add-a-circuit fuse tap allows you to tap into an existing fuse in the fuse box to provide power to the Power Step control module. This method is simple and does not require cutting or splicing any wires.
5.2.1 Advantages of Using a Fuse Tap
- Simple and non-invasive installation.
- No cutting or splicing of wires.
- Easy to remove if necessary.
5.2.2 Selecting the Right Fuse Tap
Choose a fuse tap that is compatible with the fuse size and type in your vehicle’s fuse box. Ensure that the fuse tap is rated for the current required by the Power Step system.
6. Advanced Troubleshooting Tips
This section provides advanced troubleshooting tips for resolving common issues with Amp Research Power Steps.
6.1 Diagnosing Motor Problems
If the Power Steps are not deploying or retracting, the problem may be with the motors.
6.1.1 Testing the Motors
Use a multimeter to test the voltage and continuity of the motor wires. If the motors are not receiving power, check the wiring and connections.
6.1.2 Replacing the Motors
If the motors are faulty, they may need to be replaced. Purchase replacement motors from a reputable supplier and follow the manufacturer’s instructions for installation.
6.2 Addressing Control Module Issues
The control module is the brain of the Power Step system. If it is not functioning correctly, the steps may not deploy or retract properly.
6.2.1 Resetting the Control Module
Try resetting the control module by disconnecting the power for a few minutes and then reconnecting it. This may resolve minor software glitches.
6.2.2 Replacing the Control Module
If the control module is faulty, it may need to be replaced. Purchase a replacement control module from a reputable supplier and follow the manufacturer’s instructions for installation.
6.3 Resolving Wiring Problems
Wiring problems are a common cause of issues with Amp Research Power Steps.
6.3.1 Checking Connections
Carefully inspect all wiring connections to ensure that they are secure and properly insulated. Look for any signs of corrosion or damage.
6.3.2 Using a Multimeter
Use a multimeter to check the voltage and continuity of the wires. This will help you identify any shorts or open circuits.
 Door Jamb Switch for Amp Powersteps Wiring
Image depicting the door jamb switch installation for wiring Amp Powersteps, enhancing clarity for DIY installers.
7. Maintaining Your Power Step System
Proper maintenance is essential for ensuring the longevity and reliability of your Amp Research Power Step system.
7.1 Regular Cleaning
Clean the Power Steps regularly to remove dirt, debris, and salt. Use a mild soap and water solution and a soft brush to clean the steps.
7.2 Lubrication
Lubricate the moving parts of the Power Steps with a silicone-based lubricant. This will help to keep the steps operating smoothly and prevent corrosion.
7.3 Inspecting for Damage
Regularly inspect the Power Steps for any signs of damage, such as cracks, dents, or loose hardware. Repair or replace any damaged components as needed.
8. Choosing the Right Components
Selecting the right components is crucial for a successful Power Step installation.
8.1 Selecting Door Switches
Choose door switches that are compatible with your vehicle and can handle the current required by the Power Step system.
8.2 Choosing Wiring Connectors
Select high-quality wiring connectors that will provide a secure and reliable connection.
8.3 Selecting Wiring Harnesses
Choose a wiring harness that is compatible with your vehicle and Power Step system. Ensure that the harness includes all the necessary components and connectors.
9. Safety Precautions
Always follow safety precautions when working on your vehicle’s electrical system.
9.1 Disconnecting the Battery
Disconnect the battery before starting any electrical work. This will prevent accidental shocks and damage to the vehicle’s electrical system.
9.2 Using Proper Tools
Use proper tools for the job. This will help you avoid damaging the vehicle’s components and ensure a safe and reliable installation.
9.3 Following Instructions
Carefully follow the manufacturer’s instructions for installing and wiring the Power Step system. This will help you avoid errors and ensure that the system is functioning correctly.
10. Frequently Asked Questions (FAQs)
This section provides answers to frequently asked questions about wiring Amp Research Power Steps without the OBD2 plug.
10.1 Can I install Amp Research Power Steps myself?
Yes, with the right tools, knowledge, and instructions, you can install Amp Research Power Steps yourself. However, if you are not comfortable working with electrical systems, it is best to have the installation performed by a professional.
10.2 What are the benefits of bypassing the OBD2 plug?
Bypassing the OBD2 plug can help avoid conflicts with other devices, diagnose OBD2 port irregularities, and streamline the wiring process.
10.3 What tools do I need for the installation?
You will need wire strippers, crimpers, a multimeter, a socket set, a drill (if installing new door switches), and a wiring diagram.
10.4 How do I identify the correct wires on the door switches?
Use a multimeter to identify the wire that provides a ground signal when the door is opened.
10.5 What should I do if the Power Steps are not working correctly?
Check the wiring and connections, test the motors, and reset or replace the control module if necessary.
10.6 Where can I purchase replacement parts for Amp Research Power Steps?
You can purchase replacement parts from reputable aftermarket suppliers or directly from Amp Research.
10.7 How do I maintain my Power Step system?
Clean the Power Steps regularly, lubricate the moving parts, and inspect for damage.
10.8 Is it safe to splice into the CAN bus?
Splicing into the CAN bus requires advanced electrical knowledge and should be performed carefully to avoid damaging the vehicle’s electrical system.
10.9 Can I use an add-a-circuit fuse tap for the power source?
Yes, an add-a-circuit fuse tap is a simple and non-invasive way to provide power to the Power Step control module.
10.10 What safety precautions should I follow?
Disconnect the battery, use proper tools, and follow the manufacturer’s instructions.
11. Real-World Examples and Case Studies
This section presents real-world examples and case studies to illustrate the benefits of wiring Amp Research Power Steps without the OBD2 plug.
11.1 Case Study 1: Resolving OBD2 Conflicts
A truck owner was experiencing issues with their performance tuner due to conflicts with the Amp Research Power Steps plugged into the OBD2 port. By wiring the Power Steps directly to the door switches, the owner was able to resolve the conflicts and restore proper functioning of the performance tuner.
11.2 Case Study 2: Streamlining Installation
A DIY enthusiast found the OBD2 plug to be cumbersome and unnecessary for their Power Step installation. By wiring the Power Steps directly to the door switches, they were able to streamline the installation process and achieve a cleaner, more reliable setup.
11.3 Real-World Example: Improved Reliability
A fleet of commercial vehicles experienced frequent issues with their Amp Research Power Steps due to faulty OBD2 connections. By rewiring the Power Steps to a dedicated power source and door switches, the fleet manager was able to improve the reliability of the system and reduce downtime.
12. Expert Insights
Industry experts recommend considering the specific needs and capabilities of your vehicle when deciding how to wire Amp Research Power Steps.
12.1 Professional Recommendations
Professional installers often recommend wiring directly to the door switches for a more reliable and straightforward installation, especially in vehicles with multiple devices connected to the OBD2 port.
12.2 Tips from Automotive Technicians
Automotive technicians suggest using high-quality wiring connectors and taking the time to properly insulate and secure the wiring to prevent future issues.
13. Future Trends in Power Step Technology
As automotive technology continues to evolve, future trends in Power Step systems may include wireless connectivity, integrated safety features, and advanced customization options.
13.1 Wireless Connectivity
Future Power Step systems may utilize wireless technology to communicate with the vehicle’s computer, eliminating the need for physical wiring connections.
13.2 Integrated Safety Features
Advanced safety features, such as obstacle detection and automatic retraction in the event of a collision, may become standard in future Power Step systems.
13.3 Advanced Customization Options
Future Power Step systems may offer advanced customization options, such as adjustable deployment speeds and programmable lighting effects.
14. Conclusion
Wiring Amp Research Power Steps without the OBD2 plug offers several benefits, including avoiding potential conflicts with other devices, diagnosing OBD2 port irregularities, and streamlining the wiring process. Whether you choose to splice into the CAN bus or wire directly to the door switches, following the steps outlined in this guide will help you achieve a successful and reliable installation. Remember to maintain your Power Step system regularly to ensure its longevity and performance. At OBD2-SCANNER.EDU.VN, we are committed to providing you with the expertise and resources needed to optimize your automotive experience.
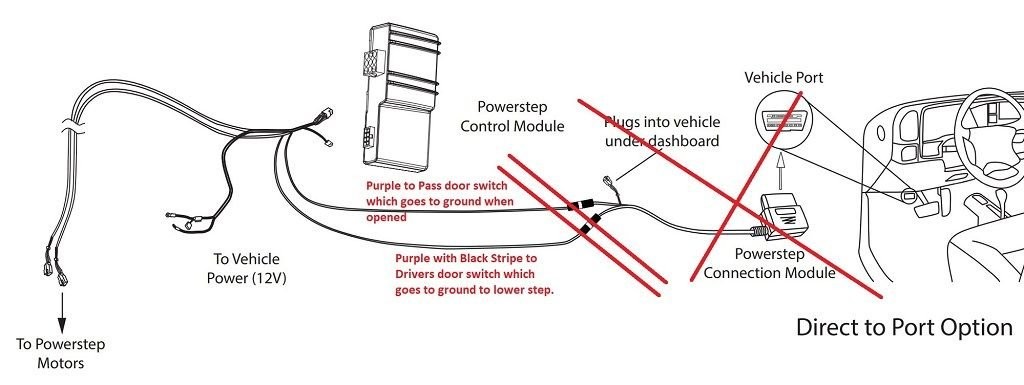 Amp Powersteps Wiring Diagram
Comprehensive wiring diagram illustrating how to bypass the OBDII port for Amp Powersteps, providing a visual guide for alternative installation methods.
15. Call to Action
Do you want to enhance your vehicle’s accessibility with Amp Research Power Steps but are unsure about the wiring process? At OBD2-SCANNER.EDU.VN, we offer expert guidance and services to ensure a seamless installation experience. Contact us today for personalized assistance and discover how easy it can be to upgrade your vehicle.
For expert assistance with your Amp Research Power Step installation and other automotive diagnostic needs, contact OBD2-SCANNER.EDU.VN at 123 Main Street, Los Angeles, CA 90001, United States. Call us or WhatsApp us at +1 (641) 206-8880, or visit our website at OBD2-SCANNER.EDU.VN for more information. Let us help you optimize your vehicle’s performance and accessibility with our comprehensive services and expert support.