Arduino Obd2 Projects offer a fantastic way to tap into your vehicle’s data and create custom automotive solutions. OBD2-SCANNER.EDU.VN is dedicated to empowering auto enthusiasts and professionals with the knowledge and tools needed to successfully implement these projects. By understanding the intricacies of OBD2 and leveraging the capabilities of Arduino, you can unlock a wealth of diagnostic and performance-enhancing possibilities. Let’s explore the exciting world of Arduino OBD2 projects and how you can get started.
1. What is the Significance of Arduino OBD2 Projects in Automotive Customization?
Arduino OBD2 projects allow you to create custom automotive solutions by tapping into your vehicle’s On-Board Diagnostics (OBD2) data. This opens doors for creating personalized dashboards, performance monitors, and diagnostic tools tailored to your specific needs and vehicle.
Arduino OBD2 projects are revolutionizing automotive customization by providing a flexible and accessible platform for enthusiasts and professionals alike. By connecting an Arduino to your vehicle’s OBD2 port, you can access a wealth of real-time data, including engine RPM, coolant temperature, vehicle speed, and diagnostic trouble codes (DTCs). This data can then be used to create custom dashboards, performance monitors, and diagnostic tools tailored to your specific needs and vehicle. The open-source nature of Arduino allows for endless possibilities, from simple data logging applications to complex engine management systems. According to a study by Grand View Research, the global automotive aftermarket size was valued at USD 397.7 billion in 2022 and is expected to grow, driven by increasing vehicle age and the demand for customization. Arduino OBD2 projects tap into this market by providing cost-effective and customizable solutions for vehicle diagnostics and performance monitoring.
2. What Key Components Are Required for an Arduino OBD2 Project?
The essential components include an Arduino board, an OBD2 adapter, a CAN bus module (if needed), and a display or interface for data output. Additionally, you will need appropriate libraries and software for data processing and visualization.
To embark on an Arduino OBD2 project, you’ll need a few key components. First and foremost, an Arduino board such as the Uno, Nano, or Mega serves as the brains of the operation. An OBD2 adapter cable is necessary to physically connect the Arduino to your vehicle’s OBD2 port. If your vehicle uses the CAN bus protocol, a CAN bus module like the MCP2515 is required to translate the data. For displaying the information, you can use an LCD screen, an OLED display, or even send the data to a smartphone app via Bluetooth. Don’t forget the necessary libraries, such as the OBD2 library for Arduino, which simplifies the process of reading and interpreting OBD2 data. Selecting the right components ensures compatibility and streamlines the development process.
3. How Do I Determine if My Motorcycle Supports the OBD2 Protocol for an Arduino Project?
Check your motorcycle’s documentation or consult online forums specific to your bike model. Some motorcycles, especially newer models, may support OBD2 or similar diagnostic protocols, even if they don’t have a standard OBD2 port.
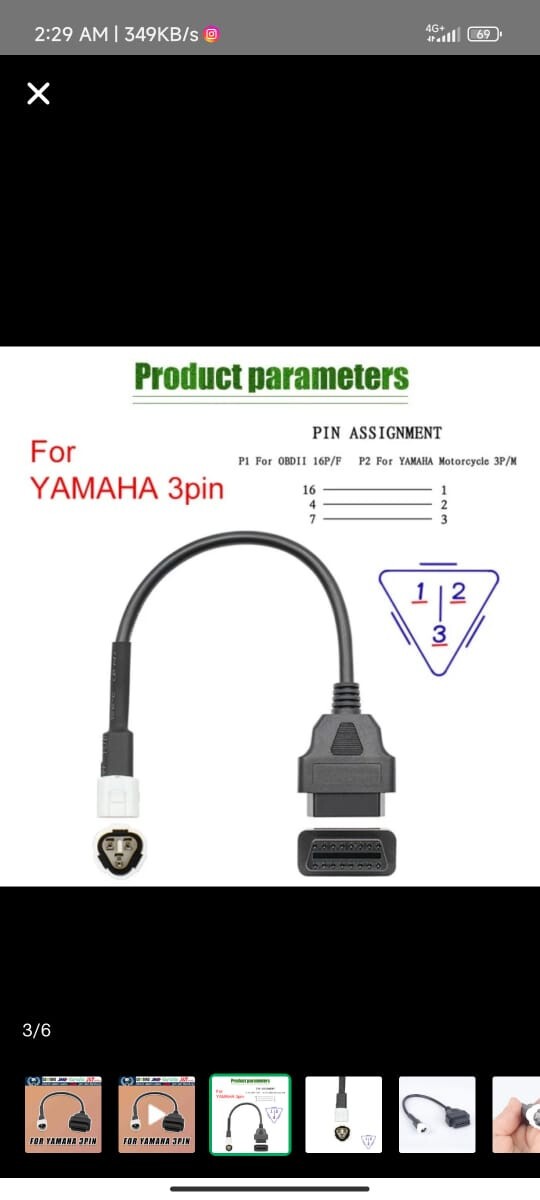
 Motorcycle ECU Connection
Determining OBD2 support on a motorcycle requires a bit of investigation. Start by consulting your motorcycle’s owner’s manual or service documentation. Online forums and communities dedicated to your specific bike model can also provide valuable insights. Look for information on diagnostic ports or protocols used by the ECU (Engine Control Unit). While many motorcycles don’t have a standard OBD2 port like cars, some newer models may support OBD2 or similar protocols via a proprietary connector. If your bike is OBD2-compliant, you’ll need to find the correct adapter to connect it to your Arduino. Keep in mind that even if your bike doesn’t officially support OBD2, there might be alternative ways to access ECU data, such as direct connection to the ECU’s communication lines, but this requires advanced knowledge and caution.
4. What Are the Initial Steps to Take When Starting an Arduino OBD2 Project?
Begin by researching your vehicle’s OBD2 compatibility and the specific PIDs (Parameter IDs) it supports. Then, gather the necessary hardware components, install the Arduino IDE, and familiarize yourself with the OBD2 library for Arduino.
Starting an Arduino OBD2 project involves a few crucial initial steps. First, research your vehicle’s OBD2 compatibility. Not all vehicles support the same set of PIDs (Parameter IDs), which are codes used to request specific data from the ECU. Identify the PIDs that your vehicle supports and that you’re interested in monitoring. Next, gather the necessary hardware components, including an Arduino board, an OBD2 adapter, and any required modules like a CAN bus interface. Install the Arduino IDE on your computer and familiarize yourself with the OBD2 library for Arduino, which provides functions for sending OBD2 requests and receiving data. With these steps completed, you’ll be well-prepared to start coding and building your project.
5. What Is the Role of Parameter IDs (PIDs) in Arduino OBD2 Projects?
PIDs are codes used to request specific data from the vehicle’s ECU, such as engine speed, coolant temperature, and throttle position. Understanding and using the correct PIDs is essential for retrieving accurate data.
Parameter IDs (PIDs) are the key to unlocking the wealth of data available through your vehicle’s OBD2 system. Each PID represents a specific piece of information, such as engine speed (RPM), coolant temperature, vehicle speed, or throttle position. When you send an OBD2 request to the ECU, you include the PID of the data you want to retrieve. The ECU then responds with the corresponding value. Understanding which PIDs are supported by your vehicle and knowing how to interpret the data they provide is crucial for any Arduino OBD2 project. Resources like the Wikipedia article on OBD2 PIDs can be invaluable for identifying the correct PIDs for your desired data.
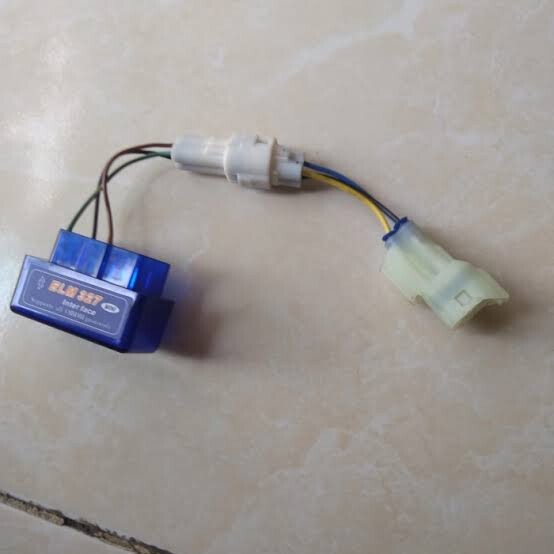
6. How Can I Connect My Arduino to My Vehicle’s OBD2 Port if It Doesn’t Have a Standard Connector?
You may need to use a custom adapter or wiring harness that connects to the ECU’s communication port. Research the specific wiring diagram for your vehicle and ensure proper connections to avoid damaging the ECU.
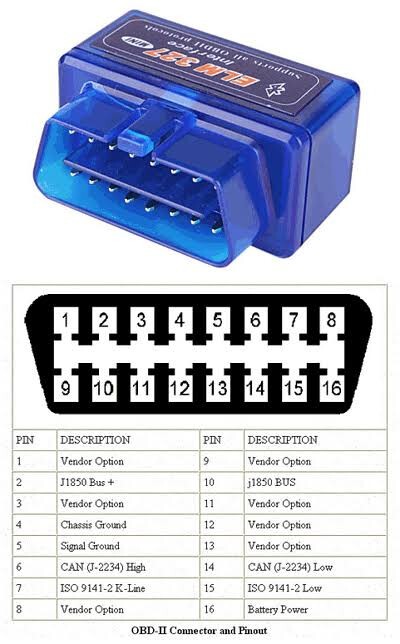
 OBD2 Connector Pinout Diagram
Connecting your Arduino to a vehicle without a standard OBD2 port requires a bit of ingenuity. You’ll likely need to create a custom adapter or wiring harness that connects to the ECU’s communication port. This involves researching the specific wiring diagram for your vehicle, which can often be found in service manuals or online forums. Identify the pins on the ECU that correspond to the OBD2 communication lines, such as CAN high, CAN low, and ground. Carefully connect these pins to your Arduino, using appropriate connectors and wiring. It’s crucial to ensure proper connections to avoid damaging the ECU. Double-check your wiring before applying power. Consider consulting with experienced automotive electricians or electronics enthusiasts for guidance.
7. What Are the Common Communication Protocols Used in OBD2 Systems and How Do They Affect Arduino Projects?
Common protocols include CAN (Controller Area Network), ISO 9141-2, and SAE J1850. The protocol used by your vehicle determines the type of interface and libraries required for your Arduino project.
OBD2 systems use several communication protocols, each with its own characteristics and requirements. The most common protocol is CAN (Controller Area Network), which is widely used in modern vehicles. Other protocols include ISO 9141-2, SAE J1850 VPW, and SAE J1850 PWM. The protocol used by your vehicle determines the type of interface and libraries required for your Arduino project. For example, if your vehicle uses CAN, you’ll need a CAN bus module like the MCP2515 to interface with the OBD2 port. The OBD2 library for Arduino typically supports multiple protocols, but you’ll need to configure it correctly for your vehicle’s specific protocol. Identifying the correct protocol is essential for successful communication with the ECU.
8. How Can I Display the Data Collected From My Vehicle’s OBD2 Port Using Arduino?
Data can be displayed on an LCD screen, an OLED display, or sent to a smartphone app via Bluetooth. Choose a display method that suits your project’s needs and your programming skills.
Displaying the data collected from your vehicle’s OBD2 port using Arduino offers several options. An LCD screen is a simple and cost-effective choice for displaying numerical data and text. OLED displays provide a more visually appealing interface with higher contrast and resolution. For wireless data display, you can use a Bluetooth module to send the data to a smartphone app. This allows you to create a custom dashboard on your phone or tablet. The choice of display method depends on your project’s requirements and your programming skills. Consider factors like readability, size, power consumption, and ease of integration when selecting a display. Libraries like the LiquidCrystal library for LCDs and the Adafruit GFX library for OLEDs can simplify the display process.
9. What Are Some Practical Applications of Arduino OBD2 Projects Beyond Basic Data Monitoring?
Beyond basic monitoring, Arduino OBD2 projects can be used for creating custom gauges, data loggers, performance analyzers, and even simple engine control systems.
 Arduino Based Car Computer
Arduino OBD2 projects extend far beyond basic data monitoring. You can create custom gauges that display real-time data in a visually appealing format. Data loggers can record vehicle parameters over time, allowing you to analyze performance and identify potential issues. Performance analyzers can calculate metrics like acceleration, horsepower, and fuel economy. More advanced projects can even implement simple engine control systems, such as adjusting fuel injection or ignition timing based on sensor data. The possibilities are endless, limited only by your imagination and technical skills. These projects can provide valuable insights into your vehicle’s performance and help you optimize its operation.
10. How Can I Troubleshoot Common Issues Encountered in Arduino OBD2 Projects?
Common issues include communication errors, incorrect data readings, and hardware malfunctions. Start by checking your wiring, verifying your code, and ensuring that your vehicle supports the requested PIDs.
Troubleshooting Arduino OBD2 projects often involves dealing with communication errors, incorrect data readings, and hardware malfunctions. If you’re experiencing communication errors, double-check your wiring and ensure that your Arduino is properly connected to the OBD2 port. Verify that your code is correctly configured for your vehicle’s communication protocol and that you’re using the correct PIDs. If you’re getting incorrect data readings, consult the OBD2 documentation for your vehicle to ensure that you’re interpreting the data correctly. Hardware malfunctions can be identified by testing individual components and looking for signs of damage. Online forums and communities can provide valuable troubleshooting tips and solutions to common problems. Don’t be afraid to ask for help when you’re stuck.
11. What Role Does the Arduino IDE Play in Developing OBD2 Applications?
The Arduino IDE is the software used to write, compile, and upload code to the Arduino board. It provides a user-friendly interface and supports a wide range of libraries and examples, making it easier to develop OBD2 applications.
The Arduino IDE (Integrated Development Environment) is the cornerstone of developing OBD2 applications with Arduino. This software allows you to write, compile, and upload code to your Arduino board. The Arduino IDE provides a user-friendly interface, complete with a text editor for writing code, a compiler for translating code into machine-readable instructions, and an uploader for transferring the code to the Arduino board. It also supports a vast library of pre-written code modules, including the OBD2 library, which simplifies the process of interacting with your vehicle’s OBD2 system. With its intuitive interface and extensive resources, the Arduino IDE makes it easier than ever to bring your OBD2 project ideas to life.
12. What Are the Advantages of Using the CAN Bus Protocol in Arduino OBD2 Projects?
CAN bus offers faster communication speeds, better error handling, and greater flexibility compared to older OBD2 protocols. It is also the dominant protocol in modern vehicles, making it essential for many Arduino OBD2 projects.
The CAN (Controller Area Network) bus protocol offers several advantages in Arduino OBD2 projects. CAN provides faster communication speeds compared to older protocols like ISO 9141-2 and SAE J1850. This allows for real-time monitoring of multiple parameters without lag. CAN also features robust error handling mechanisms, ensuring reliable data transmission. Furthermore, CAN offers greater flexibility in terms of addressing and message formatting. As the dominant protocol in modern vehicles, CAN is essential for accessing the full range of data available through the OBD2 system. Using CAN in your Arduino OBD2 projects unlocks the potential for advanced features and improved performance.
13. How Can I Ensure the Security of My Arduino OBD2 Project to Prevent Unauthorized Access?
Implement security measures such as password protection, data encryption, and physical access control to prevent unauthorized access to your vehicle’s data and systems.
Security is a critical consideration in Arduino OBD2 projects. Unauthorized access to your vehicle’s data and systems could have serious consequences. To mitigate these risks, implement security measures such as password protection to prevent unauthorized users from accessing your Arduino project. Encrypt sensitive data transmitted between the Arduino and other devices to protect it from eavesdropping. Limit physical access to the Arduino and OBD2 port to prevent tampering. Consider using a secure bootloader to prevent unauthorized firmware updates. Regularly update your Arduino’s firmware and libraries to patch security vulnerabilities. By taking these precautions, you can significantly enhance the security of your Arduino OBD2 project.
14. What Are Some Advanced Techniques for Data Analysis in Arduino OBD2 Projects?
Advanced techniques include data filtering, smoothing, and statistical analysis. These techniques can help you extract meaningful insights from the raw OBD2 data and create more sophisticated applications.
 OBD2 Diagnostic Data Visualization
To take your Arduino OBD2 projects to the next level, explore advanced data analysis techniques. Data filtering can remove noise and outliers from the raw OBD2 data, improving accuracy. Smoothing algorithms like moving averages can reduce fluctuations and reveal underlying trends. Statistical analysis techniques such as regression and correlation can help you identify relationships between different parameters. These techniques can be implemented using Arduino’s built-in math functions or by importing specialized libraries. By applying advanced data analysis, you can extract meaningful insights from the OBD2 data and create more sophisticated applications such as predictive maintenance systems or performance optimization tools.
15. What Are the Legal and Ethical Considerations When Working With Vehicle Data in Arduino OBD2 Projects?
Be aware of data privacy laws and regulations, and respect the vehicle owner’s privacy. Only collect data that is necessary for your project, and obtain consent before sharing or using the data for other purposes.
When working with vehicle data in Arduino OBD2 projects, it’s important to consider the legal and ethical implications. Be aware of data privacy laws and regulations in your jurisdiction, such as GDPR in Europe or CCPA in California. Respect the vehicle owner’s privacy by only collecting data that is necessary for your project. Obtain explicit consent before sharing or using the data for any other purposes. Avoid collecting or storing personally identifiable information (PII) unless it’s absolutely necessary. Implement security measures to protect the data from unauthorized access. Be transparent about how you’re using the data and give vehicle owners the ability to access and control their data. By adhering to these principles, you can ensure that your Arduino OBD2 projects are both legal and ethical.
16. How Can I Integrate GPS Data With My Arduino OBD2 Project for Enhanced Tracking and Analysis?
Use a GPS module to obtain location data and combine it with OBD2 data to track vehicle location, speed, and other parameters in real-time. This can be useful for creating custom navigation systems or vehicle tracking applications.
Integrating GPS data with your Arduino OBD2 project opens up a world of possibilities for enhanced tracking and analysis. By adding a GPS module to your Arduino setup, you can obtain real-time location data and combine it with the OBD2 data from your vehicle. This allows you to track vehicle location, speed, and other parameters simultaneously. You can then use this data to create custom navigation systems, vehicle tracking applications, or even geofencing systems that trigger alerts when the vehicle enters or exits a predefined area. GPS data can also be used to enhance data analysis by providing context to the OBD2 readings. For example, you can analyze fuel efficiency based on driving conditions and terrain. Integrating GPS data requires a GPS module, appropriate libraries for parsing GPS data, and a method for combining the GPS and OBD2 data streams.
17. What Are Some Open-Source Resources and Communities That Can Help Me With My Arduino OBD2 Project?
Explore online forums, GitHub repositories, and community websites dedicated to Arduino and OBD2. These resources offer code examples, tutorials, and support from experienced developers.
Arduino Based Car Computer
When embarking on an Arduino OBD2 project, you’re not alone. A wealth of open-source resources and communities are available to help you along the way. Online forums like the Arduino Forum and the Stack Overflow community offer a platform to ask questions, share knowledge, and troubleshoot issues. GitHub repositories are a treasure trove of code examples, libraries, and complete projects contributed by developers from around the world. Websites dedicated to Arduino and OBD2, such as the OBD2-SCANNER.EDU.VN, provide tutorials, articles, and project ideas. Engaging with these resources and communities can accelerate your learning, provide valuable insights, and help you overcome challenges in your Arduino OBD2 journey.
18. How Can I Calibrate the Data Obtained From the OBD2 Port to Ensure Accuracy in My Arduino Projects?
Compare the OBD2 data with known values or readings from other sensors. Use calibration equations or lookup tables to adjust the OBD2 data and compensate for any discrepancies.
Calibrating the data obtained from the OBD2 port is essential for ensuring accuracy in your Arduino projects. OBD2 data can sometimes be subject to errors or inconsistencies due to sensor drift, manufacturing tolerances, or other factors. To calibrate the data, compare the OBD2 readings with known values or readings from other sensors that you trust. For example, you can compare the OBD2 coolant temperature reading with the reading from an external temperature sensor. If there are discrepancies, use calibration equations or lookup tables to adjust the OBD2 data and compensate for the errors. Calibration equations can be derived from experimental data or based on theoretical models. Lookup tables can be created by mapping OBD2 readings to corresponding calibrated values. Regularly recalibrate your OBD2 data to maintain accuracy over time.
19. Can Arduino OBD2 Projects Be Used for Remote Vehicle Diagnostics and Monitoring?
Yes, by adding a cellular or Wi-Fi module to your Arduino project, you can transmit OBD2 data to a remote server or cloud platform for real-time diagnostics and monitoring.
Arduino OBD2 projects can be extended for remote vehicle diagnostics and monitoring. By adding a cellular or Wi-Fi module to your Arduino setup, you can transmit OBD2 data to a remote server or cloud platform in real-time. This enables you to monitor vehicle performance, diagnose issues, and track location from anywhere with an internet connection. Remote vehicle diagnostics can be used for fleet management, preventative maintenance, and stolen vehicle recovery. The remote server can be used to store and analyze the data, generate alerts, and provide insights into vehicle health. Implementing remote vehicle diagnostics requires a cellular or Wi-Fi module, a data plan, a remote server or cloud platform, and appropriate software for data transmission and processing.
20. How Do Electric Vehicles (EVs) Impact Arduino OBD2 Projects, and What Unique Data Can Be Accessed?
EVs have different diagnostic parameters compared to gasoline vehicles. Arduino OBD2 projects with EVs can access data such as battery voltage, motor temperature, and energy consumption.
Electric vehicles (EVs) are changing the landscape of Arduino OBD2 projects. EVs have different diagnostic parameters compared to gasoline vehicles. While some OBD2 PIDs remain the same, EVs offer unique data points related to their electric powertrains. Arduino OBD2 projects with EVs can access data such as battery voltage, current, and temperature; motor speed and torque; energy consumption and regeneration; and state of charge. This data can be used to create custom dashboards, range estimators, and energy management systems. Working with EV data requires an understanding of EV-specific OBD2 PIDs and communication protocols. As EVs become more prevalent, Arduino OBD2 projects will play an increasingly important role in EV diagnostics and customization.
21. What Are Some Examples of Real-World Applications of Arduino OBD2 Projects?
Examples include creating fuel efficiency monitors, custom dashboard displays, vehicle performance trackers, and diagnostic code readers. These projects can be used by hobbyists, mechanics, and automotive enthusiasts.
 OBD2 Car Performance Monitor
Arduino OBD2 projects have a wide range of real-world applications. Fuel efficiency monitors can help drivers optimize their driving habits and reduce fuel consumption. Custom dashboard displays can provide real-time information on vehicle performance and critical parameters. Vehicle performance trackers can record data over time, allowing users to analyze their driving habits and identify potential issues. Diagnostic code readers can retrieve and interpret diagnostic trouble codes (DTCs), helping mechanics and vehicle owners diagnose and repair problems. These projects can be used by hobbyists, mechanics, and automotive enthusiasts to gain insights into their vehicles and improve their performance.
22. How Can I Create a Custom Dashboard Display for My Car Using an Arduino OBD2 Project?
Use an LCD or OLED screen to display real-time data from the OBD2 port, such as speed, RPM, and engine temperature. Design a user-friendly interface and program the Arduino to read and display the desired parameters.
Creating a custom dashboard display for your car using an Arduino OBD2 project involves several steps. First, choose an LCD or OLED screen that suits your needs in terms of size, resolution, and readability. Then, design a user-friendly interface that displays the real-time data you want to monitor, such as speed, RPM, engine temperature, and fuel consumption. Program the Arduino to read the desired parameters from the OBD2 port and format them for display on the screen. Use libraries like the LiquidCrystal library for LCDs or the Adafruit GFX library for OLEDs to simplify the display process. Consider adding features like customizable layouts, alarm thresholds, and data logging capabilities. With a custom dashboard display, you can have all the information you need right at your fingertips.
23. What Is the Best Way to Store and Analyze Data Collected From an Arduino OBD2 Project?
Use an SD card module to store data locally or transmit it to a computer or cloud server for further analysis. Tools like Excel, MATLAB, or specialized data analysis software can be used to visualize and interpret the data.
Storing and analyzing data collected from an Arduino OBD2 project is essential for gaining insights into vehicle performance and identifying potential issues. The best way to store the data depends on the volume and frequency of the data. For small to medium-sized datasets, an SD card module can be used to store the data locally on an SD card. For larger datasets, it’s better to transmit the data to a computer or cloud server for further analysis. This can be done using a serial connection, Bluetooth, Wi-Fi, or cellular module. Once the data is stored, you can use tools like Excel, MATLAB, or specialized data analysis software to visualize and interpret the data. These tools allow you to create graphs, charts, and statistical analyses that can reveal trends, patterns, and anomalies in the data.
24. How Can I Use Arduino OBD2 to Monitor Fuel Efficiency in Real-Time?
Retrieve data such as engine RPM, vehicle speed, and fuel consumption rate from the OBD2 port. Calculate fuel efficiency metrics like miles per gallon (MPG) and display them on a screen or log them for later analysis.
Monitoring fuel efficiency in real-time with an Arduino OBD2 project involves retrieving data such as engine RPM, vehicle speed, and fuel consumption rate from the OBD2 port. Calculate fuel efficiency metrics like miles per gallon (MPG) or liters per 100 kilometers (L/100km) using the following formulas:
- MPG = (Vehicle Speed) / (Fuel Consumption Rate)
- L/100km = (Fuel Consumption Rate * 100) / (Vehicle Speed)
Display these metrics on a screen or log them to a file for later analysis. Consider adding features like average MPG calculation, fuel consumption graphs, and alerts for inefficient driving. By monitoring fuel efficiency in real-time, drivers can adjust their driving habits and reduce fuel consumption.
25. What Are Some Resources for Learning More About OBD2 and Automotive Diagnostics?
Explore online courses, books, and websites dedicated to OBD2 and automotive diagnostics. Consider joining automotive enthusiast communities and attending workshops or seminars to expand your knowledge.
To deepen your understanding of OBD2 and automotive diagnostics, explore the wealth of resources available online and offline. Online courses on platforms like Coursera, Udemy, and edX offer structured learning paths on OBD2, engine management systems, and vehicle diagnostics. Books like “OBD2 Automotive Computer Systems” by Robert Bosch GmbH provide in-depth knowledge of OBD2 standards and protocols. Websites dedicated to automotive diagnostics, such as OBD2-SCANNER.EDU.VN, offer articles, tutorials, and troubleshooting tips. Consider joining automotive enthusiast communities like car forums and online groups to connect with other enthusiasts and experts. Attending workshops or seminars on automotive diagnostics can provide hands-on experience and valuable insights. By continuously learning and expanding your knowledge, you can become a proficient Arduino OBD2 developer and automotive diagnostician.
26. How Can I Use Arduino OBD2 to Create a Vehicle Performance Tracker?
Collect data such as speed, acceleration, and engine parameters from the OBD2 port and log it over time. Analyze the data to track vehicle performance metrics and identify areas for improvement.
Creating a vehicle performance tracker with an Arduino OBD2 project involves collecting data such as speed, acceleration, engine RPM, and throttle position from the OBD2 port and logging it over time. Store the data on an SD card or transmit it to a computer or cloud server for analysis. Analyze the data to track vehicle performance metrics such as 0-60 mph time, quarter-mile time, horsepower, and torque. Use tools like Excel, MATLAB, or specialized data analysis software to visualize the data and identify areas for improvement. Consider adding features like GPS tracking, customizable reports, and performance comparison tools. With a vehicle performance tracker, you can gain valuable insights into your vehicle’s performance and optimize its operation.
27. What Types of Sensors Can Be Integrated With an Arduino OBD2 Project for Enhanced Data Collection?
Additional sensors such as temperature sensors, pressure sensors, and accelerometers can be integrated to collect data beyond what is available through the OBD2 port.
To enhance data collection in your Arduino OBD2 projects, consider integrating additional sensors. Temperature sensors can measure ambient temperature, exhaust gas temperature, or brake temperature. Pressure sensors can measure boost pressure, oil pressure, or fuel pressure. Accelerometers can measure vehicle acceleration, braking force, and cornering forces. These sensors can provide data that is not available through the OBD2 port, allowing you to gain a more complete picture of your vehicle’s performance and environment. Integrating additional sensors requires selecting the appropriate sensors, connecting them to the Arduino, and writing code to read and process the sensor data. Be sure to calibrate the sensors to ensure accuracy.
28. How Can I Use Arduino OBD2 to Read and Clear Diagnostic Trouble Codes (DTCs)?
Send commands to the OBD2 port to request DTCs and clear them after repairs. Display the DTCs on a screen or log them for record-keeping.
Reading and clearing Diagnostic Trouble Codes (DTCs) is a fundamental function of OBD2 systems. With an Arduino OBD2 project, you can easily implement this functionality. Send commands to the OBD2 port to request DTCs from the ECU. The ECU will respond with a list of DTCs, each representing a specific fault or issue in the vehicle’s systems. Display the DTCs on a screen or log them to a file for record-keeping. After performing repairs, you can send a command to the OBD2 port to clear the DTCs. This will reset the check engine light and clear the fault codes from the ECU’s memory. Be cautious when clearing DTCs, as it can mask underlying issues if the repairs were not properly performed.
29. What Are Some Tips for Optimizing the Power Consumption of an Arduino OBD2 Project?
Use low-power components, minimize processing and communication, and put the Arduino into sleep mode when not actively collecting data.
Optimizing power consumption is crucial for Arduino OBD2 projects, especially if they are battery-powered. Use low-power components such as low-power Arduinos, LCD screens, and sensors. Minimize processing and communication by only collecting data when necessary and using efficient algorithms. Put the Arduino into sleep mode when not actively collecting data to reduce power consumption. Disable unused peripherals and features to further reduce power draw. Consider using a voltage regulator to ensure a stable power supply and improve efficiency. By implementing these tips, you can significantly extend the battery life of your Arduino OBD2 project.
30. How Can I Share My Arduino OBD2 Project With the Community and Get Feedback?
Share your project on online forums, GitHub, and social media. Provide detailed documentation, code examples, and instructions to help others replicate and improve your project.
Sharing your Arduino OBD2 project with the community is a great way to get feedback, collaborate with others, and contribute to the open-source ecosystem. Share your project on online forums like the Arduino Forum and the Stack Overflow community. Create a GitHub repository to host your code, documentation, and instructions. Share your project on social media platforms like Twitter, Facebook, and Reddit. Provide detailed documentation that explains the project’s goals, components, and functionality. Include code examples and step-by-step instructions to help others replicate your project. Be responsive to questions and feedback from the community. By sharing your project, you can inspire others, learn from their experiences, and make a valuable contribution to the Arduino community.
31. How Does the Choice of Arduino Board Affect the Capabilities of an OBD2 Project?
The Arduino board’s processing power, memory, and available interfaces will influence the complexity and functionality of the OBD2 project.
The choice of Arduino board significantly affects the capabilities of an OBD2 project. The Arduino board’s processing power determines how quickly it can process data from the OBD2 port and perform calculations. The memory capacity limits the amount of data that can be stored and processed. The available interfaces, such as serial ports, I2C, and SPI, determine which sensors and modules can be connected to the Arduino. For simple OBD2 projects that only require reading a few parameters, a basic Arduino like the Uno or Nano may be sufficient. For more complex projects that involve data logging, advanced analysis, or integration with other sensors, a more powerful Arduino like the Mega or Due may be necessary.
32. What Is the Role of Libraries in Simplifying Arduino OBD2 Project Development?
Libraries provide pre-written code and functions that simplify common tasks such as reading OBD2 data, displaying information on a screen, and communicating with other devices.
Libraries play a crucial role in simplifying Arduino OBD2 project development. Libraries provide pre-written code and functions that handle common tasks such as reading OBD2 data, displaying information on a screen, and communicating with other devices. By using libraries, you can avoid having to write complex code from scratch and focus on the unique aspects of your project. The OBD2 library for Arduino, for example, provides functions for sending OBD2 requests, receiving data, and interpreting PIDs. Libraries like the LiquidCrystal library for LCDs and the Adafruit GFX library for OLEDs simplify the display process. Using libraries can significantly reduce the development time and complexity of your Arduino OBD2 projects.
33. What Are the Best Practices for Wiring and Connecting Components in an Arduino OBD2 Project?
Use proper wiring techniques, avoid loose connections, and protect the circuit from electrical noise and interference.
Proper wiring and component connections are essential for the reliability and performance of your Arduino OBD2 project. Use proper wiring techniques such as using appropriate gauge wire, crimping or soldering connections, and insulating exposed wires. Avoid loose connections by using secure connectors and ensuring that wires are properly seated. Protect the circuit from electrical noise and interference by using shielded cables, adding decoupling capacitors, and grounding the circuit properly. Follow datasheets and wiring diagrams to ensure that components are connected correctly. Double-check your wiring before applying power to the circuit. By following these best practices, you can minimize the risk of wiring-related issues and ensure that your Arduino OBD2 project operates reliably.
34. How Can I Add Bluetooth Connectivity to My Arduino OBD2 Project for Wireless Data Transmission?
Use a Bluetooth module to transmit OBD2 data to a smartphone, tablet, or computer. Develop a custom app or use existing software to receive and display the data.
Adding Bluetooth connectivity to your Arduino OBD2 project enables wireless data transmission to a smartphone, tablet, or computer. Use a Bluetooth module like the HC-05 or HM-10 to establish a wireless connection between the Arduino and the receiving device. Program the Arduino to transmit OBD2 data over Bluetooth using the Serial interface. Develop a custom app or use existing software like Processing or Bluetooth terminal apps to receive and display the data on the receiving device. Consider adding features like data logging, real-time graphing, and remote control. Bluetooth connectivity allows you to create wireless dashboards, remote monitoring systems, and other innovative applications for your Arduino OBD2 project.
35. What Are the Key Considerations When Choosing an OBD2 Adapter for an Arduino Project?
Consider compatibility with your vehicle, support for desired protocols, and quality of construction.
When choosing an OBD2 adapter for your Arduino project, several key considerations come into play. First, ensure that the adapter is compatible with your vehicle’s make, model, and year. Some adapters may only support certain protocols or vehicle types. Second, verify that the adapter supports the protocols you need for your project, such as CAN, ISO 9141-2, or SAE J1850. Third, consider the quality of construction of the adapter. Look for adapters that are well-built, durable, and have reliable connectors. Read reviews and compare specifications before making a purchase. A high-quality OBD2 adapter will ensure reliable communication with your vehicle’s ECU and minimize the risk of data errors or connection problems.
36. How Can I Ensure My Arduino OBD2 Project Complies With Vehicle Safety Standards and Regulations?
Avoid modifying or interfering with critical vehicle systems, and follow industry best practices for automotive electronics.
Ensuring compliance with vehicle safety standards and regulations is paramount in Arduino OBD2 projects. Avoid modifying or interfering with critical vehicle systems such as airbags, brakes, or engine management. Follow industry best practices for automotive electronics, such as using automotive-grade components, implementing safety interlocks, and protecting the circuit from overvoltage and short circuits. Be aware of vehicle safety standards and regulations in your jurisdiction, such as ISO 26262 for functional safety. Consult with experienced automotive engineers or technicians to ensure that your project meets all applicable safety requirements.
37. What Are Some Common Mistakes to Avoid When Working on Arduino OBD2 Projects?
Incorrect wiring, incompatible components, and lack of understanding of OBD2 protocols are common pitfalls.
Working on Arduino OBD2 projects can be a rewarding experience, but it’s important to avoid common mistakes that can lead to frustration and project failure. Incorrect wiring is a frequent cause of problems. Double-check your wiring diagrams and ensure that all connections are secure and properly insulated. Using incompatible components, such as an OBD2 adapter that doesn’t support your vehicle’s protocol, can also cause issues. A lack of understanding of OBD2 protocols and PIDs can lead to misinterpretation of data or incorrect calculations. Take the time to learn about OBD2 standards and research your vehicle’s specific requirements.
38. How Can I Use Arduino OBD2 Data to Improve My Driving Habits?
Analyze data such as speed, acceleration, and fuel consumption to identify areas where you can drive more efficiently and safely.
Arduino OBD2 data can be a powerful tool for improving your driving habits. By analyzing data such as speed, acceleration, braking force, and fuel consumption, you can identify areas where you can drive more efficiently and safely. For example, you can track your average speed and identify instances of speeding. You can monitor your acceleration and braking patterns to identify opportunities for smoother driving. You can analyze your fuel consumption to identify habits that are wasting gas. By using Arduino OBD2 data to gain insights into your driving behavior, you can make conscious efforts to improve your driving habits and become a safer and more efficient driver.
39. What are the limitations of using Arduino for OBD2 projects?
Arduinos are not as robust as dedicated automotive diagnostic tools and