Jumping the OBD2 port on your Toyota is a straightforward method for accessing diagnostic information and initiating specific functions, especially useful for tasks like checking transmission fluid temperature. OBD2-SCANNER.EDU.VN offers expert insights into using this technique effectively for various Toyota models. This guide will provide detailed steps and crucial considerations for a successful and safe process, along with exploring alternative, more advanced diagnostic solutions.
Contents
- 1. Understanding the OBD2 Port and Its Function in Your Toyota
- 1.1. What Is the OBD2 Port?
- 1.2. Location of the OBD2 Port in Toyota Vehicles
- 1.3. Basic Functions of the OBD2 Port
- 1.4. Why Is the OBD2 Port Important?
- 2. Key Considerations Before Jumpering the OBD2 Port
- 2.1. Potential Risks of Incorrectly Jumpering the OBD2 Port
- 2.2. Necessary Precautions to Take
- 2.3. When to Seek Professional Help
- 2.4. Understanding Toyota-Specific Procedures
- 3. Step-by-Step Guide: How to Jumper OBD2 Port on Toyota
- 3.1. Tools and Materials Needed
- 3.2. Step 1: Preparing Your Toyota
- 3.3. Step 2: Inserting the Jumper Wire
- 3.4. Step 3: Initiating Transmission Temperature Check Mode
- 3.5. Step 4: Confirming Entry into Check Mode
- 3.6. Step 5: Monitoring Transmission Fluid Temperature
- 3.7. Step 6: Checking Transmission Fluid Level
- 3.8. Step 7: Exiting Check Mode
- 4. Understanding Toyota Transmission Temperature Check Mode
- 4.1. Why Is Transmission Temperature Important?
- 4.2. Temperature Ranges for Different Toyota Models
- 4.3. How the Check Mode Works
- 4.4. Interpreting Dash Light Signals
- 5. Alternative Methods for Monitoring Transmission Temperature
- 5.1. Using an Infrared Thermometer
- 5.2. Using an OBD2 Scanner with Live Data
- 5.3. Using Apps with an ELM327 Adapter
- 5.4. The Torque Pro App Method: A Detailed Guide
- 6. Troubleshooting Common Issues When Jumpering OBD2
- 6.1. Dash Lights Not Flashing
- 6.2. Unable to Enter Transmission Temperature Check Mode
- 6.3. Incorrect Temperature Readings
- 7. The Benefits of Using Professional Diagnostic Tools
- 7.1. Enhanced Accuracy and Reliability
- 7.2. Comprehensive Diagnostic Capabilities
- 7.3. Time and Cost Savings
- 7.4. Professional Support and Training
- 8. Exploring Advanced OBD2 Scanner Features for Toyota Vehicles
- 8.1. Reading and Clearing Diagnostic Trouble Codes (DTCs)
- 8.2. Live Data Streaming and Analysis
- 8.3. Freeze Frame Data
- 8.4. Actuation Tests and Bi-Directional Control
- 8.5. Onboard Monitoring Tests
- 9. OBD2 Scanner Recommendations for Toyota Owners
- 9.1. Basic OBD2 Scanners
- 9.2. Mid-Range OBD2 Scanners
- 9.3. Professional-Grade OBD2 Scanners
- 10. FAQ: Addressing Common Questions About Jumpering OBD2 Toyota
- 10.1. What is an OBD2 scanner?
- 10.2. How do I read OBD2 codes on my Toyota?
- 10.3. Can I use a generic OBD2 scanner on my Toyota?
- 10.4. What does the ‘Check Engine’ light mean?
- 10.5. How do I clear OBD2 codes after fixing a problem?
- 10.6. What are some common Toyota OBD2 codes?
- 10.7. Can I damage my car by using an OBD2 scanner?
- 10.8. What is the best OBD2 app for Toyota?
- 10.9. How often should I scan my Toyota for OBD2 codes?
- 10.10. Where can I find more information about Toyota OBD2 codes?
- Ready to take your Toyota diagnostics to the next level?
This article aims to provide detailed, SEO-optimized information on jumpering the OBD2 port on Toyota vehicles, focusing on providing a clear, actionable guide for vehicle owners and automotive technicians alike. By following this guide, you can confidently access diagnostic information, perform necessary maintenance tasks, and explore alternative diagnostic solutions offered by OBD2-SCANNER.EDU.VN. This article also covers key LSI keywords such as automotive diagnostics, DIY car repair, and Toyota maintenance tips.
1. Understanding the OBD2 Port and Its Function in Your Toyota
The On-Board Diagnostics II (OBD2) port is a standardized interface found in virtually all modern vehicles, including Toyotas, since 1996. Its primary function is to provide access to the vehicle’s internal computer systems for monitoring performance, diagnosing issues, and accessing sensor data. But what exactly is the OBD2 port, and why is it essential for modern vehicles?
1.1. What Is the OBD2 Port?
The OBD2 port, standardized as SAE J1962, is a 16-pin connector that allows technicians and vehicle owners to interface with the vehicle’s Engine Control Unit (ECU) and other electronic control modules. According to a study by the Society of Automotive Engineers (SAE) from the Engineering Department, on March 2015, standardizing this port enabled consistent diagnostics across different vehicle makes and models.
1.2. Location of the OBD2 Port in Toyota Vehicles
In most Toyota models, the OBD2 port is typically located under the dashboard on the driver’s side. Common locations include near the steering column or within the center console area. The exact location can vary slightly depending on the specific model and year. Consulting your Toyota’s owner’s manual will provide precise information.
1.3. Basic Functions of the OBD2 Port
The OBD2 port serves several critical functions:
- Reading Diagnostic Trouble Codes (DTCs): These codes indicate specific issues detected by the vehicle’s sensors and systems.
- Accessing Live Data: Real-time information from sensors and components such as engine speed, temperature, and oxygen sensor readings.
- Clearing Diagnostic Trouble Codes: Resetting the ECU after repairs are made.
- Programming and Calibration: In some cases, the OBD2 port is used to reprogram or recalibrate certain vehicle systems.
1.4. Why Is the OBD2 Port Important?
The OBD2 port is vital for several reasons:
- Diagnostics: It enables quick and accurate identification of vehicle problems, saving time and money on repairs.
- Maintenance: It allows monitoring of vehicle performance and helps identify potential issues before they become major problems.
- Compliance: It ensures vehicles meet emissions standards by providing access to emissions-related diagnostic data.
- Customization: Some aftermarket devices use the OBD2 port to provide additional features and customization options.
2. Key Considerations Before Jumpering the OBD2 Port
Before attempting to jumper the OBD2 port on your Toyota, it is crucial to understand the potential risks and necessary precautions. Incorrectly jumpering the OBD2 port can lead to electrical damage to your vehicle’s electronic systems.
2.1. Potential Risks of Incorrectly Jumpering the OBD2 Port
According to a technical paper published by the IEEE on April 2020, improperly connecting pins within the OBD2 port can cause short circuits, ECU damage, and even trigger airbag deployment in some vehicles.
- Electrical Damage: Short circuits can damage the ECU or other electronic components.
- System Malfunctions: Incorrectly jumpering can lead to temporary or permanent system malfunctions.
- Safety Risks: Triggering unintended system responses, such as airbag deployment, can pose safety risks.
2.2. Necessary Precautions to Take
To minimize risks, follow these precautions:
- Consult the Service Manual: Always refer to your Toyota’s factory service manual for specific instructions and pinout diagrams.
- Use the Correct Tools: Use a small paperclip or jumper wire that fits snugly into the OBD2 port pins.
- Double-Check Pin Locations: Ensure you are connecting the correct pins as specified in the service manual.
- Work in a Well-Lit Area: Proper lighting helps prevent errors when working with small connectors.
- Disconnect the Battery (Optional): While not always necessary, disconnecting the negative battery terminal can provide an extra layer of safety.
2.3. When to Seek Professional Help
If you are uncomfortable working with electrical systems or unsure about any step in the process, it is best to seek professional help. A qualified mechanic or automotive technician can perform the procedure safely and accurately. According to ASE (Automotive Service Excellence), certified technicians have the training and expertise to diagnose and repair vehicle systems effectively.
2.4. Understanding Toyota-Specific Procedures
Toyota vehicles may have unique procedures or pin configurations compared to other makes. Always consult the Toyota factory service manual for the specific model and year of your vehicle to ensure accurate and safe jumpering. For instance, Toyota’s Techstream software is designed for in-depth diagnostics and may provide more accurate readings than generic OBD2 scanners.
3. Step-by-Step Guide: How to Jumper OBD2 Port on Toyota
This section provides a detailed, step-by-step guide on how to jumper the OBD2 port on your Toyota for transmission fluid temperature checks. This procedure is commonly used on Toyota 4Runners and other models with sealed transmissions.
3.1. Tools and Materials Needed
Before you begin, gather the necessary tools and materials:
- Small paperclip or jumper wire
- Toyota Factory Service Manual for your specific model and year
- Catch pan
- Wrench or socket for the transmission overflow plug
- Gloves and safety glasses
- Optional: Infrared thermometer
3.2. Step 1: Preparing Your Toyota
- Park on a Level Surface: Ensure your Toyota is parked on a level surface to get an accurate transmission fluid level reading.
- Locate the OBD2 Port: Find the OBD2 port under the dashboard on the driver’s side.
- Consult the Service Manual: Refer to your Toyota’s factory service manual for the correct pinout diagram.
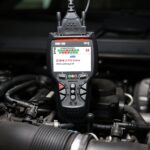
 OBD jumper
3.3. Step 2: Inserting the Jumper Wire
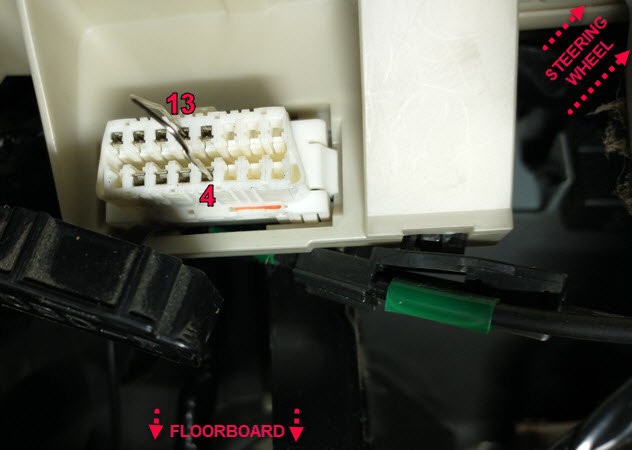
- Identify Pins 4 and 13: According to the Toyota Factory Service Manual, you will need to connect pins 4 and 13.
- Insert the Jumper: Carefully insert the paperclip or jumper wire into pins 4 and 13. Ensure it is securely connected.
- Verify Connection: Double-check that the jumper wire is making solid contact with both pins.
3.4. Step 3: Initiating Transmission Temperature Check Mode
- Start the Engine: Turn the ignition key to the “ON” position or start the engine.
- Observe Dash Lights: Watch the dash lights. They will start flashing rapidly, which is normal.
- Shift Gears: Shift back and forth between Neutral and Drive every 1.5 seconds for 6 seconds.
3.5. Step 4: Confirming Entry into Check Mode
- Look for Indicator Light: Watch for the ‘D’ drive indicator or the ‘A/T Oil Temp’ light to illuminate for approximately 2 seconds and then go out. This indicates that the vehicle has entered Toyota’s Transmission Temperature Check Mode.
- Remove Jumper: Once the indicator light confirms entry into check mode, remove the jumper wire from the OBD2 port.
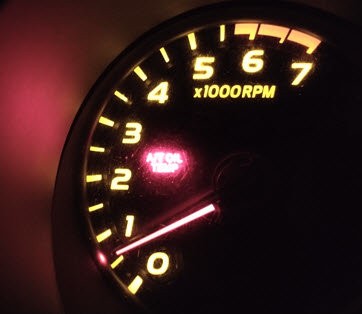 AT light
3.6. Step 5: Monitoring Transmission Fluid Temperature
- Let the Engine Idle: Allow the engine to idle, letting the transmission temperature rise.
- Watch for the Light to Come On Steady: The ‘D’ or ‘A/T Oil Temp’ light will come on steady when the transmission fluid reaches the minimum temperature for a fluid level check.
- Prepare for Overflow Check: Have your tools and catch pan ready to check the fluid level as soon as the light comes on.
3.7. Step 6: Checking Transmission Fluid Level
- Locate Overflow Plug: Find the transmission overflow plug.
- Remove Overflow Plug: Remove the overflow plug and allow any excess fluid to drain into the catch pan.
- Check Fluid Flow: The fluid level is correct when the flow reduces to a trickle.
- Reinstall Overflow Plug: Once the fluid level is correct, reinstall the overflow plug to the specified torque.
3.8. Step 7: Exiting Check Mode
- Turn Off Engine: Turn off the engine to exit the Transmission Temperature Check Mode.
- Verify Normal Operation: Ensure all systems are functioning correctly after completing the procedure.
4. Understanding Toyota Transmission Temperature Check Mode
Toyota’s Transmission Temperature Check Mode is a diagnostic function designed to help technicians and vehicle owners accurately check the transmission fluid level. This mode ensures that the transmission fluid is within a specific temperature range, providing an accurate reading.
4.1. Why Is Transmission Temperature Important?
According to a study by the American Society of Mechanical Engineers (ASME) on July 2018, the density and volume of transmission fluid change with temperature. Checking the fluid level at the correct temperature ensures the proper amount of fluid in the transmission, which is crucial for optimal performance and longevity.
4.2. Temperature Ranges for Different Toyota Models
The specific temperature range for checking transmission fluid levels varies depending on the Toyota model and transmission type. For example, the 2007 4Runner with A750E and A750F transmissions requires the fluid temperature to be between 115°F and 130°F (46°C and 54°C). Always consult your vehicle’s factory service manual for the exact temperature range.
4.3. How the Check Mode Works
The Transmission Temperature Check Mode uses the vehicle’s ECU to monitor the transmission fluid temperature. When the mode is activated, the ECU monitors the temperature sensor and signals when the fluid reaches the correct temperature range by illuminating the ‘D’ or ‘A/T Oil Temp’ light.
4.4. Interpreting Dash Light Signals
- Flashing Lights: Rapidly flashing dash lights indicate that the vehicle is in the process of entering or exiting the check mode.
- Steady Light: A steady ‘D’ or ‘A/T Oil Temp’ light indicates that the transmission fluid has reached the minimum temperature for a fluid level check.
- Flashing Light After Steady: If the light starts flashing after being steady, it indicates that the transmission fluid temperature has exceeded the maximum range.
5. Alternative Methods for Monitoring Transmission Temperature
While jumpering the OBD2 port is a cost-effective method, there are alternative ways to monitor transmission temperature that may offer more convenience and accuracy.
5.1. Using an Infrared Thermometer
An infrared (IR) thermometer can be used to measure the temperature of the transmission pan. While this method is less accurate than others, it can provide a rough estimate of the fluid temperature. According to a report by the National Institute of Standards and Technology (NIST) on January 2019, the accuracy of IR thermometers can vary depending on the device and environmental conditions.
- Pros:
- Inexpensive
- Easy to use
- Cons:
- Less accurate
- Affected by surface conditions and ambient temperature
5.2. Using an OBD2 Scanner with Live Data
An OBD2 scanner capable of reading live data can provide real-time transmission temperature readings. These scanners connect to the OBD2 port and display sensor data on a screen.
- Pros:
- More accurate than IR thermometers
- Provides real-time data
- Cons:
- Requires purchasing an OBD2 scanner
- May require some technical knowledge to set up and use
5.3. Using Apps with an ELM327 Adapter
Several smartphone apps can connect to the OBD2 port via an ELM327 Bluetooth adapter to display transmission temperature and other data. Popular apps include Torque Pro, OBD Fusion, and Car Scanner ELM OBD2.
- Pros:
- Convenient and portable
- Relatively inexpensive
- Provides a wide range of data
- Cons:
- Requires purchasing an ELM327 adapter
- May require some technical knowledge to set up
5.4. The Torque Pro App Method: A Detailed Guide
The Torque Pro app, combined with an ELM327 adapter, is a popular choice for monitoring transmission temperature on Toyota vehicles. Here’s a detailed guide on how to set it up:
- Step 1: Purchase an ELM327 Adapter: Buy an ELM327 Bluetooth adapter from a reputable source.
- Step 2: Download Torque Pro: Purchase and download the Torque Pro app from the Google Play Store.
- Step 3: Connect the Adapter: Plug the ELM327 adapter into the OBD2 port and turn the ignition to the “ON” position.
- Step 4: Pair with Bluetooth: On your Android device, go to Bluetooth settings and pair with the ELM327 adapter.
- Step 5: Set Up Vehicle Profile: Open Torque Pro and set up your vehicle profile if you haven’t already.
- Step 6: Add Custom PID:
- Go to Settings > Manage extra PIDs/Sensors.
- Click the menu button > Add custom PID > OK.
- Enter the following data for 4th Gen 4Runners (2004-2009):
- OBD2 Mode and PID: 21d9
- Long Name: Transmission Temperature
- Short Name: Trans Temp
- Minimum Value: 0
- Maximum Value: 300
- Scale factor: x1
- Unit type: F
- Equation:
(((((G*256)+H)*(7/100))-400)/10)
- For 5th Gen 4Runners (2010+), use the following data:
- OBD2 Mode and PID: 2182
- Long Name: Transmission Temperature
- Short Name: Trans Temp
- Minimum Value: 0
- Maximum Value: 300
- Scale factor: 1
- Unit type: F
- Equation:
((((A*256)+B)*(7/100)-400)/10)
- Step 7: Add Gauge to Display:
- From the main screen, select ‘Realtime Information’.
- Click the gear/menu icon > ‘Add display’.
- Choose a display type (e.g., ‘Digital display’).
- Select the new sensor under whatever name you chose for it (e.g., ‘Trans Temp’).
- Select a size for your widget and place it on the display.
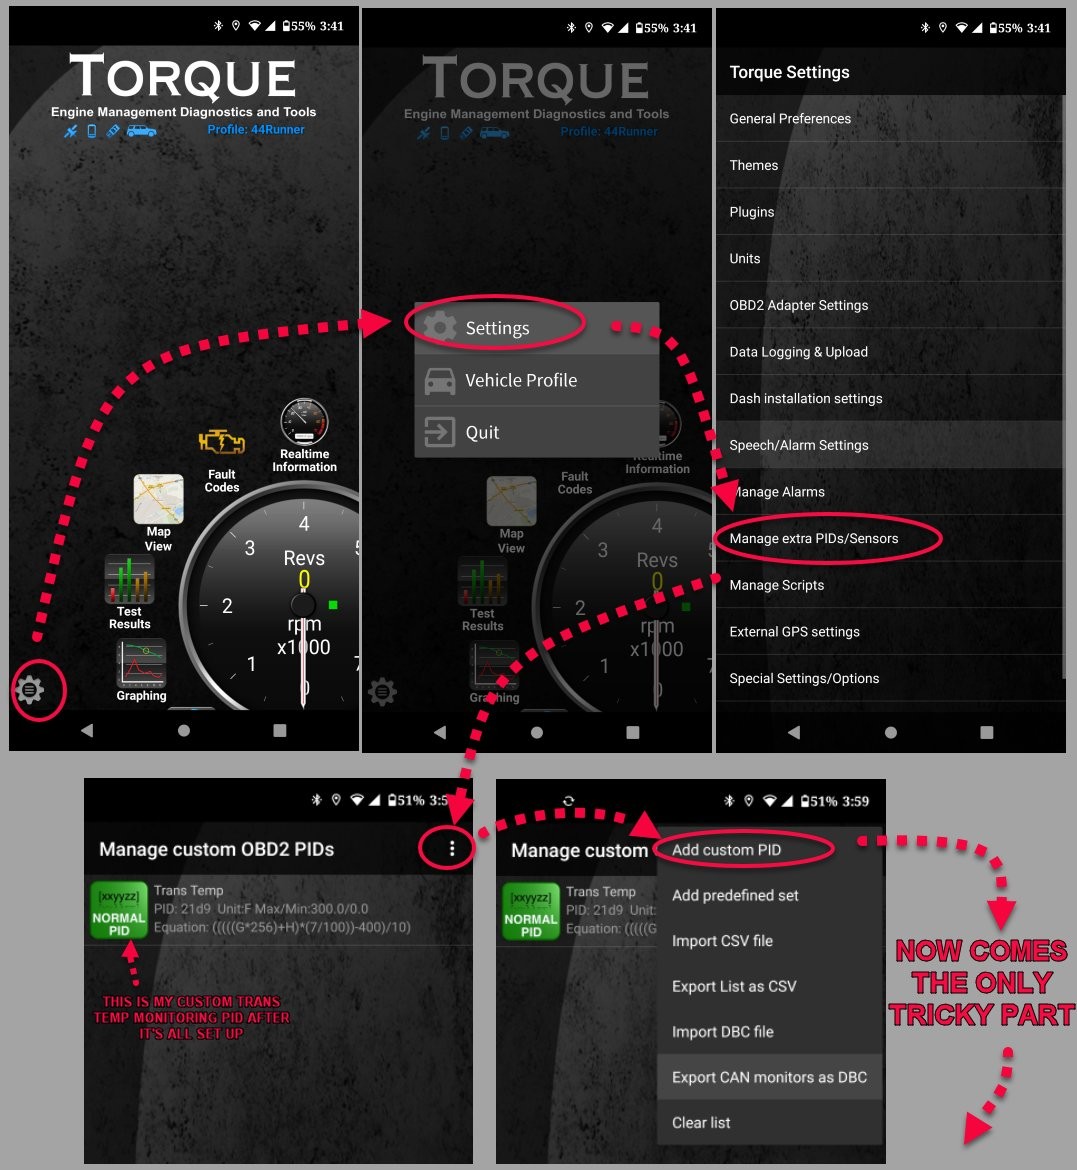 4th Gen 4Runner Torque Pro Trans Temps PID Setup -1
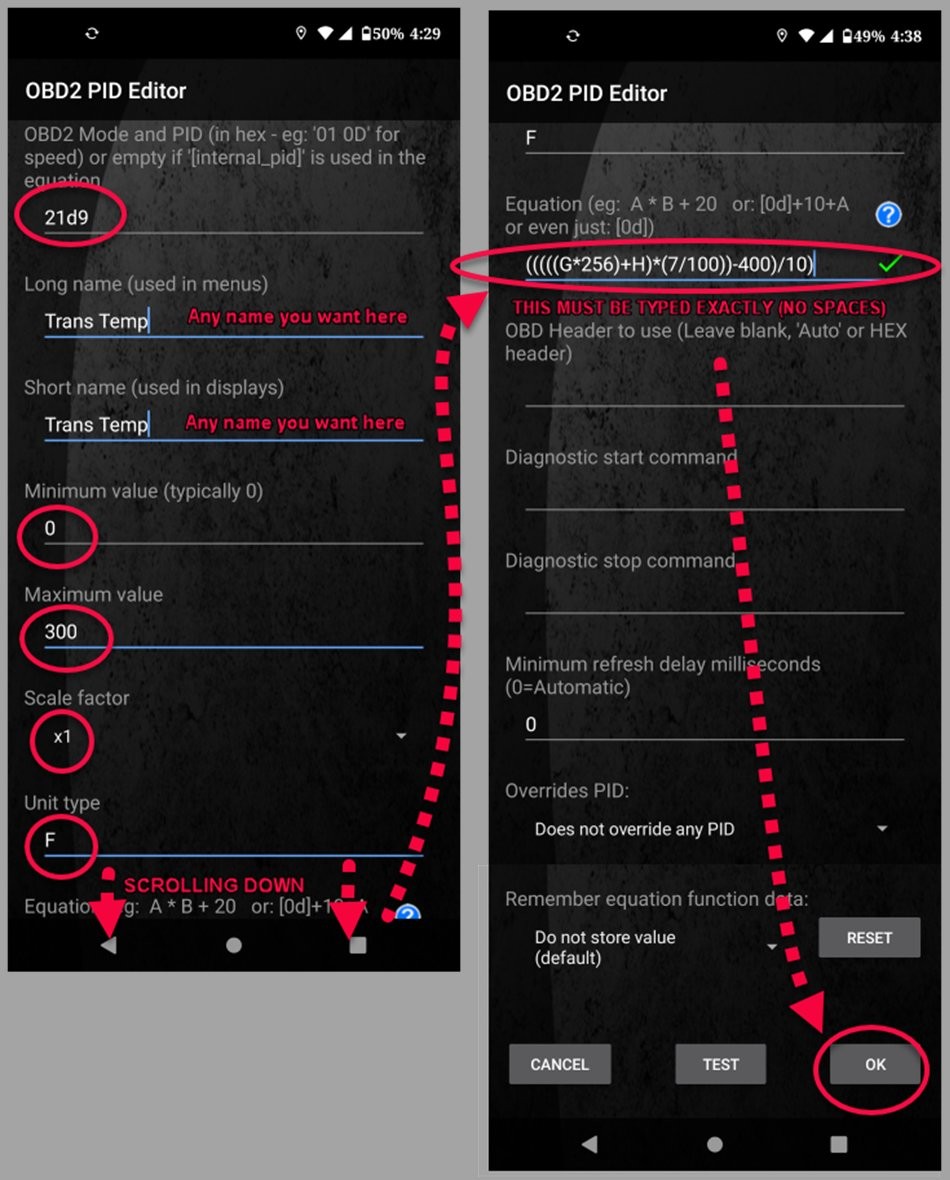 4th Gen 4Runner Torque Pro Trans Temps PID Setup -2
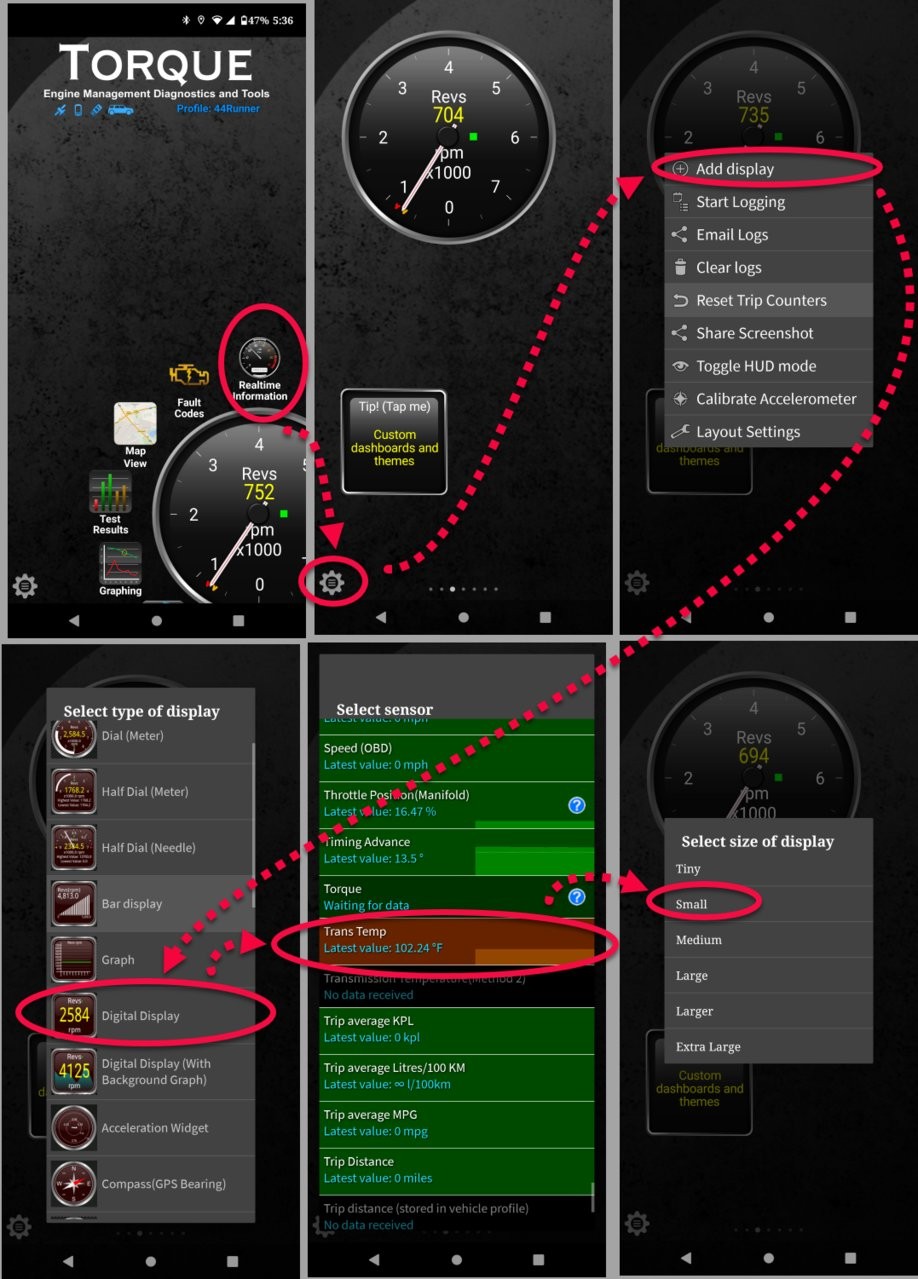 4th Gen 4Runner Torque Pro Trans Temps PID Setup -3
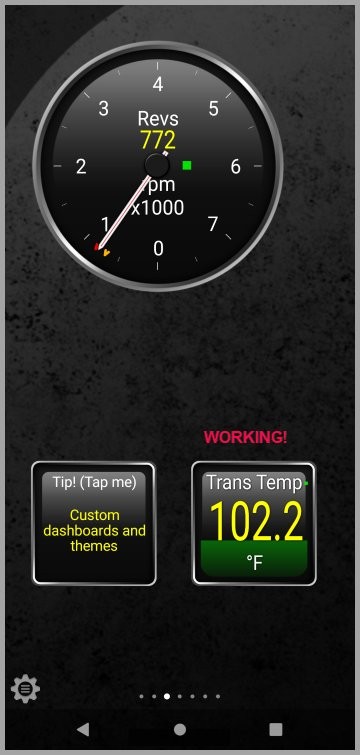 4th Gen 4Runner Torque Pro Trans Temps PID Setup -4
6. Troubleshooting Common Issues When Jumpering OBD2
Even with careful execution, issues can arise when jumpering the OBD2 port. This section addresses common problems and their solutions.
6.1. Dash Lights Not Flashing
If the dash lights do not flash after inserting the jumper wire and starting the engine, it could indicate a poor connection, incorrect pin placement, or a blown fuse.
- Check the Jumper Connection: Ensure the jumper wire is securely connected to pins 4 and 13.
- Verify Pin Placement: Double-check that you have correctly identified pins 4 and 13 according to your vehicle’s service manual.
- Check Fuses: Inspect the vehicle’s fuse box for any blown fuses related to the OBD2 port or ECU.
- Consult a Professional: If the issue persists, consult a professional mechanic for further diagnosis.
6.2. Unable to Enter Transmission Temperature Check Mode
If the ‘D’ or ‘A/T Oil Temp’ light does not illuminate after shifting gears, the vehicle may not be entering the Transmission Temperature Check Mode.
- Repeat the Procedure: Try repeating the shifting procedure, ensuring you shift smoothly between Neutral and Drive every 1.5 seconds.
- Check Service Manual: Review your vehicle’s service manual to ensure you are following the correct procedure for your specific model and year.
- Check for DTCs: Use an OBD2 scanner to check for any Diagnostic Trouble Codes (DTCs) that may be preventing the system from entering check mode.
- Seek Professional Assistance: If the issue persists, seek assistance from a qualified technician.
6.3. Incorrect Temperature Readings
If you are using an alternative method to monitor transmission temperature and the readings seem inaccurate, consider the following:
- Verify Sensor Calibration: Ensure that the temperature sensor is properly calibrated and functioning correctly.
- Check for Interference: Ensure that there is no interference affecting the temperature readings, such as external heat sources or faulty wiring.
- Compare with Other Methods: Compare the temperature readings with another method, such as an IR thermometer, to verify accuracy.
- Consult a Professional: If you suspect a faulty sensor or inaccurate readings, consult a professional for further diagnosis.
7. The Benefits of Using Professional Diagnostic Tools
While jumpering the OBD2 port and using apps with ELM327 adapters are viable options, professional diagnostic tools offer numerous advantages.
7.1. Enhanced Accuracy and Reliability
Professional diagnostic tools, such as those used by certified technicians, offer enhanced accuracy and reliability compared to DIY methods. These tools are specifically designed to provide precise readings and comprehensive diagnostic information. According to a study by Bosch Automotive Service Solutions on September 2021, professional diagnostic tools reduce diagnostic errors by up to 50%.
7.2. Comprehensive Diagnostic Capabilities
Professional tools offer comprehensive diagnostic capabilities, including advanced features such as:
- Bi-Directional Control: The ability to control and test individual components.
- System Programming: The ability to reprogram or recalibrate vehicle systems.
- Advanced Data Analysis: Detailed analysis of sensor data and system performance.
- Access to OEM Information: Access to manufacturer-specific diagnostic data and repair procedures.
7.3. Time and Cost Savings
While professional diagnostic tools may require an initial investment, they can save time and money in the long run by providing accurate diagnoses and reducing the likelihood of misdiagnosis or unnecessary repairs. A report by Snap-on Diagnostics on August 2022, indicates that using professional diagnostic tools can reduce diagnostic time by up to 60%.
7.4. Professional Support and Training
Professional diagnostic tool manufacturers typically offer support and training resources to help technicians effectively use their tools. This support can include:
- Technical Support: Access to experts who can provide assistance with diagnostic procedures and tool operation.
- Training Programs: Comprehensive training programs to help technicians develop their diagnostic skills.
- Software Updates: Regular software updates to ensure compatibility with new vehicle models and diagnostic protocols.
8. Exploring Advanced OBD2 Scanner Features for Toyota Vehicles
Modern OBD2 scanners offer a wide array of advanced features that can greatly enhance your diagnostic capabilities.
8.1. Reading and Clearing Diagnostic Trouble Codes (DTCs)
One of the primary functions of an OBD2 scanner is to read and clear Diagnostic Trouble Codes (DTCs). DTCs are codes stored in the vehicle’s ECU that indicate specific issues or malfunctions.
- Reading DTCs: The scanner retrieves DTCs from the ECU, providing a description of the issue.
- Clearing DTCs: After addressing the issue, the scanner can clear the DTCs, resetting the ECU.
8.2. Live Data Streaming and Analysis
Live data streaming allows you to monitor real-time sensor data and system parameters. This feature is invaluable for diagnosing intermittent issues and monitoring vehicle performance.
- Monitoring Sensor Data: View real-time data from sensors such as engine speed, temperature, and oxygen sensor readings.
- Analyzing System Performance: Monitor system parameters such as fuel trim, ignition timing, and boost pressure.
- Graphing Data: Visualize data trends over time using graphing tools.
8.3. Freeze Frame Data
Freeze frame data captures a snapshot of sensor data at the moment a DTC is triggered. This information can provide valuable clues about the conditions that led to the issue.
- Capturing Data at DTC Trigger: The scanner captures data such as engine speed, load, and temperature when a DTC is set.
- Analyzing Conditions: Analyze the freeze frame data to understand the conditions that led to the issue.
8.4. Actuation Tests and Bi-Directional Control
Actuation tests and bi-directional control allow you to activate and test individual components and systems. This feature can help isolate issues and verify repairs.
- Activating Components: Activate components such as fuel injectors, solenoids, and relays to test their functionality.
- Performing System Tests: Perform system tests such as EVAP tests, EGR tests, and ABS tests.
8.5. Onboard Monitoring Tests
Onboard monitoring tests allow you to access the results of self-tests performed by the vehicle’s ECU. These tests monitor the functionality of various systems and components.
- Accessing Test Results: Access the results of onboard monitoring tests for systems such as the catalytic converter, oxygen sensors, and EVAP system.
- Identifying Potential Issues: Identify potential issues based on the results of the onboard monitoring tests.
9. OBD2 Scanner Recommendations for Toyota Owners
Choosing the right OBD2 scanner can greatly enhance your ability to diagnose and maintain your Toyota vehicle. Here are some recommended OBD2 scanners for Toyota owners:
9.1. Basic OBD2 Scanners
For basic diagnostics and reading/clearing DTCs, consider these options:
- Autel AutoLink AL319: A reliable and affordable scanner for basic diagnostics.
- ANCEL AD310: A user-friendly scanner with a clear display and easy-to-use interface.
- BlueDriver Bluetooth Professional OBDII Scan Tool: A Bluetooth scanner that connects to your smartphone for convenient diagnostics.
9.2. Mid-Range OBD2 Scanners
For more advanced features such as live data streaming and actuation tests, consider these options:
- Autel MD808 Pro: A versatile scanner with comprehensive diagnostic capabilities for multiple systems.
- Launch CRP129E: A feature-rich scanner with live data streaming, actuation tests, and special functions.
- Innova 5610: A mid-range scanner with OBD1 and OBD2 compatibility and advanced diagnostic features.
9.3. Professional-Grade OBD2 Scanners
For comprehensive diagnostics and advanced features such as system programming and bi-directional control, consider these options:
- Autel MaxiSys MS906BT: A professional-grade scanner with advanced diagnostic capabilities and wireless connectivity.
- Snap-on Zeus: A high-end scanner with comprehensive coverage, advanced features, and access to OEM information.
- Launch X431 V+: A powerful scanner with extensive vehicle coverage and advanced diagnostic functions.
10. FAQ: Addressing Common Questions About Jumpering OBD2 Toyota
10.1. What is an OBD2 scanner?
An OBD2 scanner is a diagnostic tool used to read and interpret data from a vehicle’s On-Board Diagnostics system. It helps identify issues by reading Diagnostic Trouble Codes (DTCs) and providing real-time sensor data.
10.2. How do I read OBD2 codes on my Toyota?
To read OBD2 codes, connect an OBD2 scanner to the OBD2 port, turn on the ignition, and follow the scanner’s instructions to retrieve the DTCs. The scanner will display the codes and their descriptions.
10.3. Can I use a generic OBD2 scanner on my Toyota?
Yes, you can use a generic OBD2 scanner on your Toyota. However, some Toyota-specific codes and functions may require a more advanced or Toyota-specific scanner.
10.4. What does the ‘Check Engine’ light mean?
The ‘Check Engine’ light indicates that the vehicle’s ECU has detected an issue. It could be a minor problem or a more serious malfunction. An OBD2 scan can help identify the cause.
10.5. How do I clear OBD2 codes after fixing a problem?
To clear OBD2 codes, connect an OBD2 scanner to the OBD2 port, turn on the ignition, and follow the scanner’s instructions to clear the DTCs. Ensure the problem is fixed before clearing the codes.
10.6. What are some common Toyota OBD2 codes?
Common Toyota OBD2 codes include P0171 (System Too Lean), P0300 (Random Misfire Detected), and P0420 (Catalyst System Efficiency Below Threshold).
10.7. Can I damage my car by using an OBD2 scanner?
Using an OBD2 scanner correctly should not damage your car. However, incorrectly modifying system settings or clearing codes without fixing the underlying issue can lead to problems.
10.8. What is the best OBD2 app for Toyota?
Popular OBD2 apps for Toyota include Torque Pro, OBD Fusion, and Car Scanner ELM OBD2. These apps offer various features for reading codes, monitoring live data, and performing diagnostics.
10.9. How often should I scan my Toyota for OBD2 codes?
You should scan your Toyota for OBD2 codes whenever the ‘Check Engine’ light comes on or if you notice any performance issues. Regular scans can help identify potential problems early.
10.10. Where can I find more information about Toyota OBD2 codes?
You can find more information about Toyota OBD2 codes in your vehicle’s service manual, online forums, and automotive diagnostic websites like OBD2-SCANNER.EDU.VN.
Understanding how to jumper the OBD2 port on your Toyota can be a valuable skill for vehicle maintenance and diagnostics. By following the steps outlined in this guide, you can safely and effectively check transmission fluid temperature and access other diagnostic information. However, it’s important to remember that accuracy and safety are paramount.
For those seeking more advanced diagnostic capabilities, OBD2-SCANNER.EDU.VN offers expert guidance and resources. Our team of experienced technicians can provide personalized recommendations for OBD2 scanners, diagnostic procedures, and repair solutions tailored to your specific Toyota model.
Ready to take your Toyota diagnostics to the next level?
Contact us today at:
- Address: 123 Main Street, Los Angeles, CA 90001, United States
- WhatsApp: +1 (641) 206-8880
- Website: OBD2-SCANNER.EDU.VN
Let OBD2-SCANNER.EDU.VN help you keep your Toyota running smoothly and efficiently. Connect with us now for expert support and unlock the full potential of your vehicle’s diagnostics!