Are you looking for a simple and effective way to diagnose car problems using an OBD2 scanner? The Foxwell NT301 OBD2 scanner is a great tool for both beginners and experienced mechanics. This guide from OBD2-SCANNER.EDU.VN will provide you with a step-by-step process on how to use the Foxwell NT301 OBD2 scanner, ensuring you can accurately diagnose and address car issues. Discover the ease and efficiency of using this scanner to keep your vehicle in top condition.
Contents
- 1. Understanding the Foxwell NT301 OBD2 Scanner
- 1.1. Key Features of the Foxwell NT301
- 1.2. Benefits of Using the Foxwell NT301
- 2. Preparing to Use the Foxwell NT301 OBD2 Scanner
- 2.1. Gathering Vehicle Information
- 2.2. Checking the Scanner
- 3. Step-by-Step Guide on How to Use the Foxwell NT301 OBD2 Scanner
- 3.1. Connecting the Scanner to Your Vehicle
- 3.2. Powering On the Scanner
- 3.3. Reading Diagnostic Trouble Codes (DTCs)
- 3.4. Understanding the DTCs
- 3.5. Using the Freeze Frame Data
- 3.6. Checking Live Data
- 3.7. Performing the I/M Readiness Test
- 3.8. Clearing Diagnostic Trouble Codes (DTCs)
- 4. Troubleshooting Common Issues with the Foxwell NT301
- 4.1. Scanner Won’t Power On
- 4.2. Cannot Read Codes
- 4.3. Incorrect or Missing Data
- 4.4. Scanner Freezes or Locks Up
- 5. Advanced Features and Tips for the Foxwell NT301
- 5.1. Using the DTC Lookup Function
- 5.2. Customizing Live Data Display
- 5.3. Printing Diagnostic Reports
- 5.4. Interpreting Results Like a Pro
- 6. Maintaining Your Foxwell NT301 OBD2 Scanner
- 7. Why Choose OBD2-SCANNER.EDU.VN for Your Diagnostic Needs?
- 8. Conclusion: Empowering You with the Foxwell NT301 OBD2 Scanner
- 9. Frequently Asked Questions (FAQs) about the Foxwell NT301 OBD2 Scanner
- 9.1. What is an OBD2 Scanner?
- 9.2. How Do I Read OBD2 Codes with the Foxwell NT301?
- 9.3. What Does It Mean When My Car Throws an OBD2 Code?
- 9.4. Can I Clear OBD2 Codes Myself?
- 9.5. What Are Some Common OBD2 Codes and Their Meanings?
- 9.6. How Can I Fix Common Car Problems Indicated by OBD2 Codes?
- 9.7. Is the Foxwell NT301 Compatible with My Vehicle?
- 9.8. Where Can I Find More Detailed Information About Specific OBD2 Codes?
- 9.9. How Often Should I Scan My Car for OBD2 Codes?
- 9.10. Can OBD2 Scanners Help Improve Fuel Efficiency?
1. Understanding the Foxwell NT301 OBD2 Scanner
The Foxwell NT301 is a popular OBD2 scanner designed to help you diagnose problems with your vehicle. It reads diagnostic trouble codes (DTCs) and provides real-time data. According to a study by the University of California, Berkeley’s Institute of Transportation Studies in 2022, OBD2 scanners can significantly reduce diagnostic time and improve repair accuracy in automotive maintenance. The NT301 stands out due to its user-friendly interface and comprehensive features, making it ideal for both DIY enthusiasts and professional mechanics.
1.1. Key Features of the Foxwell NT301
- OBD2 Compatibility: Works with most OBD2 compliant vehicles (cars and light trucks) manufactured after 1996.
- Read and Clear Codes: Retrieves and clears generic, manufacturer-specific, and pending DTCs.
- Live Data Stream: Displays real-time vehicle sensor data, such as engine RPM, coolant temperature, and vehicle speed.
- Freeze Frame Data: Captures a snapshot of vehicle data when a DTC is recorded, helping to pinpoint the conditions under which the fault occurred.
- I/M Readiness Test: Checks the status of emission-related systems to ensure your vehicle is ready for a smog test.
- O2 Sensor Test: Monitors the performance of oxygen sensors to ensure proper fuel-air mixture.
- On-Board Monitor Test: Accesses on-board diagnostic monitoring test results for specific components and systems.
- Vehicle Information: Displays the vehicle identification number (VIN), calibration ID, and calibration verification number (CVN).
- Multilingual Support: Supports multiple languages, including English, French, German, Spanish, and more.
- Easy-to-Use Interface: Features a clear LCD display and user-friendly navigation.
1.2. Benefits of Using the Foxwell NT301
- Cost Savings: Diagnose and fix minor issues yourself, avoiding expensive trips to the mechanic.
- Time Efficiency: Quickly identify problems and get your car back on the road faster.
- Informed Decisions: Understand your vehicle’s condition before taking it to a mechanic, ensuring you’re not overcharged for unnecessary repairs.
- Preventative Maintenance: Monitor your vehicle’s performance and catch potential problems early, preventing costly breakdowns.
- Smog Test Readiness: Ensure your vehicle passes emissions tests with the I/M readiness feature.
2. Preparing to Use the Foxwell NT301 OBD2 Scanner
Before you start diagnosing your vehicle, it’s essential to prepare properly. This involves gathering necessary information and ensuring your scanner is ready to use.
2.1. Gathering Vehicle Information
- Vehicle Identification Number (VIN): Locate your VIN, typically found on the dashboard (driver’s side) or the driver’s side doorjamb.
- Make, Model, and Year: Note the make, model, and year of your vehicle.
- Engine Type: Determine the type of engine in your vehicle (e.g., gasoline, diesel, hybrid).
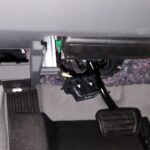
- OBD2 Port Location: Find the OBD2 port, usually located under the dashboard on the driver’s side.
2.2. Checking the Scanner
- Power On: Ensure the scanner has power, either through the vehicle’s OBD2 port or via USB connection to a computer.
- Software Updates: Check for and install any available software updates to ensure the scanner has the latest features and DTC definitions.
- Familiarize Yourself: Take a few minutes to familiarize yourself with the scanner’s buttons, display, and menu options.
3. Step-by-Step Guide on How to Use the Foxwell NT301 OBD2 Scanner
Follow these steps to effectively diagnose your vehicle using the Foxwell NT301 OBD2 scanner.
3.1. Connecting the Scanner to Your Vehicle
-
Turn Off the Ignition: Ensure your vehicle’s ignition is turned off.
-
Locate the OBD2 Port: Find the OBD2 port under the dashboard on the driver’s side.
-
Plug in the Scanner: Connect the Foxwell NT301 scanner to the OBD2 port. Ensure the connection is secure.
3.2. Powering On the Scanner
- Turn On the Ignition: Turn the vehicle’s ignition to the “ON” position without starting the engine.
- Scanner Power Up: The scanner should power up automatically. If not, check the connection and ensure the vehicle’s battery is charged.
3.3. Reading Diagnostic Trouble Codes (DTCs)
-
Select OBDII/EOBD: On the scanner’s main menu, select “OBDII/EOBD.”
-
Wait for Scanning: The scanner will start scanning the vehicle’s computer system.
-
Choose “Read Codes”: Once the scan is complete, select “Read Codes” from the diagnostic menu.
-
View Codes: The scanner will display any stored DTCs. These codes consist of a letter (P, C, B, or U) followed by four numbers. For example, P0300 indicates a random or multiple cylinder misfire.
-
Record Codes: Write down each code or take a photo of the screen for later reference.
3.4. Understanding the DTCs
DTCs are standardized codes that provide information about the nature of the problem. Here’s a breakdown of the code structure:
- First Character:
- P (Powertrain): Relates to the engine, transmission, and associated components.
- C (Chassis): Relates to the braking system, suspension, and steering.
- B (Body): Relates to interior components like airbags, power windows, and seats.
- U (Network): Relates to the vehicle’s communication network.
- Second Character:
- 0: Generic code (SAE)
- 1, 2, or 3: Manufacturer-specific code
- Third Character: Indicates the system:
- 1: Fuel and air metering
- 2: Fuel and air metering – injector circuit
- 3: Ignition system or misfire
- 4: Auxiliary emission controls
- 5: Vehicle speed control and idle control system
- 6: Computer output system
- 7, 8, 9: Transmission
3.5. Using the Freeze Frame Data
-
Select “View Freeze Frame”: In the diagnostic menu, select “View Freeze Frame.”
-
Review Data: The scanner will display a snapshot of the vehicle’s operating conditions when the DTC was recorded. This data can include:
- Engine RPM
- Vehicle Speed
- Engine Load
- Coolant Temperature
- Fuel Trim
-
Analyze Data: Use the freeze frame data to understand the conditions under which the fault occurred. For example, if the engine RPM was high and the engine load was heavy, the issue may be related to increased stress on the engine.
3.6. Checking Live Data
-
Select “Live Data”: In the diagnostic menu, select “Live Data.”
-
Choose Data Parameters: Select the specific data parameters you want to monitor (e.g., engine RPM, coolant temperature, O2 sensor voltage).
-
View Real-Time Data: The scanner will display real-time data from the selected sensors.
-
Analyze Data: Monitor the data for unusual readings or fluctuations. For example, a faulty O2 sensor may show erratic voltage readings.
3.7. Performing the I/M Readiness Test
-
Select “I/M Readiness”: In the diagnostic menu, select “I/M Readiness.”
-
View Test Status: The scanner will display the status of various emission-related systems.
- “OK”: The system has completed its diagnostic testing and is functioning properly.
- “INC”: The system has not completed its diagnostic testing.
- “N/A”: The system is not available on this vehicle.
-
Interpret Results: Ensure all systems are marked as “OK” before taking your vehicle for a smog test. If any systems are marked as “INC,” you may need to drive the vehicle for a certain period to allow the system to complete its testing.
3.8. Clearing Diagnostic Trouble Codes (DTCs)
- Select “Erase Codes”: In the diagnostic menu, select “Erase Codes.”
- Confirm Erasure: The scanner will ask you to confirm that you want to erase the codes. Select “Yes.”
- Turn Off and On Ignition: Follow the scanner’s instructions to turn off the ignition for a few seconds, then turn it back on.
- Verify Erasure: After clearing the codes, re-scan the vehicle to ensure the DTCs have been successfully cleared.
Important Note: Clearing DTCs does not fix the underlying problem. It only clears the code from the vehicle’s computer. The code will likely return if the issue is not resolved.
4. Troubleshooting Common Issues with the Foxwell NT301
Even with a user-friendly device like the Foxwell NT301, you may encounter some common issues. Here’s how to troubleshoot them:
4.1. Scanner Won’t Power On
- Check Connection: Ensure the scanner is securely connected to the OBD2 port.
- Check Vehicle Battery: Make sure the vehicle’s battery is charged. A low battery can prevent the scanner from powering on.
- Inspect OBD2 Port: Check the OBD2 port for damage or corrosion.
- Try Another Vehicle: Test the scanner on another vehicle to rule out a problem with the scanner itself.
4.2. Cannot Read Codes
- Verify Compatibility: Ensure the scanner is compatible with your vehicle. The Foxwell NT301 works with most OBD2 compliant vehicles manufactured after 1996.
- Check Ignition: Make sure the vehicle’s ignition is turned to the “ON” position without starting the engine.
- Scanner Software: Ensure the scanner has the latest software updates.
- Clear Previous Codes: Try clearing any existing codes before attempting to read new ones.
4.3. Incorrect or Missing Data
- Check Connection: Ensure the scanner is securely connected to the OBD2 port.
- Scanner Software: Ensure the scanner has the latest software updates.
- Vehicle Sensors: The issue may be with the vehicle’s sensors themselves. In this case, you may need to consult a professional mechanic.
4.4. Scanner Freezes or Locks Up
- Restart Scanner: Try restarting the scanner by disconnecting it from the OBD2 port and reconnecting it.
- Update Software: Ensure the scanner has the latest software updates.
- Contact Support: If the issue persists, contact Foxwell customer support for assistance.
5. Advanced Features and Tips for the Foxwell NT301
To get the most out of your Foxwell NT301 OBD2 scanner, explore these advanced features and tips.
5.1. Using the DTC Lookup Function
The Foxwell NT301 has a built-in DTC lookup function that provides definitions for diagnostic trouble codes. To use this feature:
- Read Codes: Retrieve the DTCs from your vehicle.
- Select DTC Lookup: Navigate to the DTC lookup function in the scanner’s menu.
- Enter Code: Enter the DTC you want to look up.
- View Definition: The scanner will display the definition of the code, providing more information about the potential problem.
5.2. Customizing Live Data Display
The Foxwell NT301 allows you to customize the live data display to show only the parameters you’re interested in. This can help you focus on specific issues and avoid being overwhelmed by too much data. To customize the live data display:
- Select Live Data: Navigate to the live data function in the scanner’s menu.
- Choose Parameters: Select the parameters you want to monitor.
- Save Configuration: Save your configuration for future use.
5.3. Printing Diagnostic Reports
The Foxwell NT301 can generate diagnostic reports that you can print and share with your mechanic. To print a report:
- Connect to Computer: Connect the scanner to your computer using a USB cable.
- Use Update Tool: Use the Foxwell update tool to download the diagnostic data to your computer.
- Print Report: Print the report from your computer.
5.4. Interpreting Results Like a Pro
Interpreting the results from your Foxwell NT301 requires a combination of technical knowledge and practical experience. Here are some tips to help you interpret the results like a pro:
- Consult Repair Manuals: Refer to your vehicle’s repair manual for specific diagnostic procedures and troubleshooting tips.
- Use Online Resources: Use online forums, databases, and repair websites to research DTCs and potential solutions.
- Consider Symptoms: Take into account the symptoms your vehicle is exhibiting. This can help you narrow down the possible causes of a DTC.
- Perform Further Testing: Don’t rely solely on the DTC. Perform additional tests, such as visual inspections and component testing, to confirm the diagnosis.
6. Maintaining Your Foxwell NT301 OBD2 Scanner
To ensure your Foxwell NT301 OBD2 scanner continues to perform accurately and reliably, follow these maintenance tips:
- Keep It Clean: Clean the scanner with a soft, dry cloth to remove dirt and grime.
- Store It Properly: Store the scanner in a cool, dry place when not in use.
- Protect the Cable: Avoid bending or twisting the OBD2 cable, as this can damage the wires.
- Update Software Regularly: Check for and install software updates to ensure the scanner has the latest features and DTC definitions.
- Handle with Care: Avoid dropping or subjecting the scanner to excessive force.
7. Why Choose OBD2-SCANNER.EDU.VN for Your Diagnostic Needs?
At OBD2-SCANNER.EDU.VN, we’re dedicated to providing you with the best information and services for diagnosing and repairing your vehicle. Here’s why you should choose us:
- Expert Guidance: Our team of experienced mechanics and automotive experts can provide you with personalized guidance and support.
- Comprehensive Resources: We offer a wide range of articles, guides, and videos to help you understand OBD2 technology and diagnose your vehicle’s problems.
- Quality Products: We offer a curated selection of high-quality OBD2 scanners and diagnostic tools.
- Customer Satisfaction: We’re committed to providing excellent customer service and ensuring your satisfaction.
8. Conclusion: Empowering You with the Foxwell NT301 OBD2 Scanner
The Foxwell NT301 OBD2 scanner is a powerful tool that can empower you to diagnose and repair your vehicle with confidence. By following this comprehensive guide, you can effectively use the NT301 to read and clear codes, view live data, perform I/M readiness tests, and troubleshoot common issues. Whether you’re a DIY enthusiast or a professional mechanic, the Foxwell NT301 is an invaluable asset for maintaining your vehicle.
Ready to take control of your vehicle’s diagnostics? Contact OBD2-SCANNER.EDU.VN today for expert advice on using the Foxwell NT301 OBD2 scanner and our comprehensive auto repair services.
Contact us:
- Address: 123 Main Street, Los Angeles, CA 90001, United States
- WhatsApp: +1 (641) 206-8880
- Website: OBD2-SCANNER.EDU.VN
9. Frequently Asked Questions (FAQs) about the Foxwell NT301 OBD2 Scanner
9.1. What is an OBD2 Scanner?
An OBD2 scanner is a diagnostic tool used to read and interpret data from a vehicle’s on-board diagnostic (OBD) system. It helps identify issues by reading diagnostic trouble codes (DTCs) and providing real-time data about the vehicle’s performance.
9.2. How Do I Read OBD2 Codes with the Foxwell NT301?
Connect the scanner to the OBD2 port, turn on the ignition (without starting the engine), select “OBDII/EOBD” from the main menu, and then choose “Read Codes.” The scanner will display any stored DTCs.
9.3. What Does It Mean When My Car Throws an OBD2 Code?
An OBD2 code indicates that a specific issue has been detected in the vehicle’s system. The code provides information about the nature and location of the problem, helping you or a mechanic diagnose and repair it.
9.4. Can I Clear OBD2 Codes Myself?
Yes, you can clear OBD2 codes using a scanner like the Foxwell NT301. However, remember that clearing the code doesn’t fix the underlying problem. The code will likely return if the issue is not resolved.
9.5. What Are Some Common OBD2 Codes and Their Meanings?
- P0300: Random/Multiple Cylinder Misfire Detected
- P0171: System Too Lean (Bank 1)
- P0420: Catalyst System Efficiency Below Threshold (Bank 1)
- P0301: Cylinder 1 Misfire Detected
- P0101: Mass or Volume Air Flow Circuit Range/Performance Problem
9.6. How Can I Fix Common Car Problems Indicated by OBD2 Codes?
To fix common car problems:
- Misfires (P0300, P0301): Check spark plugs, ignition coils, fuel injectors, and compression.
- Lean System (P0171): Inspect for vacuum leaks, check the MAF sensor, and fuel pressure.
- Catalyst Efficiency (P0420): Examine the catalytic converter, O2 sensors, and exhaust system for leaks.
9.7. Is the Foxwell NT301 Compatible with My Vehicle?
The Foxwell NT301 is compatible with most OBD2 compliant vehicles (cars and light trucks) manufactured after 1996. Check your vehicle’s manual or consult with an automotive expert to confirm compatibility.
9.8. Where Can I Find More Detailed Information About Specific OBD2 Codes?
You can find more detailed information about specific OBD2 codes in your vehicle’s repair manual, online automotive forums, and databases like OBD-Codes.com.
9.9. How Often Should I Scan My Car for OBD2 Codes?
You should scan your car for OBD2 codes whenever the check engine light comes on or if you notice any unusual symptoms or performance issues. Regular scanning can help catch potential problems early.
9.10. Can OBD2 Scanners Help Improve Fuel Efficiency?
Yes, OBD2 scanners can help improve fuel efficiency by identifying issues that affect engine performance, such as faulty O2 sensors, vacuum leaks, and misfires. Addressing these issues can restore optimal fuel economy.