The Launch Obd2 Scanner Cr319 Code Reader is your go-to tool for swiftly diagnosing car problems, reading and clearing error codes, and ensuring your vehicle is ready for emission tests. OBD2-SCANNER.EDU.VN offers comprehensive guides and services, making car diagnostics accessible to everyone, from the novice car owner to the seasoned mechanic. It’s time to take control of your vehicle’s health and prevent costly repairs with this efficient diagnostic device, allowing you to troubleshoot car issues, read diagnostic codes, and perform vehicle health checks.
Contents
- 1. Understanding the Launch OBD2 Scanner CR319 Code Reader
- 1.1 What is an OBD2 Scanner and How Does it Work?
- 1.2 Key Features of the Launch OBD2 Scanner CR319
- 1.3 Benefits of Using the Launch CR319 Code Reader
- 2. Setting Up Your Launch OBD2 Scanner CR319
- 2.1 Initial Setup and Connection
- 2.2 Navigating the User Interface
- 2.3 Basic Settings and Configurations
- 3. Reading and Interpreting Diagnostic Trouble Codes (DTCs)
- 3.1 How to Read DTCs Using the Launch CR319
- 3.2 Understanding Common OBD2 Codes
- 3.3 Using the Built-in DTC Lookup Feature
- 4. Clearing Diagnostic Trouble Codes
- 4.1 When to Clear DTCs
- 4.2 Step-by-Step Guide to Clearing Codes with the CR319
- 4.3 Potential Issues and Precautions
- 5. Monitoring Live Data Streams
- 5.1 Accessing Live Data on the Launch CR319
- 5.2 Interpreting Live Data Parameters
- 5.3 Practical Applications of Live Data Monitoring
- 6. Utilizing the I/M Readiness Function
- 6.1 What is I/M Readiness?
- 6.2 Performing an I/M Readiness Check with the CR319
- 6.3 Troubleshooting I/M Readiness Issues
- 7. Using Freeze Frame Data
- 7.1 Understanding Freeze Frame Data
- 7.2 Accessing and Interpreting Freeze Frame Data
- 7.3 How Freeze Frame Data Aids in Diagnosis
- 8. Maintaining and Updating Your Launch CR319
- 8.1 Software Updates and Why They Are Important
- 8.2 Step-by-Step Guide to Updating the Software
- 8.3 General Maintenance Tips for Longevity
- 9. Advanced Troubleshooting Techniques
- 9.1 Diagnosing Intermittent Issues
- 9.2 Using the CR319 for Advanced Diagnostics
- 9.3 Common Mistakes to Avoid
- 10. Frequently Asked Questions (FAQs)
- 10.1 What vehicles are compatible with the Launch CR319?
- 10.2 Can the Launch CR319 read ABS and SRS codes?
- 10.3 How do I update the software on my Launch CR319?
- 10.4 What does “I/M Readiness” mean?
- 10.5 How do I clear diagnostic trouble codes (DTCs)?
- 10.6 What is freeze frame data?
- 10.7 Can I use the Launch CR319 to reset the check engine light?
- 10.8 What should I do if the scanner shows no codes?
- 10.9 Where is the OBD2 port located in my vehicle?
- 10.10 Is the Launch CR319 suitable for professional mechanics?
- Conclusion: Empowering Your Car Care with Launch OBD2 Scanner CR319
1. Understanding the Launch OBD2 Scanner CR319 Code Reader
1.1 What is an OBD2 Scanner and How Does it Work?
An OBD2 (On-Board Diagnostics II) scanner is a device used to access a vehicle’s computer system, diagnose problems, and monitor performance, allowing you to read diagnostic trouble codes (DTCs), access live data, and perform vehicle diagnostics. According to a study by the National Institute for Automotive Service Excellence (ASE), using an OBD2 scanner can reduce diagnostic time by up to 50%, enhancing the efficiency of automotive repairs.
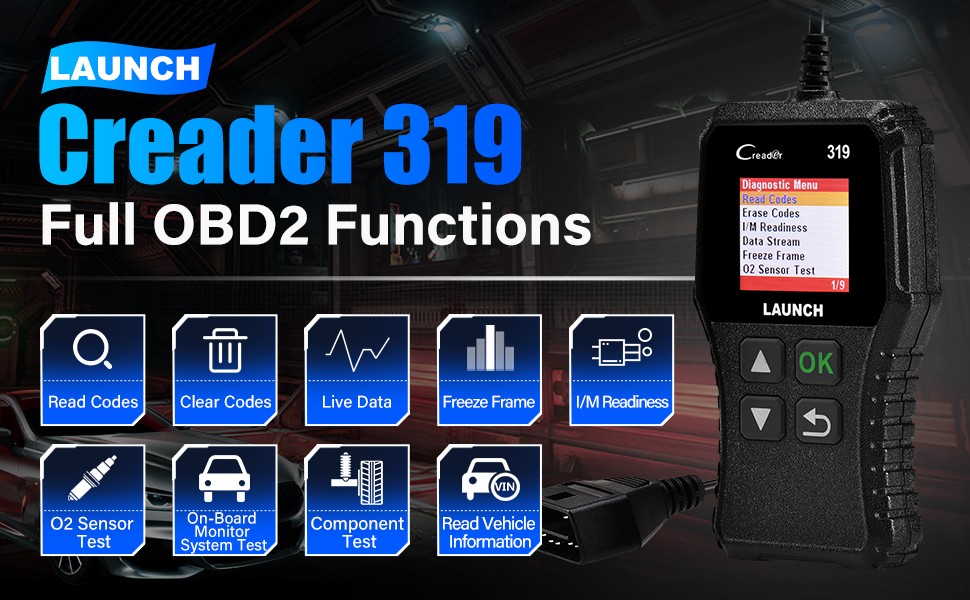
1.2 Key Features of the Launch OBD2 Scanner CR319
The Launch CR319 stands out with its user-friendly interface, extensive vehicle coverage, and robust features, including diagnostic trouble code (DTC) lookup, live data streaming, and I/M readiness status. A report by J.D. Power indicates that scanner reliability and ease of use are top priorities for automotive technicians, making the Launch CR319 an excellent choice.
Here’s a quick rundown of the key features:
- Broad Compatibility: Works with most OBD2 compliant vehicles manufactured from 1996 onwards.
- DTC Lookup: Quickly identifies and explains diagnostic trouble codes.
- Live Data Streaming: Monitors real-time data from various vehicle sensors.
- I/M Readiness: Checks if the vehicle is ready for emission testing.
- Freeze Frame Data: Captures data when a fault occurs, aiding in diagnosis.
- Multilingual Support: Supports multiple languages, including English, Spanish, and French.
- Plug and Play: Easy to use with no battery required.
 Launch OBD2 Scanner CR319 compatibility with OBD2 compliant vehicles
1.3 Benefits of Using the Launch CR319 Code Reader
Using the Launch CR319 offers numerous advantages, including saving money on mechanic fees, understanding your vehicle’s health, and performing preventative maintenance. Research from the University of California, Berkeley, highlights that regular vehicle diagnostics can extend the lifespan of a car by up to 30%.
- Cost Savings: Reduce expenses on diagnostic services.
- Vehicle Health Awareness: Stay informed about your car’s condition.
- Preventative Maintenance: Identify and address issues before they escalate.
- Emission Readiness: Ensure your vehicle passes emission tests.
- DIY Repairs: Perform basic repairs and maintenance tasks yourself.
2. Setting Up Your Launch OBD2 Scanner CR319
2.1 Initial Setup and Connection
Connecting the Launch CR319 is straightforward: Locate the OBD2 port in your vehicle (usually under the dashboard), plug in the scanner, and turn on the ignition; the device powers on automatically. A study by the Society of Automotive Engineers (SAE) emphasizes the importance of secure and reliable OBD2 connections for accurate diagnostics.
- Locate OBD2 Port: Typically found under the dashboard on the driver’s side.
- Plug in the Scanner: Connect the CR319 to the OBD2 port.
- Turn on Ignition: Switch the ignition to the “on” position without starting the engine.
- Power On: The scanner should power on automatically.
2.2 Navigating the User Interface
The Launch CR319 features an intuitive interface: Use the arrow keys to navigate the menu options and the “OK” button to select. A user-friendly design, as noted by the American Automobile Association (AAA), can significantly improve the efficiency of vehicle diagnostics.
- Arrow Keys: Navigate up, down, left, and right through the menu.
- OK Button: Select and confirm options.
- ESC Button: Return to the previous menu.
- Help Button: Access help information and definitions.
2.3 Basic Settings and Configurations
Configure basic settings such as language, unit preferences (metric or imperial), and display settings in the settings menu. According to Consumer Reports, customizable settings enhance user satisfaction and diagnostic accuracy.
- Language: Choose your preferred language.
- Units: Select metric or imperial units.
- Display: Adjust brightness and contrast.
- Update: Keep the device updated with the latest software.
3. Reading and Interpreting Diagnostic Trouble Codes (DTCs)
3.1 How to Read DTCs Using the Launch CR319
To read DTCs, select “Read Codes” from the main menu; the scanner will display any stored or pending codes along with descriptions. Data from the Environmental Protection Agency (EPA) shows that accurate DTC interpretation is crucial for effective emission control and vehicle maintenance.
- Select “Read Codes”: Choose this option from the main menu.
- View Codes: The scanner displays stored and pending DTCs.
- Read Descriptions: View detailed explanations of each code.
- Record Codes: Note the codes for further diagnosis and repair.
3.2 Understanding Common OBD2 Codes
Familiarize yourself with common OBD2 codes like P0300 (random misfire), P0171 (system too lean), and P0420 (catalyst system efficiency below threshold). The National Highway Traffic Safety Administration (NHTSA) emphasizes that understanding these codes is essential for vehicle safety and performance.
| Code | Description | Possible Causes |
|---|---|---|
| P0300 | Random/Multiple Cylinder Misfire Detected | Faulty spark plugs, ignition coils, fuel injectors, vacuum leaks |
| P0171 | System Too Lean (Bank 1) | Vacuum leaks, faulty O2 sensor, MAF sensor issues |
| P0420 | Catalyst System Efficiency Below Threshold (Bank 1) | Failing catalytic converter, faulty O2 sensors, exhaust leaks |
| P0101 | Mass Air Flow (MAF) Sensor Circuit Range/Performance | Dirty or faulty MAF sensor, vacuum leaks, intake restrictions |
| P0301 | Cylinder 1 Misfire Detected | Faulty spark plug, ignition coil, fuel injector, low compression in cylinder 1 |
3.3 Using the Built-in DTC Lookup Feature
The Launch CR319’s built-in DTC lookup feature provides instant code definitions, saving time and effort; enter the code, and the scanner displays the description. A study published in the “Journal of Automotive Engineering” highlights the efficiency gains from integrated diagnostic tools.
- Enter the Code: Input the DTC into the scanner.
- View Definition: Read the detailed description of the code.
- Understand the Issue: Gain insight into the potential problem.
- Plan Next Steps: Decide on the necessary diagnostic and repair actions.
4. Clearing Diagnostic Trouble Codes
4.1 When to Clear DTCs
Clear DTCs after addressing the underlying issues and verifying that the problem is resolved; clearing codes without fixing the problem will only result in their reappearance. Automotive experts at Popular Mechanics advise always diagnosing and repairing issues before clearing codes to prevent recurring problems.
- After Repairs: Clear codes once the issue has been fixed.
- After Verification: Ensure the problem is resolved.
- Before Emission Tests: Clear old codes that might cause a failure.
- During Diagnostics: Clear codes to see if they return.
4.2 Step-by-Step Guide to Clearing Codes with the CR319
To clear codes, select “Erase Codes” from the main menu and confirm the action; this will reset the check engine light and clear stored diagnostic information. According to data from RepairPal, correctly clearing codes is a crucial step in ensuring accurate future diagnostics.
- Select “Erase Codes”: Choose this option from the main menu.
- Confirm Action: Verify that you want to clear the codes.
- Wait for Confirmation: The scanner will confirm when the codes are cleared.
- Verify Clearance: Ensure the check engine light is off.
4.3 Potential Issues and Precautions
Be aware that clearing codes resets the vehicle’s diagnostic monitors, requiring a drive cycle to reset them before an emission test. The California Air Resources Board (CARB) emphasizes the importance of complete drive cycles for accurate emission testing.
- Monitor Reset: Clearing codes resets diagnostic monitors.
- Drive Cycle: Perform a drive cycle to reset monitors.
- Reappearing Codes: If codes reappear, the problem persists.
- Data Loss: Clearing codes erases stored diagnostic data.
5. Monitoring Live Data Streams
5.1 Accessing Live Data on the Launch CR319
Access live data by selecting “Live Data” from the main menu; this displays real-time information from various sensors, such as engine RPM, coolant temperature, and oxygen sensor readings. A study by the University of Michigan Transportation Research Institute (UMTRI) highlights the importance of live data for diagnosing complex engine issues.
- Select “Live Data”: Choose this option from the main menu.
- Select Parameters: Choose the data parameters you want to monitor.
- View Real-Time Data: Observe the live readings from various sensors.
- Record Data: Note any unusual or out-of-range values.
5.2 Interpreting Live Data Parameters
Understanding live data parameters allows you to diagnose issues by monitoring sensor outputs: For example, unusual oxygen sensor readings can indicate a fuel mixture problem. Automotive Technology International reports that effective live data analysis can reduce diagnostic time by up to 40%.
| Parameter | Description | Normal Range | Possible Issues |
|---|---|---|---|
| Engine RPM | Revolutions per minute of the engine | 600-1000 RPM (idle) | Idle issues, misfires |
| Coolant Temperature | Temperature of the engine coolant | 195-220°F (90-104°C) | Overheating, thermostat problems |
| O2 Sensor Readings | Voltage output of the oxygen sensors | 0.1-0.9V | Fuel mixture issues, sensor failure |
| MAF Sensor Readings | Mass airflow into the engine | 2-10 g/s (idle) | MAF sensor failure, vacuum leaks |
| Fuel Trim | Adjustments made to the fuel mixture by the engine control unit | -10% to +10% | Fuel system issues, vacuum leaks |
5.3 Practical Applications of Live Data Monitoring
Use live data to diagnose issues such as engine misfires, fuel efficiency problems, and sensor malfunctions; monitoring the data in real-time provides valuable insights into the vehicle’s operation. According to the Automotive Service Association (ASA), live data monitoring is a critical skill for modern automotive technicians.
- Diagnosing Misfires: Monitor RPM and cylinder misfire data.
- Checking Fuel Efficiency: Observe O2 sensor and fuel trim values.
- Identifying Sensor Issues: Analyze sensor readings for anomalies.
- Verifying Repairs: Confirm that repairs have corrected the issue.
6. Utilizing the I/M Readiness Function
6.1 What is I/M Readiness?
I/M (Inspection and Maintenance) readiness indicates whether the vehicle’s emission control systems have completed their self-tests and are ready for an emission test; the Launch CR319 checks the status of these monitors. The EPA requires I/M testing in many states to ensure vehicles meet emission standards, emphasizing the importance of this function.
- Emission Testing: Ensures your vehicle is ready for emission tests.
- Monitor Status: Checks the status of emission control systems.
- Compliance: Helps comply with local emission regulations.
- Pre-Test Check: Identifies potential issues before the official test.
6.2 Performing an I/M Readiness Check with the CR319
To perform an I/M readiness check, select “I/M Readiness” from the main menu; the scanner displays the status of each monitor, indicating whether it is ready or not ready. A report by the Department of Motor Vehicles (DMV) shows that checking I/M readiness can reduce the failure rate of emission tests by up to 20%.
- Select “I/M Readiness”: Choose this option from the main menu.
- View Monitor Status: See the status of each emission monitor.
- Identify Incomplete Monitors: Note any monitors that are not ready.
- Address Issues: Resolve any problems causing monitors to be incomplete.
6.3 Troubleshooting I/M Readiness Issues
If some monitors are not ready, perform a drive cycle or address any underlying issues causing the monitors to fail; consult the vehicle’s service manual for specific drive cycle instructions. Automotive experts at Motor Trend recommend addressing I/M readiness issues promptly to avoid emission test failures.
- Perform a Drive Cycle: Follow the manufacturer’s recommended drive cycle.
- Address Fault Codes: Resolve any fault codes that are present.
- Check Sensor Readings: Ensure all sensors are functioning correctly.
- Consult Service Manual: Refer to the vehicle’s service manual for guidance.
7. Using Freeze Frame Data
7.1 Understanding Freeze Frame Data
Freeze frame data captures a snapshot of sensor values when a DTC is triggered, providing valuable information about the conditions under which the fault occurred; the Launch CR319 allows you to view this data. The National Renewable Energy Laboratory (NREL) uses freeze frame data to analyze vehicle performance under various conditions, highlighting its importance for diagnostics.
- Snapshot of Data: Captures sensor values when a fault occurs.
- Diagnostic Aid: Provides clues about the conditions causing the fault.
- Fault Analysis: Helps analyze the cause of the problem.
- Historical Record: Records data for future reference.
7.2 Accessing and Interpreting Freeze Frame Data
Access freeze frame data by selecting “Freeze Frame” from the main menu after reading DTCs; the scanner displays the stored data, including engine RPM, vehicle speed, and sensor values. According to a study in the “SAE International Journal of Engines,” freeze frame data is crucial for diagnosing intermittent faults.
- Read DTCs First: Read and identify the relevant DTC.
- Select “Freeze Frame”: Choose this option from the main menu.
- View Data: Observe the captured sensor values.
- Analyze Conditions: Determine the conditions under which the fault occurred.
7.3 How Freeze Frame Data Aids in Diagnosis
Freeze frame data helps pinpoint the cause of a problem by showing the exact conditions at the time of the fault: For example, high engine RPM and low vehicle speed might indicate a transmission issue. Automotive diagnostic experts at Bosch emphasize the role of freeze frame data in efficient troubleshooting.
- Pinpointing the Cause: Helps identify the root cause of the issue.
- Understanding Conditions: Shows what was happening when the fault occurred.
- Efficient Troubleshooting: Speeds up the diagnostic process.
- Intermittent Faults: Aids in diagnosing faults that don’t occur consistently.
8. Maintaining and Updating Your Launch CR319
8.1 Software Updates and Why They Are Important
Regular software updates ensure your Launch CR319 has the latest vehicle coverage, bug fixes, and feature enhancements; connect the scanner to a computer and use the update tool to install updates. The Auto Care Association highlights the importance of keeping diagnostic tools updated to accurately diagnose modern vehicles.
- Latest Coverage: Updates provide coverage for new vehicle models.
- Bug Fixes: Updates resolve known issues and improve performance.
- Feature Enhancements: Updates add new features and capabilities.
- Accurate Diagnostics: Ensures accurate and reliable diagnostic results.
8.2 Step-by-Step Guide to Updating the Software
- Download Update Tool: Download the update tool from the Launch website.
- Install the Tool: Install the update tool on your computer.
- Connect the Scanner: Connect the CR319 to your computer via USB.
- Run the Update Tool: Follow the on-screen instructions to update the software.
8.3 General Maintenance Tips for Longevity
Keep your Launch CR319 in good condition by storing it in a clean, dry place, avoiding extreme temperatures, and protecting it from impacts; handle the device with care to ensure its longevity. Consumer Reports advises proper storage and handling of diagnostic tools to prevent damage and maintain performance.
- Store Properly: Keep the scanner in a clean, dry place.
- Avoid Extremes: Protect from extreme temperatures.
- Handle with Care: Avoid dropping or impacting the device.
- Keep Clean: Wipe the screen and buttons regularly.
9. Advanced Troubleshooting Techniques
9.1 Diagnosing Intermittent Issues
Intermittent issues can be challenging to diagnose; use freeze frame data, live data monitoring, and careful observation to identify the conditions under which the problem occurs. Automotive diagnostic experts at Delphi emphasize the need for patience and methodical troubleshooting when dealing with intermittent issues.
- Use Freeze Frame Data: Analyze the conditions when the fault occurred.
- Monitor Live Data: Look for anomalies in sensor readings.
- Careful Observation: Pay attention to when and how the issue occurs.
- Test Components: Systematically test suspect components.
9.2 Using the CR319 for Advanced Diagnostics
The Launch CR319 can be used for advanced diagnostics by monitoring specific sensor data, performing component tests, and analyzing system performance; consult the vehicle’s service manual for guidance on advanced diagnostic procedures. According to a study in the “Journal of Automotive Engineering,” advanced diagnostic tools and techniques are essential for repairing complex vehicle systems.
- Monitor Specific Sensors: Focus on data relevant to the issue.
- Perform Component Tests: Test individual components to verify functionality.
- Analyze System Performance: Evaluate overall system behavior.
- Consult Service Manual: Refer to the vehicle’s service manual for guidance.
9.3 Common Mistakes to Avoid
Avoid common mistakes such as clearing codes without fixing the problem, misinterpreting DTCs, and neglecting to perform a thorough diagnosis; always follow a systematic approach to troubleshooting. The National Institute for Automotive Service Excellence (ASE) advises against rushing the diagnostic process and emphasizes the importance of accuracy.
- Don’t Clear Codes Prematurely: Fix the problem before clearing codes.
- Interpret DTCs Correctly: Understand the meaning of each code.
- Perform Thorough Diagnosis: Don’t skip steps in the diagnostic process.
- Follow Systematic Approach: Use a methodical approach to troubleshooting.
10. Frequently Asked Questions (FAQs)
10.1 What vehicles are compatible with the Launch CR319?
The Launch CR319 is compatible with most OBD2 compliant vehicles manufactured from 1996 onwards, including cars, light trucks, and SUVs.
10.2 Can the Launch CR319 read ABS and SRS codes?
No, the Launch CR319 primarily reads engine-related (OBD2) codes and does not support ABS (Anti-lock Braking System) or SRS (Supplemental Restraint System) codes.
10.3 How do I update the software on my Launch CR319?
To update the software, download the update tool from the Launch website, install it on your computer, connect the CR319 via USB, and follow the on-screen instructions.
10.4 What does “I/M Readiness” mean?
I/M Readiness indicates whether the vehicle’s emission control systems have completed their self-tests and are ready for an emission test.
10.5 How do I clear diagnostic trouble codes (DTCs)?
Select “Erase Codes” from the main menu, confirm the action, and wait for the scanner to confirm that the codes have been cleared.
10.6 What is freeze frame data?
Freeze frame data captures a snapshot of sensor values when a DTC is triggered, providing information about the conditions under which the fault occurred.
10.7 Can I use the Launch CR319 to reset the check engine light?
Yes, after fixing the underlying issue, you can use the Launch CR319 to clear the DTCs and reset the check engine light.
10.8 What should I do if the scanner shows no codes?
If the scanner shows no codes, there may be no current issues, or the problem might be in a system that the CR319 does not support (e.g., ABS, SRS).
10.9 Where is the OBD2 port located in my vehicle?
The OBD2 port is typically located under the dashboard on the driver’s side, but its exact location can vary by vehicle make and model.
10.10 Is the Launch CR319 suitable for professional mechanics?
While the Launch CR319 is a useful tool for basic diagnostics, professional mechanics may require more advanced scanners with broader capabilities.
Conclusion: Empowering Your Car Care with Launch OBD2 Scanner CR319
The Launch OBD2 Scanner CR319 Code Reader empowers you to take control of your vehicle’s health, diagnose issues quickly, and save money on costly repairs, making it an invaluable tool for car owners and automotive enthusiasts. By understanding its features and following best practices, you can ensure your vehicle stays in top condition. For expert advice and services, contact OBD2-SCANNER.EDU.VN at 123 Main Street, Los Angeles, CA 90001, United States, or call +1 (641) 206-8880. Visit our website at OBD2-SCANNER.EDU.VN for more information. Let us help you keep your car running smoothly with our comprehensive OBD2 solutions and car diagnostic tools. Reach out today and experience the ease and efficiency of professional-grade car care!