The Model 3 Obd2 Adapter is a device that adds an OBD2 port to Tesla Model 3 and Model Y vehicles. This adapter allows you to access diagnostic information and other data from your car’s computer. OBD2-SCANNER.EDU.VN provides comprehensive information and services to help you effectively utilize this technology for optimal vehicle performance and diagnostics. Discover how to use this adapter to enhance your vehicle’s capabilities and ensure it runs smoothly.
Contents
- 1. Understanding the Model 3 OBD2 Adapter
- 1.1. What is an OBD2 Adapter?
- 1.2. Why Use an OBD2 Adapter with Your Tesla Model 3?
- 1.3. Compatibility of the OBD2 Adapter
- 2. Key Features and Benefits of Using a Model 3 OBD2 Adapter
- 2.1. Real-Time Data Monitoring
- 2.2. Diagnostic Trouble Codes (DTCs) Reading
- 2.3. Enhanced Vehicle Performance
- 2.4. Integration with Third-Party Apps
- 3. Step-by-Step Installation Guide for the Model 3 OBD2 Adapter
- 3.1. Preparation
- 3.2. Accessing the Connector (Pre-2024 Models)
- 3.3. Installing the OBD2 Adapter
- 3.4. Installing the OBD2 Adapter (2024 and Newer Models)
- 3.5. Final Steps
- 4. Troubleshooting Common Issues
- 4.1. Adapter Not Recognized
- 4.2. Error Codes Not Displaying
- 4.3. Intermittent Connection Issues
- 5. Choosing the Right OBD2 Adapter for Your Model 3
- 5.1. Compatibility with Tesla Model 3/Y
- 5.2. Features and Functionality
- 5.3. Wireless vs. Wired Adapters
- 5.4. Brand Reputation and Reviews
- 5.5. Price and Warranty
- 6. Advanced Tips and Tricks for Using Your Model 3 OBD2 Adapter
- 6.1. Customizing Dashboards
- 6.2. Data Logging and Analysis
- 6.3. Using Third-Party Apps for Advanced Diagnostics
- 6.4. Regular Firmware Updates
- 7. Safety Precautions When Installing and Using the OBD2 Adapter
- 7.1. Disconnect Power Properly
- 7.2. Avoid Overloading the System
- 7.3. Use Quality Adapters
- 7.4. Secure Connections
- 7.5. Monitor Vehicle Performance
- 8. Understanding OBD2 Codes for Tesla Model 3
- 8.1. Common OBD2 Codes
- 8.2. Interpreting OBD2 Codes
- 8.3. Resetting OBD2 Codes
- 9. Maintaining Your Tesla Model 3 with OBD2 Diagnostics
- 9.1. Regular Scanning
- 9.2. Monitoring Key Parameters
- 9.3. Addressing Issues Promptly
- 9.4. Keeping Records
- 10. Frequently Asked Questions (FAQ) About Model 3 OBD2 Adapters
- 10.1. What is an OBD2 scanner?
- 10.2. How do I read OBD2 error codes?
- 10.3. What are common car problems and how can they be fixed?
- 10.4. How does the OBD2 adapter enhance vehicle maintenance?
- 10.5. Can I install the Model 3 OBD2 adapter myself?
- 10.6. What if my OBD2 adapter is not recognized by the car?
- 10.7. Are there any risks associated with using an OBD2 adapter?
- 10.8. How often should I scan my Tesla Model 3 for OBD2 codes?
- 10.9. What kind of maintenance should I have done on my Tesla Model 3?
- 10.10. Where can I find more information and services related to OBD2 adapters?
1. Understanding the Model 3 OBD2 Adapter
The Model 3 OBD2 adapter provides a crucial link to your Tesla’s internal data, enhancing your ability to monitor and maintain your vehicle. This section will provide detailed insights into what this adapter is, why it’s beneficial, and its compatibility.
1.1. What is an OBD2 Adapter?
An OBD2 (On-Board Diagnostics II) adapter is a device that allows you to access your car’s computer system for diagnostics and data monitoring. According to the Environmental Protection Agency (EPA), all cars and light trucks manufactured after 1996 in the United States are required to have an OBD2 port. This port provides a standardized way to retrieve data related to vehicle performance, emissions, and other critical parameters. The Model 3 OBD2 adapter is specifically designed to add this functionality to Tesla Model 3 and Model Y vehicles, which may not come with a standard OBD2 port.
1.2. Why Use an OBD2 Adapter with Your Tesla Model 3?
Using a Model 3 OBD2 adapter offers several advantages:
- Access to Diagnostic Data: You can read diagnostic trouble codes (DTCs), which help identify issues with your vehicle.
- Performance Monitoring: Monitor real-time data such as battery health, motor performance, and energy consumption.
- Customization: Connect to third-party apps and devices to customize vehicle settings and add features.
- Vehicle Health Insights: Gain deeper insights into your Tesla’s operational status, helping you proactively address potential problems.
1.3. Compatibility of the OBD2 Adapter
The Model 3 OBD2 adapter is compatible with Tesla Model 3 and Model Y vehicles manufactured from January 2019 onwards. However, newer models produced in 2024 may have the OBD2 port located in a different location, specifically in the driver’s footwell. It is important to verify the installation location based on the model year of your vehicle to ensure proper connection and functionality.
2. Key Features and Benefits of Using a Model 3 OBD2 Adapter
Utilizing a Model 3 OBD2 adapter unlocks a range of features and benefits that can improve your vehicle’s maintenance and performance. Understanding these advantages will help you maximize the value of this tool.
2.1. Real-Time Data Monitoring
One of the primary benefits of using a Model 3 OBD2 adapter is the ability to monitor real-time data. This includes parameters such as:
- Battery Voltage: Monitor the voltage of your Tesla’s battery to ensure it’s within the optimal range.
- Motor Temperature: Keep an eye on the motor temperature to prevent overheating.
- Energy Consumption: Track energy usage to optimize driving habits and improve efficiency.
- Speed and RPM: Monitor the vehicle’s speed and revolutions per minute (RPM) in real-time.
2.2. Diagnostic Trouble Codes (DTCs) Reading
The OBD2 adapter allows you to read Diagnostic Trouble Codes (DTCs), which are codes generated by your car’s computer when it detects a problem. These codes can help you identify the source of the issue and take appropriate action.
- Identifying Issues: DTCs provide specific information about the problem, such as a faulty sensor or a malfunctioning component.
- Troubleshooting: By understanding the DTCs, you can troubleshoot the issue and determine the necessary repairs.
- Preventive Maintenance: Addressing DTCs early can prevent more serious problems and costly repairs down the line.
2.3. Enhanced Vehicle Performance
By monitoring real-time data and addressing DTCs, you can optimize your vehicle’s performance. This includes:
- Improved Efficiency: Adjusting driving habits based on energy consumption data.
- Preventing Damage: Addressing potential issues before they cause significant damage.
- Optimizing Settings: Customizing vehicle settings to suit your driving preferences.
2.4. Integration with Third-Party Apps
The Model 3 OBD2 adapter can be integrated with various third-party apps, providing additional functionality and customization options. These apps can offer features such as:
- Data Logging: Record and analyze vehicle data over time.
- Custom Dashboards: Create custom dashboards to display the data you find most relevant.
- Performance Tuning: Adjust vehicle settings to optimize performance.
3. Step-by-Step Installation Guide for the Model 3 OBD2 Adapter
Installing the Model 3 OBD2 adapter is a straightforward process. Follow these detailed steps to ensure a successful installation.
3.1. Preparation
Before you begin, gather the necessary tools and prepare your vehicle:
- Turn Off Sentry Mode: Disable Sentry Mode via the Tesla mobile app or the car’s touchscreen (Controls -> Security -> Sentry Mode = Off).
- Power Off the Vehicle: Open the driver’s side window fully and close the driver’s side door. Then, open the back door of the car to access the installation area after the power is turned off.
- Turn Off Main Power: Through the open window, use the car’s touchscreen to turn off the main power by navigating to Controls -> Security -> Power Off.
- Wait: Wait outside the car for approximately 8-10 minutes until you hear a relay “click.” Ensure there is no humming noise from the car before proceeding. According to Tesla’s official guidelines, waiting ensures all CAN buses and relays are fully powered down, preventing potential electrical issues during installation.
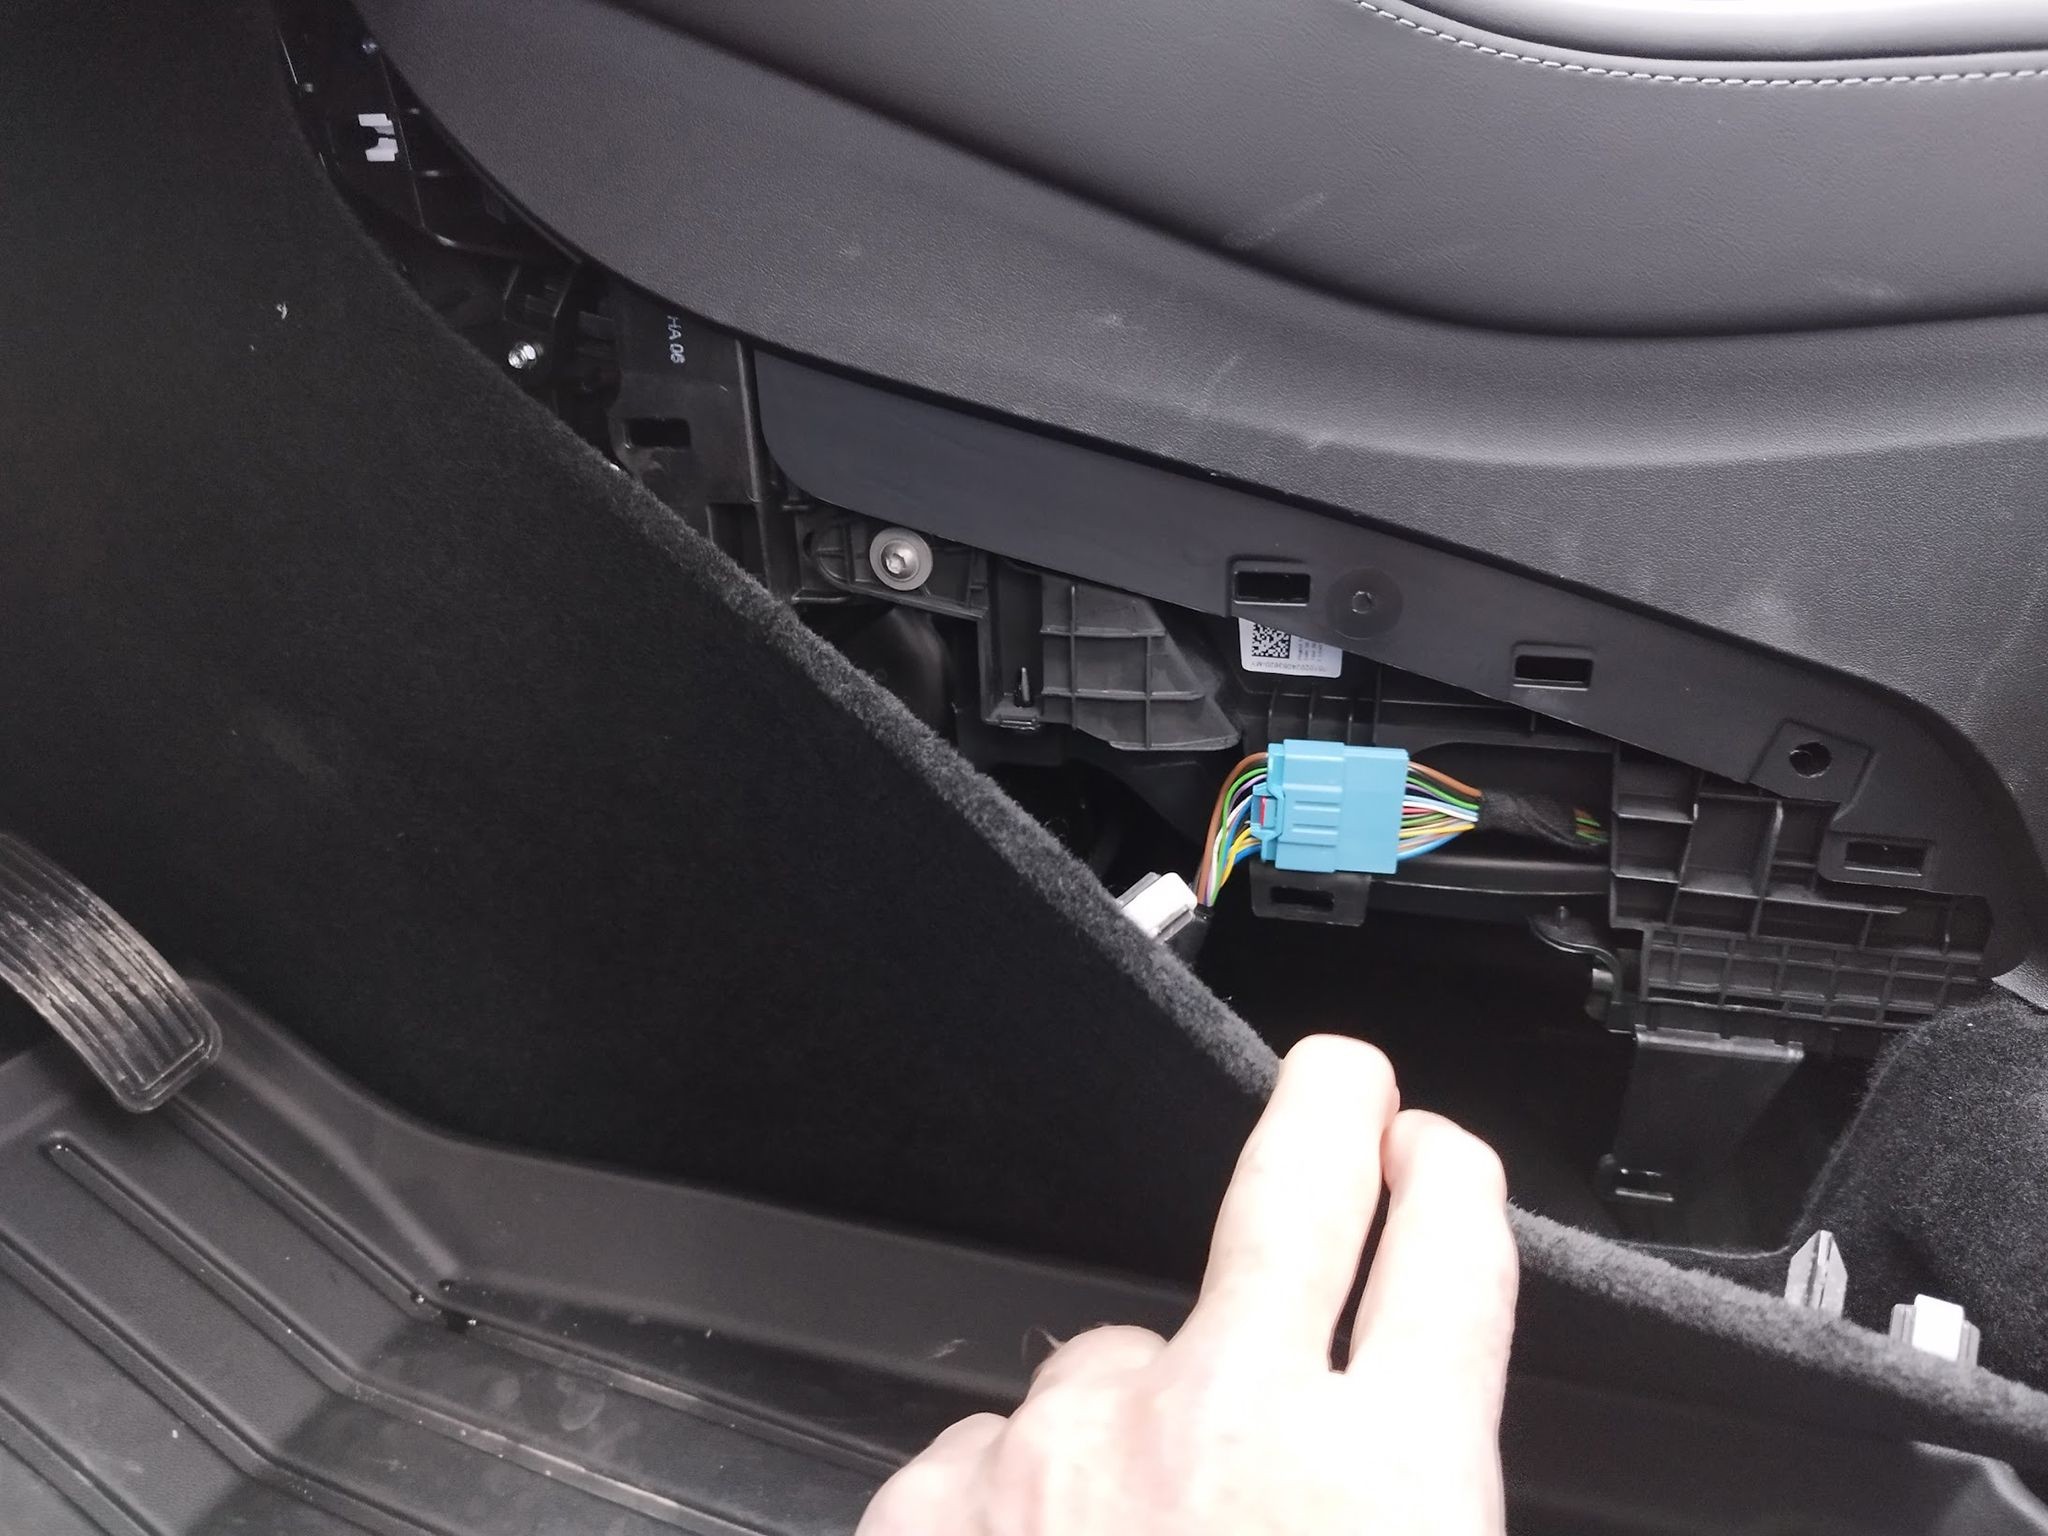
3.2. Accessing the Connector (Pre-2024 Models)
For Model 3 and Model Y vehicles manufactured before 2024, the connector is located in the rear footwell:
- Remove Protective Cover: Locate the protective cover in the rear footwell. It is secured with five clips.
- Detach the Cover: Carefully pull or slit the hatch to remove the cover and expose the wiring harness and connector.
- Disconnect the Connector: Disconnect the connector to prepare for the adapter installation.
3.3. Installing the OBD2 Adapter
- Place the Adapter: Position the OBD2 adapter between the disconnected connectors.
- Secure Connections: Ensure all connections are properly closed and secure.
- Replace the Cover: Close the protective lid.
3.4. Installing the OBD2 Adapter (2024 and Newer Models)
For 2024 and newer Model 3 vehicles, the OBD2 adapter is installed in the driver’s footwell:
- Locate the Socket: Find the socket located by the right foot in the driver’s footwell.
- Connect the Adapter: Plug the OBD2 adapter into the socket.
- Secure the Connection: Ensure the connection is firm and secure.
3.5. Final Steps
- Route the OBD2 Port (Optional): Consider routing the OBD2 port with a cable under the case in the rear footwell or under the front seats for easier access.
- Test the Connection: Turn on the vehicle and use an OBD2 scanner or a compatible app to test the connection and ensure data is being transmitted correctly.
Alt: The OBD2 port in the 2024 Tesla Model 3 is located in the driver’s footwell near the right foot.
4. Troubleshooting Common Issues
While the installation process is generally straightforward, you may encounter some common issues. Here are some troubleshooting tips to help you resolve them.
4.1. Adapter Not Recognized
If the OBD2 adapter is not recognized by your vehicle or the scanning tool, try the following:
- Check Connections: Ensure all connections are secure and properly aligned.
- Verify Compatibility: Confirm that the adapter is compatible with your Tesla Model 3 or Model Y model year.
- Restart Vehicle: Sometimes, simply restarting the vehicle can resolve connectivity issues.
- Test with Another Device: Try connecting the adapter to another OBD2 scanning tool or app to rule out compatibility issues with the original device.
4.2. Error Codes Not Displaying
If you are not seeing any error codes or data, consider these steps:
- Ensure Power Supply: Make sure the adapter is receiving power. Some adapters have an indicator light that confirms power.
- Check App Settings: Verify that the app or scanning tool is properly configured to read data from your Tesla.
- Update Firmware: Check if there are any firmware updates available for the OBD2 adapter.
- Contact Support: If the issue persists, contact the manufacturer or vendor for support.
4.3. Intermittent Connection Issues
If you experience intermittent connection problems, try these solutions:
- Secure Wiring: Ensure the wiring is not loose or damaged.
- Avoid Interference: Keep the adapter away from potential sources of interference, such as other electronic devices.
- Use a High-Quality Adapter: Invest in a high-quality OBD2 adapter to ensure a stable and reliable connection.
5. Choosing the Right OBD2 Adapter for Your Model 3
Selecting the right OBD2 adapter is crucial for ensuring compatibility and optimal performance with your Tesla Model 3. Consider these factors when making your decision.
5.1. Compatibility with Tesla Model 3/Y
Ensure that the OBD2 adapter is specifically designed and tested for compatibility with Tesla Model 3 and Model Y vehicles. Some adapters may not work correctly due to Tesla’s unique electrical systems.
5.2. Features and Functionality
Consider the features and functionality that are important to you. Some adapters offer basic DTC reading, while others provide advanced data monitoring and customization options. Determine which features align with your needs.
5.3. Wireless vs. Wired Adapters
OBD2 adapters are available in wireless (Bluetooth or Wi-Fi) and wired versions. Wireless adapters offer convenience and flexibility, while wired adapters tend to provide a more stable and reliable connection. Choose the type that best suits your preferences.
5.4. Brand Reputation and Reviews
Research the brand reputation and read reviews from other Tesla owners to gauge the reliability and performance of the OBD2 adapter. Look for adapters with positive reviews and a strong track record.
5.5. Price and Warranty
Compare prices from different vendors and consider the warranty offered by the manufacturer. A longer warranty period can provide peace of mind and protection against potential defects.
6. Advanced Tips and Tricks for Using Your Model 3 OBD2 Adapter
To maximize the benefits of your Model 3 OBD2 adapter, explore these advanced tips and tricks.
6.1. Customizing Dashboards
Many OBD2 apps allow you to create custom dashboards to display the data you find most relevant. Customize your dashboard to monitor specific parameters such as battery health, motor temperature, and energy consumption.
6.2. Data Logging and Analysis
Use data logging features to record vehicle data over time. Analyze the data to identify trends, optimize driving habits, and track vehicle performance.
6.3. Using Third-Party Apps for Advanced Diagnostics
Explore third-party apps that offer advanced diagnostic features, such as battery health analysis, performance tuning, and custom alerts. These apps can provide valuable insights into your Tesla’s operation.
6.4. Regular Firmware Updates
Keep your OBD2 adapter’s firmware up to date to ensure compatibility with the latest Tesla software and access to new features and improvements.
7. Safety Precautions When Installing and Using the OBD2 Adapter
When installing and using the OBD2 adapter, it is crucial to follow safety precautions to prevent damage to your vehicle or injury to yourself.
7.1. Disconnect Power Properly
Always disconnect the vehicle’s power properly before installing the OBD2 adapter. Follow the recommended procedure of turning off the main power through the touchscreen and waiting for 8-10 minutes until the relay clicks.
7.2. Avoid Overloading the System
Do not connect multiple devices to the OBD2 port simultaneously, as this can overload the system and cause damage.
7.3. Use Quality Adapters
Use high-quality OBD2 adapters from reputable brands to ensure a safe and reliable connection. Avoid using cheap or uncertified adapters, as they may pose a safety risk.
7.4. Secure Connections
Ensure all connections are secure and properly aligned before turning on the vehicle. Loose or faulty connections can cause electrical issues.
7.5. Monitor Vehicle Performance
Monitor vehicle performance closely after installing the OBD2 adapter. If you notice any unusual behavior, disconnect the adapter and consult a qualified technician.
8. Understanding OBD2 Codes for Tesla Model 3
Understanding OBD2 codes is essential for diagnosing and addressing issues with your Tesla Model 3. This section provides an overview of common OBD2 codes and their potential causes.
8.1. Common OBD2 Codes
Here are some common OBD2 codes that may appear when using an OBD2 scanner with your Tesla Model 3:
| Code | Description | Possible Causes |
|---|---|---|
| P0A0F | Drive Motor Performance | Motor malfunction, wiring issues, inverter problems |
| P0A80 | Replace Battery Pack | Battery pack degradation, cell imbalance, internal failure |
| P1D05 | Battery Energy Storage System Voltage Imbalance | Battery cell imbalance, faulty battery management system (BMS) |
| C0044 | Steering Angle Sensor Circuit Malfunction | Faulty steering angle sensor, wiring issues, calibration needed |
| U0100 | Lost Communication With ECM/PCM | Communication breakdown between modules, wiring issues, faulty ECM/PCM |
| U0129 | Lost Communication With Brake System Control Module | Communication breakdown, faulty brake system module, wiring problems |
| B1001 | SRS (Supplemental Restraint System) Indicator Circuit Failure | Airbag system fault, wiring issues, faulty SRS module |
| P0571 | Cruise Control/Brake Switch A Circuit | Faulty cruise control switch, brake switch malfunction, wiring problems |
| P0300 | Random/Multiple Cylinder Misfire Detected | Ignition system issues, fuel delivery problems, vacuum leaks |
| P1500 | Starter Solenoid Circuit Failure | Starter solenoid malfunction, wiring issues, faulty starter motor |
| P0606 | ECM/PCM Processor Failure | Faulty ECM/PCM, internal circuit failure |
| P0070 | Ambient Air Temperature Sensor Circuit | Faulty ambient air temperature sensor, wiring issues |
| C1115 | ABS Motor Circuit Failure | Faulty ABS motor, wiring issues |
| B1490 | Airbag squib circuit resistance high | Wiring issues, faulty airbag squib |
| C1662 | Steering Angle Sensor Not Calibrated | Calibration needed, faulty steering angle sensor |
| U0140 | Lost Communication With Body Control Module | Communication breakdown, faulty BCM, wiring problems |
| P0456 | Evaporative Emission System Leak Detected (Very Small Leak) | Loose or damaged fuel cap, EVAP system leak |
| P0340 | Camshaft Position Sensor “A” Circuit | Faulty camshaft position sensor, wiring issues |
| B1000 | ECU hardware internal fault | ECU malfunction |
| C0051 | Steering Wheel Position Sensor Circuit | Faulty steering wheel position sensor, wiring issues |
| U0101 | Lost Communication With Transmission Control Module | Communication breakdown, faulty TCM, wiring problems |
| P0102 | Mass Air Flow (MAF) Circuit Low Input | Dirty or faulty MAF sensor, wiring issues |
| B1010 | ECU EEPROM checksum error | ECU malfunction |
| C1401 | Pump motor control circuit failure | ABS pump motor fault, wiring issues |
| U0121 | Lost Communication With Anti-Lock Brake System (ABS) Control Module | Communication breakdown, faulty ABS module, wiring problems |
| P0113 | Intake Air Temperature Circuit High Input | Faulty intake air temperature sensor, wiring issues |
| B1023 | EEPROM error | ECU malfunction |
| C1670 | Yaw Rate Sensor Failure | Faulty yaw rate sensor, wiring issues |
| U0155 | Lost Communication With Instrument Panel Cluster (IPC) Control Module | Communication breakdown, faulty IPC, wiring problems |
| P0118 | Engine Coolant Temperature Circuit High Input | Faulty engine coolant temperature sensor, wiring issues |
| B1043 | Internal control module memory failure | ECU malfunction |
| C1201 | Engine control system malfunction | Related to other engine codes, ECM fault |
| U0284 | Lost Communication With Active Grill Air Shutter Module | Communication breakdown, faulty shutter module, wiring problems |
| P0123 | Throttle/Pedal Position Sensor/Switch A Circuit High Input | Faulty throttle position sensor, wiring issues |
| B1078 | Driver airbag resistance too low | Wiring issues, faulty driver airbag |
| C1310 | Stop lamp switch system failure | Faulty stop lamp switch, wiring issues |
| U0401 | Invalid Data Received From ECM/PCM | Data mismatch, ECM/PCM issues |
| P0128 | Coolant Thermostat (Coolant Temperature Below Thermostat Regulating Temperature) | Faulty thermostat, cooling system issues |
| B1101 | Front passenger’s seat airbag system malfunction | Faulty passenger airbag, wiring issues |
| C1345 | Stroke sensor malfunction | ABS actuator fault, sensor malfunction |
| U0415 | Invalid Data Received From Anti-Lock Brake System (ABS) Control Module | Data mismatch, ABS issues |
| P0131 | O2 Sensor Circuit Low Voltage (Bank 1, Sensor 1) | Faulty O2 sensor, exhaust leaks |
| B1120 | Side airbag system malfunction | Faulty side airbag, wiring issues |
| C1418 | Front speed sensor malfunction | Faulty wheel speed sensor, wiring issues |
| U1100 | CAN timeout | Communication issues within the CAN network |
| P0135 | O2 Sensor Heater Circuit Malfunction (Bank 1, Sensor 1) | Faulty O2 sensor heater, wiring issues |
| B1200 | B-CAN malfunction | Communication issues within the B-CAN network |
| C1421 | Rear speed sensor malfunction | Faulty wheel speed sensor, wiring issues |
| U2100 | Controller area network (CAN) communication bus malfunction | Communication issues within the CAN network |
| P0171 | System Too Lean (Bank 1) | Vacuum leaks, MAF sensor issues, fuel delivery problems |
| B1201 | LIN communication malfunction | Communication issues within the LIN network |
| C1431 | Steering angle sensor malfunction | Faulty steering angle sensor, wiring issues |
| U3000 | Control module malfunction | ECU malfunction |
| P0172 | System Too Rich (Bank 1) | Faulty O2 sensor, fuel injector issues |
| B1204 | ECU malfunction | ECU malfunction |
| C1500 | Motor position sensor malfunction | Motor control issues |
| U3003 | Battery voltage | Issues with the vehicle’s battery voltage |
| P0201 | Injector Circuit Malfunction – Cylinder 1 | Faulty fuel injector, wiring issues |
| B1300 | Short to ground fault in the lamp or LED circuit | Electrical short in the lighting system |
| C1611 | Torque sensor malfunction | Issues with the torque sensor |
| U3016 | Vehicle system voltage | Issues with the vehicle’s system voltage |
| P0217 | Engine Overtemperature Condition | Overheating engine, cooling system issues |
| B1301 | Open circuit fault in the lamp or LED circuit | Open circuit in the lighting system |
| C1612 | Angle sensor power supply voltage malfunction | Issues with the angle sensor power supply |
| U3020 | Control module software incompatibility | Software mismatch within the control modules |
| P0219 | Engine Overspeed Condition | Engine exceeding maximum RPM |
| B1302 | Open circuit fault in the lighting system | Open circuit in the lighting system |
| C1613 | Fail-safe relay malfunction | Issues with the fail-safe relay |
| U3031 | Event data recorder malfunction | Issues with the event data recorder |
| P0222 | Throttle/Pedal Position Sensor/Switch C Circuit Low Input | Faulty throttle position sensor, wiring issues |
| B1303 | Interior lighting failure | Issues with the interior lighting system |
| C1614 | Steering angle sensor power supply low voltage | Low voltage to the steering angle sensor |
| U3041 | Invalid data | Data mismatch |
| P0223 | Throttle/Pedal Position Sensor/Switch C Circuit High Input | Faulty throttle position sensor, wiring issues |
| B1304 | Light failure | Issues with the lighting system |
| C1615 | Torque sensor signal malfunction | Issues with the torque sensor signal |
| U3050 | Control module self-test failed | Control module failed self-test |
| P0234 | Turbocharger/Supercharger Overboost Condition | Overboost condition in the turbocharger or supercharger |
| B1305 | Open or short circuit failure of the interior lamp | Open or short circuit in the interior lamp circuit |
| C1616 | Torque sensor signal abnormality | Abnormal torque sensor signal |
| U3055 | Component internal failure | Internal component failure |
8.2. Interpreting OBD2 Codes
When you retrieve an OBD2 code, it will typically consist of a letter followed by four numbers. The letter indicates the system the code relates to:
- P: Powertrain (engine, transmission)
- B: Body (interior, airbags)
- C: Chassis (brakes, steering)
- U: Network (communication)
The first number indicates whether the code is generic (0) or manufacturer-specific (1). The remaining numbers provide more specific information about the issue.
8.3. Resetting OBD2 Codes
After addressing the underlying issue, you can reset the OBD2 code using the OBD2 scanner or app. Keep in mind that resetting the code does not fix the problem; it only clears the code from the system. If the issue persists, the code will reappear.
9. Maintaining Your Tesla Model 3 with OBD2 Diagnostics
Regular OBD2 diagnostics can help you maintain your Tesla Model 3 and prevent costly repairs. Here are some tips for incorporating OBD2 diagnostics into your maintenance routine.
9.1. Regular Scanning
Scan your Tesla Model 3 for OBD2 codes on a regular basis, such as monthly or quarterly. This allows you to identify potential issues early and address them before they become serious problems.
9.2. Monitoring Key Parameters
Monitor key parameters such as battery health, motor temperature, and energy consumption to track vehicle performance and identify any deviations from the norm.
9.3. Addressing Issues Promptly
If you identify any OBD2 codes or abnormal data, address the issues promptly. Ignoring problems can lead to further damage and more expensive repairs.
9.4. Keeping Records
Keep records of all OBD2 scans and maintenance activities. This can help you track vehicle performance over time and identify any recurring issues.
10. Frequently Asked Questions (FAQ) About Model 3 OBD2 Adapters
Here are some frequently asked questions about Model 3 OBD2 adapters to help you better understand this technology.
10.1. What is an OBD2 scanner?
An OBD2 scanner is a diagnostic tool used to retrieve data from a vehicle’s computer system, helping to identify and troubleshoot issues.
10.2. How do I read OBD2 error codes?
Connect an OBD2 scanner to the OBD2 port, turn on the vehicle, and use the scanner to retrieve the error codes. Consult the scanner’s manual for specific instructions.
10.3. What are common car problems and how can they be fixed?
Common car problems include engine issues, transmission problems, and electrical faults. Use an OBD2 scanner to identify the specific issue and consult a qualified technician for repairs.
10.4. How does the OBD2 adapter enhance vehicle maintenance?
The OBD2 adapter allows you to monitor real-time data, read diagnostic trouble codes, and optimize vehicle performance, leading to better maintenance and fewer repairs.
10.5. Can I install the Model 3 OBD2 adapter myself?
Yes, the installation process is straightforward and can be done by following the step-by-step guide provided.
10.6. What if my OBD2 adapter is not recognized by the car?
Check the connections, ensure compatibility, restart the vehicle, and test with another device.
10.7. Are there any risks associated with using an OBD2 adapter?
When installed and used correctly, there are minimal risks associated with using an OBD2 adapter. However, it is essential to follow safety precautions and use quality adapters.
10.8. How often should I scan my Tesla Model 3 for OBD2 codes?
Scan your Tesla Model 3 for OBD2 codes on a regular basis, such as monthly or quarterly, to identify potential issues early.
10.9. What kind of maintenance should I have done on my Tesla Model 3?
Tesla recommends that you have your Model 3 do these maintenance:
- Brake fluid health every 2 years (replace if needed)
- Cabin air filter every year
- HEPA filter every 3 years
- Check A/C every 2 years
10.10. Where can I find more information and services related to OBD2 adapters?
You can find more information and services related to OBD2 adapters at OBD2-SCANNER.EDU.VN.
Understanding and utilizing the Model 3 OBD2 adapter empowers you to take better care of your vehicle. With real-time data monitoring, diagnostic trouble code reading, and customization options, you can optimize your Tesla’s performance and prevent costly repairs. Stay informed, follow safety precautions, and enjoy the benefits of this valuable technology.
For further assistance and expert advice on using OBD2 scanners and related automotive services, contact us today. Our team at OBD2-SCANNER.EDU.VN is ready to help you maximize your vehicle’s performance and ensure its longevity. Reach out to us at 123 Main Street, Los Angeles, CA 90001, United States, via Whatsapp at +1 (641) 206-8880, or visit our website at OBD2-SCANNER.EDU.VN. Let us help you keep your vehicle running smoothly and efficiently!