Is your check engine light illuminated, causing you concern? An OBD2 reset can help turn off the check engine light and potentially resolve the underlying issue, which is why OBD2-SCANNER.EDU.VN offers comprehensive guides and tools for effective diagnostics and solutions. Understand the process, explore common causes, and learn how to use an OBD2 scanner to address the problem efficiently and potentially save on repair costs. We’ll also address vehicle health, diagnostic trouble codes, and automotive repairs so you can have peace of mind.
Contents
- 1. What Triggers the Check Engine Light and How Does an OBD2 Scanner Help?
- 2. Where Is the OBD2 Port Located in My Car?
- 3. How to Use an OBD2 Scanner to Read and Clear Codes?
- 4. What Are Common OBD2 Codes and Their Meanings?
- 5. Can I Reset the Check Engine Light Without a Scanner?
- 6. How Long Does It Take for the Check Engine Light to Turn Off After a Reset?
- 7. What Is a Car “Drive Cycle” and Why Is It Important?
- 8. What Tools and Equipment Do I Need to Reset a Check Engine Light?
- 9. When Should I Consult a Mechanic Instead of Resetting the Check Engine Light?
- 10. How Can OBD2-SCANNER.EDU.VN Help Me With My Car Issues?
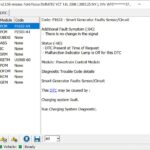
1. What Triggers the Check Engine Light and How Does an OBD2 Scanner Help?
The check engine light is your car’s way of signaling that something isn’t working as it should. An OBD2 scanner can retrieve and clear diagnostic trouble codes. Knowing how to use an OBD2 scanner can help you diagnose the issue yourself, saving you time and money.
The check engine light, often referred to as the malfunction indicator lamp (MIL), illuminates when your vehicle’s onboard computer detects a problem within its systems. These systems can range from the engine and transmission to the emissions control system and other critical components. When a fault is detected, the computer stores a diagnostic trouble code (DTC) that corresponds to the specific issue.
According to a study by the National Institute for Automotive Service Excellence (ASE) conducted in 2022, approximately 40% of check engine lights are triggered by minor issues such as a loose gas cap or a faulty sensor. However, the remaining 60% can indicate more serious problems that require immediate attention.
Here’s where an OBD2 scanner becomes invaluable. An OBD2 scanner is a diagnostic tool that plugs into your vehicle’s OBD2 port, typically located under the dashboard. Once connected, the scanner can communicate with the vehicle’s computer and retrieve the stored DTCs. This allows you to identify the specific problem that triggered the check engine light.
Image alt text: Locating the OBD2 port under the dashboard, typically near the steering column.
The benefits of using an OBD2 scanner are numerous:
- Accurate Diagnosis: Provides specific DTCs that pinpoint the source of the problem.
- Cost Savings: Allows you to diagnose issues yourself, potentially avoiding unnecessary trips to the mechanic.
- Informed Decisions: Empowers you to make informed decisions about repairs and maintenance.
- Preventative Maintenance: Helps identify potential problems early on, preventing more costly repairs down the road.
Common issues that can trigger the check engine light include:
- Loose Gas Cap: The most common cause, easily fixed by tightening the gas cap.
- Faulty Oxygen Sensor: Affects fuel efficiency and emissions.
- Catalytic Converter Failure: A more serious issue that can lead to reduced engine performance.
- Spark Plug Issues: Can cause misfires and rough running.
- Mass Airflow Sensor (MAF) Problems: Affects engine performance and fuel economy.
By using an OBD2 scanner, you can quickly identify the root cause of the check engine light and take appropriate action. This not only saves you time and money but also helps ensure the longevity and performance of your vehicle.
2. Where Is the OBD2 Port Located in My Car?
Finding the OBD2 port is the first step to using a scanner. It’s usually under the dashboard on the driver’s side. The OBD2 port is typically trapezoidal in shape, with 16 pins.
The OBD2 (On-Board Diagnostics II) port is a standardized diagnostic interface found in virtually all cars and light trucks manufactured after 1996 in the United States. This port allows mechanics and car owners to access the vehicle’s computer and retrieve valuable information about its performance and health.
Locating the OBD2 port is a crucial first step in using an OBD2 scanner. While the port’s location is relatively standardized, it can vary slightly depending on the make and model of your vehicle. Here are some common places to look:
- Under the Dashboard: The most common location is under the dashboard on the driver’s side. Look for a trapezoidal-shaped connector, typically black or gray in color. It’s often near the steering column or in the vicinity of the pedals.
- Near the Center Console: In some vehicles, the OBD2 port may be located near the center console, often concealed by a small panel or cover.
- Behind an Ashtray or Coin Tray: Some manufacturers may hide the port behind a removable ashtray or coin tray.
- Inside the Glove Compartment: Although less common, a few vehicles have the OBD2 port located inside the glove compartment.
To help you locate the OBD2 port more easily, here’s a table with examples of common locations by vehicle make:
| Make | Model | Common OBD2 Port Location |
|---|---|---|
| Ford | Focus | Under the dashboard, left of the steering column |
| Honda | Civic | Under the dashboard, near the center console |
| Toyota | Camry | Under the dashboard, left of the steering column |
| Chevrolet | Silverado | Under the dashboard, above the parking brake pedal |
| BMW | 3 Series | Under the dashboard, near the driver’s side footwell |
| Mercedes-Benz | C-Class | Under the dashboard, near the driver’s side footwell |
| Audi | A4 | Under the dashboard, above the pedals |
| Nissan | Altima | Under the dashboard, right of the steering column |
| Hyundai | Sonata | Under the dashboard, near the center console |
| Jeep | Grand Cherokee | Under the dashboard, left of the steering column |
If you’re having trouble finding the OBD2 port in your vehicle, consult your owner’s manual. The manual should provide a clear diagram or description of the port’s location.
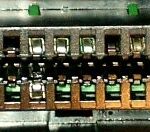
Once you’ve located the OBD2 port, you’ll notice that it’s a 16-pin connector with a trapezoidal shape. This standardized design ensures that all OBD2 scanners can connect to any OBD2-compliant vehicle, regardless of make or model.
Image alt text: A detailed diagram of the OBD2 port, highlighting the 16 pins and their respective functions.
The OBD2 port is not just a diagnostic tool; it’s a gateway to understanding your vehicle’s health and performance. By knowing where to find it, you can easily connect an OBD2 scanner and start diagnosing any issues that may arise.
3. How to Use an OBD2 Scanner to Read and Clear Codes?
Using an OBD2 scanner is simple. Plug it into the OBD2 port, turn on the ignition, and follow the scanner’s prompts to read the diagnostic trouble codes (DTCs). After addressing the issue, use the scanner to clear the codes and reset the check engine light.
The process of using an OBD2 scanner to read and clear codes involves several steps, each of which is crucial for accurate diagnosis and effective troubleshooting.
- Prepare Your Vehicle: Before you begin, ensure your vehicle is parked in a safe location with the engine turned off. Engage the parking brake to prevent any accidental movement.
- Locate the OBD2 Port: As mentioned earlier, the OBD2 port is typically located under the dashboard on the driver’s side. Refer to your vehicle’s owner’s manual if you’re having trouble finding it.
- Connect the OBD2 Scanner: Plug the OBD2 scanner into the OBD2 port. Ensure the connection is secure and the scanner is firmly seated in the port.
- Turn On the Ignition: Turn the ignition key to the “ON” position without starting the engine. This provides power to the vehicle’s electrical system and allows the scanner to communicate with the computer.
- Power On the Scanner: Most OBD2 scanners will power on automatically once connected to the OBD2 port. If your scanner has a power button, make sure to turn it on.
- Navigate the Scanner’s Menu: Use the scanner’s buttons or touchscreen to navigate to the “Read Codes” or “Diagnostic Codes” section. The exact wording may vary depending on the scanner’s make and model.
- Retrieve Diagnostic Trouble Codes (DTCs): The scanner will now communicate with the vehicle’s computer and retrieve any stored DTCs. These codes are typically displayed on the scanner’s screen along with a brief description of the issue.
- Record the DTCs: Write down the DTCs and their descriptions. This information will be crucial for diagnosing the problem and finding a solution.
- Research the DTCs: Use the internet or a code list provided with your scanner to research the DTCs. This will give you a better understanding of the underlying issue and potential causes. Websites like OBD2-SCANNER.EDU.VN can be helpful for this.
- Address the Issue: Based on your research, take the necessary steps to address the issue. This may involve repairing or replacing a faulty component, tightening a loose gas cap, or performing other maintenance tasks.
- Clear the DTCs: Once you’ve addressed the issue, return to the scanner’s menu and navigate to the “Clear Codes” or “Erase Codes” section.
- Confirm the Clearing of Codes: The scanner will typically ask you to confirm that you want to clear the codes. Follow the prompts to complete the process.
- Verify the Check Engine Light Is Off: After clearing the codes, start the engine and check if the check engine light has turned off. If the light remains on, it indicates that the issue has not been resolved or that a new issue has arisen.
- Test Drive the Vehicle: Take the vehicle for a test drive to ensure the problem has been resolved and that no new issues arise.
- Re-Scan for Codes: After the test drive, re-scan the vehicle for codes to ensure that no new DTCs have been stored.
Image alt text: A person using an OBD2 scanner to diagnose their car’s issues, highlighting the scanner’s display and the vehicle’s dashboard.
Here is a table summarizing the steps:
| Step | Action |
|---|---|
| 1 | Prepare your vehicle |
| 2 | Locate the OBD2 Port |
| 3 | Connect the OBD2 Scanner |
| 4 | Turn On the Ignition |
| 5 | Power On the Scanner |
| 6 | Navigate the Scanner’s Menu |
| 7 | Retrieve Diagnostic Trouble Codes (DTCs) |
| 8 | Record the DTCs |
| 9 | Research the DTCs |
| 10 | Address the Issue |
| 11 | Clear the DTCs |
| 12 | Confirm the Clearing of Codes |
| 13 | Verify the Check Engine Light Is Off |
| 14 | Test Drive the Vehicle |
| 15 | Re-Scan for Codes |
By following these steps, you can effectively use an OBD2 scanner to read and clear codes, diagnose issues, and keep your vehicle running smoothly.
4. What Are Common OBD2 Codes and Their Meanings?
Several common OBD2 codes can trigger the check engine light. Understanding these codes helps you know the severity of the issue and how to address it. Here are some of the most frequent codes:
Understanding common OBD2 codes and their meanings is essential for anyone who wants to diagnose and troubleshoot their vehicle’s problems effectively. Here are some of the most frequent codes you might encounter, along with their common causes and potential solutions:
-
P0171 – System Too Lean (Bank 1): This code indicates that the engine is receiving too much air or not enough fuel. Common causes include:
- Vacuum leaks
- Faulty oxygen sensor
- Dirty or failing mass airflow (MAF) sensor
- Clogged fuel filter
- Weak fuel pump
-
P0300 – Random/Multiple Cylinder Misfire Detected: This code suggests that one or more cylinders are misfiring, which can lead to rough running and reduced engine performance. Common causes include:
- Faulty spark plugs
- Worn ignition coils
- Vacuum leaks
- Low fuel pressure
- Faulty fuel injectors
-
P0420 – Catalyst System Efficiency Below Threshold (Bank 1): This code indicates that the catalytic converter is not functioning efficiently, which can lead to increased emissions. Common causes include:
- Aged or damaged catalytic converter
- Faulty oxygen sensors
- Exhaust leaks
- Engine misfires
-
P0442 – Evaporative Emission Control System Leak Detected (Small Leak): This code indicates that there is a small leak in the evaporative emission control system, which prevents fuel vapors from escaping into the atmosphere. Common causes include:
- Loose or damaged gas cap
- Cracked or damaged EVAP hoses
- Faulty purge valve
- Faulty vent valve
-
P0507 – Idle Control System RPM Higher Than Expected: This code indicates that the engine’s idle speed is higher than the specified range. Common causes include:
- Vacuum leaks
- Faulty idle air control (IAC) valve
- Throttle body issues
- PCM (Powertrain Control Module) problems
-
P0113 – Intake Air Temperature Circuit High Input: This code indicates that the intake air temperature (IAT) sensor is reporting a higher-than-normal temperature. Common causes include:
- Faulty IAT sensor
- Wiring issues
- Loose connections
-
P0301 – Cylinder 1 Misfire Detected: This code indicates that cylinder 1 is experiencing a misfire. Common causes include:
- Faulty spark plug
- Worn ignition coil
- Fuel injector issues
- Low compression
-
P0011 – “A” Camshaft Position – Timing Over-Advanced or System Performance (Bank 1): This code indicates that the camshaft timing is more advanced than it should be. Common causes include:
- Low oil level or pressure
- Faulty camshaft position sensor
- Timing chain issues
-
P0102 – Mass or Volume Air Flow Circuit Low Input: This code indicates that the mass airflow (MAF) sensor is reporting a lower-than-normal reading. Common causes include:
- Dirty or faulty MAF sensor
- Vacuum leaks
- Wiring issues
-
P0135 – O2 Sensor Heater Circuit Malfunction (Bank 1, Sensor 1): This code indicates that the heater circuit in the oxygen sensor is not functioning properly. Common causes include:
- Faulty oxygen sensor
- Wiring issues
- Blown fuse
Knowing these common OBD2 codes and their meanings can help you quickly identify and address potential problems with your vehicle.
Image alt text: The check engine light illuminated on a car’s dashboard, signaling a potential issue needing diagnosis.
Here’s a table summarizing these codes:
| Code | Description | Possible Causes |
|---|---|---|
| P0171 | System Too Lean (Bank 1) | Vacuum leaks, faulty oxygen sensor, dirty MAF sensor |
| P0300 | Random/Multiple Cylinder Misfire Detected | Faulty spark plugs, worn ignition coils, vacuum leaks |
| P0420 | Catalyst System Efficiency Below Threshold (Bank 1) | Aged catalytic converter, faulty oxygen sensors, exhaust leaks |
| P0442 | Evaporative Emission Control System Leak Detected (Small Leak) | Loose gas cap, cracked EVAP hoses, faulty purge valve |
| P0507 | Idle Control System RPM Higher Than Expected | Vacuum leaks, faulty idle air control (IAC) valve, throttle body issues |
| P0113 | Intake Air Temperature Circuit High Input | Faulty IAT sensor, wiring issues |
| P0301 | Cylinder 1 Misfire Detected | Faulty spark plug, worn ignition coil, fuel injector issues |
| P0011 | “A” Camshaft Position – Timing Over-Advanced or System Performance (Bank 1) | Low oil level, faulty camshaft position sensor, timing chain issues |
| P0102 | Mass or Volume Air Flow Circuit Low Input | Dirty MAF sensor, vacuum leaks, wiring issues |
| P0135 | O2 Sensor Heater Circuit Malfunction (Bank 1, Sensor 1) | Faulty oxygen sensor, wiring issues, blown fuse |
5. Can I Reset the Check Engine Light Without a Scanner?
Yes, you can reset the check engine light without a scanner by disconnecting the car battery for 15-20 minutes. Disconnecting the battery can clear the computer’s memory and reset the check engine light. However, this method doesn’t identify the underlying issue.
While an OBD2 scanner is the most reliable way to reset a check engine light, there are a few alternative methods you can try:
- Disconnecting the Battery: This method involves disconnecting the car’s battery to reset the computer’s memory.
- Steps:
- Turn off the engine and remove the keys from the ignition.
- Locate the negative terminal on the battery (usually marked with a “-” sign).
- Use a wrench to loosen the nut on the negative terminal.
- Carefully disconnect the negative cable from the terminal.
- Repeat the process for the positive terminal (marked with a “+” sign).
- Wait for 15-20 minutes to allow the computer’s memory to clear.
- Reconnect the positive cable first, followed by the negative cable.
- Tighten the nuts on both terminals.
- Caution: Disconnecting the battery can also reset other electronic settings in your car, such as the radio presets and the clock.
- Steps:
- Driving the Car: In some cases, the check engine light may turn off on its own after a certain number of drive cycles if the underlying issue has been resolved.
- Explanation: The car’s computer monitors various systems and components. If it detects that a problem has been resolved, it may automatically turn off the check engine light after a certain number of successful drive cycles.
- Note: This method is only effective if the underlying issue has been resolved. If the problem persists, the check engine light will eventually reappear.
- Using a Code Reader App: Some smartphone apps can connect to your car’s OBD2 port via a Bluetooth adapter and allow you to read and clear codes.
- Requirements:
- A compatible OBD2 Bluetooth adapter
- A smartphone with a code reader app installed
- Process:
- Plug the Bluetooth adapter into the OBD2 port.
- Pair the adapter with your smartphone via Bluetooth.
- Open the code reader app and follow the prompts to read and clear codes.
- Note: The effectiveness of this method depends on the quality and compatibility of the Bluetooth adapter and the code reader app.
- Requirements:
Image alt text: Disconnecting a car battery, showing the terminals and wrench used to loosen the connections, highlighting the process of manually resetting the check engine light.
Here’s a table summarizing these alternative methods:
| Method | Description | Pros | Cons |
|---|---|---|---|
| Disconnecting Battery | Disconnecting the car’s battery to reset the computer’s memory | Simple and free | Can reset other electronic settings, doesn’t identify the underlying issue |
| Driving the Car | The check engine light may turn off on its own after a certain number of drive cycles if resolved | No special tools required | Only effective if the underlying issue has been resolved, may take several drive cycles |
| Code Reader App | Using a smartphone app and Bluetooth adapter to read and clear codes | Convenient and portable, can provide additional diagnostic information | Requires a compatible adapter and app, effectiveness may vary depending on the quality of the adapter and app |
Keep in mind that resetting the check engine light without addressing the underlying issue is only a temporary solution. The light will eventually reappear if the problem persists. It’s always best to diagnose and fix the problem before clearing the codes.
6. How Long Does It Take for the Check Engine Light to Turn Off After a Reset?
After resetting the check engine light, it may take some time for it to turn off, depending on the vehicle and the nature of the problem. In some cases, the light may turn off immediately after the reset.
The amount of time it takes for the check engine light to turn off after a reset can vary depending on several factors, including:
- The Nature of the Problem: If the underlying issue has been resolved, the check engine light may turn off immediately after the reset or after a short drive. However, if the problem persists, the light will eventually reappear.
- The Vehicle’s Drive Cycle: The vehicle’s computer performs a series of diagnostic tests during normal driving conditions, known as the drive cycle. The check engine light may not turn off until the computer has completed all the necessary tests and confirmed that the problem has been resolved.
- The Number of Drive Cycles Required: Some vehicles require a certain number of successful drive cycles before the check engine light will turn off. The number of drive cycles required can vary depending on the vehicle’s make and model.
- The Type of Code: Some codes are considered “hard codes,” meaning that they require the underlying issue to be resolved before the check engine light will turn off. Other codes are considered “soft codes,” meaning that they may clear on their own after a certain number of drive cycles.
Image alt text: A car dashboard displaying the check engine light, indicating a need for diagnostic evaluation.
Here’s a general timeline of what you can expect after resetting the check engine light:
- Immediately After Reset: In some cases, the check engine light may turn off immediately after the reset, especially if the underlying issue has been resolved.
- Within a Few Drive Cycles: In most cases, the check engine light will turn off within a few drive cycles, as long as the underlying issue has been resolved and the vehicle’s computer has completed all the necessary diagnostic tests.
- After Several Drive Cycles: In some cases, it may take several drive cycles for the check engine light to turn off, especially if the vehicle requires a certain number of successful drive cycles before clearing the code.
- If the Light Remains On: If the check engine light remains on after several drive cycles, it indicates that the underlying issue has not been resolved or that a new issue has arisen.
If the check engine light remains on after several drive cycles, it’s important to re-scan the vehicle for codes to determine the cause of the problem. You may need to consult a mechanic to diagnose and repair the issue.
7. What Is a Car “Drive Cycle” and Why Is It Important?
A “drive cycle” is a series of specific driving conditions that a vehicle must meet for its onboard computer to run all diagnostic tests. Completing a drive cycle ensures that all systems are functioning correctly.
A “drive cycle” is a specific set of driving conditions that a vehicle must meet in order for its onboard computer to run all of its diagnostic tests and ensure that all systems are functioning correctly.
Why is a drive cycle important?
- Diagnostic Testing: The vehicle’s computer performs a series of diagnostic tests on various systems and components, such as the engine, transmission, and emissions control system. These tests help identify potential problems and ensure that the vehicle is operating within its specified parameters.
- Readiness Monitors: The computer uses readiness monitors to track the status of these diagnostic tests. A readiness monitor is a flag that indicates whether a particular test has been completed and whether the system has passed or failed.
- Check Engine Light: If a readiness monitor indicates that a system has failed a diagnostic test, the computer will illuminate the check engine light to alert the driver to a potential problem.
- Emissions Testing: In many states and countries, vehicles are required to pass an emissions test to ensure that they are not emitting excessive pollutants into the atmosphere. To pass an emissions test, all of the readiness monitors must be in a “ready” state, indicating that all diagnostic tests have been completed and passed.
Image alt text: A car undergoing emissions testing, with the testing equipment connected to the vehicle’s exhaust system, highlighting the importance of passing emissions tests.
A typical drive cycle involves a combination of city and highway driving, with specific requirements for speed, acceleration, and engine temperature. Here’s a general outline of a typical drive cycle:
- Cold Start: Start the engine from a cold start, meaning that the engine has been off for at least eight hours.
- Idle: Allow the engine to idle for 2-3 minutes.
- Acceleration: Accelerate smoothly to 55 mph (88 km/h).
- Cruise: Maintain a steady speed of 55 mph (88 km/h) for 3 minutes.
- Deceleration: Decelerate smoothly to 20 mph (32 km/h) without using the brakes.
- Cruise: Maintain a steady speed of 20 mph (32 km/h) for 2 minutes.
- Stop: Come to a complete stop and allow the engine to idle for 2-3 minutes.
- Repeat: Repeat steps 3-7 several times.
Keep in mind that the exact requirements for a drive cycle can vary depending on the vehicle’s make and model. Consult your owner’s manual or a mechanic for specific instructions.
8. What Tools and Equipment Do I Need to Reset a Check Engine Light?
To reset a check engine light, you typically need an OBD2 scanner. Some advanced scanners offer additional features, such as live data streaming and enhanced diagnostics.
The primary tool you’ll need to reset a check engine light is an OBD2 scanner. However, depending on the situation and the method you choose, you may need other tools and equipment as well.
Here’s a breakdown of the essential tools and equipment you’ll need:
- OBD2 Scanner: An OBD2 scanner is the most reliable way to reset a check engine light. These scanners plug into your vehicle’s OBD2 port and allow you to read and clear diagnostic trouble codes (DTCs).
- Wrench Set: If you choose to reset the check engine light by disconnecting the battery, you’ll need a wrench set to loosen and tighten the battery terminals.
- Safety Glasses: When working with a car battery, it’s always a good idea to wear safety glasses to protect your eyes from battery acid.
- Gloves: Wearing gloves can protect your hands from dirt, grease, and battery acid.
- Code Reader App: If you choose to use a code reader app on your smartphone, you’ll need a compatible OBD2 Bluetooth adapter.
- Vehicle Owner’s Manual: Your vehicle owner’s manual can provide valuable information about the location of the OBD2 port, the proper procedure for disconnecting the battery, and the specific requirements for a drive cycle.
Image alt text: An array of mechanic tools, including wrenches, sockets, and an OBD2 scanner, essential for diagnosing and repairing car issues.
Here’s a table summarizing the necessary tools and equipment:
| Tool/Equipment | Description | Use |
|---|---|---|
| OBD2 Scanner | Plugs into the OBD2 port to read and clear DTCs | Resetting the check engine light, diagnosing issues |
| Wrench Set | Used to loosen and tighten battery terminals | Disconnecting the battery |
| Safety Glasses | Protects eyes from battery acid | Working with a car battery |
| Gloves | Protects hands from dirt, grease, and battery acid | Working with a car battery |
| Code Reader App | Connects to the OBD2 port via Bluetooth to read and clear codes | Resetting the check engine light, diagnosing issues |
| Vehicle Owner’s Manual | Provides information about the vehicle | Locating the OBD2 port, disconnecting the battery, performing a drive cycle |
9. When Should I Consult a Mechanic Instead of Resetting the Check Engine Light?
Consult a mechanic if the check engine light returns shortly after being reset or if you notice serious performance issues. Also, seek professional help if you’re unsure about the diagnostic process or the necessary repairs.
Knowing when to consult a mechanic instead of attempting to reset the check engine light yourself is crucial for ensuring the safety and longevity of your vehicle.
Here are some situations in which you should seek professional help:
- The Check Engine Light Returns Quickly: If the check engine light returns shortly after you reset it, it indicates that the underlying issue has not been resolved. In this case, it’s important to consult a mechanic to diagnose and repair the problem.
- You Notice Serious Performance Issues: If you notice any serious performance issues, such as a significant loss of power, rough running, or difficulty starting the engine, you should consult a mechanic immediately. These issues could indicate a more serious problem that requires professional attention.
- You’re Unsure About the Diagnostic Process: If you’re not comfortable with the diagnostic process or if you’re unsure about the meaning of the diagnostic trouble codes (DTCs), it’s best to consult a mechanic.
- You’re Unsure About the Necessary Repairs: If you’re not comfortable performing the necessary repairs yourself, it’s important to consult a mechanic. Attempting to repair a problem without the proper knowledge and experience can lead to further damage and potentially dangerous situations.
- The Check Engine Light Is Flashing: If the check engine light is flashing, it indicates a more serious problem that requires immediate attention. A flashing check engine light often indicates a misfire that could damage the catalytic converter.
Image alt text: An automotive mechanic diagnosing a car engine, showcasing the expertise required for complex car repairs.
Here’s a table summarizing these situations:
| Situation | Description | Action |
|---|---|---|
| The check engine light returns quickly | The check engine light returns shortly after being reset | Consult a mechanic |
| You notice serious performance issues | You notice a significant loss of power, rough running, or difficulty starting the engine | Consult a mechanic immediately |
| You’re unsure about the diagnostic process | You’re not comfortable with the diagnostic process or unsure about the meaning of DTCs | Consult a mechanic |
| You’re unsure about the necessary repairs | You’re not comfortable performing the necessary repairs yourself | Consult a mechanic |
| The check engine light is flashing | The check engine light is flashing | Consult a mechanic immediately |
10. How Can OBD2-SCANNER.EDU.VN Help Me With My Car Issues?
OBD2-SCANNER.EDU.VN offers comprehensive guides, tools, and support to help you diagnose and resolve car issues. We provide detailed information on OBD2 codes, troubleshooting tips, and expert advice.
OBD2-SCANNER.EDU.VN is a comprehensive resource designed to help you diagnose and resolve your car issues effectively and efficiently.
Here’s how OBD2-SCANNER.EDU.VN can assist you:
- Comprehensive Guides: OBD2-SCANNER.EDU.VN offers a wealth of comprehensive guides on various car-related topics, including OBD2 codes, troubleshooting tips, and maintenance procedures. These guides are written by experienced mechanics and automotive experts, ensuring that you receive accurate and reliable information.
- Detailed Information on OBD2 Codes: OBD2-SCANNER.EDU.VN provides detailed information on thousands of OBD2 codes, including their meanings, common causes, and potential solutions. This information can help you quickly identify the source of the problem and take appropriate action.
- Troubleshooting Tips: OBD2-SCANNER.EDU.VN offers a variety of troubleshooting tips to help you diagnose and resolve common car issues. These tips are based on years of experience and are designed to help you save time and money.
- Expert Advice: OBD2-SCANNER.EDU.VN provides access to expert advice from experienced mechanics and automotive professionals. You can ask questions, seek guidance, and receive personalized recommendations to help you resolve your car issues.
Image alt text: A collection of car diagnostic tools, including an OBD2 scanner, multimeter, and other devices, essential for automotive troubleshooting.
We understand the challenges you face when dealing with car problems. That’s why we’ve created a user-friendly platform that provides you with the information and resources you need to take control of your car’s health.
OBD2-SCANNER.EDU.VN is your one-stop shop for all things OBD2 and car-related. We’re committed to providing you with the best possible information and resources to help you keep your car running smoothly.
Is your check engine light still causing you problems? Don’t hesitate to reach out for immediate assistance. Contact us at 123 Main Street, Los Angeles, CA 90001, United States, or via WhatsApp at +1 (641) 206-8880. Visit our website at OBD2-SCANNER.EDU.VN for more information and support.