The Vgate Scan Obd2 Bluetooth Manual provides instructions for using Vgate’s OBD2 Bluetooth scanners, enabling users to diagnose vehicle issues via smartphones or tablets. At OBD2-SCANNER.EDU.VN, we empower you to understand and utilize your Vgate Scan tool effectively, simplifying automotive diagnostics. Unlock vehicle insights, troubleshoot problems efficiently, and maintain your car’s health with confidence.
Contents
- 1. Understanding the Vgate Scan OBD2 Bluetooth Manual
- 1.1. What is the Vgate Scan OBD2 Bluetooth Manual?
- 1.2. Why is the Vgate Scan OBD2 Bluetooth Manual Important?
- 1.3. Key Sections of the Vgate Scan OBD2 Bluetooth Manual
- 1.4. Benefits of Using a Vgate OBD2 Bluetooth Scanner
- 1.5. Where to Find the Vgate Scan OBD2 Bluetooth Manual
- 2. Setting Up Your Vgate Scan OBD2 Bluetooth Scanner
- 2.1. Software Installation
- 2.2. Pairing the Scanner with Your Device
- 2.3. Troubleshooting Pairing Issues
- 2.4. Configuring the App
- 2.5. Testing the Connection
- 3. Basic Operations with Your Vgate Scan OBD2 Bluetooth Scanner
- 3.1. Reading Diagnostic Trouble Codes (DTCs)
- 3.2. Understanding DTCs
- 3.3. Clearing Diagnostic Trouble Codes (DTCs)
- 3.4. Viewing Live Data
- 3.5. Interpreting Live Data
- 4. Advanced Features of Vgate Scan OBD2 Bluetooth Scanners
- 4.1. Data Logging
- 4.2. Customized Dashboards
- 4.3. Specialized Diagnostic Tests
- 4.4. Using Freeze Frame Data
- 4.5. I/M Readiness Monitors
- 5. Troubleshooting Common Issues
- 5.1. Scanner Not Connecting
- 5.2. Inaccurate Data
- 5.3. App Crashing
- 5.4. Scanner Not Reading All Codes
- 5.5. Bluetooth Connection Drops
- 6. Understanding OBD2 Protocols
- 6.1. What are OBD2 Protocols?
- 6.2. Common OBD2 Protocols
- 6.3. How to Determine Which Protocol Your Vehicle Uses
- 6.4. Why Protocol Support Matters
- 6.5. Choosing an OBD2 Scanner with Wide Protocol Support
- 7. Advanced Diagnostic Techniques
- 7.1. Performing Component Tests
- 7.2. Using a Multimeter
- 7.3. Using an Oscilloscope
- 7.4. Performing a Compression Test
- 7.5. Performing a Leak-Down Test
- 8. Staying Updated with OBD2 Technology
- 8.1. Following Industry News
- 8.2. Taking Training Courses
- 8.3. Using Online Resources
- 8.4. Participating in Online Communities
- 8.5. Keeping Your Scanner Updated
- 9. Practical Applications and Case Studies
- 9.1. Diagnosing a Misfire
- 9.2. Diagnosing a Faulty Oxygen Sensor
- 9.3. Diagnosing a Vacuum Leak
- 9.4. Resetting the Check Engine Light
- 9.5. Monitoring Fuel Efficiency
- 10. Frequently Asked Questions (FAQs)
- 10.1. What is an OBD2 Scanner?
- 10.2. How Does an OBD2 Scanner Work?
- 10.3. What is the OBD2 Port Location?
- 10.4. What are Common OBD2 Codes?
- 10.5. How Do I Read OBD2 Codes?
- 10.6. How Do I Clear OBD2 Codes?
- 10.7. What is Live Data on an OBD2 Scanner?
- 10.8. What are the Benefits of Using an OBD2 Scanner?
- 10.9. Can an OBD2 Scanner Fix My Car?
- 10.10. Where Can I Buy an OBD2 Scanner?
1. Understanding the Vgate Scan OBD2 Bluetooth Manual
1.1. What is the Vgate Scan OBD2 Bluetooth Manual?
The Vgate Scan OBD2 Bluetooth manual is a comprehensive guide that provides detailed instructions on how to use Vgate OBD2 Bluetooth scanners to diagnose vehicle problems. Vgate iCar Pro OBD2 Bluetooth 4.0(BLE) is also supported. These scanners connect wirelessly to your smartphone or tablet, allowing you to read and clear diagnostic trouble codes (DTCs), monitor real-time engine data, and perform other diagnostic functions.
1.2. Why is the Vgate Scan OBD2 Bluetooth Manual Important?
The manual is essential for maximizing the potential of your Vgate OBD2 scanner. It helps you:
- Understand the device: Learn about its features, functions, and limitations.
- Connect properly: Ensure successful pairing with your smartphone or tablet.
- Interpret data: Understand the meaning of diagnostic trouble codes and real-time sensor readings.
- Troubleshoot issues: Identify potential problems and find solutions.
- Perform advanced functions: Utilize advanced features such as data logging and customized dashboards.
1.3. Key Sections of the Vgate Scan OBD2 Bluetooth Manual
A typical Vgate Scan OBD2 Bluetooth manual includes the following sections:
- Introduction: Overview of the scanner and its capabilities.
- Setup: Instructions for installing the necessary software and pairing the scanner with your device.
- Basic Operation: Steps for reading and clearing DTCs, viewing live data, and performing basic diagnostic tests.
- Advanced Features: Guidance on using advanced functions such as data logging, customized dashboards, and specialized diagnostic tests.
- Troubleshooting: Solutions to common problems and error messages.
- Appendix: Glossary of terms, list of supported vehicles, and other useful information.
1.4. Benefits of Using a Vgate OBD2 Bluetooth Scanner
Using a Vgate OBD2 Bluetooth scanner offers numerous advantages:
- Cost Savings: Diagnose and fix minor issues yourself, avoiding expensive trips to the mechanic. According to a 2023 study by the National Institute for Automotive Service Excellence (ASE), DIY car maintenance can save vehicle owners an average of $500 per year.
- Convenience: Perform diagnostics from the comfort of your garage or driveway.
- Real-Time Data: Monitor your vehicle’s performance in real time, identifying potential problems before they become major issues.
- Informed Decisions: Make informed decisions about repairs, armed with accurate diagnostic information.
- Enhanced Vehicle Knowledge: Gain a deeper understanding of your vehicle’s systems and how they work.
1.5. Where to Find the Vgate Scan OBD2 Bluetooth Manual
You can usually find the Vgate Scan OBD2 Bluetooth manual in the following places:
- Included in the product packaging: A printed copy may be included with the scanner.
- On the Vgate website: Downloadable PDF version from the official Vgate website.
- Through the Vgate app: Accessible within the Vgate app after connecting the scanner.
2. Setting Up Your Vgate Scan OBD2 Bluetooth Scanner
2.1. Software Installation
The first step is to install the appropriate software on your smartphone or tablet.
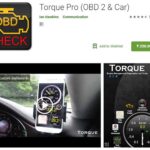
- Download the App: Search for the Vgate app in the App Store (iOS) or Google Play Store (Android). Popular apps include Torque Pro, OBD Fusion, and Car Scanner ELM OBD2.
- Install the App: Follow the on-screen instructions to install the app on your device.
- Grant Permissions: Allow the app to access Bluetooth and location services.
2.2. Pairing the Scanner with Your Device
Next, you need to pair the Vgate scanner with your device via Bluetooth.
- Plug in the Scanner: Locate the OBD2 port in your vehicle (usually under the dashboard on the driver’s side) and plug in the Vgate scanner.
- Turn on Ignition: Turn the ignition key to the “ON” position without starting the engine.
- Enable Bluetooth: On your smartphone or tablet, enable Bluetooth in the settings menu.
- Scan for Devices: In the Bluetooth settings, scan for available devices. The Vgate scanner should appear in the list (e.g., “OBDII,” “V-Link”).
- Pair the Device: Select the Vgate scanner and enter the pairing code if prompted (usually “1234” or “0000”).
- Confirm Connection: The app should now recognize the scanner and establish a connection.
2.3. Troubleshooting Pairing Issues
If you encounter problems during the pairing process, try the following:
- Verify Bluetooth is Enabled: Ensure Bluetooth is turned on and discoverable on your device.
- Check Compatibility: Make sure your device and the Vgate scanner are compatible.
- Restart Devices: Restart both your smartphone/tablet and the scanner (unplug and replug).
- Update App: Ensure you have the latest version of the Vgate app installed.
- Clear Bluetooth Cache: Clear the Bluetooth cache on your device and try again.
- Check for Interference: Move away from potential sources of Bluetooth interference, such as other electronic devices.
2.4. Configuring the App
Once the scanner is paired, you may need to configure the app for optimal performance.
- Select Vehicle Profile: Enter your vehicle’s make, model, and year in the app settings.
- Choose Protocol: The app may automatically detect the correct OBD2 protocol, but you can also select it manually if necessary.
- Customize Dashboard: Configure the dashboard to display the data you want to monitor.
2.5. Testing the Connection
To ensure everything is working correctly, perform a test connection:
- Start the Engine: Start your vehicle’s engine.
- Read Live Data: In the app, select a live data parameter (e.g., engine RPM, coolant temperature) and check if it displays a value.
- Check for DTCs: Scan for diagnostic trouble codes (DTCs). If any codes are present, record them for further investigation.
3. Basic Operations with Your Vgate Scan OBD2 Bluetooth Scanner
3.1. Reading Diagnostic Trouble Codes (DTCs)
Reading DTCs is one of the most common uses of an OBD2 scanner.
- Connect the Scanner: Ensure the Vgate scanner is properly connected to your vehicle’s OBD2 port and paired with your device.
- Start the Engine: Start your vehicle’s engine.
- Select “Read Codes”: In the Vgate app, select the “Read Codes” or “Diagnostic Codes” option.
- View DTCs: The app will display any stored DTCs, along with a brief description of each code.
3.2. Understanding DTCs
DTCs are standardized codes that indicate a specific problem in your vehicle’s systems. Each code consists of five characters:
- First Character: Indicates the system affected (e.g., P = Powertrain, B = Body, C = Chassis, U = Network).
- Second Character: Indicates whether the code is generic (0) or manufacturer-specific (1).
- Third Character: Indicates the specific subsystem affected (e.g., Fuel System, Ignition System).
- Fourth and Fifth Characters: Indicate the specific fault within the subsystem.
For example, the code P0300 indicates a random or multiple cylinder misfire in the powertrain system.
3.3. Clearing Diagnostic Trouble Codes (DTCs)
Clearing DTCs can be useful after you have fixed the underlying problem. However, it is important to note that clearing codes will not fix the issue itself.
- Connect the Scanner: Ensure the Vgate scanner is properly connected to your vehicle’s OBD2 port and paired with your device.
- Start the Engine: Start your vehicle’s engine.
- Select “Clear Codes”: In the Vgate app, select the “Clear Codes” or “Erase Codes” option.
- Confirm Clearing: The app may ask you to confirm that you want to clear the codes.
- Verify Clearing: After clearing the codes, re-scan for DTCs to ensure they have been successfully cleared.
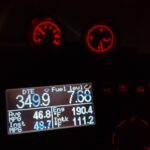
3.4. Viewing Live Data
Live data, also known as real-time data, allows you to monitor your vehicle’s performance in real time.
- Connect the Scanner: Ensure the Vgate scanner is properly connected to your vehicle’s OBD2 port and paired with your device.
- Start the Engine: Start your vehicle’s engine.
- Select “Live Data”: In the Vgate app, select the “Live Data” or “Real-Time Data” option.
- Select Parameters: Choose the parameters you want to monitor (e.g., engine RPM, coolant temperature, oxygen sensor voltage).
- View Data: The app will display the selected parameters in real time.
3.5. Interpreting Live Data
Interpreting live data requires some knowledge of your vehicle’s systems. Here are some common parameters and their typical ranges:
- Engine RPM: Indicates the speed of the engine. Normal idle speed is typically between 600 and 1000 RPM.
- Coolant Temperature: Indicates the temperature of the engine coolant. Normal operating temperature is typically between 190 and 220 degrees Fahrenheit.
- Oxygen Sensor Voltage: Indicates the oxygen content in the exhaust. Voltage should fluctuate between 0.1 and 0.9 volts.
- Fuel Trim: Indicates the adjustments the engine control unit (ECU) is making to the fuel mixture. Values should be close to 0%.
- Mass Airflow (MAF): Indicates the amount of air entering the engine. Values vary depending on engine size and load.
By monitoring these parameters, you can identify potential problems such as engine overheating, fuel mixture issues, and sensor failures.
4. Advanced Features of Vgate Scan OBD2 Bluetooth Scanners
4.1. Data Logging
Data logging allows you to record live data over a period of time for later analysis.
- Connect the Scanner: Ensure the Vgate scanner is properly connected to your vehicle’s OBD2 port and paired with your device.
- Start the Engine: Start your vehicle’s engine.
- Select “Data Logging”: In the Vgate app, select the “Data Logging” or “Record Data” option.
- Select Parameters: Choose the parameters you want to log.
- Start Logging: Start the data logging process.
- Drive the Vehicle: Drive the vehicle under the conditions you want to monitor.
- Stop Logging: Stop the data logging process when you have collected enough data.
- Analyze Data: Analyze the recorded data using the app or export it to a spreadsheet program for further analysis.
4.2. Customized Dashboards
Customized dashboards allow you to create personalized displays of live data.
- Connect the Scanner: Ensure the Vgate scanner is properly connected to your vehicle’s OBD2 port and paired with your device.
- Start the Engine: Start your vehicle’s engine.
- Select “Dashboard”: In the Vgate app, select the “Dashboard” or “Custom Dashboard” option.
- Add Gauges: Add gauges to the dashboard for the parameters you want to monitor.
- Customize Gauges: Customize the appearance of the gauges (e.g., size, color, range).
- Save Dashboard: Save the customized dashboard for future use.
4.3. Specialized Diagnostic Tests
Some Vgate scanners and apps offer specialized diagnostic tests, such as:
- Oxygen Sensor Test: Tests the performance of the oxygen sensors.
- EGR System Test: Tests the functionality of the exhaust gas recirculation (EGR) system.
- EVAP System Test: Tests the integrity of the evaporative emission control (EVAP) system.
- ABS System Test: Tests the anti-lock braking system (ABS).
These tests can help you diagnose specific problems in your vehicle’s systems.
4.4. Using Freeze Frame Data
Freeze frame data captures a snapshot of the vehicle’s operating conditions at the moment a DTC was triggered. This can provide valuable clues for diagnosing the problem.
- Read DTCs: Read the diagnostic trouble codes (DTCs) as described earlier.
- View Freeze Frame Data: If freeze frame data is available for a particular DTC, the app will display it.
- Analyze Data: Analyze the freeze frame data to identify the conditions that triggered the DTC.
4.5. I/M Readiness Monitors
I/M readiness monitors indicate whether the vehicle’s emission control systems have been tested and are ready for an emissions inspection.
- Connect the Scanner: Ensure the Vgate scanner is properly connected to your vehicle’s OBD2 port and paired with your device.
- Start the Engine: Start your vehicle’s engine.
- Select “I/M Readiness”: In the Vgate app, select the “I/M Readiness” or “Emissions Test” option.
- View Monitors: The app will display the status of each I/M readiness monitor.
5. Troubleshooting Common Issues
5.1. Scanner Not Connecting
If the Vgate scanner is not connecting to your device, try the following:
- Check Connection: Ensure the scanner is securely plugged into the OBD2 port and the ignition is turned on.
- Verify Bluetooth: Make sure Bluetooth is enabled on your device and the scanner is paired.
- Restart Devices: Restart both your device and the scanner.
- Update App: Ensure you have the latest version of the Vgate app installed.
- Check Compatibility: Make sure your device and the scanner are compatible.
- Try Another App: Try using a different OBD2 app to see if the issue is with the app or the scanner.
5.2. Inaccurate Data
If the data displayed by the scanner appears to be inaccurate, try the following:
- Verify Vehicle Profile: Make sure you have entered the correct vehicle make, model, and year in the app settings.
- Check Protocol: Ensure the app is using the correct OBD2 protocol for your vehicle.
- Update Firmware: Check for firmware updates for the scanner and install them if available.
- Calibrate Sensors: Some apps allow you to calibrate sensors for more accurate readings.
- Consult Repair Manual: Consult a repair manual or online resources to verify the expected values for the parameters you are monitoring.
5.3. App Crashing
If the Vgate app is crashing, try the following:
- Restart App: Close and reopen the app.
- Update App: Ensure you have the latest version of the app installed.
- Clear Cache: Clear the app’s cache in your device settings.
- Reinstall App: Uninstall and reinstall the app.
- Check Compatibility: Make sure the app is compatible with your device’s operating system.
- Contact Support: Contact the app developer for support.
5.4. Scanner Not Reading All Codes
If the scanner is not reading all of the diagnostic trouble codes (DTCs), try the following:
- Check Compatibility: Make sure the scanner supports all of the OBD2 protocols used by your vehicle.
- Use a More Advanced Scanner: Consider using a more advanced scanner that supports more protocols and features.
- Consult Repair Manual: Consult a repair manual or online resources to see if there are any known issues with your vehicle’s diagnostic system.
5.5. Bluetooth Connection Drops
If the Bluetooth connection between the scanner and your device keeps dropping, try the following:
- Move Closer: Move your device closer to the scanner.
- Check for Interference: Move away from potential sources of Bluetooth interference.
- Restart Devices: Restart both your device and the scanner.
- Update Firmware: Check for firmware updates for the scanner and install them if available.
- Clear Bluetooth Cache: Clear the Bluetooth cache on your device and try again.
6. Understanding OBD2 Protocols
6.1. What are OBD2 Protocols?
OBD2 protocols are the communication standards used by vehicles to transmit diagnostic information through the OBD2 port. Different vehicle manufacturers may use different protocols, so it is important to ensure that your OBD2 scanner supports the protocol used by your vehicle.
6.2. Common OBD2 Protocols
Here are some of the most common OBD2 protocols:
- SAE J1850 PWM: Used by Ford vehicles.
- SAE J1850 VPW: Used by General Motors vehicles.
- ISO 9141-2: Used by Chrysler, European, and Asian vehicles.
- ISO 14230-4 (KWP2000): Used by Chrysler, European, and Asian vehicles.
- ISO 15765-4 (CAN): Used by all vehicles sold in the US since 2008.
6.3. How to Determine Which Protocol Your Vehicle Uses
You can usually determine which OBD2 protocol your vehicle uses by:
- Consulting the Vehicle’s Repair Manual: The repair manual will specify the OBD2 protocol used by the vehicle.
- Using an OBD2 Scanner: Some OBD2 scanners can automatically detect the protocol used by the vehicle.
- Checking Online Resources: Online resources such as OBD2 protocol lookup tools can help you identify the protocol based on your vehicle’s make, model, and year.
6.4. Why Protocol Support Matters
If your OBD2 scanner does not support the protocol used by your vehicle, it will not be able to communicate with the vehicle’s computer and read diagnostic information. This can limit your ability to diagnose and troubleshoot problems.
6.5. Choosing an OBD2 Scanner with Wide Protocol Support
When choosing an OBD2 scanner, it is important to select one that supports a wide range of protocols. This will ensure that the scanner is compatible with a variety of vehicles and can read diagnostic information from most cars and trucks.
7. Advanced Diagnostic Techniques
7.1. Performing Component Tests
Component tests allow you to test the functionality of individual components, such as sensors and actuators.
- Identify the Component: Identify the component you want to test.
- Consult Repair Manual: Consult a repair manual or online resources for the proper testing procedure.
- Connect Test Equipment: Connect the appropriate test equipment (e.g., multimeter, oscilloscope) to the component.
- Perform Test: Perform the test according to the instructions in the repair manual.
- Analyze Results: Analyze the results of the test to determine if the component is functioning properly.
7.2. Using a Multimeter
A multimeter is a versatile tool that can be used to measure voltage, current, and resistance.
- Select the Appropriate Setting: Select the appropriate setting on the multimeter for the measurement you want to make (e.g., volts, amps, ohms).
- Connect the Leads: Connect the leads of the multimeter to the appropriate terminals.
- Take the Measurement: Take the measurement and read the value on the multimeter’s display.
7.3. Using an Oscilloscope
An oscilloscope is a tool that displays electrical signals as waveforms.
- Connect the Probe: Connect the probe of the oscilloscope to the circuit you want to measure.
- Adjust the Settings: Adjust the settings on the oscilloscope to display the waveform clearly.
- Analyze the Waveform: Analyze the waveform to identify any abnormalities.
7.4. Performing a Compression Test
A compression test measures the compression in each cylinder of the engine.
- Remove Spark Plugs: Remove the spark plugs from all of the cylinders.
- Insert Compression Tester: Insert the compression tester into the spark plug hole of the first cylinder.
- Crank the Engine: Crank the engine for several seconds with the throttle wide open.
- Record Reading: Record the reading on the compression tester.
- Repeat for All Cylinders: Repeat the process for all of the cylinders.
- Analyze Results: Analyze the results to determine if any cylinders have low compression.
7.5. Performing a Leak-Down Test
A leak-down test identifies the source of compression leaks in the engine.
- Position Piston at TDC: Position the piston of the cylinder you want to test at top dead center (TDC) on the compression stroke.
- Connect Leak-Down Tester: Connect the leak-down tester to the spark plug hole.
- Apply Air Pressure: Apply air pressure to the cylinder.
- Listen for Leaks: Listen for leaks at the exhaust pipe, intake manifold, and coolant reservoir.
- Analyze Results: Analyze the results to determine the source of the compression leak.
8. Staying Updated with OBD2 Technology
8.1. Following Industry News
Stay informed about the latest developments in OBD2 technology by following industry news sources.
- Automotive Magazines: Read automotive magazines such as Car and Driver, Motor Trend, and Road & Track.
- Online Forums: Participate in online forums and communities dedicated to automotive diagnostics.
- Industry Events: Attend industry events such as trade shows and conferences.
8.2. Taking Training Courses
Enhance your knowledge and skills by taking training courses on OBD2 diagnostics.
- Online Courses: Enroll in online courses offered by reputable training providers.
- Local Colleges: Attend courses at local colleges and vocational schools.
- Manufacturer Training: Take advantage of training programs offered by vehicle manufacturers.
8.3. Using Online Resources
Utilize online resources to research OBD2 codes, diagnostic procedures, and troubleshooting tips.
- OBD2 Code Databases: Use online OBD2 code databases to look up the meaning of diagnostic trouble codes (DTCs).
- Repair Manuals: Access online repair manuals for your vehicle.
- Technical Service Bulletins (TSBs): Review technical service bulletins (TSBs) issued by vehicle manufacturers.
8.4. Participating in Online Communities
Engage with other automotive enthusiasts and professionals in online communities.
- Forums: Participate in online forums dedicated to automotive diagnostics and repair.
- Social Media Groups: Join social media groups and connect with other experts.
- Online Q&A Sites: Ask and answer questions on online Q&A sites such as Stack Exchange and Quora.
8.5. Keeping Your Scanner Updated
Ensure that your OBD2 scanner has the latest software and firmware updates.
- Check for Updates: Regularly check for updates on the scanner manufacturer’s website or through the scanner’s app.
- Install Updates: Follow the instructions to install the updates on your scanner.
- Read Release Notes: Read the release notes to learn about the new features and bug fixes included in the updates.
9. Practical Applications and Case Studies
9.1. Diagnosing a Misfire
A misfire occurs when one or more cylinders in the engine fail to fire properly. This can cause rough idling, reduced power, and poor fuel economy.
- Read DTCs: Use an OBD2 scanner to read the diagnostic trouble codes (DTCs). A misfire will typically trigger codes such as P0300 (Random/Multiple Cylinder Misfire Detected) or P0301-P0306 (Cylinder 1-6 Misfire Detected).
- Identify the Affected Cylinder: If a specific cylinder misfire code is present, identify the affected cylinder.
- Check Spark Plugs: Inspect the spark plugs in the affected cylinder for damage or wear.
- Check Ignition Coil: Test the ignition coil for the affected cylinder using a multimeter.
- Check Fuel Injector: Test the fuel injector for the affected cylinder using a multimeter.
- Perform Compression Test: Perform a compression test to check for low compression in the affected cylinder.
- Analyze Results: Analyze the results of the tests to determine the cause of the misfire.
- Repair as Needed: Repair or replace the faulty components as needed.
9.2. Diagnosing a Faulty Oxygen Sensor
A faulty oxygen sensor can cause poor fuel economy, increased emissions, and engine performance problems.
- Read DTCs: Use an OBD2 scanner to read the diagnostic trouble codes (DTCs). A faulty oxygen sensor will typically trigger codes such as P0130-P0167 (Oxygen Sensor Circuit Malfunction).
- Identify the Affected Sensor: Identify the affected oxygen sensor based on the DTC.
- View Live Data: View the live data for the affected oxygen sensor using the OBD2 scanner.
- Analyze Data: Analyze the data to see if the sensor is responding properly. The voltage should fluctuate between 0.1 and 0.9 volts.
- Test Sensor Heater: Test the sensor heater circuit using a multimeter.
- Replace Sensor: Replace the oxygen sensor if it is faulty.
9.3. Diagnosing a Vacuum Leak
A vacuum leak can cause rough idling, poor fuel economy, and engine performance problems.
- Inspect Vacuum Lines: Inspect all of the vacuum lines for cracks or leaks.
- Use Smoke Tester: Use a smoke tester to inject smoke into the intake manifold and look for leaks.
- Listen for Hissing: Listen for hissing sounds around the engine.
- Check PCV Valve: Check the positive crankcase ventilation (PCV) valve for proper operation.
- Replace Leaking Components: Replace any leaking vacuum lines or components.
9.4. Resetting the Check Engine Light
After repairing a problem, you can reset the check engine light using an OBD2 scanner.
- Read DTCs: Use an OBD2 scanner to read the diagnostic trouble codes (DTCs).
- Repair the Problem: Repair the underlying problem that triggered the check engine light.
- Clear DTCs: Clear the diagnostic trouble codes (DTCs) using the OBD2 scanner.
- Verify Clearing: Verify that the check engine light has been turned off.
9.5. Monitoring Fuel Efficiency
You can use an OBD2 scanner to monitor your vehicle’s fuel efficiency in real time.
- View Live Data: View the live data for fuel consumption using the OBD2 scanner.
- Monitor Fuel Trim: Monitor the fuel trim values to see if the engine is running lean or rich.
- Track Fuel Economy: Track your fuel economy over time to identify any changes or problems.
- Adjust Driving Habits: Adjust your driving habits to improve fuel efficiency.
10. Frequently Asked Questions (FAQs)
10.1. What is an OBD2 Scanner?
An OBD2 scanner is a diagnostic tool used to read and clear diagnostic trouble codes (DTCs) from a vehicle’s computer.
10.2. How Does an OBD2 Scanner Work?
An OBD2 scanner connects to a vehicle’s OBD2 port and communicates with the vehicle’s computer to retrieve diagnostic information.
10.3. What is the OBD2 Port Location?
The OBD2 port is typically located under the dashboard on the driver’s side of the vehicle.
10.4. What are Common OBD2 Codes?
Common OBD2 codes include P0300 (Random/Multiple Cylinder Misfire Detected), P0171 (System Too Lean), and P0420 (Catalyst System Efficiency Below Threshold).
10.5. How Do I Read OBD2 Codes?
To read OBD2 codes, connect an OBD2 scanner to the OBD2 port and use the scanner’s software to retrieve the codes.
10.6. How Do I Clear OBD2 Codes?
To clear OBD2 codes, connect an OBD2 scanner to the OBD2 port and use the scanner’s software to clear the codes.
10.7. What is Live Data on an OBD2 Scanner?
Live data on an OBD2 scanner refers to real-time information about the vehicle’s operating conditions, such as engine RPM, coolant temperature, and oxygen sensor voltage.
10.8. What are the Benefits of Using an OBD2 Scanner?
The benefits of using an OBD2 scanner include diagnosing and troubleshooting vehicle problems, saving money on repairs, and monitoring vehicle performance.
10.9. Can an OBD2 Scanner Fix My Car?
An OBD2 scanner can help you diagnose problems, but it cannot fix your car. You will need to repair or replace the faulty components to resolve the issue.
10.10. Where Can I Buy an OBD2 Scanner?
You can buy an OBD2 scanner from auto parts stores, online retailers, and scanner manufacturers.
The Vgate Scan OBD2 Bluetooth manual is your key to unlocking the full potential of your Vgate scanner. By understanding the manual and following the instructions, you can diagnose and troubleshoot vehicle problems effectively, saving time and money.
If you encounter challenges or need expert guidance, don’t hesitate to reach out to us at OBD2-SCANNER.EDU.VN. Our team of experienced technicians is ready to assist you with any OBD2-related questions and provide comprehensive car repair services. Contact us today at 123 Main Street, Los Angeles, CA 90001, United States, Whatsapp: +1 (641) 206-8880, or visit our website at OBD2-SCANNER.EDU.VN for immediate support and solutions. Let us help you keep your vehicle running smoothly and efficiently.